
Are you ready to take your gaming experience to the next level? Setting up your Logitech Gamepad F310 is a key step to enhancing your gameplay. Whether you’re a casual gamer or a seasoned pro, this versatile gamepad can provide you with precise control and immersive gameplay on your PC. In this article, we’ll guide you through the setup process, so you can jump right into the action without any hassle. From connecting the gamepad to your PC to configuring the necessary settings, we’ll cover all the important steps to ensure a smooth and seamless gaming experience. So, grab your Logitech Gamepad F310 and let’s get started!
Inside This Article
- Requirements
- Step 1: Installing the Logitech Gaming Software
- Step 2: Connecting the Logitech Gamepad F310 to your computer
- Step 3: Configuring the gamepad settings
- Step 4: Testing the gamepad functionality
- Troubleshooting common issues
- Conclusion
- FAQs
Requirements
Before you begin setting up your Logitech Gamepad F310, make sure you have the following requirements:
- A computer with an available USB port: The Logitech Gamepad F310 connects to your computer using a USB cable. Ensure that your computer has an available USB port for the gamepad.
- Internet connection: To download and install the necessary software, you will need an active internet connection.
- Operating System Compatibility: The Logitech Gamepad F310 is compatible with various operating systems, including Windows XP, Vista, 7, 8, and 10, as well as Mac OS X 10.5 or later. Make sure your computer is running one of these supported operating systems.
- Logitech Gaming Software: To fully utilize the features of the Logitech Gamepad F310, you will need to download and install the Logitech Gaming Software. This software allows you to customize and configure the gamepad settings according to your preference.
Now that you have the necessary requirements, you can proceed to the next steps to set up your Logitech Gamepad F310.
Step 1: Installing the Logitech Gaming Software
Before you can start using the Logitech Gamepad F310, you will first need to install the Logitech Gaming Software on your computer. This software is essential for setting up and customizing your gamepad’s functionality.
To begin the installation process, you’ll need to visit the official Logitech website. Navigate to the support section and locate the Logitech Gaming Software download page. Make sure to download the latest version compatible with your operating system.
Once the software download is complete, locate the installer file in your designated download folder. Double-click on the file to start the installation. You will be guided through a series of on-screen prompts to complete the installation process.
During the installation, you may be prompted to review and accept the End User License Agreement (EULA). Make sure to read through the agreement carefully and agree to the terms and conditions to proceed with the installation.
Next, you will need to choose the installation location for the Logitech Gaming Software. You can either go with the default installation path or specify a different location according to your preference. Once you’ve made your choice, click on the “Install” button to begin the installation process.
The Logitech Gaming Software installation may take a few moments to complete. Once it’s finished, you will see a success message indicating that the software has been installed successfully. From there, you can close the installation wizard.
Now that you have successfully installed the Logitech Gaming Software, you are one step closer to setting up and using your Logitech Gamepad F310. In the next step, we will guide you through the process of connecting the gamepad to your computer.
Step 2: Connecting the Logitech Gamepad F310 to your computer
After installing the Logitech Gaming Software, the next step is to connect your Logitech Gamepad F310 to your computer. Follow these simple steps to ensure a successful connection:
1. Locate the USB cable: The Logitech Gamepad F310 comes with a USB cable that is used to connect the gamepad to your computer. Make sure you have the cable ready before proceeding.
2. Connect the USB cable: Take one end of the USB cable and insert it into the USB port on your computer. It is usually located on the front or back of the computer tower. If you are using a laptop, the USB port can be found on the sides or rear of the device.
3. Connect the other end of the USB cable to the gamepad: Take the other end of the USB cable and insert it into the USB port located on the top of the Logitech Gamepad F310. Ensure that the cable is securely connected to both the gamepad and the computer.
4. Wait for the computer to recognize the gamepad: Once the gamepad is connected, your computer should automatically recognize it and install the necessary drivers. It may take a few moments for the installation process to complete.
5. Verify the connection: After the driver installation is complete, you can verify that the Logitech Gamepad F310 is properly connected by opening the Logitech Gaming Software. The gamepad should be listed and identified as connected within the software’s interface.
By following these steps, you can easily connect your Logitech Gamepad F310 to your computer and ensure that it is ready to be used for gaming and other applications. Now that the gamepad is connected, you can proceed to the next step of configuring the settings to optimize your gaming experience.
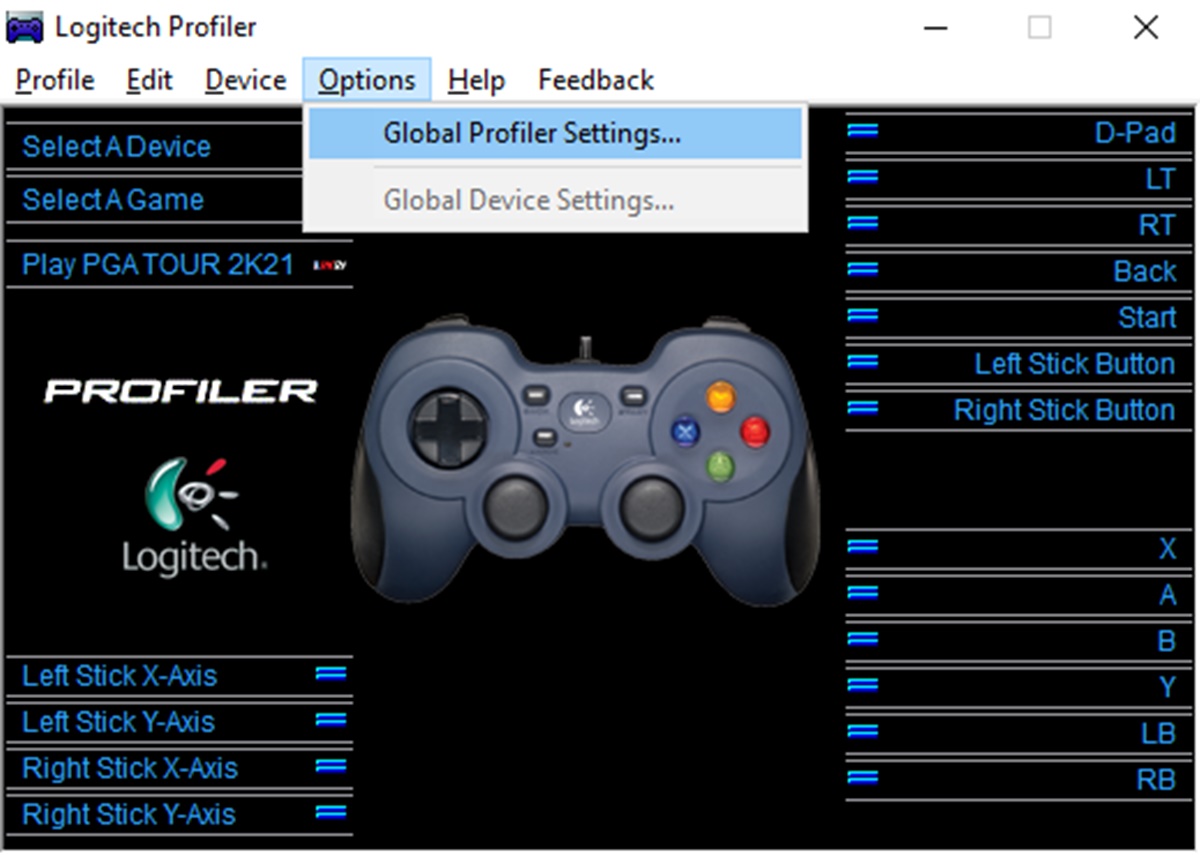
Step 3: Configuring the gamepad settings
Once you have successfully installed the Logitech Gaming Software and connected your Logitech Gamepad F310 to your computer, the next step is to configure the gamepad settings. This will allow you to customize the controls and optimize the gamepad for your gaming experience.
To begin configuring the gamepad settings, follow these steps:
- Open the Logitech Gaming Software on your computer.
- Select the connected Logitech Gamepad F310 from the list of detected devices. If your gamepad is not being recognized, make sure it is properly connected to your computer and try restarting the Logitech Gaming Software.
- Navigate to the “Settings” tab, where you will find various options for customizing your gamepad.
- Start by adjusting the button assignments. You can reassign the functions of the gamepad buttons according to your preference. Simply click on a button and choose a new assignment from the drop-down menu.
- Next, explore the “Advanced Settings” section, where you can fine-tune the sensitivity of the analog sticks and triggers. This allows for more precise control in games that require delicate movements.
- If you are using the gamepad for a specific game, it is recommended to create a custom profile. This way, you can have different configurations for different games, ensuring optimal performance and compatibility.
- Once you have made all the desired changes to the gamepad settings, click on the “Apply” button to save the configurations.
It’s also worth mentioning that the Logitech Gaming Software offers additional features like the ability to create macros, adjust vibration settings, and update the firmware of your gamepad.
By taking the time to configure the gamepad settings, you can personalize your gaming experience and maximize your performance. Whether you’re a casual gamer or a serious gamer, having a properly configured gamepad can greatly enhance your gameplay and immersion.
Step 4: Testing the gamepad functionality
Once you have successfully installed and configured the Logitech Gamepad F310, the final step is to test its functionality. Testing the gamepad will ensure that all buttons, triggers, and joysticks are working properly, allowing you to enjoy your gaming experience to the fullest.
To test the gamepad functionality, follow these simple steps:
- Launch a game or gamepad testing software: Open your favorite PC game that supports gamepad input or download a gamepad testing software like “JoyToKey” or “Xpadder”. These programs allow you to map the gamepad buttons to keyboard inputs for games that do not have native gamepad support.
- Select the gamepad as the input device: In the game’s settings or the gamepad testing software, make sure to set the Logitech Gamepad F310 as the default input device. This ensures that the game correctly recognizes the gamepad’s inputs.
- Test the buttons: Press each button on the gamepad to verify that it registers correctly. Make sure that the corresponding button on the screen or in the game responds accordingly.
- Test the triggers: The Logitech Gamepad F310 features analog triggers. Test these triggers by gently pressing them and observing if they register as intended in the game or software.
- Test the joysticks: Move the joysticks in different directions and check if the on-screen character or cursor responds accordingly. Ensure that the joysticks have a smooth range of motion and return to the center position when released.
- Test the vibration feedback: If your gamepad has vibration feedback, check if it is working by enabling vibration in the game’s settings or through the gamepad testing software. You should feel subtle vibrations when appropriate, such as during explosions or intense gameplay moments.
- Inspect the connections: While testing, keep an eye on the USB connection between the gamepad and the computer. If the gamepad disconnects or becomes unresponsive during use, it could indicate a loose or faulty connection.
By following these steps, you can verify that the Logitech Gamepad F310 is functioning as expected. If you encounter any issues, refer back to the previous steps to ensure that the gamepad is properly installed and configured. You can also consult the gamepad’s manual or contact Logitech’s customer support for further assistance. With a fully functional gamepad, you can now enjoy your favorite games with precise and responsive controls.
Troubleshooting common issues
If you encounter any issues while setting up or using your Logitech Gamepad F310, don’t worry! Here are some common problems you might come across and how to troubleshoot them:
1. Gamepad not recognized: If your computer does not recognize the gamepad when connected, try the following steps:
- Ensure that the gamepad is properly connected to the computer via USB.
- Check if the gamepad is compatible with your operating system. Visit the Logitech website to download the latest drivers.
- Try connecting the gamepad to a different USB port on your computer.
- Restart your computer and check if the gamepad is detected.
2. Buttons or controls not working: If the buttons or controls on your gamepad are not functioning correctly, follow these troubleshooting steps:
- Make sure that you have installed the Logitech Gaming Software and have the latest drivers for the gamepad.
- Check if the game you are playing supports gamepad input. Adjust the game settings accordingly.
- Try reconnecting the gamepad to your computer and test if the buttons are working properly.
- Check the gamepad settings in the Logitech Gaming Software and make any necessary adjustments.
3. Calibration issues: If you are experiencing calibration problems with your gamepad, try the following troubleshooting steps:
- Open the Logitech Gaming Software and navigate to the gamepad settings.
- Select the gamepad and choose the “Calibrate” option.
- Follow the on-screen instructions to calibrate the gamepad.
- If the calibration is unsuccessful, try reinstalling the Logitech Gaming Software and repeat the calibration process.
4. Lag or delay: If you are facing lag or delay while using the gamepad, try the following solutions:
- Ensure that the gamepad is connected directly to a USB port on your computer, avoiding any USB hubs or extension cables.
- Close any background applications or processes that may be causing high CPU usage.
- Check if there are any driver updates available for your gamepad.
- Adjust the in-game settings for input lag if available.
5. Gamepad disconnects frequently: If your gamepad keeps disconnecting during gameplay, try the following troubleshooting steps:
- Make sure that the gamepad’s USB cable is securely connected to both the gamepad and your computer.
- Try using a different USB cable to check if the issue persists.
- Ensure that the USB ports on your computer are working properly. Try connecting other devices to verify.
- Update the firmware of your gamepad if available.
If you have tried all of the above troubleshooting steps and the issue persists, it could be a hardware problem. In such cases, it is best to contact Logitech support for further assistance.
Conclusion
Setting up the Logitech Gamepad F310 is a straightforward process that allows gamers to enhance their gaming experience. The ergonomic design, customizable buttons, and plug-and-play functionality make this controller a popular choice for gamers of all levels. Whether you are playing on your PC or gaming console, the F310 offers precision control and seamless compatibility.
By following the step-by-step instructions provided in this guide, you can easily configure the F310 controller to suit your preferences. From mapping buttons to adjusting sensitivity, the Logitech Gaming Software provides a user-friendly interface for customization.
With its durable build quality and intuitive layout, the Logitech Gamepad F310 is a reliable companion for gamers seeking a competitive edge. So, go ahead and unleash your gaming potential with this versatile controller.
FAQs
Q: How do I connect the Logitech Gamepad F310 to my computer?
A: To connect the Logitech Gamepad F310 to your computer, simply plug the USB cable into an available USB port on your computer. The device should be automatically recognized and ready to use.
Q: Is the Logitech Gamepad F310 compatible with consoles?
A: No, the Logitech Gamepad F310 is designed specifically for use with computers. It is not compatible with consoles such as PlayStation or Xbox. However, Logitech offers other gamepads that are compatible with consoles.
Q: Can I customize the buttons on the Logitech Gamepad F310?
A: Yes, you can customize the buttons on the Logitech Gamepad F310. Logitech provides software called the Logitech Gaming Software, which allows you to remap the gamepad’s buttons according to your preferences. You can assign different functions to each button to enhance your gaming experience.
Q: Does the Logitech Gamepad F310 work with all games?
A: The Logitech Gamepad F310 is compatible with a wide range of games. It uses the standard DirectInput and XInput modes, making it compatible with most PC games. However, some older or specialized games may not be fully compatible with the gamepad. It’s always a good idea to check the game’s system requirements or consult the manufacturer for compatibility details.
Q: Can I use the Logitech Gamepad F310 wirelessly?
A: No, the Logitech Gamepad F310 is a wired gamepad and does not have wireless functionality. It requires a wired connection to your computer using the included USB cable. This ensures a stable and lag-free gaming experience.