
Logitech is a renowned brand when it comes to wireless keyboards. With its seamless connectivity and ergonomic design, Logitech keyboards have gained immense popularity among customers. As a user, you may find yourself in situations where you need to capture and save a screenshot while using your Logitech wireless keyboard. Whether it’s for work, school, or personal use, taking a screenshot can be an essential tool for capturing information or sharing moments. In this comprehensive guide, we will walk you through the step-by-step process of how to screenshot on a Logitech wireless keyboard. From the necessary keyboard shortcuts to troubleshooting tips, we’ve got you covered. Let’s dive in and discover how you can effortlessly capture and save screenshots with your Logitech wireless keyboard.
Inside This Article
- Overview of Logitech Wireless Keyboards
- Methods of Screenshotting on Logitech Wireless Keyboards
- Tips and Tricks for Screenshotting on Logitech Wireless Keyboards
- Troubleshooting and Common Issues
- Conclusion
- FAQs
Overview of Logitech Wireless Keyboards
Logitech is a renowned brand in the world of computer peripherals, known for its high-quality and innovative products. Their line of wireless keyboards offers convenience, flexibility, and sleek designs that cater to the needs of different users.
Logitech wireless keyboards use advanced wireless technology to connect to your computer or device, eliminating the need for messy cables and allowing you to work seamlessly from a distance. These keyboards are designed to provide a comfortable and efficient typing experience while maintaining a clutter-free workspace.
With their reliable wireless connections, Logitech wireless keyboards offer freedom of movement and allow you to work or play from your preferred location. Whether you’re sitting on the couch, standing at a standing desk, or working from a distance, these keyboards provide the flexibility to customize your workspace according to your needs.
Logitech offers a wide range of wireless keyboards, from compact and portable models suitable for travel, to full-sized keyboards with additional features like backlit keys and multimedia controls. With different options available, you can choose a Logitech wireless keyboard that best suits your preferences and requirements.
Logitech wireless keyboards are designed with durability in mind, ensuring long-lasting performance even with daily use. The keyboards are built with high-quality materials and undergo rigorous testing to meet Logitech’s standards of reliability and durability. This means you can rely on your Logitech wireless keyboard for consistent performance and longevity.
In addition to their superior build quality, Logitech wireless keyboards are also known for their energy efficiency. These keyboards utilize advanced power-saving features, allowing you to maximize battery life. With extended battery life, you can enjoy uninterrupted usage without having to constantly replace or recharge the batteries.
Overall, Logitech wireless keyboards offer a fantastic combination of convenience, functionality, and reliability. Whether you’re a professional who needs a reliable keyboard for work or a casual user who wants to enhance their typing experience, Logitech wireless keyboards are a great choice.
Methods of Screenshotting on Logitech Wireless Keyboards
Logitech wireless keyboards are not only convenient for typing, but they also offer various methods for capturing screenshots. Whether you want to capture an important document, save a funny conversation, or showcase a stunning image, Logitech has you covered. In this article, we’ll explore three different methods you can use to take screenshots on your Logitech wireless keyboard.
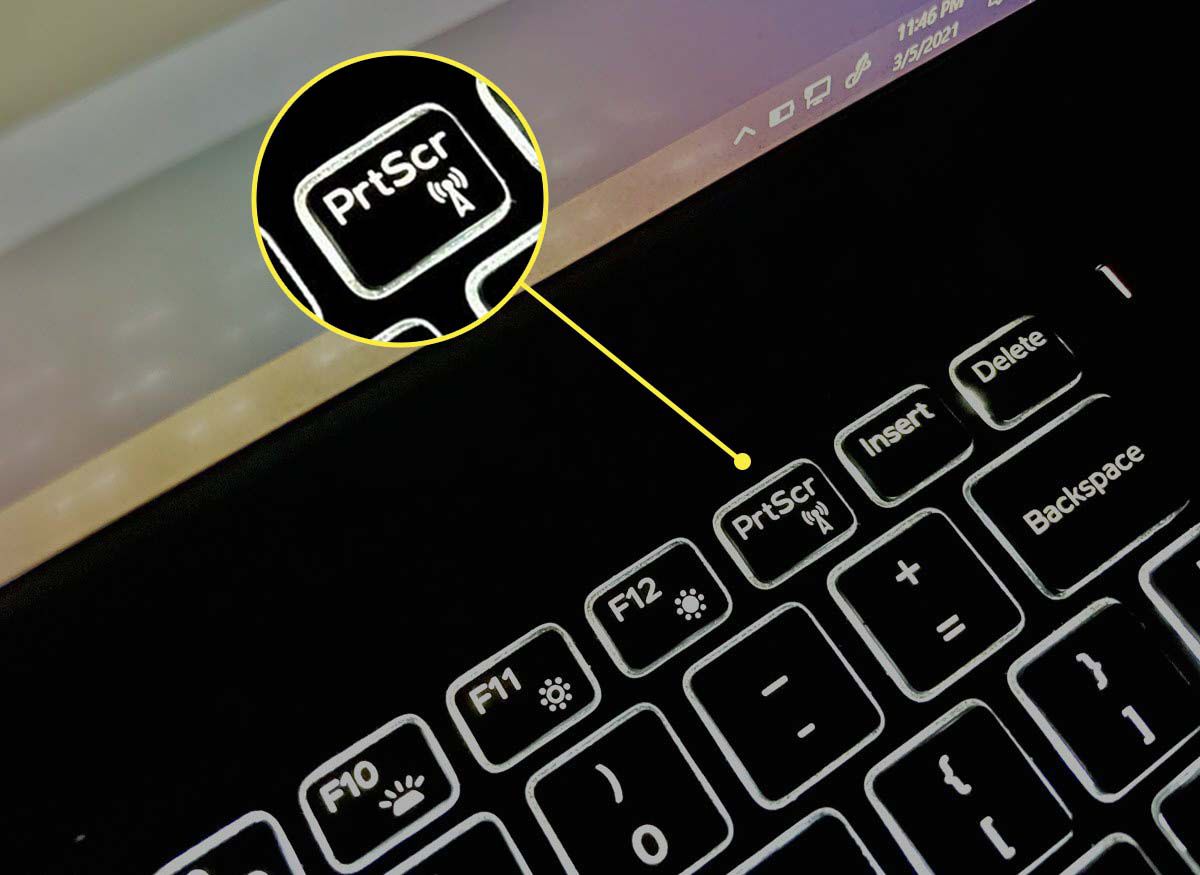
Option 1: Using the Print Screen (PrtScn) Button
One of the simplest ways to take a screenshot on your Logitech wireless keyboard is by utilizing the dedicated Print Screen (PrtScn) button. This button is usually located in the upper right corner of the keyboard, often labeled as “PrtScn” or a similar abbreviation.
Here’s how to take a screenshot using the Print Screen button:
- Ensure that the content you want to capture is visible on your screen.
- Press the Print Screen (PrtScn) button on your Logitech wireless keyboard.
- The screenshot is now saved to your clipboard.
- Open an image editing software or a word processing program like Microsoft Word.
- Press “Ctrl + V” to paste the screenshot into the software.
- Save the screenshot in your desired format (e.g., JPEG, PNG, GIF).
Option 2: Using Logitech SetPoint Software
If you’re using a Logitech wireless keyboard that is supported by the Logitech SetPoint software, you can take advantage of additional screenshot features and customization options available in the software.
Here’s how to take a screenshot using Logitech SetPoint:
- Ensure that the Logitech SetPoint software is installed on your computer.
- Launch the Logitech SetPoint software from your desktop or system tray.
- Navigate to the keyboard settings or advanced options.
- Look for the screenshot option or hotkey customization.
- Assign a preferred key combination for capturing screenshots (e.g., “Shift + F12”).
- Save the settings and exit the Logitech SetPoint software.
- Use the assigned key combination to take screenshots whenever needed.
Option 3: Using Third-Party Screenshot Software
If you prefer more advanced screenshot features or find the need for additional editing capabilities, you can opt for third-party screenshot software that is compatible with Logitech keyboards.
There are several third-party screenshot software options available, such as Snagit, Greenshot, or Lightshot. These software applications offer intuitive interfaces, customizable screenshot settings, and various editing tools to enhance your screenshots.
To use third-party screenshot software:
- Download and install the preferred third-party screenshot software on your computer.
- Launch the software and configure any necessary settings or preferences.
- Follow the software’s instructions to capture screenshots using your Logitech wireless keyboard.
- Utilize the additional editing and sharing features provided by the software if desired.
By exploring these three different methods, you can easily capture screenshots using your Logitech wireless keyboard. Whether you prefer the simplicity of the Print Screen button, the customization options of Logitech SetPoint, or the advanced features of third-party software, you’ll be able to capture and share your screen contents effortlessly.
Tips and Tricks for Screenshotting on Logitech Wireless Keyboards
When it comes to taking screenshots on your Logitech wireless keyboard, there are a few tips and tricks that can make the process easier and more efficient. Whether you want to adjust keyboard settings or use shortcut keys for quicker screenshots, these tips will help you capture your screen with ease.
Adjusting keyboard settings for optimal screenshotting:
One way to enhance your screenshotting experience is by adjusting the settings on your Logitech wireless keyboard. You can customize the function of specific keys to make taking screenshots more convenient. By assigning the Print Screen key or any other desired key to a dedicated screenshot function, you can eliminate the hassle of searching for the right key when you need to capture something quickly.
Using shortcut keys for quicker screenshots:
Another useful tip is to utilize shortcut keys for faster screenshotting. Logitech wireless keyboards often have a combination of keys that can be pressed simultaneously to trigger a screenshot. This could involve using the Function (Fn) key along with the Print Screen key, or other key combinations specified by your keyboard model. By familiarizing yourself with these shortcut keys, you can snap screenshots without interrupting your workflow, ensuring that you capture important moments effortlessly.
Remember to explore the user manual or online resources provided by Logitech for your specific wireless keyboard model. These resources may contain additional tips and tricks tailored to your device, enabling you to make the most of its features for screenshotting and beyond.
Troubleshooting and Common Issues
If you’re experiencing issues while trying to capture screenshots on your Logitech wireless keyboard, don’t worry. Here are some common problems and their solutions:
Screenshot not capturing the desired area: If you find that your screenshots are not capturing the specific area you want, it’s possible that your keyboard is not properly configured. Make sure you are pressing the correct keys and that your keyboard is in the correct mode for capturing screenshots. Additionally, check if any software or applications are interfering with the screenshot process.
Keyboard shortcuts not working properly: If the keyboard shortcuts for capturing screenshots are not working as expected, there could be a few reasons. First, ensure that you are pressing the correct combination of keys simultaneously. If that doesn’t work, try restarting your computer and checking if there are any updates available for your Logitech wireless keyboard’s drivers.
Logitech SetPoint software not detecting the keyboard: If the Logitech SetPoint software is not detecting your Logitech wireless keyboard, there could be a compatibility issue or a problem with the installation. Make sure you have the latest version of the SetPoint software installed, and try reconnecting or pairing your keyboard with the software. If the issue persists, contact Logitech support for further assistance.
By troubleshooting these common issues, you should be able to successfully capture screenshots on your Logitech wireless keyboard and enjoy its convenient features.
Conclusion
Being able to capture screenshots is a necessary skill in today’s digital age. The Logitech wireless keyboard offers an easy and convenient way to take screenshots on various devices. Whether you are using a Windows PC, Mac, or mobile device, the Logitech keyboard provides a seamless experience with its dedicated screenshot button.
By following the simple steps outlined in this article, you can easily take screenshots without the need for additional software or complex manual configurations. The Logitech wireless keyboard’s screenshot function makes it a valuable tool for professionals, students, and anyone who needs to capture and share content effortlessly.
So, next time you need to take a screenshot, remember that Logitech wireless keyboard has got you covered. Capture and share your favorite moments, important information, or anything that requires visual representation with ease, all at the touch of a button.
FAQs
1. How do I take a screenshot using a Logitech wireless keyboard?
To take a screenshot using a Logitech wireless keyboard, you can use the Print Screen (PrtScn) key or a combination of keys, depending on the operating system you are using. On Windows, press the PrtScn key to capture the entire screen, or use the Alt + PrtScn combination to capture the active window only. On macOS, use the Command + Shift + 3 keys to capture the entire screen, or Command + Shift + 4 to capture a specific area. Make sure to check your keyboard’s user manual for specific instructions as it may vary slightly depending on the model.
2. Can I take a screenshot without using the Print Screen key?
Yes, you can use various software programs to capture screenshots on your computer without relying on the Print Screen key. Some popular options include Snagit, Greenshot, and Lightshot, which offer additional features like annotation, editing, and sharing capabilities. These software programs can be downloaded and installed on your computer, providing more flexibility and customization options for capturing screenshots.
3. How can I capture a screenshot on a Logitech wireless keyboard when using a mobile device?
If you are using a Logitech wireless keyboard with a mobile device like a smartphone or tablet, the process of capturing a screenshot may differ depending on the operating system. For iOS devices, simultaneously press the Home button and the Power button to capture a screenshot. On Android devices, simultaneously press the Power button and the Volume Down button. Note that these key combinations may vary slightly depending on the specific device you are using.
4. Are there any alternative methods for capturing screenshots?
Apart from using the Print Screen key or software programs, there are alternative methods for capturing screenshots on your computer. For example, you can use the Snipping Tool on Windows or the Grab utility on macOS to capture screenshots with more control over the selection area. Additionally, many web browsers have built-in screenshot capture capabilities that allow you to capture full web pages or specific sections of a webpage.
5. How can I access and manage my screenshots after capturing them?
Once you have captured a screenshot, it is stored as an image file on your computer or mobile device. On Windows computers, screenshots are saved in the “Pictures” folder by default, while on macOS, they are saved to the desktop. You can access and manage your screenshots by navigating to the appropriate folder or using file management applications on your device. From there, you can rename, move, delete, or share your screenshots as needed.