
The iPhone Magnifier is a useful accessibility feature that allows users to magnify objects or text on their device’s screen. With the release of iOS 14, Apple has introduced a redesigned Magnifier that offers improved functionality and a more intuitive user interface. In this article, we will explore how to make the most of the redesigned iPhone Magnifier in iOS 14. Whether you have difficulty reading small text, need to examine small details, or simply want to zoom in on something, the Magnifier can be a valuable tool. Let’s dive in and discover the various features and tips that can help you effectively utilize the redesigned iPhone Magnifier in iOS 14.
Inside This Article
- How to Use the Redesigned iPhone Magnifier in iOS 14
- Accessing the Magnifier feature
- Adjusting magnification levels
- Using filters for better visibility
- Enabling and Customizing the Flashlight
- Utilizing the capture feature
- Enhancing readability with the zoom controller
- Enlarging text on the screen
- Adjusting contrast and color settings
- Enabling auto-brightness for optimal viewing
- Using Magnifier with External Accessories
- Conclusion
- FAQs
How to Use the Redesigned iPhone Magnifier in iOS 14
Are you struggling with small text or fine details on your iPhone? The redesigned Magnifier feature in iOS 14 can help you overcome this challenge. Whether you have difficulty reading small fonts or need to examine tiny objects, the Magnifier feature provides a powerful tool for magnifying and enhancing visibility. In this article, we will guide you through the steps to use the redesigned Magnifier on your iPhone running iOS 14.
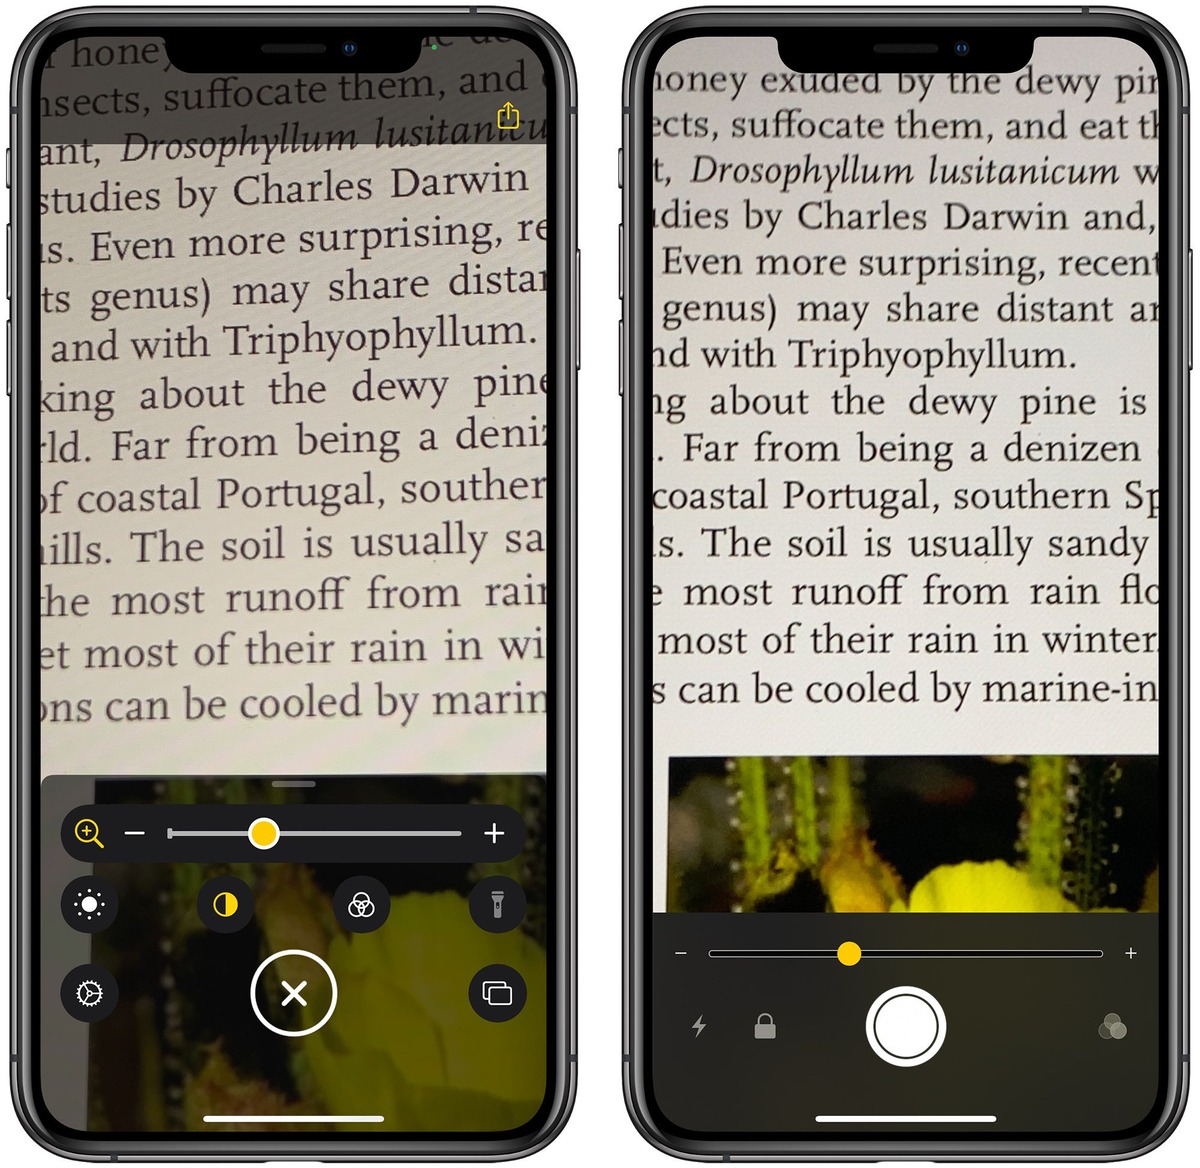
1. Accessing the Magnifier feature
To access the Magnifier feature, follow these simple steps:
- Open your Settings app on your iPhone.
- Scroll down and tap on “Accessibility”.
- Select “Magnifier” from the available options.
- Toggle the switch to turn on the Magnifier.
2. Adjusting magnification levels
Once you have enabled the Magnifier, you can adjust the magnification level according to your preference:
- Launch the Magnifier from the Control Center by swiping down from the top-right corner of the screen and tapping the Magnifier icon.
- Pinch in or out on the screen to adjust the magnification level.
3. Using filters for better visibility
The redesigned Magnifier offers various filters that can enhance visibility in different lighting conditions:
- Open the Magnifier.
- Tap on the Filters button at the bottom of the screen.
- Select the filter that provides the best visibility for your needs.
4. Enabling and customizing the flashlight
When using the Magnifier, you can utilize the flashlight feature to improve visibility:
- Open the Magnifier.
- Tap on the Flashlight button at the bottom-left corner of the screen to turn it on.
- To customize the flashlight settings, tap on the Settings button next to the Flashlight button.
5. Utilizing the capture feature
The Magnifier allows you to capture and save magnified images for future reference:
- Open the Magnifier.
- Align the object or text you want to capture in the magnified view.
- Tap on the Capture button at the bottom-center of the screen.
- The captured image will be saved in your Photos app.
6. Enhancing readability with the zoom controller
The Zoom Controller feature in the Magnifier makes it easier to read magnified text:
- Open the Magnifier.
- Tap on the Zoom Controller button at the bottom-right corner of the screen.
- Move the zoom slider up or down to adjust the magnification level.
7. Enlarging text on the screen
If you want to enlarge text on the entire screen, you can enable the “Follow Focus” feature:
- Open the Magnifier.
- Tap on the Settings button at the bottom-left corner of the screen.
- Toggle on the “Follow Focus” option.
8. Adjusting contrast and color settings
The Magnifier allows you to adjust contrast and color settings for better visibility:
- Open the Magnifier.
- Tap on the Settings button at the bottom-left corner of the screen.
- Go to “Color Filters” and select the desired filter.
- Adjust the intensity using the slider for optimal visibility.
9. Enabling auto-brightness for optimal viewing
Enabling the auto-brightness feature ensures optimal viewing experience in different lighting conditions:
- Open the Settings app on your iPhone.
- Scroll down and tap on “Display & Brightness”.
- Toggle on the “Auto-Brightness” option.
10. Using Magnifier with external accessories
In addition to the built-in camera, you can also use external accessories with the Magnifier:
- Connect the external accessory, such as a tripod or a clip-on lens, to your iPhone.
- Launch the Magnifier.
- Tap on the Settings button at the bottom-left corner of the screen.
- Select the external accessory from the “Camera” option.
With the redesigned Magnifier feature in iOS 14, you can now easily magnify and enhance visibility on your iPhone. Whether you need to read small text or examine tiny details, the Magnifier provides a powerful tool to assist you. Try out these steps and make the most of this useful feature!
Accessing the Magnifier feature
One of the most notable improvements in the latest iOS 14 update is the redesigned Magnifier feature for iPhones. The Magnifier provides enhanced accessibility by turning your iPhone into a powerful magnifying glass, allowing you to view small text or objects with ease. Here is how you can access and utilize this feature:
To access the Magnifier feature, simply follow these steps:
- Open the Control Center on your iPhone by swiping down from the top-right corner of the screen on newer models or up from the bottom of the screen on older models.
- Tap on the magnifying glass icon to activate the Magnifier.
- You can also customize the Control Center to ensure the Magnifier icon is readily accessible. To do this, go to Settings, then Control Center, and add the Magnifier feature from the list of available controls.
Once you have accessed the Magnifier feature, you are ready to explore its various functionalities and settings to suit your needs. Let’s dive deeper into the different features and options available to you.
Adjusting magnification levels
One of the key features of the redesigned iPhone Magnifier is the ability to adjust the magnification levels according to your needs. This allows you to get a clearer and closer view of the objects or text you want to magnify. Here’s how you can adjust the magnification levels:
1. Launch the Magnifier app on your iPhone. You can do this by triple-clicking the side or home button, depending on your iPhone model and settings. Alternatively, you can also access the Magnifier app from the Accessibility settings.
2. Once the Magnifier app is open, you’ll see a slider at the bottom of the screen. This slider represents the magnification level.
3. To increase the magnification, drag the slider towards the right. As you move the slider to the right, the objects or text you’re viewing will appear larger and more zoomed in.
4. Conversely, to decrease the magnification, drag the slider towards the left. This will make the objects or text appear smaller and less zoomed in.
5. As you adjust the magnification levels, you’ll notice that the changes take effect in real-time, allowing you to find the perfect magnification for your needs.
6. Experiment with different magnification levels to find the one that works best for you, whether you need a subtle zoom or a more significant magnification.
By adjusting the magnification levels, you can customize the viewing experience on your iPhone, making it easier to read small text, view intricate details, or enlarge objects for better visibility.
Using filters for better visibility
One of the convenient features of the redesigned iPhone Magnifier in iOS 14 is the ability to use filters for better visibility. These filters can help enhance the contrast and colors on the screen, making it easier to read and view objects.
To access the filters in the Magnifier app, follow these simple steps:
- Open the Magnifier app on your iPhone.
- Tap on the filter icon located at the bottom right corner of the screen.
- A list of available filters will appear. Swipe left or right to choose the filter that best suits your needs.
- Once you select a filter, the screen will adjust accordingly, applying the selected filter to enhance visibility.
There are several filters to choose from, each designed to address specific visual needs. For example:
- Inverted: This filter flips the colors on the screen, making text and objects appear in contrasting colors. It can be helpful for individuals with certain visual impairments.
- Grayscale: This filter removes all color from the screen, displaying everything in shades of gray. It can be beneficial for reducing visual distractions.
- Yellow/Blue Filter: This filter adjusts the color balance on the screen, enhancing the contrast between yellow and blue to assist individuals with color blindness.
- Red/Green Filter: Similar to the Yellow/Blue filter, this filter enhances the contrast between red and green colors, aiding those with certain types of color vision deficiencies.
By experimenting with different filters, you can find the one that works best for your unique visual needs. Keep in mind that the filters may impact the overall appearance of images and videos, so you may want to disable them temporarily for optimal viewing of multimedia content.
Using filters for better visibility in the redesigned iPhone Magnifier can significantly improve your reading and viewing experience. Whether you have difficulty reading small text or struggle with certain visual impairments, give the filters a try and see the difference they can make.
Enabling and Customizing the Flashlight
One of the useful features of the redesigned iPhone Magnifier in iOS 14 is the ability to enable and customize the flashlight for enhanced visibility in low-light situations. The flashlight feature can be accessed directly from the Magnifier interface, allowing you to illuminate the subject you’re magnifying.
To enable the flashlight, simply open the Magnifier app on your iPhone. In the bottom-right corner of the screen, you’ll find an icon that resembles a flashlight. Tap on it to turn on the flashlight and illuminate your surroundings.
But that’s not all – iOS 14 offers customization options for the flashlight in the Magnifier. To access these options, tap on the flashlight icon to enable it, and then tap on the gear icon next to it. This will open a menu that allows you to adjust various settings related to the flashlight.
Firstly, you can choose between three different flashlight intensities: low, medium, and high. This allows you to adjust the brightness level based on your specific needs and the lighting conditions around you. Simply tap on the desired intensity level to select it.
In addition to brightness, you can also enable the flashlight strobe feature. This causes the flashlight to emit rapid pulses of light, which can be useful for attracting attention or signaling in emergency situations. To activate the strobe function, toggle the switch next to “Strobe” in the flashlight settings menu.
Moreover, iOS 14 introduces a new feature called “Auto” for the flashlight. When the Auto mode is enabled, the flashlight brightness will automatically adjust based on the ambient light conditions. This ensures that the flashlight provides optimal illumination without being too bright in well-lit environments or too dim in darker settings.
With the ability to enable and customize the flashlight in the redesigned iPhone Magnifier, you can effortlessly enhance visibility in low-light situations. Whether you’re reading small text in a dimly lit room or examining objects up close in a poorly lit area, the flashlight feature in the Magnifier will provide the necessary illumination for clear and detailed magnification.
Utilizing the capture feature
One of the handy features of the redesigned iPhone Magnifier in iOS 14 is the capture feature. This feature allows you to take a snapshot of the magnified content on your screen, making it convenient for capturing important information, documents, or even capturing something you want to remember for later.
To utilize the capture feature, simply follow these steps:
- Open the Magnifier app on your iPhone by accessing it through the Control Center or the Home screen.
- Adjust the magnification level and filters according to your preference.
- Position your iPhone’s camera lens over the content you want to capture.
- Tap on the shutter button located at the bottom center of the screen to capture the image.
- The captured image will appear in a small preview thumbnail in the bottom left corner of the screen.
- You can tap on the thumbnail to view the captured image in full-screen mode.
- To save the captured image, tap on the Share button located at the bottom left corner of the screen.
- Select the desired option from the Share menu, such as saving it to your Photos app or sharing it via email or messaging apps.
With the capture feature, you no longer need to rely on external cameras or cumbersome processes to capture important visuals. Whether it’s capturing a whiteboard during a meeting, saving a document for future reference, or preserving a handwritten note, the iPhone Magnifier’s capture feature makes it effortlessly easy.
Remember to always respect privacy and secure sensitive information when utilizing the capture feature. Avoid capturing personal or confidential data without permission or proper authorization.
Enhancing readability with the zoom controller
One of the key features of the redesigned Magnifier in iOS 14 is the zoom controller, which allows you to easily adjust the magnification level for enhanced readability. Whether you need to enlarge text on a document or zoom in on fine details, the zoom controller provides precise control over the magnification.
To access the zoom controller, open the Magnifier app on your iPhone. Once the camera view is displayed, pinch with two fingers to zoom in. You will notice a zoom controller icon at the bottom of the screen. Tap on the zoom controller icon to reveal the control options.
The zoom controller consists of two sliders – one for adjusting the magnification level and the other for adjusting the brightness. By sliding the magnification control, you can increase or decrease the level of zoom. This allows you to find the perfect magnification that suits your reading needs.
Additionally, the brightness control slider lets you adjust the brightness of the magnified image. If you are reading in low light conditions or need more clarity, you can increase the brightness to enhance readability. On the other hand, if the screen appears too bright, you can decrease the brightness for a more comfortable viewing experience.
Furthermore, the zoom controller also features a toggle switch to enable or disable the “Follow Focus” feature. When “Follow Focus” is enabled, the Magnifier will automatically adjust the focus when you move the camera. This ensures that the magnified image remains sharp and clear, even when you change the position of your device.
The zoom controller is an invaluable tool for individuals with visual impairments or those who require larger text for easier reading. With its precise adjustment options and follow focus feature, it offers enhanced readability and ensures that the magnified content remains legible and readable.
So, next time you use the Magnifier on your iPhone, make use of the zoom controller to find the perfect magnification level and optimize the brightness to enhance readability for a more comfortable reading experience.
Enlarging text on the screen
One of the useful features of the redesigned iPhone Magnifier in iOS 14 is the ability to enlarge text on the screen. This can be particularly helpful for those with visual impairments or anyone who needs to view text more clearly.
To enlarge text using the Magnifier, follow these simple steps:
- Open the Magnifier app on your iPhone. You can access it by triple-clicking the Home button or the side button depending on your device.
- Once the Magnifier is open, tap on the screen to bring up the controls.
- Look for the “Aa” button, which represents the text enlargement feature. Tap on it to activate the feature.
- You can now use the slider at the bottom of the screen to adjust the text size according to your preference. Slide it to the right to increase the text size or to the left to decrease it.
- As you adjust the text size, the changes will immediately take effect on the screen, allowing you to see the enlarged text clearly.
This feature is especially useful when reading small text in documents, websites, or any other app on your iPhone. It provides a convenient way to customize the text size and make it more readable without needing to adjust the overall system font size.
Additionally, the enlarged text feature works seamlessly with other Magnifier features. For example, you can combine it with the magnification and flashlight features to enhance your reading experience even further.
Now, you can comfortably read text on your iPhone, regardless of its size, and ensure that it is easily legible for you.
Adjusting contrast and color settings
One of the key features of the redesigned iPhone Magnifier in iOS 14 is the ability to adjust contrast and color settings. This feature allows users with visual impairments or specific color preferences to optimize the appearance of the magnified content.
To adjust contrast and color settings, follow these simple steps:
- Open the Magnifier feature on your iPhone by either triple-clicking the Home or Side button (depending on your device model) or by accessing it through the Control Center.
- Tap on the Filters button located at the bottom of the screen. This will open a list of available filters that can be applied to the magnified image.
- Select the “Contrast” or “Color Filters” option, depending on your preferences. The Contrast option allows you to adjust the level of contrast, making the text and images more distinguishable. The Color Filters option provides various color filters that can enhance readability for individuals with specific color vision impairments.
- Once you have chosen the desired option, you can use the slider to increase or decrease the intensity of the contrast or select a specific color filter.
- Observe the changes in real-time as you adjust the settings. This allows you to find the optimal contrast and color combination that suits your needs.
- Experiment with different settings until you find the one that provides the best visibility and readability for you.
By adjusting the contrast and color settings in the iPhone Magnifier, you can customize the visual experience to match your specific preferences and visual requirements. This can significantly enhance the usability of the Magnifier feature and make it more accessible for individuals with visual challenges.
So, don’t hesitate to explore the contrast and color settings in the redesigned iPhone Magnifier and make the most out of this powerful accessibility tool.
Let’s start writing about ‘9. Enabling auto-brightness for optimal viewing’:
Enabling auto-brightness for optimal viewing
When using the redesigned iPhone Magnifier feature in iOS 14, enabling the auto-brightness feature can greatly enhance your viewing experience. With auto-brightness turned on, your iPhone will automatically adjust the screen brightness based on the lighting conditions around you. This ensures that the magnified content is always clear and easy to see, regardless of the environment you’re in.
To enable auto-brightness, follow these simple steps:
- Open the Settings app on your iPhone.
- Scroll down and tap on Display & Brightness.
- Toggle the switch next to Auto-Brightness to turn it on.
Once auto-brightness is enabled, your iPhone will use its ambient light sensor to detect changes in the lighting conditions. It will then adjust the screen brightness accordingly, ensuring optimal visibility for the magnified content in the Magnifier.
Enabling auto-brightness is particularly useful when using the Magnifier feature in different environments. Whether you are in a brightly lit room or outdoors in direct sunlight, your iPhone will automatically adjust the brightness so that the magnified content is neither too dim nor too bright.
This feature not only saves you the hassle of constantly adjusting the screen brightness manually but also ensures that you can focus on the magnified content without straining your eyes or experiencing any discomfort.
Keep in mind that enabling auto-brightness may have an impact on your iPhone’s battery life, especially if you frequently use the Magnifier feature for an extended period of time. However, this trade-off is generally worth it for the improved viewing experience that auto-brightness provides.
By enabling the auto-brightness feature, you can optimize your iPhone Magnifier usage and ensure that the magnified content is always clear and easy to read, regardless of the lighting conditions around you.
With auto-brightness, you can focus on utilizing the Magnifier feature to its fullest potential without worrying about adjusting the screen brightness manually. Give it a try and see how it revolutionizes your magnification experience on iOS 14!
Using Magnifier with External Accessories
The iPhone Magnifier feature in iOS 14 is not only compatible with the built-in camera, but it can also be used with external accessories to enhance its functionality. Here are some ways you can utilize the Magnifier feature with external accessories:
1. Clip-on Lenses: Attach clip-on lenses to your iPhone camera to further enhance its magnification capabilities. These lenses are available in various magnification levels and can provide a broader field of view.
2. Lighting Attachments: Use external lighting attachments to improve visibility while using the Magnifier feature. These attachments can provide additional light sources in different intensities, allowing for clearer and more detailed magnification.
3. Stabilization Tools: If you require steady hands while using the Magnifier feature, consider using external stabilization tools such as tripods or mounting brackets. These accessories can help reduce camera shake and ensure a more focused and stable magnification experience.
4. Bluetooth Shutter Remotes: To capture images or zoom in/out without touching the screen, connect a Bluetooth shutter remote to your iPhone. This allows for hands-free operation and precise control over the Magnifier feature.
5. External Displays: Connect your iPhone to an external display or monitor to view the magnified content on a larger screen. This is particularly useful for individuals with visual impairments who require a bigger display to comfortably read or examine objects.
6. Wireless Headsets: If you need audio assistance while using the Magnifier feature, pair your iPhone with wireless headsets or earphones. This enables you to receive voice prompts, descriptions, or assistance while magnifying objects or reading text.
7. External Power Banks: To ensure uninterrupted use of the Magnifier feature, especially in situations where you may need extended magnification time, connect your iPhone to an external power bank. This will provide additional battery life and prevent your device from running out of power.
8. Protective Cases: Consider using protective cases with built-in attachments or features that enhance the capabilities of the Magnifier. Some cases come with built-in lenses, lights, or stands specifically designed to improve the magnification experience.
Remember to choose accessories that are compatible with your iPhone model and iOS version to ensure seamless integration and optimal performance with the Magnifier feature.
By utilizing external accessories, you can customize and enhance your Magnifier experience according to your specific needs, enabling you to magnify objects, texts, or images with greater precision and convenience.
Conclusion
In conclusion, the redesigned iPhone Magnifier in iOS 14 offers a refreshing and improved user experience for those who rely on their smartphones for magnification purposes. With its revamped interface and added functionalities, this native tool becomes even more versatile and useful. Whether you need to zoom in on small text, examine intricate details, or enhance your overall visibility, the Magnifier is a powerful tool at your fingertips.
Gone are the days of struggling with reading glasses or carrying around a separate magnifying device. With iOS 14, you can easily access and customize the Magnifier to fit your specific needs. From adjusting contrast levels and applying filters to utilizing the flashlight for better lighting, the Magnifier puts you in control of your visual experience.
Whether you have a visual impairment, need help reading small print, or simply want to examine something more closely, the redesigned iPhone Magnifier in iOS 14 is a game-changer. It seamlessly integrates into your daily life, providing you with the convenience and accessibility you deserve. So go ahead and unlock the power of the Magnifier on your iPhone, and see a whole new world in amazing detail.
FAQs
1. What is the iPhone Magnifier in iOS 14?
The iPhone Magnifier in iOS 14 is a built-in accessibility feature that allows users to magnify objects and texts in real-time using their iPhone’s camera. It provides a handy way to magnify small prints, fine details, or objects that are hard to see with the naked eye.
2. How do I access the iPhone Magnifier?
To access the iPhone Magnifier, go to your iPhone’s Settings, then tap on “Accessibility.” From there, select “Magnifier” and toggle the switch to enable it. You can also add the Magnifier to your Control Center for quick access by going to Settings, then Control Center, and customizing it.
3. Can I use the iPhone Magnifier without enabling the whole accessibility feature?
Yes, you can use the iPhone Magnifier without enabling the entire accessibility feature. It can be accessed directly from the Control Center or even added to the lock screen for quick and easy access.
4. What are some of the features of the redesigned iPhone Magnifier in iOS 14?
The redesigned iPhone Magnifier in iOS 14 offers several new features, including the ability to adjust zoom level with a convenient slider, lock focus on a specific object or text, and adjust brightness for clearer visibility. Additionally, it now supports quick switching between the rear and front camera, making it even more versatile.
5. Can the iPhone Magnifier be used for more than just magnifying texts and objects?
Absolutely! The iPhone Magnifier can also be used for other purposes beyond magnification. It can be used to capture and save magnified images for reference or to share with others. This can be particularly useful for visually impaired individuals or for capturing small details that need to be examined more closely.