
Are you struggling to read fine print or need to magnify small objects for a closer look? Look no further than the Magnifier app on iOS 14! With the latest iOS update, Apple has introduced a powerful tool that turns your iPhone into a handheld magnifying glass. Whether you have visual impairments or simply need to zoom in on something for a better view, the Magnifier app is here to help. In this article, we will explore how to use the Magnifier app on your iOS 14 device to enhance your vision and make everyday tasks easier. So, grab your iPhone and let’s dive into the world of the Magnifier app!
Inside This Article
- Overview of the Magnifier App
- Accessing and Opening the Magnifier App
- Navigating the Magnifier App Interface
- Using the Magnifier Tools and Features
- Customizing Magnifier Settings
- Conclusion
- FAQs
Overview of the Magnifier App
The Magnifier app is a powerful tool available on iOS 14 that turns your iPhone into a magnifying glass. It is designed to assist individuals with visual impairments or those who need a closer look at small text or objects. With the Magnifier app, you can easily zoom in, capture images, adjust brightness, and even apply various filters for better visibility.
Whether you are reading a menu in a dimly lit restaurant, examining fine print on a prescription bottle, or trying to decipher small text on a document, the Magnifier app can provide the enhanced vision you need. It offers a range of features that make it easier to view and understand details that may otherwise be challenging to see.
By utilizing the camera on your iPhone, the Magnifier app allows you to magnify objects or text up to 15 times the original size. This means you can enlarge the image or text on your screen, providing clear visibility and eliminating the need for a physical magnifying glass.
In addition to zooming in, the Magnifier app also offers various tools and features to enhance your viewing experience. For example, you can use the built-in flashlight to illuminate dark or poorly lit areas. This can be particularly helpful when reading in low light conditions.
To improve contrast and make text easier to read, you can also apply various filters such as grayscale, inverted colors, or yellow on black. These filters can help individuals with certain visual impairments or conditions, such as color blindness, to distinguish between different elements more effectively.
The Magnifier app is not only versatile but also highly accessible. It can be accessed directly from the Control Center or through the Accessibility settings on your iPhone. This allows users to quickly open the app and start using it whenever and wherever needed.
Overall, the Magnifier app offers a convenient and user-friendly solution for individuals who require magnification assistance. Its range of features, combined with the iPhone’s camera capabilities, make it a valuable tool for everyday tasks and activities that require closer inspection.
Accessing and Opening the Magnifier App
iOS 14 brings a lot of exciting new features, including the Magnifier app that can transform your iPhone into a handy magnifying glass. Whether you need to read small text, examine tiny details, or enhance your visibility, the Magnifier app is an invaluable tool to have at your fingertips.
To access and open the Magnifier app, follow these simple steps:
- Unlock your iPhone by entering your passcode or using Face ID or Touch ID.
- From your home screen, swipe down from the top-right corner on iPhone X or later models. On iPhone 8 or earlier models, swipe up from the bottom of the screen. This will reveal the Control Center.
- In the Control Center, locate the Magnifier app icon. It looks like a magnifying glass.
- Tap on the Magnifier app icon to open it.
Alternatively, you can also access the Magnifier app from the lock screen by triple-pressing the side button (on iPhone models with Face ID) or the home button (on iPhone models with Touch ID).
Once you have successfully accessed and opened the Magnifier app, you are ready to explore its features and make the most out of this powerful magnifying tool.
Navigating the Magnifier App Interface
Once you have accessed and opened the Magnifier app on your iOS 14 device, you will find a user-friendly interface that allows you to easily navigate and utilize its features. Let’s explore how to navigate the Magnifier app interface:
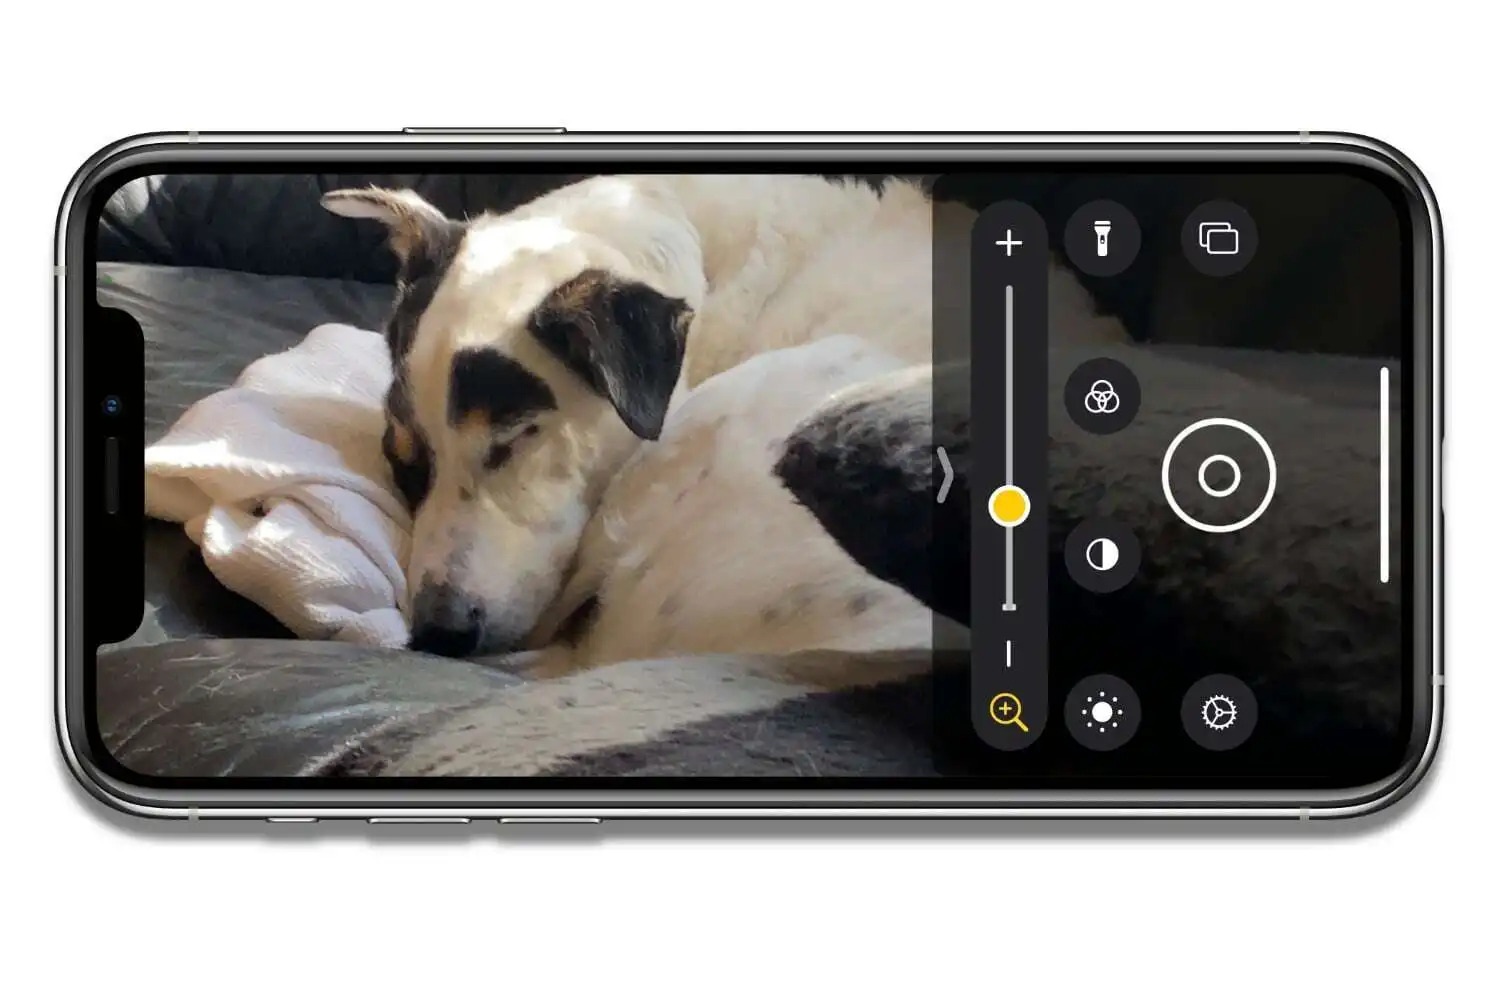
1. Zooming In and Out: The primary function of the Magnifier app is to zoom in on objects and texts, making them easier to see. To zoom in, use the familiar pinch-to-zoom gesture on your device’s screen. Alternatively, you can use the zoom slider located at the bottom of the interface to adjust the level of magnification.
2. switching on Different Modes: The Magnifier app offers various modes to enhance readability and visibility. You can access these modes by tapping the filter button, represented by three overlapping circles, in the bottom-right corner of the interface. The available modes include full color, grayscale, inverted colors, and yellow/blue filters. Experiment with these modes to find the one that works best for you.
3. Freeze Frame: The Magnifier app features a convenient freeze frame option that allows you to capture and freeze an image for closer examination. To activate this feature, simply tap the freeze frame button, represented by a camera icon, at the bottom of the interface. Once the freeze frame is enabled, you can pan and zoom within the frozen image to examine specific details more closely.
4. Adjusting Brightness and Contrast: The Magnifier app offers the ability to adjust the brightness and contrast of the magnified image, helping you optimize visibility according to your preferences. To adjust the brightness, swipe up or down on the screen. To adjust contrast, swipe left or right. Play around with these settings until you achieve the desired level of visibility.
5. Turning on the Torch: In low-light situations, the Magnifier app provides an integrated torch feature that can illuminate the subject and enhance visibility. You can activate the torch by tapping the flashlight button, represented by a lightning bolt icon, at the bottom of the interface. This can be particularly helpful when examining small text or objects in dimly lit environments.
Now that you are familiar with the key navigation options within the Magnifier app interface, you can effectively utilize the app’s features to enhance your visual experience. Whether you are reading fine print, examining objects, or navigating in low-light conditions, the Magnifier app provides a convenient and accessible solution.
Using the Magnifier Tools and Features
The iOS 14 Magnifier app offers a variety of tools and features to enhance your magnification and visual experience. Whether you need to zoom in on text, capture images, or adjust the color contrast, the Magnifier app has you covered. Let’s explore how to utilize these tools effectively:
1. Zoom In and Out: One of the primary functions of the Magnifier app is to zoom in on objects or text. You can adjust the zoom level by using the slider at the bottom of the app interface. Slide it to the right to increase the magnification and to the left to decrease it.
2. Image Capture: The Magnifier app allows you to take photos of what you’re magnifying. To capture an image, simply tap the white circular button at the bottom center of the app. The image will be saved to your Photos library for future reference.
3. Auto-Brightness and Flashlight: The Magnifier app intelligently adjusts the brightness based on the ambient lighting conditions. However, if you need additional lighting, you can enable the flashlight by tapping the flashlight icon at the bottom left. This feature can be especially helpful in low-light situations.
4. Color Filters: The Magnifier app provides various color filters to enhance visibility for individuals with visual impairments or specific color preferences. To access these filters, tap the filter icon at the bottom right. You can choose from options like grayscale, red/green filter, and inverted colors.
5. Focus Lock: The Magnifier app includes a useful feature called Focus Lock. This enables you to lock the focus on a specific object or text, allowing you to move the device without losing focus. To activate Focus Lock, tap and hold on the screen until the yellow square appears, indicating that the focus is locked.
6. Freeze Frame: If you want to closely examine a specific item or text, you can use the Freeze Frame feature. Tap the white circular button at the bottom center twice quickly to capture a frozen image. This allows you to inspect the details without the need to hold the device steady.
7. Change Magnifier Appearance: The Magnifier app provides options to customize its appearance, including the contrast settings and the magnifier lens. To access these settings, tap on the “Settings” icon in the bottom right corner of the app interface. You can adjust the color contrast, enable or disable the loupe view, and change the magnification level.
8. Assistive Touch: If you have enabled Assistive Touch on your device, you can activate the Magnifier app quickly by assigning it to one of the virtual buttons. This makes it even more convenient to access the Magnifier app whenever you need it.
With these tools and features, the Magnifier app becomes an indispensable tool for individuals with visual impairments or for anyone who needs to magnify objects or text for easier viewing. Take advantage of these functionalities and enhance your visual experience with the iOS 14 Magnifier app.
Customizing Magnifier Settings
The Magnifier app on iOS 14 offers a range of customizable settings that allow you to tailor the app to your specific visual needs. Here’s how you can make the most of these customization options:
1. Adjusting Magnification Level: To change the magnification level, simply drag the slider located at the bottom of the screen. Slide it to the left to decrease the magnification and to the right to increase it. Finding the right magnification level will help you read and view objects more comfortably.
2. Enabling Auto-Brightness: iOS 14’s Magnifier app also provides an option to enable Auto-Brightness. When enabled, the app adjusts the brightness of your device’s flashlight to optimize visibility. To turn on Auto-Brightness, go to the Magnifier Settings and toggle the “Auto-Brightness” switch.
3. Choosing Filter Options: The Magnifier app offers different filter options to enhance visibility. You can choose from filters such as Normal, Yellow/Blue, Grayscale, and Red/Blue. Experiment with these filters to find the one that works best for you. To customize the filter, go to the Magnifier Settings and select the desired filter option.
4. Enabling Torch Mode: Torch Mode allows you to use your device’s flashlight as a continuous source of light while using the Magnifier app. This can be particularly helpful in low-light situations. To enable Torch Mode, tap the Torch icon located at the bottom left corner of the screen.
5. Adjusting Contrast: The Magnifier app provides the option to adjust the contrast between text and background colors. This can be beneficial for individuals with vision impairments who require higher contrast to read more comfortably. To adjust the contrast, go to the Magnifier Settings and use the contrast slider.
6. Customizing Shortcut Accessibility: If you frequently use the Magnifier app, consider customizing accessibility shortcuts to quickly access the app. You can assign a specific gesture or button combination to open the Magnifier app instantly. To customize accessibility shortcuts, go to the Accessibility section in your device’s settings.
7. Enabling Focus Lock: Focus Lock allows you to lock the focus on a specific item or text, even when you move your device. This is particularly useful when reading small print or examining details. To enable Focus Lock, tap and hold on the screen until the blue focus lock box appears, then release your finger.
8. Adjusting Brightness: If you find the Magnifier app’s screen brightness too harsh or too dim, you can adjust it to your liking. Simply go to the Magnifier Settings, select Brightness, and use the slider to find the optimal brightness level.
By customizing the Magnifier app settings, you can optimize it according to your visual requirements, allowing for a more comfortable, personalized experience. Explore these customization options to make the most of the Magnifier app’s features and improve your visual accessibility on iOS 14.
With the introduction of iOS 14’s Magnifier app, Apple has once again demonstrated its commitment to providing useful and innovative features to its users. This handy tool allows you to turn your iPhone into a powerful magnifying glass, making it easier to read small print, identify objects, or even explore the world around you in greater detail.
By simply enabling the Magnifier app in your iPhone’s settings, you can access a range of helpful features such as zooming in and out, adjusting contrast and brightness, and even capturing images for future reference. Whether you have vision impairment, need assistance with reading fine print, or simply want to enhance your visual experience, the Magnifier app is a must-have tool for every iOS 14 user.
So why strain your eyes when you can simply use iOS 14’s Magnifier app to make things clearer and more accessible? Say goodbye to squinting and hello to a world of enhanced vision.
FAQs
Q: What is the Magnifier app in iOS 14?
The Magnifier app is a built-in accessibility feature in iOS 14 that allows users to use their iPhone’s camera as a magnifying glass. It provides an easy way to zoom in on objects, text, or small details, making it useful for individuals with visual impairments or anyone who needs a closer look at something.
Q: How do I access the Magnifier app on iOS 14?
To access the Magnifier app on iOS 14, simply go to the home screen and open the Control Center. From there, look for the Magnifier icon, which looks like a magnifying glass, and tap on it to launch the app. You can also customize the Control Center to add the Magnifier shortcut for quick access.
Q: Can I use the Magnifier app without zooming in?
Yes, you can use the Magnifier app without zooming in. When you launch the app and initially open the camera, it will display a live feed of what the camera sees. From there, you have the option to zoom in by pinching the screen or using the zoom slider. However, if you want to use the app without zooming, simply leave the zoom level at its default setting.
Q: Are there any additional features in the Magnifier app?
Yes, besides the basic magnifying functionality, the Magnifier app in iOS 14 offers several additional features. These include the ability to adjust brightness and contrast, enable flash for low-light situations, apply filters to enhance visibility, and even capture images for future reference. These features make the Magnifier app a versatile tool for many different use cases.
Q: Can I use the Magnifier app on older iPhone models?
The Magnifier app is available on iPhone models running iOS 14 or later. Therefore, if your iPhone is compatible with iOS 14, you will be able to access and use the Magnifier app. It’s worth noting that some older iPhone models may not support all the advanced features of the Magnifier app, but the basic magnifying functionality should still be available.