
Are you struggling to read small text or examine details in photographs on your iPhone? Don’t worry, the latest iOS 16 update introduces a helpful feature called detection mode in the Magnifier app. This powerful tool allows you to use your iPhone as a magnifying glass, making it easier to zoom in on text, images, and objects with precision.
With detection mode, you can enhance your visual experience by making use of the powerful camera on your iPhone. Whether you’re trying to read small print on a document, examine tiny details on a map, or even check the authenticity of a product label, the Magnifier’s detection mode has got you covered. In this article, we will guide you through the steps to use detection mode effectively on your iPhone, so you can take advantage of this useful feature and make your life a little easier.
Inside This Article
- How to Access the Detection Mode in Magnifier
- Adjusting Magnification Level in Detection Mode
- Changing Colors and Filters in Detection Mode
- Capturing and Saving Images in Detection Mode
- Conclusion
- FAQs
How to Access the Detection Mode in Magnifier
Do you ever find yourself struggling to read small text or see details up close on your iPhone? Well, the Magnifier feature is here to help. With the iOS 16 update, Apple has introduced a new and improved Magnifier app that includes a handy Detection Mode. This mode allows you to easily identify and highlight specific objects and text in real time.
Accessing the Detection Mode in the Magnifier app is quick and simple. Just follow these steps:
- Open the Magnifier app on your iPhone. You can find it by swiping up from the bottom of the screen and tapping on the magnifying glass icon.
- Once the Magnifier app is open, you will see a “+” button at the bottom center of the screen. Tap on it to access additional options.
- In the list that appears, look for the “Detection Mode” option and tap on it to enable it.
Now that you have enabled the Detection Mode in the Magnifier app, let’s explore how to make the most out of this feature.
Adjusting Magnification Level in Detection Mode
When using the detection mode in the Magnifier feature on your iPhone (iOS 16), you have the ability to adjust the magnification level according to your needs. This feature allows you to zoom in on specific objects or text using your device’s camera. Here’s how you can adjust the magnification level:
1. Open the Magnifier app on your iPhone. You can access this app by swiping right from the Lock screen or the Home screen, or by asking Siri to open the Magnifier.
2. Tap on the “Magnify” button to activate the camera and enter the magnification mode.
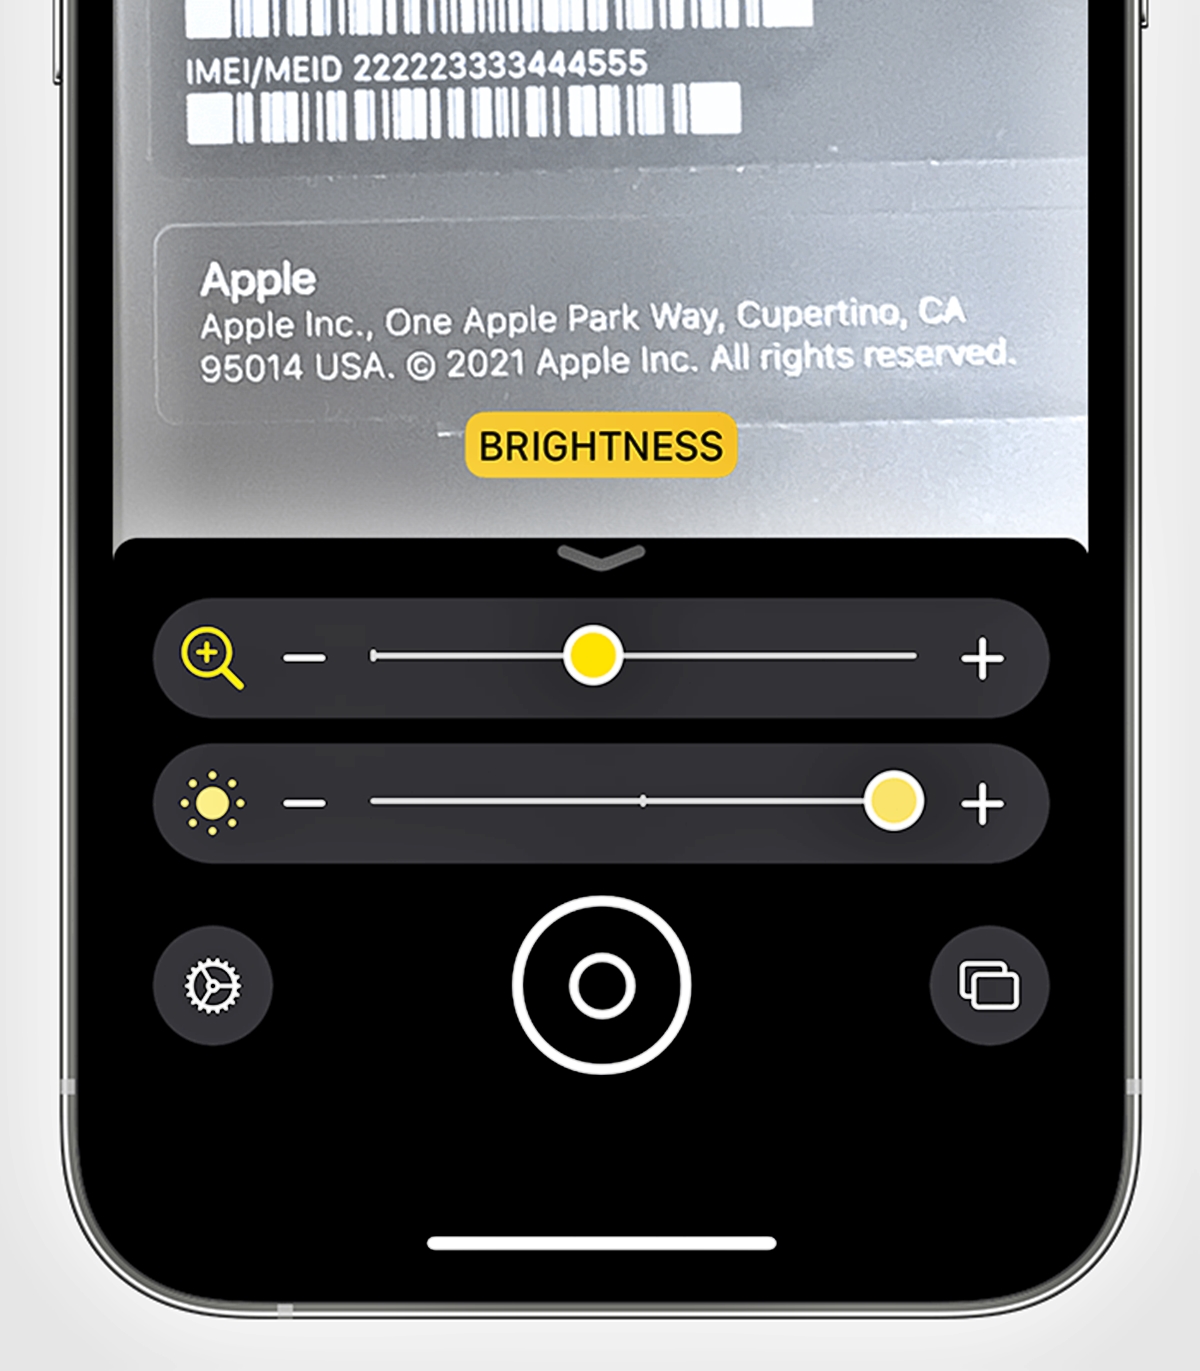
3. Once you’re in the magnification mode, you’ll notice a slider at the bottom of the screen. This slider controls the magnification level. Slide it to the right to increase the magnification, and to the left to decrease it. As you adjust the slider, the magnified view will update accordingly, allowing you to find the optimal level of magnification.
4. Experiment with different magnification levels to find the one that suits your needs best. Depending on the size of the object or text you’re trying to magnify, you may need to adjust the magnification accordingly.
5. It’s important to note that increasing the magnification level too much may cause the image to become blurry or pixelated. In such cases, it’s recommended to decrease the magnification level slightly to ensure a clear and sharp view.
6. Once you’ve found your desired magnification level, you can use the detection mode to identify and highlight specific objects or text. Simply tap on the screen to activate the detection mode, and move your iPhone’s camera towards the object or text you wish to focus on. The detection mode will automatically adjust the magnification to provide a clearer view of the selected area.
By adjusting the magnification level in the detection mode of the Magnifier feature on your iPhone, you can easily zoom in on objects or text and enhance your overall viewing experience. Whether you need to read fine print, examine small details, or simply have a closer look at something, the magnification feature in detection mode is a valuable tool to have at your fingertips.
Changing Colors and Filters in Detection Mode
One of the great features of the Magnifier on iPhone (iOS 16) is the ability to change colors and apply filters in detection mode. This feature allows users to customize the visual representation of objects they are magnifying, making it even more helpful for individuals with visual impairments.
To change the colors and filters in detection mode, follow these simple steps:
- Open the Magnifier app on your iPhone.
- Tap on the “Settings” icon located at the bottom left corner of the screen.
- In the settings menu, you will find the “Color Filters” option. Tap on it.
- You will now see a list of different color filters to choose from. Swipe left or right to explore the options.
- When you find a color filter that suits your preference, tap on it to select it.
- Now, go back to the magnifier screen by tapping on the “Back” arrow in the top left corner.
- You will notice that the colors and filters have been applied to the objects you are magnifying in detection mode.
By changing the colors and filters in detection mode, you can enhance the contrast and visibility of the objects you are magnifying. This can be especially useful when reading small text, distinguishing different colors, or viewing objects in low-light conditions.
Additionally, the Magnifier also provides the option to invert colors, which can further improve visibility for some users. To invert colors, simply toggle the “Invert Colors” option in the settings menu.
Whether you prefer high contrast, grayscale, or any other specific color filter, the Magnifier app on iPhone (iOS 16) offers a range of options to suit your needs. Experiment with different filters to find the one that works best for you.
Now you can make the most out of the Magnifier app by changing colors and filters in detection mode. Enjoy an enhanced visual experience while magnifying objects on your iPhone.
Capturing and Saving Images in Detection Mode
When using the detection mode in the Magnifier feature on your iPhone, you have the ability to not only zoom in on objects but also capture and save images. Whether you’re trying to read small text or examine something in detail, this feature can be incredibly useful.
To capture an image in detection mode, first, ensure that you have enabled the detection mode by following the steps mentioned earlier. Once the detection mode is activated, you can position your iPhone’s camera over the object you want to capture. Make sure the object is within the frame and clearly visible on the screen.
Once the object is in focus on your iPhone’s screen, tap the capture button. This button is usually represented by a camera icon and is located at the bottom center of the magnifier interface. Give your iPhone a moment to process and capture the image.
After capturing the image, you will see a thumbnail preview at the bottom right corner of the screen. You can tap on this preview to view the captured image in full size. From here, you have various options to work with the image. You can edit the image using the built-in editing tools, share it with others via messaging or social media apps, or save it to your iPhone’s Photos app.
To save the captured image, tap on the share icon, usually represented by a square with an arrow pointing upwards. This will open a menu with different options. Select “Save Image” from the list, and the image will be saved to your iPhone’s Photos app, where you can access it anytime.
It’s important to note that the image captured in detection mode will retain the zoomed-in view and any visual enhancements applied. This allows you to refer back to the image later without losing the detailed information you’ve gained through the magnifier feature.
Capturing and saving images in detection mode opens up a world of possibilities for visually impaired individuals, students, professionals, and anyone else in need of a closer look at objects or text. Whether it’s for personal use or work-related tasks, this feature on your iPhone can greatly assist you in various situations.
Now that you know how to capture and save images in detection mode, make the most of this powerful feature on your iPhone and experience the convenience it offers in magnifying and preserving important visual information.
Conclusion
With the introduction of Detection Mode in the Magnifier feature on iPhone (iOS 16), users now have an even more powerful tool at their disposal. This mode allows for various objects to be identified and described, providing invaluable assistance to individuals with visual impairments or those who may need help identifying certain items.
Whether you need to read a document, find out the ingredients in a product, or simply explore your surroundings more effectively, the Detection Mode in Magnifier can make a significant difference. Its versatility, ease of use, and accessibility features make it a standout feature on the iPhone.
By utilizing Detection Mode in Magnifier, iPhone users can experience a newfound level of independence, convenience, and enhanced understanding of their environment. So, whether you are a visually impaired individual or someone looking to make the most of your iPhone’s capabilities, don’t hesitate to explore and utilize the Magnifier’s Detection Mode feature on your iPhone (iOS 16).
FAQs
1. What is the detection mode in the Magnifier on iPhone?
The detection mode in the Magnifier on iPhone allows you to identify and highlight specific objects or text using your device’s camera. It utilizes advanced image recognition technology and provides real-time assistance for visually impaired individuals or anyone who needs assistance in identifying objects.
2. How do I access the detection mode in the Magnifier on iPhone?
To access the detection mode in the Magnifier on iPhone, follow these steps:
- Open the Magnifier app on your iPhone.
- Tap on the “Detect” button located at the bottom center of the screen.
- Point your device’s camera at the object or text you want to identify.
- The Magnifier will automatically detect and highlight the object or text on the screen.
3. What types of objects can be detected using the Magnifier on iPhone?
The Magnifier on iPhone can detect a wide range of objects, including but not limited to:
- Text on signs, papers, or books
- Barcodes and QR codes
- Colors
- Money denominations
- Objects with specific patterns or shapes
4. Can I customize the detection settings in the Magnifier on iPhone?
Yes, you can customize the detection settings in the Magnifier on iPhone. Here’s how:
- Open the Magnifier app on your iPhone.
- Tap on the “Settings” button located at the bottom right of the screen.
- Select “Detection Settings.”
- From here, you can toggle various detection options on or off based on your preferences.
5. Are there any additional features in the detection mode of the Magnifier on iPhone?
Yes, the detection mode in the Magnifier on iPhone offers additional features to enhance the usability and functionality. These features include:
- Adjusting the magnification level
- Using a flashlight for better visibility
- Taking photos or capturing screenshots of the detected objects
- Sharing the identified objects or text with others