
Have you ever wondered how to check the location history of an iPhone? Whether you are trying to keep track of your own whereabouts or monitor someone else’s movements, knowing how to access the iPhone’s location history can provide valuable insights.
In this article, we will explore six proven methods to check the location history of an iPhone in 2023. From using built-in iOS features to utilizing third-party apps, we will cover a range of techniques that will enable you to view the past locations visited by an iPhone user.
Whether you’re a concerned parent, suspicious partner, or simply curious about your own location patterns, discovering these methods will give you a comprehensive understanding of how to access and review iPhone location history. So, let’s dive in and find out how to track the past locations of an iPhone user!
Inside This Article
- Location Tracking on iPhone
- Frequently Asked Questions (FAQs)
- Method 1: Use Find My App
- Method 2: Check Location History in Google Maps
- Method 3: Review Significant Locations
- Method 4: View Locations in Timeline
- Method 5: Access Location Data via iCloud
- Method 6: Check Location History in Third-Party Apps
- Conclusion
- FAQs
Location Tracking on iPhone
Location tracking on iPhone has become an integral part of our lives, allowing us to navigate, find nearby places, and even share our location with friends and family. However, it is also essential to have access to our own location history for various reasons, such as tracking our movements, reviewing past routes, or even understanding our daily routines. In this article, we will explore six proven ways to check iPhone location history in 2023.
1. View Location History Using Find My App
The Find My app on iPhone offers a straightforward way to track and view your location history. Simply open the Find My app, tap on the “Me” tab at the bottom, and then select “Location History.” Here, you can see a detailed timeline of locations you have visited, including dates, times, and even addresses. This feature is especially useful for keeping track of your daily movements or reviewing places you have been.
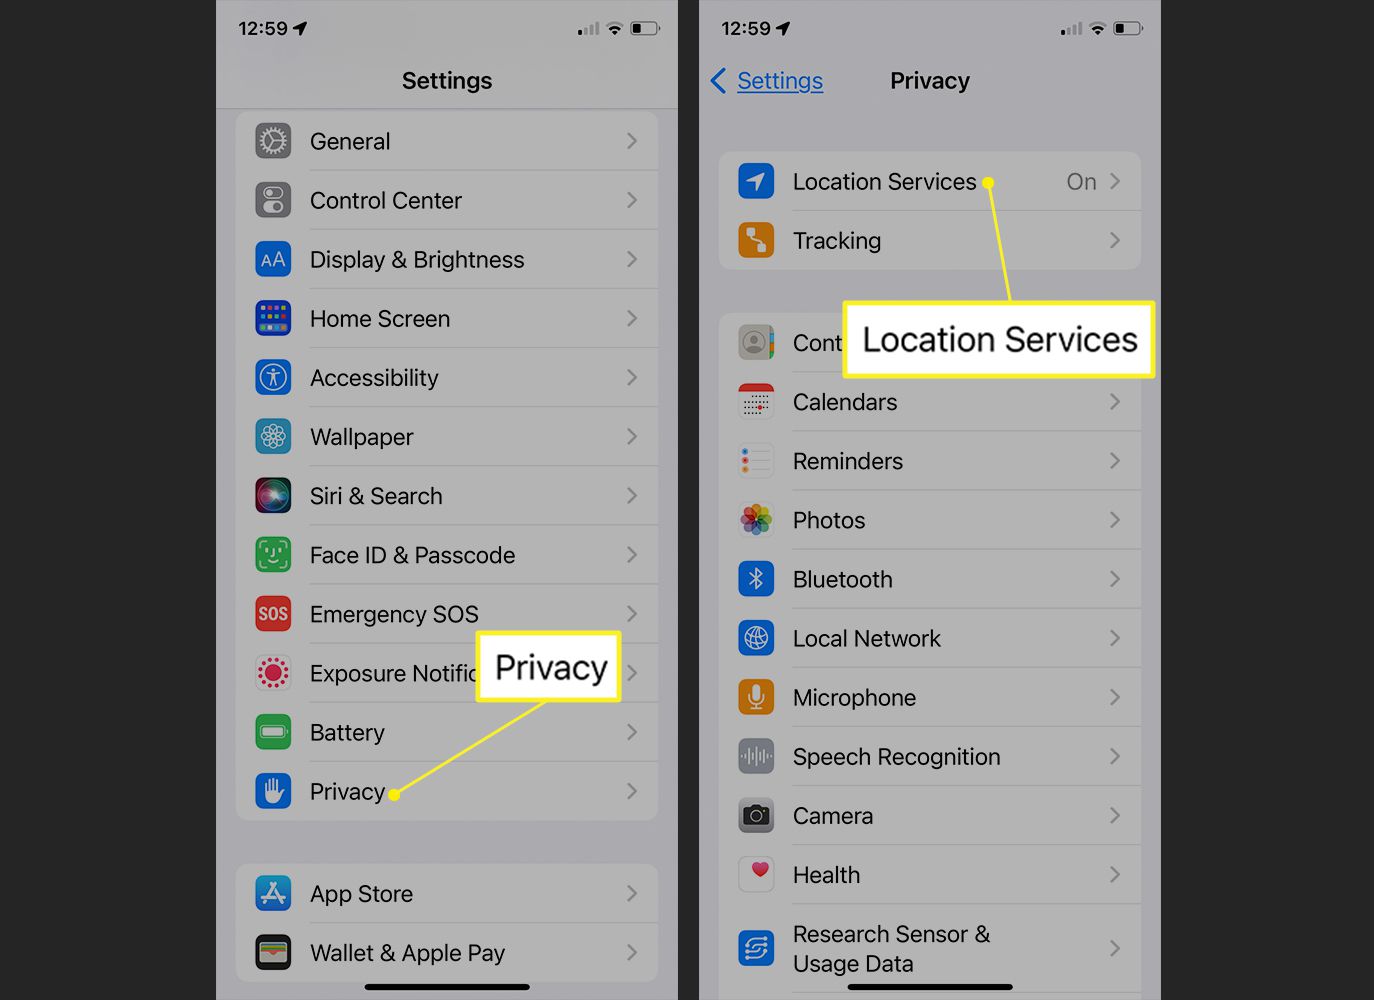
2. Access Location History on iPhone Settings
Another way to check your iPhone location history is through the device’s settings. Go to “Settings,” then tap on “Privacy.” From there, select “Location Services” and scroll down to find “System Services.” Under “System Services,” you will find “Significant Locations.” Tap on it, and you will see a list of significant places you have visited along with dates and times. This feature allows you to have a quick overview of your location history directly from your iPhone settings.
3. Check Location History with iCloud
If you have enabled iCloud on your iPhone, you can also access your location history through iCloud.com. Simply log in to your iCloud account using a computer or another device, and click on the “Find iPhone” icon. Next, select “All Devices” at the top of the screen, and choose your iPhone from the list. From there, click on the “Timeline” icon, and you will have access to your location history on a map. This method is ideal if you want to check your location history from a larger screen or when your iPhone is not readily available.
4. Use Third-Party Location Tracking Apps
In addition to the native options provided by Apple, there are also several third-party location tracking apps available on the App Store. These apps offer advanced features and functionalities, allowing you to track and monitor your location history seamlessly. Some popular apps include “Life360,” “Find My Friends,” and “Glympse.” These apps often provide real-time location sharing, location alerts, and the ability to review past location history with ease.
With these four proven ways, you can easily check your iPhone location history and gain valuable insights into your daily movements. Whether you prefer using the native features of your device or opt for third-party apps, tracking your location history can be a powerful tool for personal tracking or simply understanding your whereabouts. Remember to respect privacy and use these features responsibly.
Frequently Asked Questions (FAQs)
1. Can I disable location tracking on my iPhone?
Yes, you can disable location tracking on your iPhone. To do this, go to “Settings,” then tap on “Privacy.” From there, select “Location Services” and toggle off the option. Keep in mind that disabling location tracking will affect the functionality of certain apps and services that rely on it.
2. Can I delete my location history on iPhone?
Yes, you have the option to delete your location history on your iPhone. You can do this by going to “Settings,” then tapping on “Privacy.” From there, select “Location Services” and choose “System Services.” Under “System Services,” tap on “Significant Locations” and then select “Clear History.” This will delete all the stored location history on your device.
3. Are third-party location tracking apps safe?
Third-party location tracking apps available on the App Store go through a strict review process by Apple to ensure they meet privacy and security standards. However, it’s always recommended to read the app reviews, check the permissions it requires, and only download apps from trusted developers.
4. Can I track someone else’s location history on iPhone?
No, you cannot track someone else’s location history on iPhone without their consent. iPhone location tracking is a personal feature and requires permission from the device owner to share their location. Always respect privacy and only track the location of others with their consent.
With these helpful tips and insights, you can now navigate through your iPhone’s location tracking features and access your location history with ease. Whether it’s for personal convenience or monitoring purposes, understanding your location history can provide valuable information about your daily routines and activities.
Method 1: Use Find My App
One of the easiest and most straightforward ways to check the location history on your iPhone is by using the Find My app. This app, developed by Apple, allows you to track the location of your device and view its location history.
To use the Find My app, ensure that you have enabled the app on your iPhone. Open the Find My app, and you will see a map displaying the current location of your device. To access the location history, tap on the “Devices” tab at the bottom of the screen.
On the Devices screen, you will see a list of all the Apple devices associated with your iCloud account. Select the iPhone for which you want to check the location history. The app will display its location on the map, along with a timeline of its location history below.
By tapping on any point on the timeline, you can view the specific location of your iPhone at that particular time. This allows you to track where your device has been and when it was at each location.
The Find My app also offers additional features such as the ability to play a sound on your iPhone, lock it remotely, or erase its data in case it’s lost or stolen. However, for the purpose of checking location history, focus on the “Devices” tab and the timeline of locations associated with your iPhone.
With the Find My app, you can have peace of mind knowing that you can easily track the location of your iPhone and view its location history whenever you need to.
Method 2: Check Location History in Google Maps
Google Maps is a powerful navigation and mapping tool that many iPhone users rely on. Not only does it provide real-time directions and traffic updates, but it also keeps a record of your location history. Here’s how you can access your iPhone’s location history using Google Maps.
The first step is to ensure that you have the Google Maps app installed on your iPhone. If you don’t have it already, you can download it for free from the App Store. Once installed, open the app and sign in with your Google account.
Once you’re signed in, tap on the Menu icon, usually located in the top-left corner of the screen. This will open a side menu with various options. Scroll down and select “Your timeline.”
On the next screen, you’ll see a calendar with your recorded locations marked. You can scroll through the dates to view your location history for specific days. Google Maps provides the flexibility to view your location history by day, week, or month.
Tap on a specific date to view the recorded locations for that day. You’ll see the places you visited marked on the map along with the time stamp. You can tap on a location to get more details, such as the duration of your visit and the route you took.
Google Maps also allows you to customize your location history settings. To access these settings, tap on the Menu icon once again, select “Settings,” then choose “Personal content.”
From here, you can enable or disable location history, adjust the location accuracy, or even delete your entire location history if desired. Note that disabling location history will prevent Google Maps from recording your future locations.
Method 3: Review Significant Locations
If you want to delve deeper into your iPhone’s location history, another method you can use is reviewing the Significant Locations feature. This feature tracks and saves the places you frequently visit, allowing you to have a comprehensive overview of your past locations.
To access this feature, follow these simple steps:
- Open the “Settings” app on your iPhone.
- Scroll down and tap on “Privacy.”
- Next, select “Location Services.”
- Scroll down and choose “System Services.”
- Now, tap on “Significant Locations.”
- You may be prompted to enter your passcode or authenticate using Face ID or Touch ID.
Once you’ve successfully entered the Significant Locations section, you will see a list of places you have visited. These locations are sorted by date, making it easy for you to track your movements over time.
By selecting a specific location, you can view more details about it, including the date and time of your visits. You can even see a map preview of the location, allowing you to visualize your past movements.
Moreover, the Significant Locations feature provides you with the option to delete specific locations or clear your entire location history if you wish.
It’s important to note that the Significant Locations feature is only available if you have enabled Location Services on your iPhone and granted permission for the device to track your location. Additionally, this feature is protected by the same level of privacy and security measures as other location-based services on iOS, ensuring your data remains confidential.
Reviewing Significant Locations on your iPhone can be a great way to gain insights into your past movements and track the places you frequently visit. Whether you’re curious about your travel patterns or need to keep an eye on your location history for personal or business reasons, this method offers a convenient way to access and manage your iPhone’s location data.
Method 4: View Locations in Timeline
Another effective way to check iPhone location history is by viewing it in a timeline format. This provides a visual representation of the places you have been to, making it easier to track your movements over a specific period of time.
One of the methods to view locations in a timeline is by using the Apple Maps app. Follow these steps to access the timeline:
- Open the Apple Maps app on your iPhone.
- Tap on the “Search” bar at the top of the screen.
- Scroll down and tap on “Favorites.”
- Under the Favorites section, you will find a list of recently visited locations. Tap on any location to view it on the map.
- Swipe up on the location card to reveal more information, such as the date and time of the visit.
- To view the location in the timeline format, tap on the “Recents” tab at the bottom of the screen. This will display a chronological list of your visited locations.
Alternatively, you can also use third-party apps like Google Maps, which offer similar features to track your iPhone’s location history in a timeline format. These apps provide additional functionalities and customization options for an enhanced tracking experience.
By viewing your iPhone’s location history in a timeline, you can easily trace your footsteps and keep track of the places you have been. This can be particularly useful for reviewing past travels or for maintaining a record of the locations you visit regularly.
Method 5: Access Location Data via iCloud
Another way to check the location history of your iPhone is by accessing the location data through iCloud. iCloud is Apple’s cloud storage and synchronization service that allows you to store and access your data across multiple devices.
To access the location data via iCloud, you need to make sure that you have enabled the “Find My iPhone” feature on your device and have iCloud backup turned on.
Here’s how you can access location history through iCloud:
- Go to the iCloud website on your computer and sign in with your Apple ID and password.
- Click on the “Find iPhone” icon.
- From the drop-down menu at the top of the screen, select your iPhone.
- A map will appear showing the current location of your iPhone.
- Click on the “All Devices” dropdown menu at the top of the screen and select your iPhone again.
- Now, click on the “i” icon next to your iPhone’s name.
- A pop-up window will appear displaying various options.
- Click on “Play Sound” to make your iPhone emit a sound if it’s nearby.
- If you want to erase the contents of your iPhone remotely, click on “Erase iPhone”. Note that this will delete all data on your device, including location history.
- To view the location history of your iPhone, click on “Lost Mode” option.
- A map will appear showing the historical location data of your iPhone within the specified time frame.
By accessing your location history through iCloud, you can keep track of where your iPhone has been and ensure its safety and security. It’s a useful feature, especially if your iPhone gets lost or stolen.
html
Method 6: Check Location History in Third-Party Apps
If you’re looking for more advanced features and in-depth location history analysis, you can consider using third-party apps specifically designed for tracking iPhone location history. These apps offer additional functionalities, such as detailed maps, geofencing, and real-time tracking. Here are some popular third-party apps that you can use to check your iPhone’s location history:
1. Life360: Life360 is a comprehensive family tracking app that allows you to view the location history of your iPhone. It provides real-time location updates, shows the exact routes taken, and even sends notifications when family members arrive or leave certain places.
2. Find My Friends: Find My Friends, developed by Apple, is an app that allows you to share your location with specific individuals. While its primary purpose is to keep track of friends and family, you can use it to view your own location history as well. It provides a clear timeline showing your past locations, along with the option to receive notifications when someone arrives or leaves a designated location.
3. Google Maps: Google Maps is a widely-used navigation app that also allows you to view your location history. Simply open the app, tap on your profile picture, go to “Your Timeline,” and you will be able to see a detailed summary of your past locations. Google Maps even provides insights, such as frequent places you visit and the distance traveled.
4. Spyic: Spyic is another popular tracking app that offers location history tracking for iPhones. It lets you monitor the location of the target iPhone remotely, view the location history of specific time periods, and even set up geofences for alerts when the device enters or leaves certain areas. Spyic is known for its stealth mode and comprehensive tracking capabilities.
These are just a few examples of third-party apps that can help you check your iPhone’s location history. Keep in mind that some apps may require a subscription or offer in-app purchases for premium features. It’s important to research and choose a reputable app that suits your needs and respects your privacy.
By using these third-party apps, you can gain deeper insights into your iPhone’s location history and make the most out of advanced tracking features.
Conclusion
In conclusion, checking iPhone location history can be a useful tool for various reasons, such as keeping track of your own whereabouts, monitoring the movements of loved ones, or even recovering a lost or stolen device. With the advancements in technology, there are now several proven ways to check iPhone location history.
Whether you opt for built-in features like Find My iPhone or utilize third-party applications, you can easily access the location history of an iPhone and gather valuable insights. By following the methods mentioned in this article, you can ensure the safety and security of your device and the people around you.
Remember to prioritize privacy and ethically use these location tracking methods. Always obtain proper consent from individuals whose location you wish to monitor and refrain from using these methods for malicious intent.
With the ability to track location history, iPhone users can have peace of mind, enhance safety measures, and stay connected with their loved ones. Embrace the power of technology and leverage these proven methods to effectively check iPhone location history.
FAQs
Q: How can I check the location history on my iPhone?
A: To check the location history on your iPhone, you can use the built-in Find My app. Open the Find My app on your device, tap on the “Me” tab, and then select “Location History”. From there, you will be able to view a map with all the locations your iPhone has been.
Q: Can I view the location history of a lost or stolen iPhone?
A: Yes, if you have enabled the Find My iPhone feature and the device is still connected to the internet, you can view the location history of a lost or stolen iPhone using the Find My app or the Find My iPhone website. This can help you track down your device or provide valuable information to law enforcement.
Q: Are there any third-party apps that can help me track iPhone location history?
A: Yes, there are several third-party apps available on the App Store that can help you track the location history of an iPhone. These apps provide additional features and functionality beyond what is offered by the native Find My app. Some popular options include Life360, FamiSafe, and Find My Friends.
Q: Can I delete my iPhone’s location history?
A: Yes, you can delete your iPhone’s location history. In the Find My app, go to the “Me” tab, tap on “Location History”, and then select “Clear History”. This will remove all the stored location data from your device. Keep in mind that clearing the location history will also remove it from any connected iCloud devices.
Q: Does checking iPhone location history drain the battery?
A: Checking iPhone location history does not significantly drain the battery, as it is a passive activity that relies on data already collected by the device. However, continuously tracking the live location of a device can have an impact on battery life. It is recommended to use location tracking sparingly and disable it when not needed to conserve battery power.