
Welcome to our comprehensive guide on how to delete a contact on direct call on the Sony Xperia L1. As cell phone experts, we understand the need for managing contacts efficiently on mobile devices. The Sony Xperia L1 is a popular smartphone that offers a user-friendly interface, but sometimes it can be a bit tricky to find certain settings or features. Deleting a contact on direct call can be one of those tasks that require a bit of guidance. In this article, we will provide you with step-by-step instructions on how to delete a contact on direct call on the Sony Xperia L1, ensuring that you can easily remove unwanted or outdated contacts from your phone. So, let’s dive in and get started!
Inside This Article
- Step 1: Open the Phone App
- Step 2: Access the Contact List
- Step 3: Select the Contact to Delete
- Step 4: Delete the Contact
- Conclusion
- FAQs
Step 1: Open the Phone App
Deleting a contact on Sony Xperia L1 is a simple process that can be done directly from the Phone app. To begin, locate and open the Phone app on your device. The Phone app is typically represented by the icon of a phone handset and can be found on the home screen or in the app drawer.
Once you have opened the Phone app, you will be presented with the dialer interface, where you can make phone calls and access your contact list. This interface allows you to manage and interact with your contacts, including the option to delete unwanted contacts.
If you have a shortcut to the Phone app on your home screen, you can simply tap on it to open the app. Alternatively, you can swipe up from the bottom of the screen to access the app drawer, then scroll through the list of installed apps and tap on the “Phone” icon to open the app.
Now that you have successfully opened the Phone app, you are ready to proceed to the next step and access your contact list.
Step 2: Access the Contact List
Once you have opened the Phone app on your Sony Xperia L1, the next step is to access the contact list. The contact list is where all your saved contacts are stored, making it easy to find and manage them.
To access the contact list, you can either tap on the “Contacts” icon located at the bottom of the screen or swipe left or right until you reach the “Contacts” tab. This will open up the contact list, displaying all the contacts you have saved on your device.
If you have a large number of contacts, you can use the search bar at the top of the contact list to quickly find a specific contact. Simply tap on the search bar and start typing the contact’s name, and the list will automatically filter to show matching results.
Additionally, you may also have the option to organize your contacts into different groups or categories. This can help you to further streamline your contact management. To access these groups, look for an icon or tab labeled “Groups” or “Categories.” Once you tap on it, you will be able to view and manage your contacts according to the assigned groups.
Once you have accessed the contact list, you are now ready to proceed with the next step, which is selecting the contact you want to delete.
Step 3: Select the Contact to Delete
Now that you have accessed your contact list on your Sony Xperia L1, it’s time to select the contact you want to delete. Follow these simple steps:
1. Scroll through the contact list or use the search bar at the top to quickly find the contact you wish to delete.
2. Once you have located the contact, tap on it to open its details. Here, you will see all the information related to that contact, such as their name, phone number, email address, and any other details you may have saved.
3. Take a moment to ensure that you have selected the correct contact for deletion. Double-check the name and other details to avoid accidentally deleting the wrong contact.
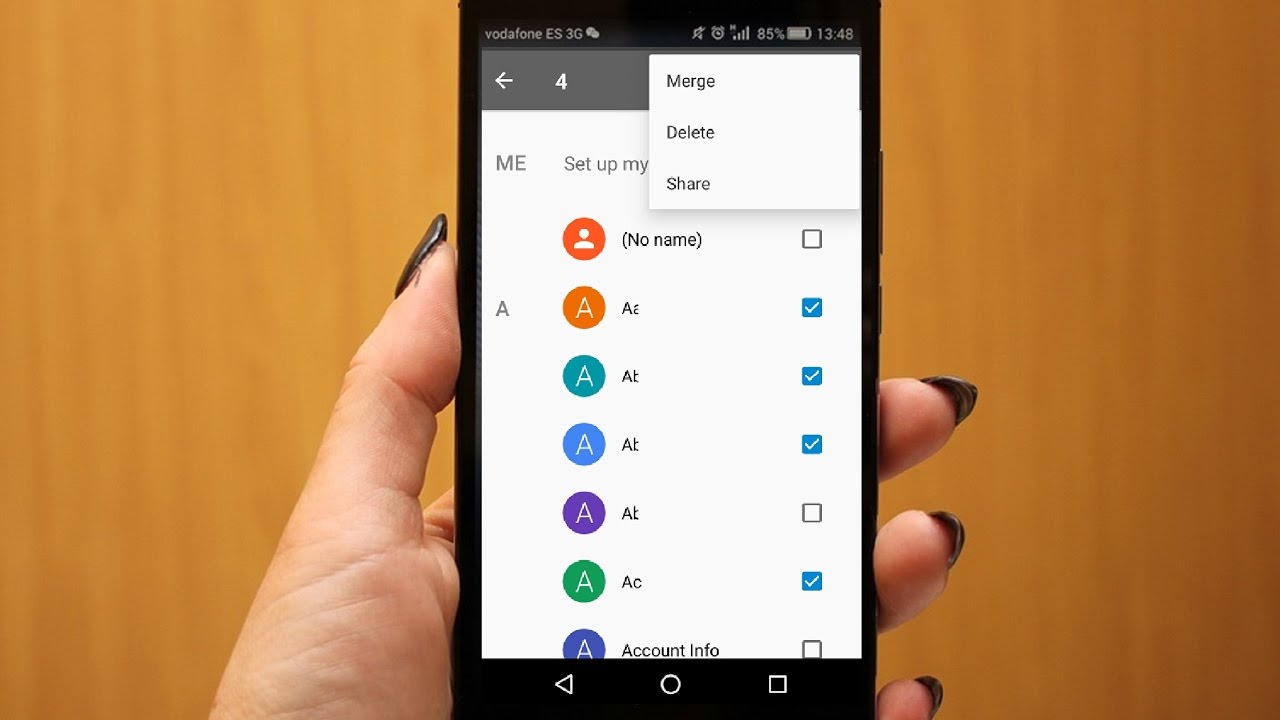
4. If you are certain that you want to delete the contact, look for the options or settings menu at the top-right corner of the screen. It may be represented by three dots or lines.
5. Tap on the options menu, and a dropdown list of actions will appear. Look for the “Delete” or “Remove” option in this list.
6. Once you have found the delete option, tap on it to initiate the contact deletion process.
7. A confirmation message may appear, asking you to confirm whether you really want to delete the contact. Take a moment to read the message and make sure you are comfortable proceeding with the deletion.
8. If you are certain about deleting the contact, tap on the “Delete” or “Confirm” button. The contact will then be removed from your contact list, and all associated information will be deleted.
By following these steps, you can easily select and delete the desired contact from your Sony Xperia L1. It’s important to double-check the contact details and confirm your intention before proceeding with the deletion to avoid any accidental deletions.
Step 4: Delete the Contact
Once you have selected the contact that you wish to delete, follow these simple steps to remove it from your Sony Xperia L1:
1. Tap on the contact’s name or icon to open their profile. This will display their contact information and various options.
2. Look for the delete button, usually represented by a trash can icon. It is typically located at the top-right corner of the screen, but the specific placement may vary slightly depending on the version of the operating system you are running.
3. Tap on the delete button to initiate the contact deletion process. A confirmation prompt may appear on the screen, asking you to double-check your decision before proceeding.
4. Confirm the deletion by tapping on the “Delete” or “OK” button. After confirming, the contact will be permanently removed from your phone and cannot be retrieved unless you have previously backed up your contacts.
5. Once the contact is deleted, you will be returned to the contact list or the previous screen you were on, depending on your device’s settings.
That’s it! The contact has been successfully deleted from your Sony Xperia L1. Repeat these steps for any other contacts you wish to remove from your phone.
Conclusion
Deleting a contact on your Sony Xperia L1 through direct call is a simple and straightforward process. By following the steps outlined in this guide, you can efficiently manage and organize your contacts, ensuring that your phonebook remains up-to-date.
With the convenience of direct call, you can effortlessly remove unwanted or outdated contacts from your Xperia L1. Whether you need to clear space, maintain a clutter-free contact list, or simply want to streamline your phone’s functionality, deleting contacts through direct call is an effective solution.
Remember, it’s always a good practice to regularly review and update your contacts to ensure you have the most relevant and accurate information at your fingertips. So go ahead and give it a try!
FAQs
1. How can I delete a contact on the Sony Xperia L1?
To delete a contact on the Sony Xperia L1, follow these steps:
– Open the Contacts app on your phone.
– Find the contact you want to delete and tap on it.
– Tap on the menu icon (typically represented by three dots or lines) in the top-right corner of the screen.
– Select the “Delete” option from the menu.
– A confirmation message will appear; tap “OK” to confirm the deletion.
– The contact will now be deleted from your Sony Xperia L1.
2. Will deleting a contact on the Sony Xperia L1 also delete it from connected accounts?
No, deleting a contact from the Sony Xperia L1 will only remove it from the local phonebook. If the contact is also saved in accounts like Google or Microsoft Exchange, it will remain there unless manually deleted from those accounts as well.
3. Is there a way to recover a deleted contact on the Sony Xperia L1?
If you have accidentally deleted a contact on your Sony Xperia L1, there might still be a way to recover it. Here’s what you can try:
– Open the Contacts app on your phone.
– Tap on the menu icon and select “Settings”.
– Look for an option like “Recycle Bin” or “Deleted Contacts.
– If available, open the recycle bin and check if the deleted contact is present.
– If you find the contact, select it and restore it to your phonebook.
4. Can I delete multiple contacts at once on the Sony Xperia L1?
Unfortunately, the Sony Xperia L1 does not have a built-in feature to delete multiple contacts at once. You would need to delete each contact individually by following the steps mentioned in the first FAQ.
5. What happens if I delete a contact with multiple phone numbers on the Sony Xperia L1?
When you delete a contact with multiple phone numbers on the Sony Xperia L1, all the associated phone numbers will be deleted along with the contact. If you want to keep any specific phone number, it is recommended to edit the contact and remove the unwanted phone numbers before deleting the contact.