
Are you a new iPhone user looking to transfer your contacts from a SIM card to your shiny new device? Well, you’ve come to the right place! In this article, we will guide you through the step-by-step process of importing your contacts from a SIM card to an iPhone.
Having your contacts readily available on your iPhone will make it easier for you to stay connected with friends, family, and colleagues. Whether you’ve just switched from an Android device or simply want to consolidate your contact list, importing your contacts to your iPhone is a simple and efficient way to keep all your important information in one place.
So, if you’re ready to bring your contacts into the iOS ecosystem, let’s dive into the process of importing contacts from a SIM to an iPhone!
Inside This Article
- How to Import Contacts from SIM to the iPhone (2023)
- Transfer Contacts using iCloud
- Import Contacts using a Third-Party App
- Import Contacts using the Settings App
- Import Contacts using the SIM Card Manager
- Conclusion
- FAQs
How to Import Contacts from SIM to the iPhone (2023)
Importing contacts from a SIM card to an iPhone can be a seamless process that allows you to easily transfer your contacts to your new device. Whether you’re switching from an Android phone or upgrading to a newer iPhone model, importing contacts from your SIM card ensures that you won’t lose any important phone numbers or contact information. In this guide, we’ll provide you with a step-by-step process to import your contacts, troubleshoot common issues you may encounter, and offer tips for managing your imported contacts on your iPhone.
Overview of SIM Card Contacts Transfer
A SIM (Subscriber Identity Module) card is a small chip that stores information such as your phone number, contacts, and text messages. When you insert a SIM card into your iPhone, it automatically detects and imports the contacts stored on the SIM card. This makes it easy to access your contacts without manually adding them one by one.
However, it’s important to note that not all contacts on a SIM card can be transferred to an iPhone. SIM cards have limited storage space, so they often store only basic contact information, such as phone numbers and names. Additional details, like email addresses, addresses, and notes, may not be transferred. Additionally, iPhone contact formats may differ from the SIM card format, which could result in some information being displayed differently or not imported at all.
Step-by-Step Guide: Importing Contacts from SIM to iPhone
Follow these steps to import your contacts from a SIM card to your iPhone:
- Ensure that your iPhone is powered off.
- Locate the SIM card tray on your iPhone. The tray is typically located on the side or top of the device, depending on the iPhone model.
- Insert a paperclip or SIM card removal tool into the small hole next to the SIM card tray to eject the tray.
- Remove the SIM card from your previous device and place it into the SIM card tray of the iPhone.
- Insert the SIM card tray back into the iPhone.
- Power on your iPhone, and the device will automatically detect and import the contacts from the SIM card.
- To confirm the import, go to the “Contacts” app on your iPhone and check if your contacts have been successfully transferred. You may need to wait for a few moments for the contacts to fully sync with your iPhone.
Troubleshooting Common Issues During the Transfer Process
If you encounter any issues during the contact transfer process, try the following troubleshooting steps:
- Ensure that the SIM card is properly inserted into the SIM card tray and securely placed in the iPhone.
- Check if the SIM card is compatible with your iPhone model.
- Restart your iPhone and try the import process again.
- If the contacts still don’t appear, navigate to “Settings” > “Contacts” and toggle on the “SIM Contacts” option.
- If you have a large number of contacts, it may take some time for them to sync and appear on your iPhone. Be patient and allow time for the transfer to complete.
Tips for Managing Imported Contacts on iPhone
Once you have successfully imported your contacts from your SIM card to your iPhone, here are some useful tips for managing them:
- Edit and update contact information directly from the “Contacts” app on your iPhone.
- Sync your contacts with iCloud to ensure they are securely backed up and accessible across all your Apple devices.
- Create contact groups to organize your contacts for easier access.
- Link duplicate contacts to merge them into a single entry.
- Use third-party contact management apps from the App Store for advanced contact organization and features.
Now you’re ready to import your contacts from your SIM card to your iPhone with ease. Follow the step-by-step guide, troubleshoot any issues that may arise, and manage your contacts efficiently on your iPhone. Enjoy the seamless transfer and keep all your important contacts at your fingertips!
Transfer Contacts using iCloud
One of the easiest ways to transfer contacts from one iPhone to another is by using iCloud. iCloud is Apple’s cloud storage and synchronization service that allows you to backup and sync your data, including contacts, across all your devices. Here’s a step-by-step guide on how to transfer contacts using iCloud:
1. Make sure both iPhones are connected to a Wi-Fi network and signed in to the same iCloud account.
2. On your old iPhone, go to “Settings” and tap on your name at the top of the screen. Then, select “iCloud” and make sure the “Contacts” option is enabled. This will ensure that your contacts are backed up to iCloud.
3. On your new iPhone, go through the initial setup process until you reach the “Apps & Data” screen. Select “Restore from iCloud Backup.”
4. Sign in to the same iCloud account that you used on your old iPhone. Choose the most recent backup that contains your contacts.
5. Allow your new iPhone to complete the restore process. This may take some time depending on the size of your backup and the speed of your internet connection.
6. Once the restore is complete, open the Contacts app on your new iPhone and verify that all your contacts have been transferred successfully.
By using iCloud, you can easily transfer your contacts from one iPhone to another without the need for a physical SIM card or any additional software. This method ensures that your contacts are securely backed up and synced across all your devices.
It’s important to note that if you’re transferring contacts to a non-Apple device, such as an Android phone, the iCloud method may not be applicable. In such instances, you can explore other methods like using third-party apps or exporting your contacts as a file.
Import Contacts using a Third-Party App
If you’re looking for an alternative method to import contacts from your SIM card to your iPhone, using a third-party app can be a convenient solution. There are several apps available on the App Store that can help you with this process.
One popular app for importing contacts is “My Contacts Backup.” This app allows you to backup your contacts to a VCF (vCard) file and then import them into your iPhone. Here’s how you can use this app to transfer your contacts:
- Download the “My Contacts Backup” app from the App Store and install it on your iPhone.
- Open the app and tap on the “Backup” button to create a backup of your contacts.
- Once the backup is created, tap on the “Email” button to send the backup file to your email address.
- Go to your email inbox and open the email containing the backup file.
- Tap on the backup file attachment and select the option to “Open in Contacts” or “Import to Contacts.”
- Your iPhone will automatically import the contacts from the backup file, and you’ll find them in the Contacts app.
Another useful app for importing contacts is “Simpler Contacts.” This app provides a simple and intuitive interface for transferring contacts from your SIM card to your iPhone. Here’s how you can use “Simpler Contacts” to import your contacts:
- Download the “Simpler Contacts” app from the App Store and install it on your iPhone.
- Open the app and tap on the “Import” button to initiate the contact import process.
- Select the option to import contacts from your SIM card.
- Follow the on-screen instructions to complete the import process.
- Once the import is complete, you’ll find your contacts in the Contacts app on your iPhone.
Using a third-party app to import contacts from your SIM card to your iPhone can be a convenient and efficient way to transfer your contacts. These apps often offer additional features, such as contact management and organization, which can help you keep your contacts organized on your iPhone.
It’s important to note that while third-party apps can be effective for importing your contacts, always ensure that you download apps from trusted sources and read reviews before installation.
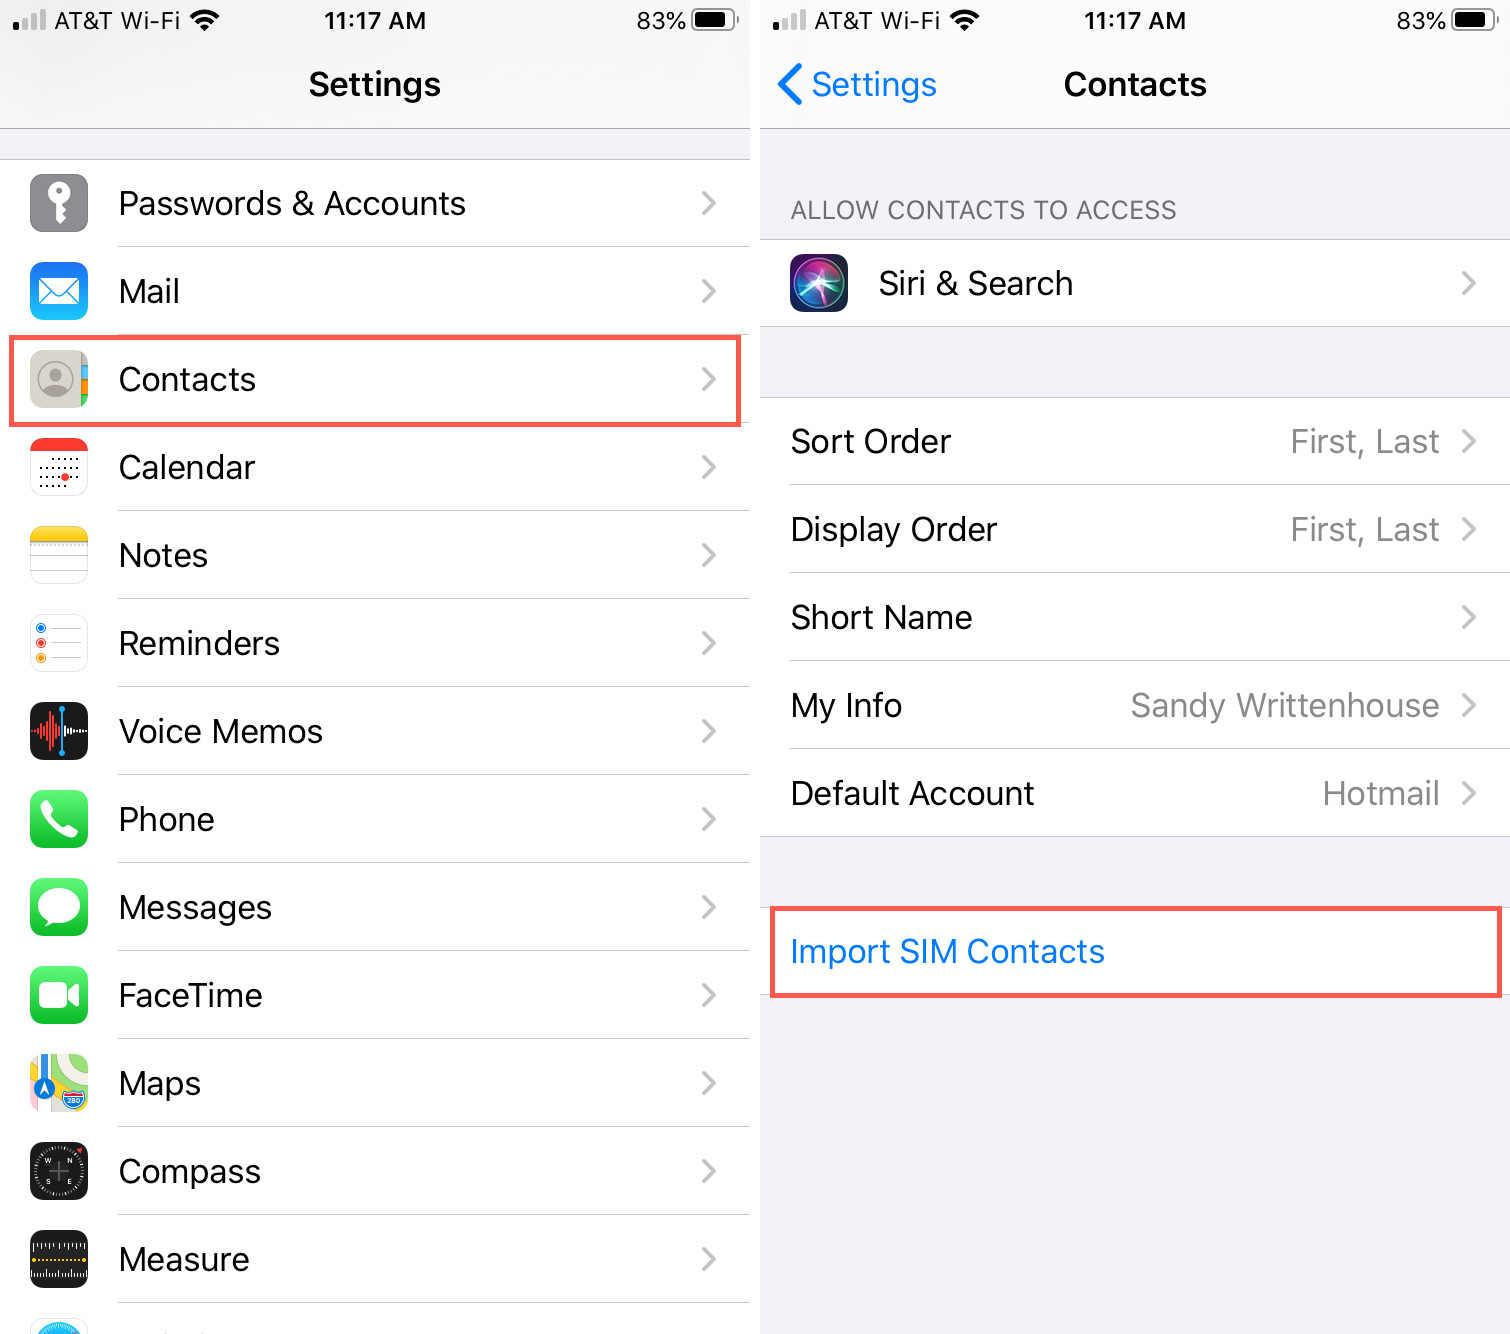
Import Contacts using the Settings App
One of the easiest ways to import contacts from a SIM card to your iPhone is by using the Settings app. This method allows you to quickly transfer all your contacts without the need for any additional apps or services.
Here’s a step-by-step guide on how to import your contacts using the Settings app:
- Insert your SIM card into the iPhone.
- Open the Settings app on your iPhone.
- Scroll down and tap on “Contacts”.
- Under the Contacts section, tap on “Import SIM Contacts”.
- Wait for your iPhone to detect and import the contacts from your SIM card.
- Once the import process is complete, you will see a confirmation message.
By following these simple steps, you can seamlessly import your contacts from your SIM card to your iPhone using the Settings app. This method ensures that all your contacts are quickly accessible on your iPhone, allowing you to easily make calls, send messages, and organize your contacts.
However, it’s important to note that the import process may vary slightly depending on the version of iOS running on your iPhone. But generally, the steps mentioned above should guide you through the process with ease.
If you encounter any issues during the import process, such as missing or incomplete contacts, there are a few troubleshooting steps you can try:
- Ensure that your SIM card is properly inserted into the iPhone.
- Restart your iPhone and try the import process again.
- If the issue persists, try using a different SIM card or contact your mobile service provider for assistance.
Once you have successfully imported your contacts, it’s a good idea to manage them effectively on your iPhone. Here are some tips to help you with contact management:
- Organize your contacts into groups or categories for easy navigation.
- Add additional details such as email addresses, birthdays, and addresses to each contact.
- Regularly back up your contacts to avoid any data loss.
- Sync your contacts with other devices or cloud services for seamless access across multiple platforms.
- Delete any duplicate or outdated contacts to keep your contact list clean and clutter-free.
By following these tips, you can ensure that your imported contacts are well-managed and easily accessible on your iPhone.
Import Contacts using the SIM Card Manager
Importing contacts to your iPhone from a SIM card can be easily done using the SIM Card Manager feature. This convenient tool allows you to transfer your contacts from your SIM card to your iPhone in just a few simple steps.
To begin, make sure your iPhone is powered on and unlocked. Insert the SIM card containing the contacts you wish to import into the iPhone’s SIM card tray. Once inserted, follow these steps:
- Open the Settings app on your iPhone. It’s the gear-shaped icon typically found on the home screen.
- Scroll down and tap on “Contacts”.
- Tap on “Import SIM Contacts”.
- Wait for your iPhone to detect and import the contacts from the SIM card. This process can take a few moments depending on the number of contacts being transferred.
- Once the import is complete, you will see a confirmation message. Tap on “Done” to finish the process.
That’s it! Your contacts have now been successfully imported to your iPhone using the SIM Card Manager. You can now access and manage your contacts through the Contacts app on your device.
Please note that the SIM Card Manager feature is only available on iPhones running iOS 13 or later. If you are using an earlier version of iOS, you may need to use alternative methods to import your contacts.
If you encounter any issues during the import process, here are some troubleshooting tips:
- Make sure the SIM card is properly inserted into the iPhone’s SIM card tray.
- Ensure that the contacts on the SIM card are not locked or protected with a PIN code.
- Restart your iPhone and attempt the import process again.
- If the issue persists, try using a different SIM card or contact your mobile service provider for further assistance.
Once you have successfully imported your contacts, it’s important to manage them efficiently on your iPhone. Here are some tips:
- Organize your contacts into groups or categories for easier navigation.
- Regularly update and backup your contacts to avoid any loss of data.
- Take advantage of contact management apps available on the App Store to enhance your contact organization and synchronization capabilities.
Conclusion
The process of importing contacts from your SIM card to the iPhone is straightforward and can be done in just a few simple steps. By following the guidelines provided in this article, you can easily transfer all your important contacts to your new iPhone, ensuring that you have all the necessary information readily available at your fingertips.
Remember, having your contacts easily accessible on your phone is essential for staying connected and organized. So, whether you’re switching to a new iPhone or simply want to back up your contacts for safekeeping, follow the steps outlined in this guide to effortlessly import your SIM contacts to your iPhone.
With this knowledge, you can confidently manage your contacts and enjoy a seamless transition to your new iPhone, without the hassle of manually adding each contact one-by-one. So go ahead, take advantage of the convenient import feature and have all your contacts readily available on your iPhone with just a few simple taps!
FAQs
1. Can I import contacts from my SIM card to an iPhone?
Yes, you can import contacts from your SIM card to an iPhone. The process is quite simple and can be done directly on your iPhone’s settings.
2. How do I import contacts from my SIM card to an iPhone?
To import contacts from your SIM card to an iPhone, follow these steps:
1. Insert your SIM card into your iPhone.
2. Open the “Settings” app on your iPhone.
3. Scroll down and tap “Contacts”.
4. Select “Import SIM Contacts”.
5. Wait for the import process to complete.
Once the import is done, your contacts will be available on your iPhone’s Contacts app.
3. Will importing contacts from my SIM card erase any existing data on my iPhone?
No, importing contacts from your SIM card to an iPhone will not erase any existing data on your device. It will only add the contacts from your SIM card to your iPhone’s Contacts app.
4. Is it possible to import contacts from multiple SIM cards to an iPhone?
Yes, if you have multiple SIM cards with contacts that you want to import to your iPhone, you can do so. Simply insert the SIM cards one by one into your iPhone and follow the steps mentioned earlier to import the contacts.
5. What if I have a large number of contacts on my SIM card?
If you have a large number of contacts on your SIM card, the import process may take a few minutes to complete. Please be patient and avoid interrupting the process. Once the import is done, you will have access to all your contacts on your iPhone.