
In the world of mobile phones, finding the perfect phone case is essential. Whether it’s for protection, style, or customization, a phone case adds a touch of personality to our beloved devices. But there are times when we need to remove our phone case – whether it’s to clean it, switch to a different one, or access certain features. In this article, we will explore the different methods and techniques to safely and easily remove a phone case from various models. From the popular iPhone to Android devices, we’ll provide step-by-step instructions to ensure a seamless process. So, if you’re wondering how to remove your phone case without any hassle, look no further. Let’s dive in and discover the tricks to successfully removing your phone case with ease!
Inside This Article
- Why remove a phone case?
- Step-by-step guide to removing a phone case
- Additional Tips and Precautions
- Conclusion
- FAQs
Why remove a phone case?
A phone case serves as a protective shield for your beloved mobile device, shielding it from accidental drops, scratches, and other potential damage. It adds a layer of defense and style to your phone, making it an essential accessory for many users. However, there are situations where removing the phone case becomes necessary. Let’s explore a few reasons why you might need to take off your phone case:
1. Cleaning and maintenance: Over time, your phone case can accumulate dust, lint, and dirt, both on the outer surface and within the corners and crevices. Regular cleaning is important to maintain the hygiene and appearance of your phone. Removing the case allows for thorough cleaning, ensuring that no debris is left trapped against your device.
2. Accessibility: Some phone cases, especially those with a rugged design or extra protective features, can make it more challenging to access certain ports, buttons, or features of your phone. Removing the case grants you full access to all the functionalities without any hindrance.
3. Heat dissipation: We know that smartphones tend to generate heat during extended usage. A phone case, while providing protection, may also restrict the heat dissipation process. In some cases, removing the case can help in cooling down your phone and prevent overheating issues.
4. Style and customization: Many users like to switch between different phone cases to match their mood, outfit, or occasion. Removing the current case allows for effortless swapping to suit your style preferences, keeping your phone fresh and fashion-forward.
5. Troubleshooting and repairs: When encountering technical issues or seeking professional repairs, it is often required to remove the phone case. It provides easy access to the internal components or the possibility of detaching the case from the phone for necessary investigations or fixes.
While a phone case is valuable in safeguarding your device, there are instances where removing it becomes necessary. Whether for cleaning purposes, better accessibility, heat dissipation, style changes, or repairs, knowing how to remove your phone case correctly is crucial to maintain the longevity and functionality of your mobile phone.
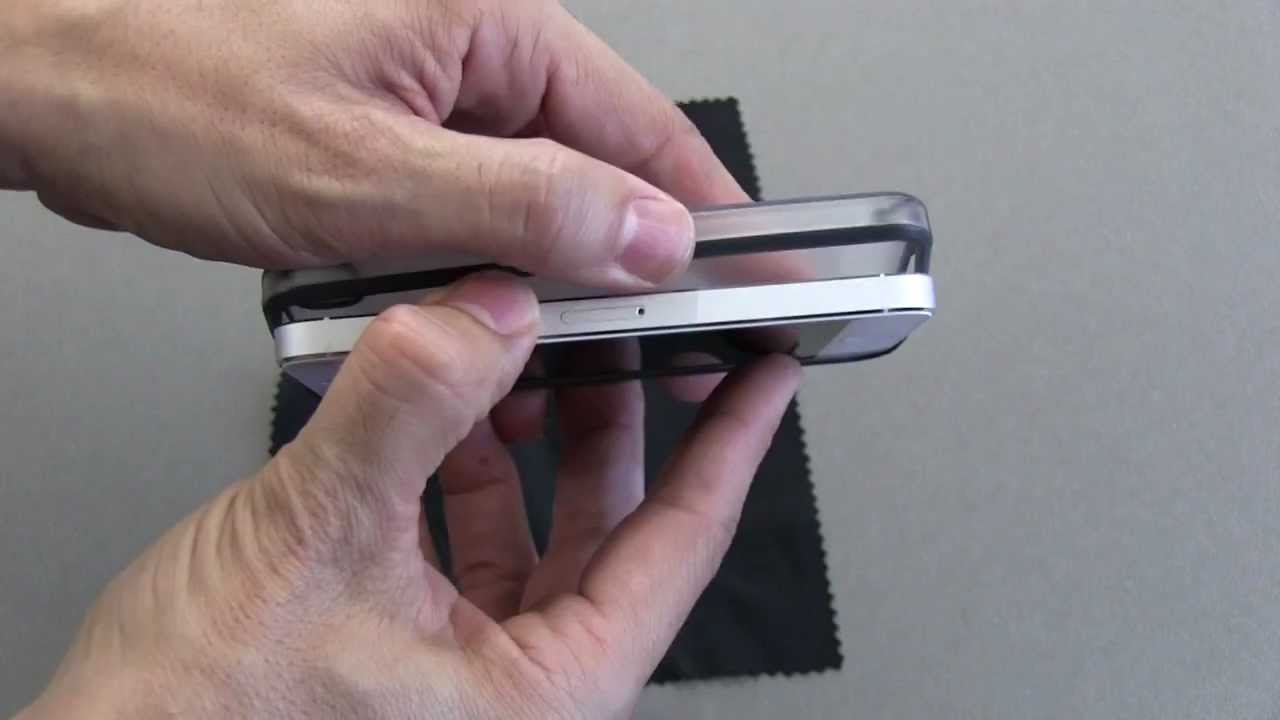
Step-by-step guide to removing a phone case
Removing a phone case may seem simple, but sometimes it can be tricky if you don’t know the right technique. Whether you’re changing your phone case for a new one or need to remove it for maintenance purposes, follow these step-by-step instructions:
- Power off your phone: Before removing the case, ensure that your phone is powered off. This will prevent any accidental button presses or screen interactions while you’re handling the case.
- Locate the edges: Look for the edges or seams of the phone case. Most cases have a two-piece design with a top and bottom piece that snap together. Some may have a single-piece design that wraps around the phone.
- Start from a corner: Begin by gently prying open the case from one corner using your finger or a thin, non-metallic tool such as a plastic opening tool or a credit card.
- Work your way around: Once you’ve loosened one corner, proceed to work your way around the edges of the phone case, gradually separating the case from the phone. Be careful not to use excessive force to avoid damaging your phone or the case.
- Remove the case: Once you have successfully loosened all the edges, the phone case should easily come off. Gently lift it away from the phone and set it aside.
- Inspect for residue: After removing the case, take a moment to inspect both the phone and the case for any residue or dirt that may have accumulated. Clean any residue using a soft cloth or a gentle cleaning solution suitable for smartphones.
That’s it! You have successfully removed the phone case and are ready to either install a new one or enjoy your phone in its naked glory. Remember to handle the phone with care when it’s without a case, as it may be more vulnerable to accidental drops or scratches.
If you encounter any difficulties in removing the phone case or if the case is stubbornly stuck, it’s advisable to consult the manufacturer’s instructions or seek assistance from a professional technician to avoid any unintentional damage to your phone.
Before removing the case, it’s worth noting that certain phone cases may have specialized installation mechanisms, such as flip cases or waterproof cases. In such cases, refer to the manufacturer’s instructions for specific removal guidelines to ensure the proper handling of your phone case.
Additional Tips and Precautions
When removing a phone case, there are a few additional tips and precautions that you should keep in mind to ensure a safe and effective process. Here are some important things to consider:
1. Handle with care: While removing a phone case may seem like a simple task, it’s important to handle your phone with care. Avoid using excessive force or prying too hard, as this could potentially damage the phone or its components.
2. Clean before removing: Before you start removing the phone case, make sure to clean the exterior of your phone. This helps to remove any dirt, dust, or debris that may have accumulated on the surface, minimizing the chances of scratching your phone during the process.
3. Remove attachments and accessories: If your phone case has any attachments or accessories, such as pop sockets or card holders, it’s a good idea to remove them before attempting to take off the case. This makes it easier to maneuver and reduces the risk of accidentally damaging them.
4. Follow the manufacturer’s instructions: Different phone cases may have unique mechanisms or features for attachment and removal. It’s always recommended to consult the manufacturer’s instructions or guidelines specific to your phone case to ensure you follow the correct procedure.
5. Check for any latches or locks: Some phone cases may have latches or locks that secure the case in place. Before you start removing the case, check for any such mechanisms and unlock or release them accordingly. This prevents any unnecessary resistance when trying to remove the case.
6. Watch out for fragile parts: Pay attention to any fragile parts of your phone, such as the camera lenses or buttons. When removing the case, be cautious not to put excessive pressure on these sensitive areas to avoid damage.
7. Inspect for damage: While removing the phone case, take a moment to inspect it for any signs of damage. Check for cracks, dents, or loose parts that may require immediate attention or replacement.
8. Keep a backup case: If you frequently change phone cases, it’s always handy to have a backup case available. This allows you to switch cases without leaving your phone vulnerable or unprotected.
9. Take your time: Removing a phone case should be done with patience and care. Rushing through the process increases the risk of accidental damage. Take your time to ensure a smooth and safe removal.
10. Seek professional help if needed: If you encounter any difficulties or if you’re unsure about removing your phone case, don’t hesitate to seek professional help. It’s better to be safe than sorry when it comes to your valuable device.
By following these additional tips and precautions, you can confidently remove your phone case without any mishaps and keep your device protected. Remember to handle your phone with care and always prioritize its safety throughout the process.
Conclusion
Removing a phone case might seem like a simple task, but it’s important to handle it with care to avoid any damage to your device. By following the right steps and using the appropriate techniques, you can efficiently and safely remove your phone case without any hassle.
Remember to always read the manufacturer’s instructions for your specific phone case model. If you encounter any difficulties or have concerns, it’s best to seek assistance from professionals or contact the phone case manufacturer for guidance.
By regularly removing and cleaning your phone case, you can maintain the cleanliness and functionality of your device. So, when the time comes for a new phone case or a change in style, you’ll know exactly how to remove and replace it without any worries.
Now that you’re equipped with the necessary knowledge, go ahead and confidently remove your phone case whenever the need arises!
FAQs
1. Why should I remove my phone case?
Removing your phone case periodically is important for several reasons. It allows you to clean the phone and case separately, preventing any dirt or grime from accumulating in hard-to-reach areas. It also gives your phone a chance to ‘breathe’ by allowing proper airflow, which can help prevent overheating and potential performance issues. Lastly, removing the case allows you to inspect the phone for any signs of damage or wear and tear.
2. How often should I remove my phone case?
The frequency of removing your phone case depends on personal preference and usage. As a general guideline, it is recommended to remove your phone case at least once a month to thoroughly clean both the case and the phone. However, if you work in a dusty or dirty environment or frequently drop your phone, you may want to remove the case more often.
3. How do I safely remove a phone case?
To safely remove a phone case, start by locating the opening or seams on the case. Gently apply pressure or use a small tool like a fingernail to pry the edges apart. Be cautious and avoid using excessive force, as this can potentially damage your phone or the case. Once the case is partially open, carefully slide your phone out of the case, ensuring not to drop or scratch it in the process.
4. Can removing the phone case void my warranty?
In most cases, removing the phone case does not void the warranty. Manufacturers understand that users may need to clean or inspect their devices periodically. However, if any damage occurs to the phone during the removal of the case, it may not be covered under warranty. It’s always a good idea to consult your phone’s warranty documentation or contact the manufacturer for clarification.
5. Should I replace the phone case after removing it?
Replacing the phone case after removing it is advisable, as it provides protection against bumps, scratches, and accidental drops. Additionally, a well-fitted case ensures that the phone’s ports and buttons are easily accessible and protected from dust and debris. Make sure to clean the case before putting it back on to maintain its longevity and ensure hygiene.