
Welcome to the world of Galaxy phones! If you’re looking to harness the power of your Samsung Galaxy device to scan documents, we’ve got you covered. Scanning on your Galaxy phone is an efficient and convenient way to digitize your important papers, receipts, or even handwritten notes. With just a few taps, you’ll be able to create high-quality digital copies that can be easily stored, shared, or edited. In this article, we’ll guide you step by step through the process of scanning documents on your Galaxy phone. Whether you’re a student, a business professional, or simply someone who wants to declutter their physical files, scanning on your Galaxy phone is a game-changer. Let’s dive in and discover the wonders of scanning on your Samsung Galaxy device.
Inside This Article
- How to Scan on Galaxy Phone
- Step 1: Open the Camera App
- Step 2: Access the Scanner Mode
- Step 3: Position the Document
- Step 4: Capture the Document
- Step 5: Adjust the Scan Settings
- Step 6: Save and Share the Scanned Document
- Troubleshooting Tips
- Conclusion
- FAQs
How to Scan on Galaxy Phone
Scanning documents on your Galaxy phone is a convenient way to digitize physical documents, receipts, or handwritten notes. The built-in scanner feature on Galaxy phones allows you to easily capture high-quality scans with just a few simple steps. In this article, we will guide you through the process of scanning on your Galaxy phone, so you can effortlessly digitize your important documents.
Step 1: Open the Camera App
To begin scanning, open the camera app on your Galaxy phone. You can access the camera app directly from the home screen or the app drawer. Look for the camera icon and tap on it to launch the app.
Step 2: Access the Scanner Mode
Once you have opened the camera app, you need to access the scanner mode. To do this, look for the scanning icon on the camera interface. It is usually located in the top-center or bottom-right corner of the screen. Tap on the scanner icon to enter the scanner mode.
Step 3: Position the Document
Now that you are in the scanner mode, you need to position the document you want to scan. Place the document on a flat surface with good lighting. Ensure that the document is aligned properly and fully visible within the borders displayed on your screen.
Step 4: Capture the Document
Once the document is properly positioned, tap the shutter button to capture the scan. Your Galaxy phone will automatically capture the image and convert it into a high-quality scan. You can also use the volume buttons as a shutter button for convenience.
Step 5: Adjust the Scan Settings
After capturing the document, you have the option to adjust the scan settings. Galaxy phones offer various options to enhance the scan, such as adjusting the brightness, contrast, or cropping the image. You can access these settings by tapping on the editing tools icon, which usually looks like a pencil or a wand.
Step 6: Save and Share the Scanned Document
Once you are satisfied with the scan and any adjustments you made, it’s time to save and share your scanned document. Tap on the save or done button to save the scan to your phone’s gallery or a specific folder. You can also choose to share the scan directly from the scanning app to other apps or via email.
Troubleshooting Tips
If you encounter any issues while scanning on your Galaxy phone, here are a few troubleshooting tips:
- Ensure good lighting: Make sure the document is well-lit to avoid dark or blurry scans.
- Check the document alignment: Ensure that the document is properly aligned within the borders on the screen to prevent any part from being cut off in the scan.
- Clean your camera lens: If the scan quality is poor, clean the camera lens to remove any dust or smudges that might affect the image clarity.
- Update your phone’s software: Keeping your phone’s software up to date can help resolve any compatibility issues with the scanning feature.
Step 1: Open the Camera App
Opening the camera app is the first step in using your Galaxy phone to scan documents. The camera app is usually located on your home screen or in the app drawer. Look for the camera icon, which is a white circle with a camera icon inside.
Simply tap on the camera icon to open the camera app. If it is your first time using the camera app, you may need to grant permission for the app to access your device’s camera and storage. Once you have granted the necessary permissions, the camera app will open and you will be ready to start scanning.
It is important to note that the steps mentioned here may vary slightly depending on the model and version of your Galaxy phone. However, the general process of opening the camera app should be similar across different Galaxy devices.
Now that you have successfully opened the camera app, you can proceed to the next step and start accessing the scanner mode to scan your documents using your Galaxy phone.
Step 2: Access the Scanner Mode
Once you have opened the camera app on your Galaxy phone, accessing the scanner mode is a breeze. Follow these simple steps to get started:
- Look for the “More” option on the camera app interface. It is usually represented by three dots or lines, depending on your phone’s model.
- Tap on the “More” option to reveal a dropdown menu. Scroll through the options until you find the “Scanner” or “Scan” mode.
- Select the “Scanner” or “Scan” mode by tapping on it. This will switch the camera app to the scanning functionality.
Once you have accessed the scanner mode, you are ready to scan your documents with ease. The scanner mode offers various features and settings to enhance the scanning process and optimize the quality of the scanned documents.
Step 3: Position the Document
Once you have accessed the scanning mode on your Galaxy phone, the next step is to position the document correctly for the best scan. Ensuring that the document is well-aligned and centered within the camera frame will help generate a clear and accurate scan.
Here’s a breakdown of how to position the document:
- Hold your Galaxy phone steady, keeping it parallel to the document surface.
- Avoid any tilting or angling of the phone, as it can distort the scan.
- If possible, find a well-lit area to ensure optimal visibility of the document.
- Place the document on a flat surface, making sure it doesn’t have any folds or creases that could hinder the scanning process.
- Adjust the distance between your phone and the document to ensure the entire document is captured within the camera frame.
- Check that all edges of the document are visible and not cut off.
By following these positioning guidelines, you can improve the overall quality of the scan and avoid any errors or inaccuracies. Taking a few extra moments to position the document properly can save you time and frustration in the long run.
Step 4: Capture the Document
Once you have positioned the document correctly, it’s time to capture the scan. The process of capturing the document may vary slightly depending on the model of your Galaxy phone. However, the following steps outline the general procedure.
First, ensure that the document is in focus on your phone’s screen. Tap on the capture button, which is often represented by a circular icon or simply the word “Capture”. A shutter sound or a visual animation will indicate that the document has been successfully captured.
Make sure to hold your phone steady while capturing the document to avoid any blurriness. If needed, you can use the grid lines on your phone’s screen as a guide to ensure proper alignment.
After capturing the document, you will have the option to review and edit the scan. Most Galaxy phones offer basic editing tools, such as cropping, rotating, or adjusting the brightness and contrast of the scanned document. Take advantage of these features to enhance the scan quality if necessary.
Once you are satisfied with the captured document, tap on the save or done button. This will store the scanned document in your phone’s gallery or designated scanning app, depending on your device’s settings.
Keep in mind that some Galaxy phones also offer an option to capture multiple pages as a single document. If you have more than one page to scan, you can easily switch to the multi-page mode and continue capturing additional pages.
It’s important to mention that the location and accessibility of the capture button may vary on different Galaxy phone models. Familiarize yourself with the camera interface of your specific device to locate and use the capture function effectively.
By following these steps, you can successfully capture the document using your Galaxy phone’s scanning capability. Remember to review and save the scan before moving on to the next steps of the scanning process.
Step 5: Adjust the Scan Settings
After capturing the document on your Galaxy phone, you have the option to adjust the scan settings for optimal results. The scan settings allow you to customize various aspects of the scanned document, such as brightness, contrast, color mode, and resolution. Here’s how to adjust the scan settings on your Galaxy phone:
1. Once you have captured the document, tap on the “Edit” or “Adjust” button, depending on the camera app you’re using. This will bring up the editing tools or settings menu.
2. Look for the option to adjust the scan settings. This may be represented by a gear icon, a settings menu, or specific sliders for brightness and contrast.
3. Tap on the appropriate option or sliders to access the scan settings. You may have options such as brightness, contrast, color mode (black and white, grayscale, or color), and resolution.
4. To adjust the brightness or contrast, drag the respective sliders left or right to increase or decrease the level. This allows you to make the document clearer or adjust the overall image quality.
5. If you want a black and white scan, select the “Black and White” or “Grayscale” color mode. This is ideal for documents with text or simple images.
6. Adjust the resolution according to your needs. Higher resolutions result in larger file sizes, while lower resolutions may affect the quality of the scan. Choose a resolution that balances both factors.
7. Once you have made the desired adjustments, tap on the “Apply” or “Save” button to save the settings.
8. Review the scanned document with the adjusted settings to ensure it meets your requirements. If necessary, repeat the previous steps to fine-tune the settings.
9. After you’re satisfied with the scan settings, tap on the “Save” or “Done” button to finalize the changes and save the scanned document.
By adjusting the scan settings on your Galaxy phone, you can optimize the quality and appearance of the scanned documents. This allows you to fine-tune the output based on the type of document and your specific requirements.
Step 6: Save and Share the Scanned Document
Once you have successfully captured the document using the scanning feature on your Galaxy phone, it’s time to save and share it. Follow these simple steps to complete the process:
1. After capturing the document, you will be presented with the scanned image on your screen. Take a moment to review it and make sure the scan is clear and readable.
2. If you are satisfied with the scan, tap on the “Save” button, usually located in the top-right corner of the screen. This action will save the scanned document to your phone’s gallery or the default document scanning app.
3. Alternatively, if you want to make any adjustments to the scanned document before saving it, tap on the “Edit” button. This will allow you to crop, resize, or enhance the scan to your liking. Once you are done editing, tap on the “Save” button to save the changes.
4. After saving the document, you can access it from your phone’s gallery or the document scanning app. Depending on your preference, you can rename the file or add any necessary tags or labels to make it easier to find later.
5. To share the scanned document with others, locate the sharing option within the document scanning app or your phone’s gallery. This option is typically represented by an icon depicting an arrow pointing out of a square. Tap on this icon to proceed.
6. You will now be presented with various sharing options, such as Bluetooth, email, messaging apps, or cloud storage services. Choose the desired method of sharing that suits your needs.
7. If you select email, messaging apps, or any other similar sharing method, you will be prompted to choose the recipient or recipients from your contacts. Enter the necessary details and tap on the “Send” button to share the scanned document.
8. If you choose a cloud storage service like Google Drive or Dropbox, you will be asked to log in to your account and grant necessary permissions. Once that is done, select the destination folder where you want to save the document and click on the “Upload” or “Save” button.
9. Congratulations! You have successfully saved and shared the scanned document from your Galaxy phone. The recipient(s) will now be able to access and view the document based on the sharing method you selected.
Now you can confidently utilize the scanning feature on your Galaxy phone to digitize documents, receipts, or any other paper-based information with ease. Whether it’s for personal or professional use, the convenience of scanning and sharing documents directly from your phone is unmatched.
Troubleshooting Tips
Even with the most advanced technology, there may be times when you encounter issues while scanning on your Galaxy phone. But don’t worry, we’re here to help you troubleshoot and overcome any obstacles you may face. Here are some handy tips to get you back on track:
1. Ensure Sufficient Lighting: When scanning documents, make sure you have adequate lighting. Insufficient lighting can result in blurry or low-quality scans. Consider moving to a well-lit area or adjusting your phone’s exposure settings if available.
2. Check Camera Focus: Double-check that the camera lens on your Galaxy phone is clean and free of any obstructions. If the lens is dirty, it can affect the clarity of your scans. Use a soft, lint-free cloth to gently clean the lens if necessary.
3. Position the Document Properly: Proper positioning of the document is crucial for accurate scans. Place the document flat on a stable surface and ensure it is aligned with the edges of your phone’s screen. This helps prevent any distortions or skewed scans.
4. Restart the Camera App: If you’re experiencing technical glitches or the scanning function is not working correctly, try closing the camera app and reopening it. This simple restart can sometimes resolve temporary software issues.
5. Update Your Phone’s Software: Ensure that your Galaxy phone’s software is up to date. Manufacturers often release software updates that address bugs and improve performance. Keeping your phone updated can help enhance the scanning experience.
6. Clear Cache and Data: If you have been using the scanning feature for a while and are experiencing persistent issues, clearing the cache and data of the camera app can sometimes solve the problem. This action resets the app to its default state and clears any temporary files or corrupted data.
7. Use a Third-Party Scanning App: If the built-in scanning feature on your Galaxy phone still isn’t meeting your needs, consider trying a third-party scanning app from the Google Play Store. These apps often offer additional features and customization options that may better suit your requirements.
8. Contact Customer Support: If all else fails and you’re still experiencing difficulties with scanning on your Galaxy phone, reach out to the customer support team of your phone manufacturer or service provider. They will have the expertise to provide further guidance and assistance.
Now armed with these troubleshooting tips, you can confidently overcome any scanning issues you may encounter while using your Galaxy phone. Enjoy the convenience and efficiency of document scanning right at your fingertips!
Conclusion
Scanning on your Galaxy phone is a powerful and convenient feature that allows you to digitize documents, photos, and barcodes with ease. Whether you need to save important paperwork, capture a memorable moment, or quickly access information from barcodes, your Galaxy phone has the tools to make it happen.
Throughout this article, we’ve explored the various methods available for scanning on your Galaxy phone. From the built-in camera app to third-party scanning apps, there are plenty of options to suit your needs. By following the step-by-step instructions and utilizing the tips provided, you’ll be able to unleash the full scanning potential of your Galaxy phone.
Remember to keep your phone updated with the latest software and take advantage of the available features to enhance your scanning experience. So whether you’re a student, a professional, or someone who simply wants to go paperless, scanning on your Galaxy phone is a game-changer that simplifies your life.
So grab your Galaxy phone, harness its scanning capabilities, and digitize your world with just a few taps!
FAQs
1. How do I scan documents on my Galaxy phone?
To scan documents on your Galaxy phone, follow these steps:
1. Open the camera app on your phone.
2. Point the camera at the document you want to scan, ensuring that it is well-lit and in focus.
3. Look for the document scan mode or option in your camera app. It is usually represented by a document icon or labeled as “Scan” or “Document Scan.”
4. Tap on the document scan mode or option to activate it.
5. Align the document within the boundaries displayed on the screen.
6. Once aligned, the camera app will automatically capture the document.
7. Review the captured scan and make any necessary adjustments or edits.
8. Save the scanned document to your desired location on your phone or cloud storage.
That’s it! You have successfully scanned a document on your Galaxy phone.
2. Can I convert scanned documents into editable text on my Galaxy phone?
Yes, you can convert scanned documents into editable text on your Galaxy phone through the use of Optical Character Recognition (OCR) technology. OCR analyzes the scanned document’s text and converts it into editable text that can be copied, modified, and saved in various formats.
To convert a scanned document into editable text on your Galaxy phone:
1. Open the document in a document editing app or in Google Drive.
2. Tap the three-dot menu icon and look for the option to “Extract Text” or “Convert to Text.”
3. Select this option and wait for the OCR process to complete.
4. Once completed, you can edit and modify the extracted text as needed.
3. Are there any recommended document scanning apps for Galaxy phones?
Yes, there are several highly-rated document scanning apps available for Galaxy phones. Some of the popular ones include:
– Adobe Scan: This app offers powerful scanning features, OCR capabilities, and cloud storage integration.
– Microsoft Office Lens: Microsoft’s scanning app that can convert scanned documents into Word, PowerPoint, or PDF files.
– CamScanner: Offers advanced scanning features, automatic edge detection, and the ability to collaborate and share scanned documents.
– Google Drive: The Google Drive app has a built-in scanning feature that can scan and save documents directly to your Drive storage.
These apps provide convenient scanning options and often have additional features like automatic cropping, image enhancement, and cloud synchronization.
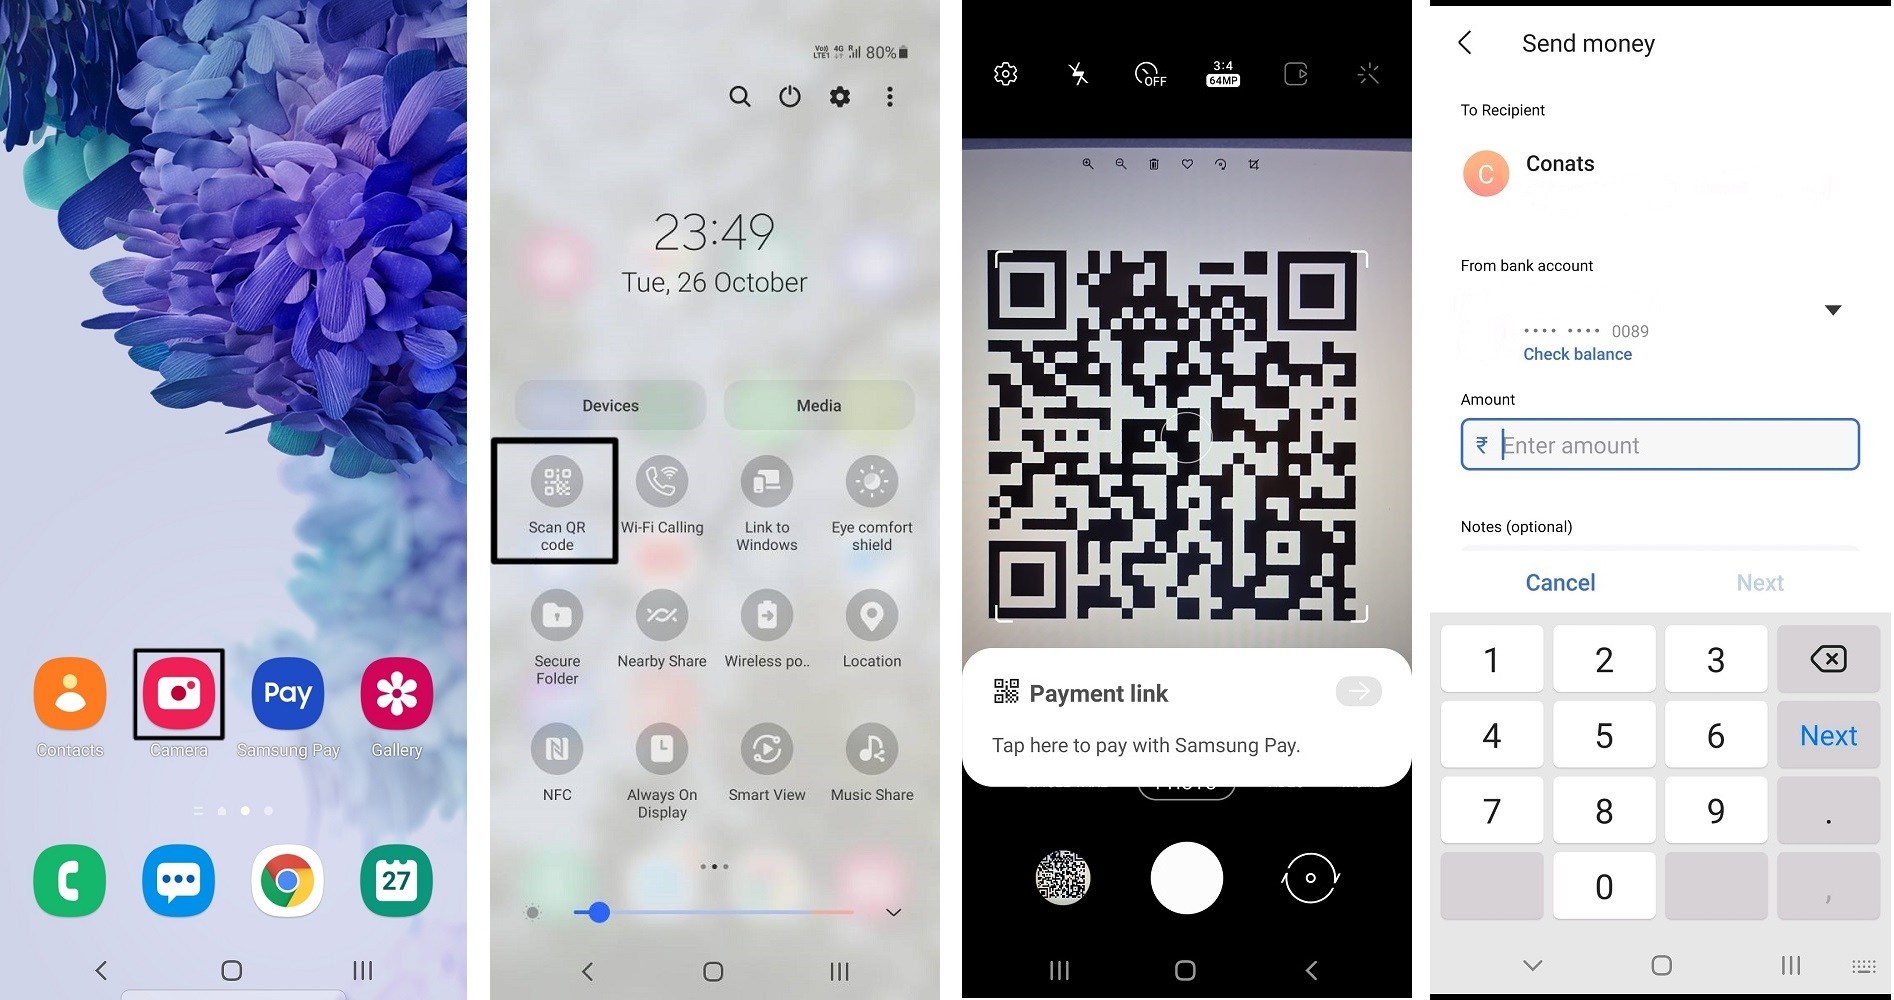
4. Can I scan QR codes or barcodes on my Galaxy phone?
Yes, Galaxy phones have native support for scanning QR codes and barcodes. To scan a QR code or barcode on your Galaxy phone, follow these steps:
1. Open the camera app on your phone.
2. Point the camera at the QR code or barcode.
3. Ensure that the code is well within the frame and properly aligned.
4. The camera app will automatically recognize the code and provide relevant information or prompt an action.
You may need to enable the QR code scanning feature in your camera app’s settings if it is not already enabled. Some Galaxy phones also offer a dedicated QR code scanning feature in the quick settings panel.
5. Can I scan multiple pages and save them as a single PDF on my Galaxy phone?
Yes, you can scan multiple pages and save them as a single PDF on your Galaxy phone. Many document scanning apps, such as Adobe Scan and CamScanner, offer this feature. To do this:
1. Open the scanning app on your phone.
2. Select the “Scan” or “Document Scan” option.
3. Place the first page of your document within the scanning area and capture the scan.
4. After capturing, look for an option to “Add Page” or “Scan Next Page.”
5. Continue adding pages until you’ve scanned all the necessary pages of your document.
6. Once you’ve finished scanning, look for an option to “Save as PDF” or “Merge as PDF.”
7. Save the merged PDF document to your desired location on your phone or cloud storage.
Now you have a single PDF file containing all the scanned pages of your document.