
In today’s fast-paced digital world, staying connected is more crucial than ever. One of the key components of mobile connectivity is the Subscriber Identity Module (SIM) card. If you own an iPhone and are looking to switch your SIM card, you’ve come to the right place. Whether you’re upgrading to a new phone, switching carriers, or traveling internationally, knowing how to switch your SIM card can save you time and frustration. In this article, we will guide you through the process of switching the SIM card on your iPhone, providing step-by-step instructions and helpful tips along the way. So, let’s dive in and ensure you stay connected wherever your journey takes you!
Inside This Article
- Overview
- Step 1: Power off your iPhone
- Step 2: Locate the SIM card tray
- Step 3: Eject the SIM card tray using a SIM eject tool or paperclip
- Step 4: Remove the current SIM card from the tray
- Step 5: Insert the new SIM card into the tray
- Step 6: Reinsert the SIM card tray into the iPhone
- Step 7: Power on your iPhone and activate the new SIM card
- Troubleshooting Tips for SIM card switching issues
- Conclusion
- FAQs
Overview
Switching the SIM card on your iPhone may be necessary if you are changing carriers, traveling abroad, or upgrading to a new iPhone model. The SIM card is a small, removable card that stores your mobile phone’s information, including your phone number and carrier details. By following a few simple steps, you can easily switch the SIM card on your iPhone and get back to using your device with a new carrier or updated information.
In this article, we will guide you through the process of switching the SIM card on your iPhone. We will explain how to remove the SIM card tray, insert the new SIM card, and activate it. Whether you have the latest iPhone model or an older one, the process remains relatively the same, allowing you to switch your SIM card quickly and hassle-free.
Before we dive into the steps, it’s important to note that while switching the SIM card on your iPhone is a relatively straightforward process, it’s always a good idea to back up your device and ensure you have any necessary activation information or carrier settings handy. This will help to avoid any potential issues and ensure a smooth transition.
Step 1: Power off your iPhone
Before you begin the process of switching your SIM card on your iPhone, it is important to power off your device. This will ensure that you can safely handle the SIM card and avoid any potential damage to your phone or the SIM card itself.
To power off your iPhone:
- Press and hold the power button, which is typically located on the right-hand side or the top of the device.
- A slider will appear on the screen with the option to “slide to power off.”
- Slide the button from left to right to power off your iPhone.
By following these steps, you can ensure that your iPhone is turned off and ready for the SIM card removal process. Remember to be gentle when handling your iPhone and avoid applying excessive force to any components.
Step 2: Locate the SIM card tray
Locating the SIM card tray on your iPhone is essential for switching SIM cards. Follow these steps to find the SIM card tray:
- First, make sure your iPhone is powered off. This will prevent any damage to the device or the SIM card during the process.
- Take a look at the sides of your iPhone. On most models, the SIM card tray is located on the right side, near the volume buttons.
- On some older models, like the iPhone 4 and 4S, the SIM card tray can be found on the top of the device.
Keep in mind that the location of the SIM card tray may vary slightly depending on the specific iPhone model you have. Refer to your iPhone’s user manual or Apple’s support website for more detailed information if needed.
Once you have located the SIM card tray, you’re ready to move on to the next step of the process.
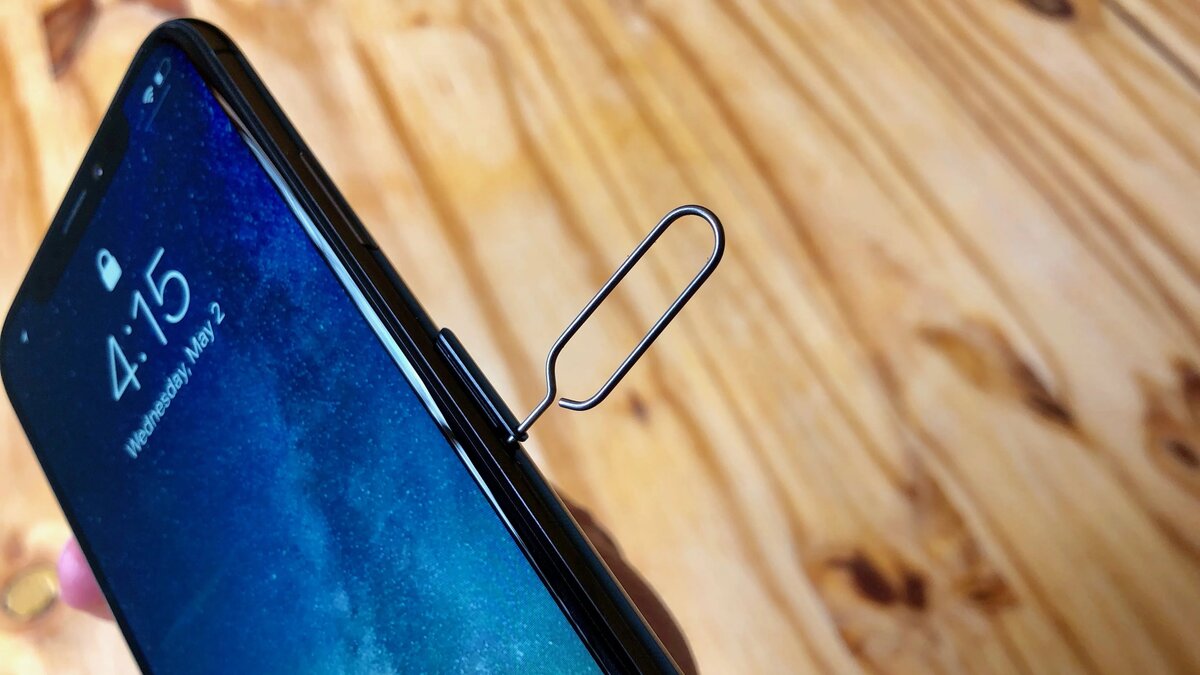
Step 3: Eject the SIM card tray using a SIM eject tool or paperclip
Switching the SIM card on your iPhone requires you to eject the existing SIM card from the device. To do this, you will need a SIM eject tool or a small paperclip.
First, locate the SIM card tray on your iPhone. Typically, it is located on the side of the device. Look for a small hole next to the tray.
Once you’ve located the SIM card tray and the small hole, insert the SIM eject tool into the hole. If you don’t have a SIM eject tool, you can use a small, unfolded paperclip.
Gently push the SIM eject tool or paperclip into the hole until the SIM card tray begins to come out. Be careful not to apply too much force, as you may damage your iPhone.
Once the SIM card tray is partially out, you can remove it entirely by pulling it gently with your fingers.
Take out the existing SIM card from the tray and set it aside. Make sure you keep it in a safe place so that you don’t lose it.
At this point, you can either insert a new SIM card or reinsert the same SIM card if you are swapping it with another device. Make sure the new SIM card is compatible with your iPhone.
Now that you’ve ejected the SIM card tray and removed the old SIM card, you can proceed to the next step of inserting the new SIM card into your iPhone.
Step 4: Remove the current SIM card from the tray
Once you have located the SIM card tray and have it removed from your iPhone, it’s time to take out the current SIM card. The SIM card is a small, rectangular chip that houses your mobile network information and other personal data.
To remove the SIM card from the tray, gently push on the exposed edge of the SIM card until it pops out. Be careful not to apply too much pressure, as you don’t want to damage the SIM card or any of the components surrounding it.
Once the SIM card is partially out of the tray, you can use your fingers or a pair of tweezers to completely remove it. Again, be gentle and handle the SIM card with care to avoid any unnecessary damage.
After you have successfully removed the current SIM card from the tray, take a moment to examine it. Check for any signs of physical damage or wear and tear. If you notice any issues with the SIM card, such as scratches or bent connectors, it may be worth considering a replacement.
It’s also essential to ensure that the replacement SIM card you plan on using is compatible with your iPhone model and the network provider you wish to switch to. Some older iPhone models may require a different SIM card size, so double-check the compatibility before proceeding with the switch.
Once you have removed the current SIM card and verified the compatibility of the replacement, you’re ready to move on to the next step: inserting the new SIM card into the tray.
Step 5: Insert the new SIM card into the tray
Now that you have removed the old SIM card from your iPhone, it’s time to insert the new one. Here’s how you can do it:
1. Take the new SIM card and hold it with the gold contacts facing downwards.
2. Gently slide the SIM card into the SIM card tray. Make sure it fits securely and aligns properly with the tray slot.
3. Carefully insert the SIM card tray back into your iPhone. Make sure it goes in the correct orientation and fits snugly into the slot.
4. Push the SIM card tray firmly but gently until it clicks into place. You should feel a slight resistance as it locks into position.
5. Double-check to ensure that the SIM card tray is completely flush with the side of your iPhone.
By following these steps, you have successfully inserted the new SIM card into your iPhone. Now, you can proceed to activate your new SIM card and start enjoying the services offered by your mobile network provider.
Step 6: Reinsert the SIM card tray into the iPhone
Once you have inserted the new SIM card into your iPhone, it’s time to reinsert the SIM card tray back into the device. Follow these simple steps to complete the process:
- Hold the SIM card tray with the SIM card facing downwards.
- Align the tray with the SIM card slot on the side of your iPhone.
- Gently push the tray back into the device until it is fully inserted.
- Make sure the tray is flush with the iPhone’s frame and there are no visible gaps.
- Turn off your iPhone.
- Locate the SIM card tray, which is typically located on the side of the iPhone.
- Use the SIM card removal tool or a paperclip to gently push into the small hole next to the SIM card tray.
- The tray should pop out. Carefully remove the tray from the iPhone.
- Take out the old SIM card and insert the new one into the tray.
- Reinsert the SIM card tray into the iPhone.
- Turn your iPhone back on.
It is important to ensure that the tray is properly inserted to avoid any connectivity issues or damage to the SIM card.
Once the SIM card tray is reinserted, power on your iPhone and wait for it to detect the new SIM card. You may need to enter the PIN code or follow any activation prompts that appear on the screen.
Remember to store the ejected SIM card safely in case you need to reinsert it at a later time.
Congratulations! You have successfully switched the SIM card on your iPhone. Enjoy using your new network provider and the services they offer.
Step 7: Power on your iPhone and activate the new SIM card
Now that you have successfully inserted the new SIM card into your iPhone, it’s time to power it on and complete the activation process. Follow these simple steps to get your iPhone up and running with the new SIM card:
1. Press and hold the power button on your iPhone until the Apple logo appears on the screen. This indicates that your iPhone is turning on.
2. Once your iPhone has booted up, it should automatically detect the new SIM card and prompt you to activate it. If prompted, follow the on-screen instructions to complete the activation process. Please note that the exact steps may vary depending on your iPhone model and iOS version.
3. If your iPhone doesn’t automatically detect the new SIM card or prompt you to activate it, you can manually activate it by going to the Settings app. Open the Settings app, tap on “Cellular” or “Mobile Data,” and then select “SIM Card” or “SIM Card Manager.” From there, you should see an option to activate the new SIM card. Follow the on-screen instructions to complete the activation.
4. If you’re switching to a new carrier, you may also need to contact your new carrier to ensure that your iPhone is properly activated on their network. They may provide you with further instructions or assist you with any additional steps required.
5. Once your new SIM card has been successfully activated, you should see the signal bars on your iPhone indicating that you are connected to your new carrier’s network. You should also be able to make calls, send texts, and access cellular data as usual. Congratulations, you have successfully switched your SIM card and activated your iPhone with the new SIM card!
Remember, if you experience any issues during the activation process or have any questions, don’t hesitate to contact your carrier’s customer support for assistance. They will be able to guide you through the necessary steps and troubleshoot any problems that may arise.
Troubleshooting Tips for SIM card switching issues
Switching your SIM card is usually a straightforward process, but occasionally you may encounter some issues along the way. If you’re experiencing difficulties with switching your SIM card on your iPhone, don’t worry, there are some troubleshooting steps you can try to resolve the problem.
1. Check the SIM card compatibility: Ensure that the new SIM card you are trying to switch to is compatible with your iPhone model. Some older iPhone models may only support specific SIM card sizes, so it’s important to verify compatibility before attempting to switch.
2. Clean the SIM card slot: Dust and debris can accumulate in the SIM card slot over time, which can interfere with the proper connection. Gently clean the SIM card slot using compressed air or a soft brush to remove any dirt or debris. Ensure that the slot is completely dry before attempting to insert the SIM card.
3. Restart your iPhone: Sometimes a simple restart can resolve temporary glitches or conflicts with the SIM card. Press and hold the power button, then slide to power off. Wait for a few seconds, then press and hold the power button again until the Apple logo appears. Once your iPhone restarts, try switching the SIM card again.
4. Reset network settings: Resetting your network settings can help resolve network-related issues that may be preventing the new SIM card from being recognized. Go to Settings > General > Reset > Reset Network Settings. This will remove all saved Wi-Fi passwords, so make sure you have them handy before proceeding. After resetting, try switching the SIM card again.
5. Update iOS: Outdated software can sometimes cause compatibility issues with new SIM cards. Ensure that your iPhone is running the latest version of iOS. Go to Settings > General > Software Update and follow the on-screen instructions to install any available updates. Once the update is complete, try switching the SIM card again.
6. Contact your carrier: If you’ve tried all the troubleshooting steps and are still unable to switch your SIM card, it’s possible that there may be an issue with your carrier’s network or your account. Reach out to your carrier’s customer support for assistance. They will be able to troubleshoot the issue further and provide guidance specific to your situation.
By following these troubleshooting tips, you should be able to overcome any issues you encounter while switching your SIM card on your iPhone. Remember to always handle your SIM card with care and ensure that you have a compatible SIM card for your iPhone model.
Conclusion
Switching the SIM card on your iPhone is a relatively simple process that allows you to change carriers, upgrade to a new device, or use your phone while traveling internationally. By following the steps outlined in this article, you can easily remove the old SIM card and insert a new one, ensuring that your iPhone stays connected to the cellular network. Remember to back up your data before initiating the switch and check with your carrier for any specific instructions or requirements. With the ability to switch SIM cards, you have the flexibility to adapt to your changing needs and stay connected in a fast-paced and ever-evolving world of mobile technology.
FAQs
Q: Can I switch the SIM card on my iPhone?
Absolutely! The iPhone offers the flexibility to switch SIM cards whenever necessary, allowing you to change carriers or use a local SIM card while traveling abroad.
Q: How do I switch the SIM card on my iPhone?
To switch the SIM card on your iPhone, follow these steps:
Q: Do I need to activate the new SIM card after switching it?
In most cases, yes. After switching to a new SIM card, you will need to activate it with your carrier. This can usually be done online or by calling your carrier’s customer service. They will guide you through the activation process, which may involve providing your new SIM card’s details and activating the new network plan associated with the SIM card.
Q: What happens to my old SIM card after switching?
Once you have switched to a new SIM card and activated it, your old SIM card becomes inactive. It is recommended to keep your old SIM card in a safe place as it may contain important contacts or messages. Additionally, your old SIM card can be used later if you decide to switch back to it or use it for backup purposes.
Q: Can I use my iPhone without a SIM card?
Yes, you can use certain features of your iPhone without a SIM card. However, to access cellular networks for calls, messages, and data, a valid SIM card is required. Without a SIM card, you can still connect to Wi-Fi networks, use apps that don’t require a cellular connection, and utilize other non-cellular functions of your iPhone.