
Are you looking to switch your SIM card on your iPhone? Whether you’re upgrading to a new device, changing carriers, or simply need to replace a faulty SIM card, knowing how to switch the SIM card on your iPhone is essential. Luckily, the process is relatively simple and can be done in a few easy steps. In this article, we will guide you through the process and provide you with all the information you need to successfully switch your SIM card on your iPhone. From removing the old SIM card to inserting the new one and activating it, we’ve got you covered. So, let’s dive in and explore the steps to ensure a smooth and hassle-free SIM card switch on your iPhone.
Inside This Article
- Overview
- Step 1: Power off your iPhone
- Step 2: Locate the SIM card tray
- Step 3: Remove the old SIM card
- Step 4: Insert the new SIM card
- Step 5: Power on your iPhone
- Step 6: Activate the new SIM card
- Troubleshooting Tips
- Conclusion
- FAQs
Overview
If you’re looking to switch your SIM card on an iPhone, you’ve come to the right place. Switching SIM cards can be necessary when you’re changing carriers, traveling internationally, or upgrading to a new phone. Luckily, the process is straightforward and can be done in a few simple steps. In this article, we’ll walk you through the process of switching your SIM card on an iPhone.
Before we dive into the steps, it’s important to note that not all iPhones have SIM card slots. Older models like the iPhone 4 and 4s, as well as the original iPhone, use a different technology and do not require SIM cards. However, if you have an iPhone 5 or newer, chances are it has a SIM card slot located on the side or top of the device.
Ready to get started? Let’s jump into the step-by-step process of switching your SIM card on an iPhone.
Step 1: Power off your iPhone
Before you begin the process of switching your SIM card on your iPhone, it’s important to power off your device. This ensures that you can safely handle the SIM card without causing any damage to the internal components of your phone. To power off your iPhone, simply press and hold the power button located on the side or top of your device, depending on the model.
After holding down the power button for a few seconds, you will see a slider appear on your screen indicating the option to power off your iPhone. Slide the button to the right to turn off your device. Wait for a few seconds until the screen goes completely dark, indicating that your iPhone is now powered off.
Powering off your iPhone is an essential step to ensure the safety and effectiveness of the SIM card switching process. It eliminates the risk of accidentally damaging your phone or causing any errors during the card replacement.
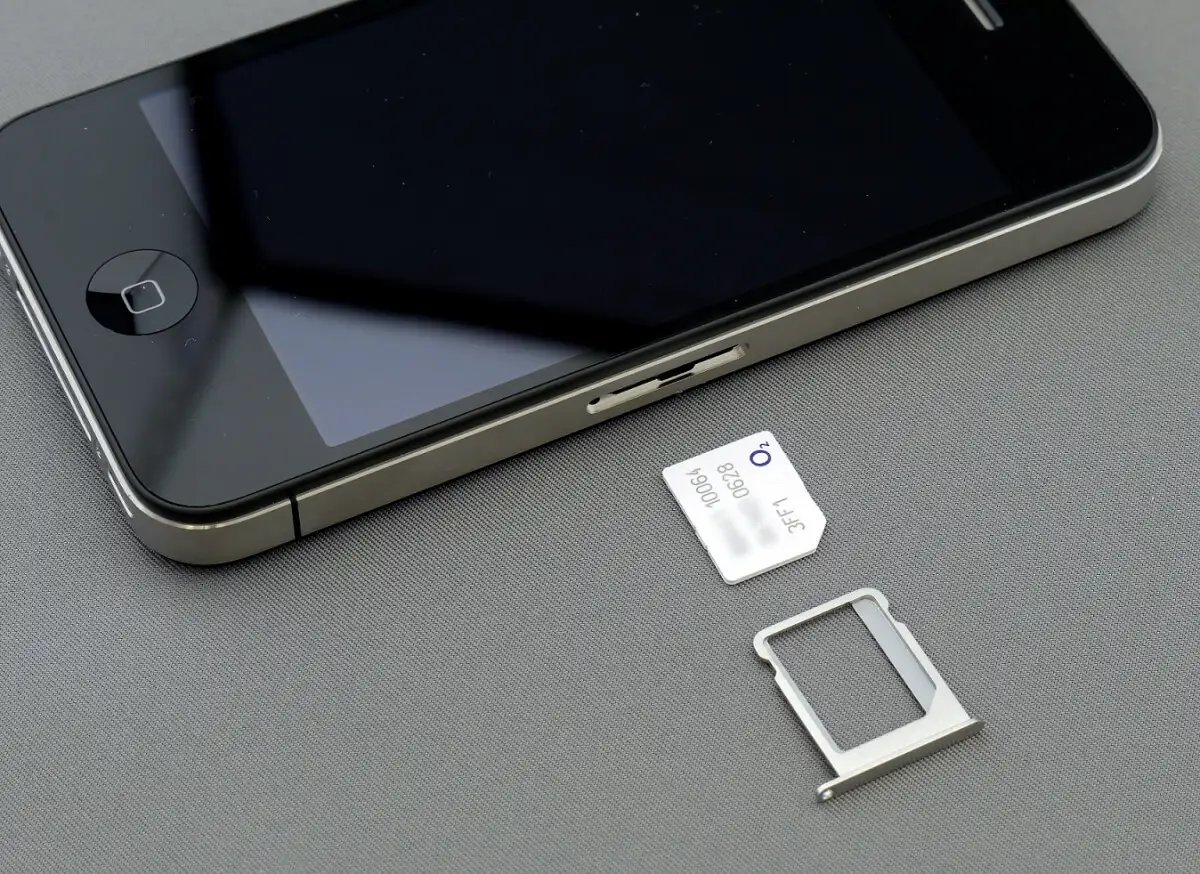
Step 2: Locate the SIM card tray
Now that you’ve powered off your iPhone, it’s time to locate the SIM card tray. The SIM card tray is a small slot typically located on the side or top of your iPhone, depending on the model.
To find the SIM card tray, you can look for a small pinhole or a tiny compartment with a removable cover. On newer iPhone models, such as the iPhone 11 or iPhone 12, the SIM card tray is usually located on the right side of the device.
If you’re not sure where the SIM card tray is located, you can refer to the user manual or visit the manufacturer’s website for a diagram specific to your iPhone model.
Remember, it’s important to handle the SIM card tray with care to avoid any damage. Use a SIM card ejector tool or a small paperclip to gently push into the pinhole or slot and release the tray.
Step 3: Remove the old SIM card
Removing the old SIM card from your iPhone is a straightforward process. Follow these simple steps:
1. Start by locating the SIM card tray. On most iPhone models, the SIM card tray is located on the right side of the phone. However, if you have an older iPhone like the iPhone 4 or iPhone 5, the SIM card tray is located on the top edge of the device.
2. Once you have located the SIM card tray, you will need a SIM card removal tool or a straightened paperclip. Insert the tool into the small pinhole next to the SIM card tray. Apply a gentle amount of pressure until the tray pops out slightly.
3. Pull the SIM card tray out of the iPhone. It is important to handle it carefully to avoid any damage or bending of the pins. Take note of the orientation of the SIM card in the tray, as you will need to insert the new SIM card in the same way.
4. Remove the old SIM card from the tray by gently pushing it out or sliding it out, depending on the design of the tray. Place the old SIM card in a safe location or dispose of it properly.
5. Inspect the SIM card slot and tray for any dirt or debris. Use a soft, lint-free cloth or a can of compressed air to clean any dust or particles that may have accumulated.
6. Once you have removed the old SIM card and cleaned the slot, you are now ready to insert the new SIM card. Proceed to the next step to learn how to properly insert the new SIM card into your iPhone.
Step 4: Insert the new SIM card
After removing the old SIM card from your iPhone, it’s time to insert the new one. Follow these steps to ensure a smooth transition:
- Take the new SIM card out of its packaging. Be careful not to touch the metal contacts on the card.
- Locate the SIM card tray on your iPhone. The tray is typically on the side of the device, but the exact location may vary depending on the model.
- Use a SIM card ejector tool or a small paperclip to gently push into the small hole on the SIM card tray. Apply slight pressure until the tray pops out.
- Remove the tray from the iPhone and place it on a flat surface.
- Position the new SIM card on the tray, making sure that the metal contacts are facing downward and the notched corner aligns with the notch on the tray.
- Carefully insert the tray back into the iPhone, ensuring that it is properly aligned and securely inserted.
- Gently push the tray all the way in until it sits flush with the device.
- Power on your iPhone and wait for it to recognize the new SIM card. This process may take a few moments.
Note that if your iPhone is locked to a specific carrier, you may need to unlock it before the new SIM card will work. Contact your carrier for assistance with the unlocking process.
Once your iPhone recognizes the new SIM card, you’re ready to start using your phone with your new carrier. Enjoy the improved network coverage and enhanced features that come with your new SIM card!
Step 5: Power on your iPhone
Now that you have successfully inserted the new SIM card into your iPhone, it’s time to power on the device. This step is crucial as it allows your iPhone to detect the new SIM card and establish a connection with your mobile network provider.
To power on your iPhone, press and hold the power button located on the side or top of your device, depending on the model of your iPhone. After a few seconds, the Apple logo will appear on the screen, indicating that your iPhone is booting up.
During the booting process, your iPhone will display the familiar “Hello” screen, prompting you to set up your device. If you have already set up your iPhone in the past, you may be prompted to sign in to your Apple ID account. Simply follow the on-screen instructions to proceed.
Once your iPhone is powered on and ready for use, you should see the signal bars or the cellular network icon in the top-left corner of the screen. This indicates that your iPhone has successfully connected to the mobile network using the new SIM card.
If you do not see the signal bars or the cellular network icon, it may indicate that there is an issue with the SIM card or the activation process. In such cases, you can try the following troubleshooting steps:
1. Restart your iPhone by pressing and holding the power button until the “slide to power off” slider appears. Slide the slider to power off your iPhone, then press and hold the power button again to turn it back on.
2. Ensure that you have inserted the SIM card correctly and that it is securely in place.
3. Check if your mobile network provider requires any additional steps for SIM card activation, such as making a phone call or visiting their website.
If the problem persists, it is recommended to contact your mobile network provider for further assistance.
Once your iPhone is powered on and connected to the mobile network, you can start using it to make calls, send messages, browse the internet, and enjoy all the features and functionalities that it offers.
Remember, switching your SIM card to a different network provider may require you to update your network settings or configure additional features, such as APN settings. Check with your mobile network provider for any specific instructions or settings that need to be configured on your iPhone.
Step 6: Activate the new SIM card
Once you have inserted your new SIM card into your iPhone, the final step is to activate it. Activating your new SIM card allows you to use your mobile phone services with your new carrier or plan. The process may vary depending on your carrier, but here are the general steps to activate your new SIM card:
1.
Make sure your iPhone is connected to a stable Wi-Fi or cellular network.
2.
Open the Settings app on your iPhone.
3.
Scroll down and tap on “Cellular” or “Mobile Data”.
4.
Look for the option “SIM Applications” or “SIM Toolkit” and tap on it.
5.
Select the option to activate your SIM card.
6.
Follow the prompts and enter any required information, such as your new SIM card number or activation code.
7.
Wait for the activation process to complete. This can take a few minutes or longer, depending on your carrier.
8.
Once your new SIM card is activated, you should see signal bars or network indicators on your iPhone’s status bar.
9.
Test your phone by making a call or sending a text message to ensure that your new SIM card is working properly.
If you encounter any issues during the activation process, try restarting your iPhone and repeating the steps. If the problem persists, contact your carrier for further assistance. They can help troubleshoot the activation process and ensure that your new SIM card is activated successfully.
Remember, activating your new SIM card is crucial for accessing mobile phone services such as calling, texting, and data usage. Make sure to complete this step to fully utilize your new SIM card and enjoy uninterrupted communication on your iPhone.
Troubleshooting Tips
If you encounter any issues while switching your SIM card on your iPhone, don’t worry. Here are some troubleshooting tips to help you resolve common problems:
1. No SIM Card Detected: If your iPhone does not detect the new SIM card after inserting it, make sure it is properly inserted. Remove the SIM card, check for any dust or debris, and reinsert it carefully. Restart your iPhone and check if the SIM card is recognized.
2. Invalid SIM Card: If your iPhone displays an “Invalid SIM Card” message, it could be due to an incompatible or damaged card. Try using a different SIM card from the same carrier or contact your carrier for assistance.
3. No Service: If your iPhone shows “No Service” or “Searching” after switching the SIM card, ensure that the carrier supports the new SIM card. Check if the carrier settings need to be updated. You can do this by going to Settings > General > About. If an update is available, follow the prompts to install it.
4. Activation Issue: If you are unable to activate the new SIM card, check your network connection. Ensure that you have a stable internet connection, either through Wi-Fi or cellular data. If the problem persists, contact your carrier for activation assistance.
5. Locked iPhone: If your iPhone is locked to a specific carrier, you may need to unlock it before using a different SIM card. Contact your carrier to request an unlock or use a third-party unlocking service if applicable.
6. Compatibility: Ensure that the new SIM card is compatible with your iPhone model. Check with your carrier or consult the iPhone documentation to confirm compatibility.
7. Reset Network Settings: If you are still experiencing issues, you can try resetting your network settings. Go to Settings > General > Reset > Reset Network Settings. Note that this will remove all saved Wi-Fi networks and passwords, so make sure to reconnect to Wi-Fi networks afterward.
8. Seek Professional Help: If none of the above troubleshooting tips work, it may be necessary to seek assistance from an authorized service provider or the Apple Support team.
Remember, switching a SIM card on an iPhone should be a straightforward process. However, if you encounter any difficulties, following these troubleshooting tips should help you resolve common issues and get your iPhone up and running with the new SIM card.
Conclusion
Switching SIM cards on an iPhone is a simple and straightforward process that allows you to change carriers, upgrade to a new device, or use a local SIM card while abroad. By following the steps outlined in this article, you can easily remove the old SIM card and insert the new one, ensuring that your iPhone stays connected to the cellular network.
Whether you’re switching SIM cards for practical reasons or exploring the benefits of a different carrier, the ability to change SIM cards on an iPhone provides flexibility and convenience. Remember to backup your important data before switching SIM cards, and feel free to refer back to this guide whenever you need to make the switch.
As technology continues to advance, the process of switching SIM cards on iPhones may become even more seamless. However, for now, this guide will help you navigate the process smoothly and make sure you can stay connected, no matter where your mobile phone journeys take you.
FAQs
1. How do I switch the SIM card on my iPhone?
To switch the SIM card on your iPhone, follow these steps:
- Power off your iPhone by pressing and holding the power button.
- Locate the SIM card tray, which is usually found on the side or top of the iPhone.
- Insert a SIM card removal tool or a small paperclip into the tiny hole on the SIM card tray.
- Gently push the tool or paperclip until the tray pops out.
- Remove the old SIM card from the tray and insert the new SIM card.
- Push the tray back into the iPhone until it clicks into place.
- Power on your iPhone and wait for it to connect to the new SIM card.
2. Can I switch my SIM card to a different carrier on an unlocked iPhone?
Yes, if your iPhone is unlocked, you can switch your SIM card to a different carrier. An unlocked iPhone is not tied to a specific carrier and can be used with any carrier that supports the phone’s network compatibility. Simply follow the steps mentioned above to switch your SIM card to the desired carrier.
3. Will switching my SIM card delete any data or settings on my iPhone?
No, switching your SIM card will not delete any data or settings on your iPhone. The SIM card is responsible for providing cellular connectivity and does not store any user data or settings. However, it’s always a good idea to backup your iPhone before making any changes, just to be on the safe side.
4. What should I do if my iPhone does not recognize the new SIM card?
If your iPhone does not recognize the new SIM card after switching, try the following troubleshooting steps:
- Make sure the SIM card is properly inserted into the SIM card tray.
- Restart your iPhone and check if it detects the SIM card.
- If the issue persists, contact your carrier for assistance or visit an authorized service center.
5. Can I use my old SIM card in a new iPhone?
It depends on the compatibility of the SIM card. If your old SIM card is the correct size and compatible with the new iPhone, you can use it. However, keep in mind that newer iPhones may require nano-sized SIM cards, while older models may use micro or standard-sized SIM cards. If your old SIM card does not fit, you will need to obtain a new SIM card from your carrier.