
Taking a screenshot on an iPhone has become an essential task for many users. Whether you want to capture an important message, save a memorable moment from a video, or simply share something interesting with friends, knowing how to take a screenshot can come in handy. Fortunately, the process is quick and straightforward, requiring just a simple combination of button presses on your iPhone. In this comprehensive guide, we will walk you through the steps of taking a screenshot on various iPhone models, from the latest iPhone 12 to older ones like iPhone 7. So, whether you’re a new iPhone user or have been using these devices for years, read on to learn how to capture those memorable moments with just a few taps.
Inside This Article
- Methods to Take a Screenshot on iPhone
- Using the Side Button and Volume Up Button
- Using AssistiveTouch
- Using the Home Button and Power Button
- Additional Tips for Taking Screenshots on iPhone
- Conclusion
- FAQs
Methods to Take a Screenshot on iPhone
Taking a screenshot on your iPhone can be incredibly useful when you want to capture a moment, save important information, or share something interesting with others. Fortunately, Apple has made it easy to take a screenshot on iPhone with just a few simple steps. In this guide, we’ll walk you through the various methods you can use to take a screenshot on your iPhone.
1. Using the Side Button and Volume Up Button
This is the most common method to take a screenshot on iPhone. Simply follow these steps:
- Open the app or screen that you want to capture.
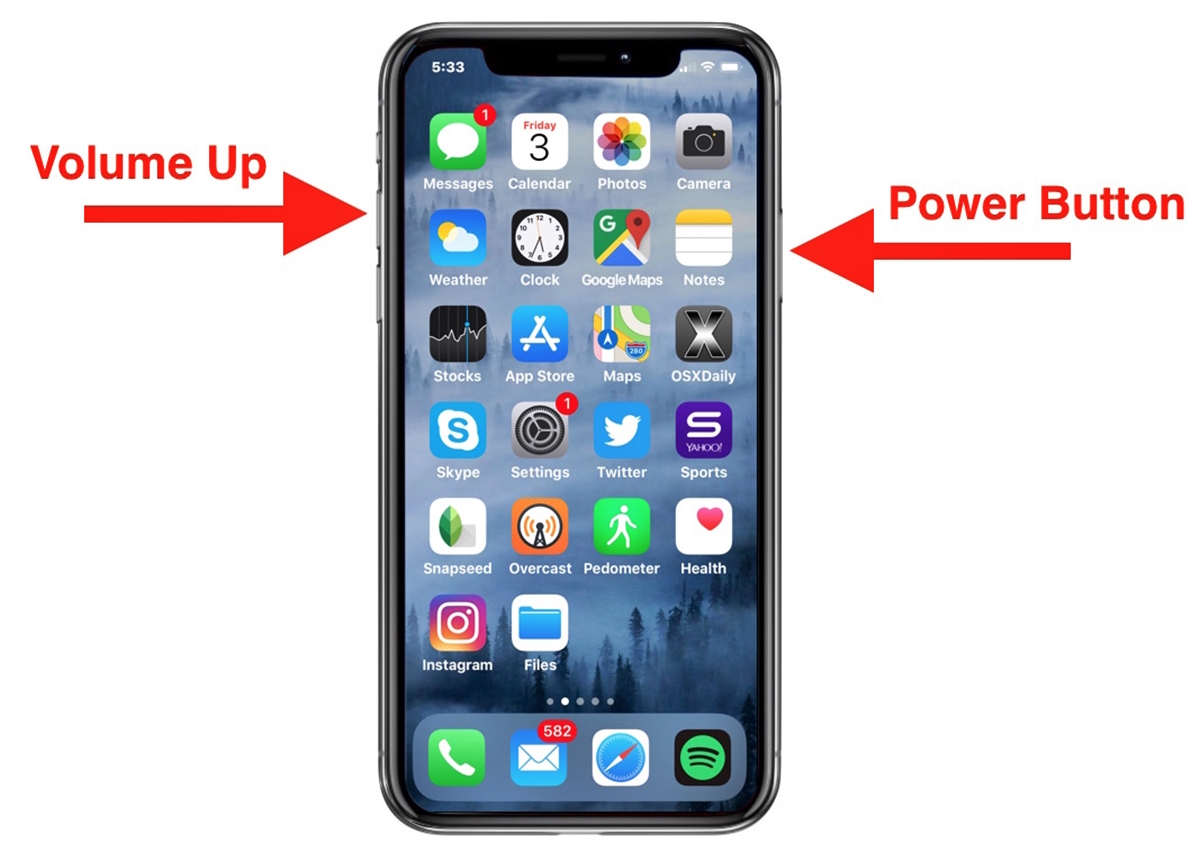
- Press and hold the Side button (located on the right side of the iPhone) and the Volume Up button (found on the left side of the iPhone) simultaneously.
- Release both buttons quickly.
- You will see a preview of the screenshot in the lower-left corner of the screen. You can tap on it to make edits or share it immediately.
2. Using AssistiveTouch
If you find it difficult to press both buttons simultaneously, or if you have trouble reaching the buttons due to physical limitations, you can use AssistiveTouch. Follow these steps:
- Go to Settings on your iPhone and tap on “Accessibility”.
- Tap on “Touch”.
- Under “Physical & Motor”, tap on “AssistiveTouch”.
- Toggle the switch to enable AssistiveTouch.
- Once enabled, you will see a round button on your screen. Tap on it, then tap on “Device” and select “More”.
- Tap on “Screenshot”.
- A screenshot will be captured instantly, and you can find it in your Photos app.
3. Using the Home Button and Power Button
For older iPhone models that still have a Home button, you can take a screenshot using these steps:
- Open the app or screen that you want to capture.
- Press and hold the Home button (located at the bottom of the iPhone) and the Power button (found on the right side of the iPhone) simultaneously.
- Release both buttons quickly.
- A preview of the screenshot will appear at the bottom left of the screen. You can tap on it to make edits or share it right away.
Additional Tips for Taking Screenshots on iPhone
Here are a few additional tips to enhance your screenshot-taking experience on iPhone:
- If you want to annotate or edit your screenshot before sharing, tap on the preview image that appears in the bottom-left corner of the screen after taking the screenshot.
- Screenshots are automatically saved to the Photos app. You can find them in your “Screenshots” album.
- If you have an Apple Watch connected to your iPhone, taking a screenshot on your watch will also capture the corresponding screen on your iPhone.
- If your iPhone has Face ID, you may see a flash around the edges of the screen when a screenshot is taken.
Now that you’re equipped with multiple methods to take a screenshot on iPhone, you can easily capture and share important moments or information with just a few taps. So go ahead and give it a try!
Using the Side Button and Volume Up Button
If you’re wondering how to take a screenshot on your iPhone, the easiest and most common method is to use the side button and volume up button. This method works on all iPhone models with Face ID, including the iPhone X, iPhone XS, iPhone XR, iPhone 11, and iPhone 12 series.
To capture a screenshot using this method, simply follow these steps:
- Open the app, screen, or content that you want to capture in the screenshot.
- Make sure both your iPhone and the content are visible on the screen.
- Press and hold the side button (previously known as the power button) on the right side of your iPhone.
- While still holding the side button, quickly press the volume up button on the left side of your iPhone.
- Release both buttons at the same time.
After the screenshot is taken, you will see a thumbnail of the screenshot appear in the bottom left corner of your iPhone’s screen. You can tap on the thumbnail to quickly access and edit the screenshot, or swipe it away if you don’t need it.
The screenshot will also be saved in your Photos app under the “Screenshots” album for easy access later. From there, you can view, edit, share, or delete the screenshot, just like any other photo in your library.
This method of capturing screenshots is quick, convenient, and easy to remember. It allows you to capture anything on your iPhone’s screen, from photos and messages to websites and social media posts.
So, the next time you come across something interesting or important on your iPhone, use the side button and volume up button combination to capture a screenshot and save it for later!
Using AssistiveTouch
If you’re looking for an alternative method to capture screenshots on your iPhone, AssistiveTouch is a great option. AssistiveTouch is an accessibility feature that creates a virtual button overlay on your screen, giving you easy access to various functions, including taking screenshots.
To activate AssistiveTouch, follow these steps:
- Go to the “Settings” app on your iPhone.
- Scroll down and tap on “Accessibility”.
- Tap on “Touch” under the “Physical and Motor” section.
- On the next screen, tap on “AssistiveTouch”.
- Toggle the switch to turn on AssistiveTouch.
Once AssistiveTouch is enabled, a small gray button will appear on the screen. You can move this button to any corner of the screen by dragging it with your finger. To capture a screenshot using AssistiveTouch, follow these steps:
- Tap the AssistiveTouch button on the screen to open the AssistiveTouch menu.
- Tap on “Device”.
- In the Device menu, tap on “More”.
- Now, tap on “Screenshot”.
After tapping on “Screenshot”, your iPhone will capture the current screen and save it to your Photos app. You can access your screenshots by opening the Photos app and navigating to the “Screenshots” album.
Using AssistiveTouch to take screenshots on your iPhone is a convenient option, especially for users who find it difficult to press the physical buttons simultaneously. It provides an accessible way to capture moments on your screen with just a few taps.
Using the Home Button and Power Button
If you’re looking for an alternative method to take a screenshot on your iPhone, you can try using the home button and power button combination. This method works well for older iPhone models that have a physical home button.
To take a screenshot using the home button and power button, follow these simple steps:
- Open the screen or app that you want to capture.
- Make sure that everything you want to include in the screenshot is displayed on the screen.
- Position your fingers so that they are ready to press the home button and power button simultaneously.
- Press the home button and power button at the same time and hold them for about a second.
- You will see a flash on the screen, indicating that the screenshot has been captured.
- Release the buttons.
Once you have successfully taken the screenshot, it will be saved to your iPhone’s camera roll or screenshot album. To access the screenshot, open the Photos app and navigate to the Screenshots album.
Using the home button and power button combination is a quick and convenient way to capture screenshots on your iPhone. It allows you to capture the entire screen, including the status bar and any open apps or content.
This method is especially useful if you need to quickly capture a screenshot in the middle of using an app or browsing the web. It eliminates the need to navigate through menus or enable additional features to take a screenshot.
However, be cautious not to accidentally trigger other actions on your iPhone when pressing the home button and power button together. Make sure to press them simultaneously and firmly, without pressing any other buttons.
That’s it! Now you know how to take a screenshot on your iPhone using the home button and power button combination. Give it a try the next time you want to capture a memorable moment or share important information with others!
Additional Tips for Taking Screenshots on iPhone
Now that you know the basic methods of taking screenshots on your iPhone, here are some additional tips to make the process even easier and more efficient:
1. Edit Your Screenshots: After taking a screenshot, you have the option to edit it immediately. Simply tap on the screenshot preview that appears in the bottom left corner of your screen. From there, you can crop, annotate, and even add text to your screenshot before saving or sharing it.
2. Organize your Screenshots: With the increasing number of screenshots you take, it’s helpful to keep them organized. You can create folders in your Photos app specifically for screenshots. To do this, go to the Photos app, tap on “Albums,” then “Edit,” and finally “New Album.” Name your new album “Screenshots” and tap on “Save.” Now, whenever you take a screenshot, you can easily find and access it in the Screenshots album.
3. Enable Markup in Notification Center: Markup is a powerful tool that allows you to quickly edit and annotate screenshots. By enabling Markup in the Notification Center, you can access it with just a swipe down from the top-right corner of your screen. To enable it, go to Settings, then Control Center, and finally Customize Controls. Look for the Markup option and tap on the green plus symbol to add it to your Control Center.
4. Use Gestures: If your iPhone supports gesture controls, you can take advantage of them to make taking screenshots even easier. For example, on the iPhone X or newer models, you can take a screenshot by pressing the side button and volume up button simultaneously, just like the traditional method. However, instead of holding the buttons down, simply tap and release them quickly. This gesture can make it faster to capture your screen without having to hold the buttons for an extended period of time.
5. Share Screenshots Directly: Sharing screenshots with others is often a common practice. To make sharing even more convenient, you can quickly share a screenshot directly from the preview screen. After taking a screenshot, tap on the preview in the bottom left corner, then tap on the share icon. You can choose to send the screenshot via iMessage, email, social media, or other compatible apps without having to go through the extra steps of saving it first.
6. Take Full-Page Screenshots: With iOS 13 and later versions, you have the ability to capture full-page screenshots of websites or documents. After taking a screenshot, tap on the preview in the bottom left corner, then tap on “Full Page” at the top of the screen. This will capture the entire content, allowing you to scroll through and review the entire page as one image.
By following these additional tips, you’ll be able to take and manage screenshots on your iPhone more effectively, saving you time and enhancing your overall user experience.
Conclusion
Taking a screenshot on an iPhone is a simple task that can be incredibly useful in various situations. Whether you want to capture a funny conversation, save an important document, or share a beautiful moment from a video, knowing how to take a screenshot on your iPhone allows you to easily capture and preserve these moments.
By following the step-by-step guide outlined in this article, you can quickly and effortlessly capture screenshots on your iPhone. Whether you have an iPhone X, iPhone 11, or any other model, the process remains fairly consistent. With a combination of button presses and quick timing, you can capture screenshots without hassle.
Now that you know how to take a screenshot on your iPhone, go ahead and try it out! Experiment with different scenarios and explore the possibilities of capturing and sharing your screen. This handy feature is a valuable tool for both personal and professional use. So, go ahead, start capturing and sharing your favorite moments with ease!
FAQs
1. How do I take a screenshot on my iPhone?
To take a screenshot on an iPhone, simultaneously press and hold the Side button and the Volume Up button. Release the buttons quickly, and you’ll see a thumbnail of the screenshot in the bottom left corner of the screen. You can then tap the thumbnail to edit or share the screenshot, or swipe it away to dismiss it.
2. Where are the screenshots saved on iPhone?
By default, screenshots on an iPhone are saved in the Photos app. You can view them by opening the Photos app and tapping on the “Screenshots” album. Alternatively, you can also find your screenshots by going to the “All Photos” album and looking for the most recent ones.
3. Can I annotate or mark up a screenshot on iPhone?
Yes, you can annotate and mark up screenshots on iPhone using the built-in Markup feature. After taking a screenshot, tap the thumbnail that appears in the bottom left corner of the screen to enter Markup mode. From there, you can draw, add text, crop, or use the various tools available to enhance your screenshot. Once you’re done, you can save or share the annotated screenshot.
4. Is there a way to take a screenshot on iPhone without pressing buttons?
Yes, if you have an iPhone with Face ID (iPhone X or later models), you can take a screenshot without pressing any buttons. Simply go to the screen you want to capture, position it as desired, then swipe up from the bottom of the screen and simultaneously press the Volume Up button to capture the screenshot. This method requires you to enable the “AssistiveTouch” feature in the Accessibility settings.
5. Can I take a screenshot of a specific portion of the screen on iPhone?
Yes, you can take a screenshot of a specific portion of the screen on iPhone by using the “Full Page” capture option in the screenshot editor. After taking the initial screenshot, tap on the thumbnail and select “Full Page” at the top of the screen. This will enable you to scroll through the entire page and capture the desired portion of the screen in the screenshot.