Are you wondering how to take a screenshot on your iPhone 13 or earlier models? Capturing a screenshot is a handy feature that allows you to save and share what’s displayed on your device’s screen. Whether you want to capture a funny conversation, save an important note, or share an interesting image, taking a screenshot can come in handy in various situations.
In this article, we will guide you through the simple steps to take a screenshot on your iPhone 13 or earlier models. We will also address some common questions and provide useful tips to make the process effortless and efficient. So, if you’re ready to learn how to capture those memorable moments on your iPhone, let’s dive in!
Inside This Article
How to Take a Screenshot on iPhone 13 & Earlier Models
Whether you have the latest iPhone 13 or an earlier model, taking a screenshot is a handy feature that allows you to capture and share what’s on your screen. In this article, we will guide you through different methods to take a screenshot on iPhone 13 and earlier models.
Using the Physical Buttons
The simplest and most common way to take a screenshot on an iPhone is by using the physical buttons. Here’s how:
- Open the app or screen you want to capture.
- Simultaneously press and hold the Side button (formerly known as the Sleep/Wake button) and the Volume Up button.
- Release both buttons quickly.
- You will see a preview of the screenshot in the bottom left corner of the screen. Tap on it to edit or share, or swipe it away to dismiss it.
Using Assistive Touch
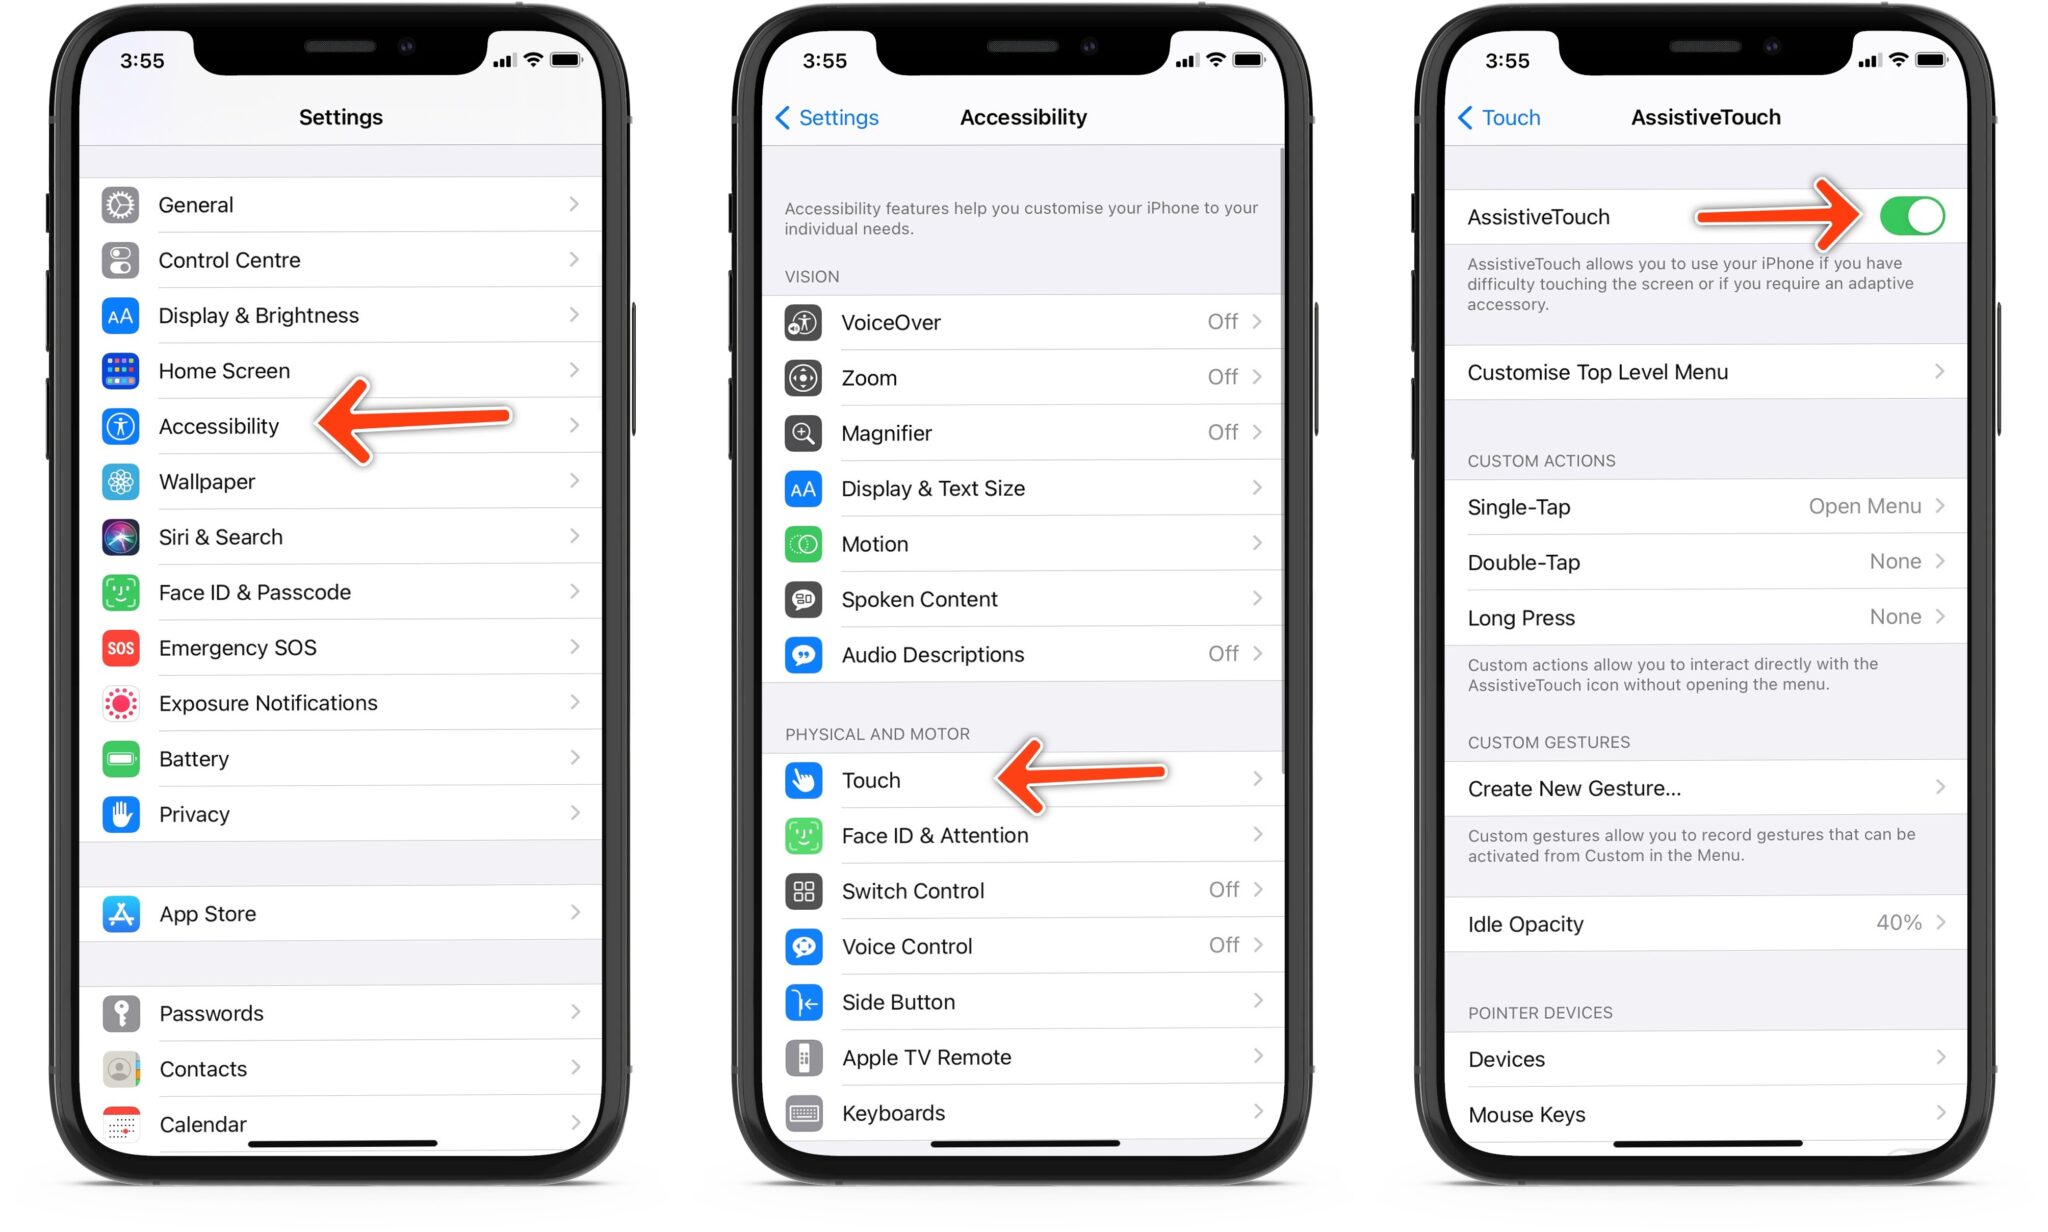
If you find it difficult to press the physical buttons simultaneously, you can enable Assistive Touch to take a screenshot with just a tap. Follow these steps:
- Go to “Settings” and select “Accessibility”.
- Tap on “Touch” and choose “Assistive Touch”.
- Toggle on the “Assistive Touch” switch.
- Tap on “Customize Top Level Menu” and select “Screenshot”.
- Now, whenever you want to take a screenshot, tap on the Assistive Touch overlay, then tap on “Screenshot”.
Using Siri
If you prefer a hands-free approach, you can also use Siri to take a screenshot. Here’s what you do:
- Activate Siri by pressing and holding the Side button or saying “Hey Siri”.
- Simply say “Take a screenshot” or “Capture the screen”.
- Siri will instantly capture a screenshot for you.
Accessing Screenshots in the Photos App
After taking a screenshot, you can easily access it in the Photos app. Here’s how:
- Open the Photos app on your iPhone.
- Tap on the “Albums” tab at the bottom of the screen.
- Scroll down and tap on “Screenshots”.
- You will find all your screenshots organized in chronological order.
Now that you know how to take a screenshot on your iPhone 13 or earlier models, capturing and sharing moments from your screen is a breeze. It’s a useful feature for capturing memorable conversations, saving important information, or troubleshooting technical issues.
Remember to be mindful of sensitive or personal information when sharing screenshots, and always respect the privacy of others.
Conclusion
Learning how to take a screenshot on your iPhone, whether it’s the latest iPhone 13 or an earlier model, is a valuable skill that can come in handy in various situations. Capturing important moments, saving crucial information, or sharing funny conversations with friends has never been easier.
With the simple button combination or the convenient Assistive Touch feature, you can effortlessly capture screenshots on your iPhone. Whether you want to capture the entire screen, a specific portion, or even record a video of your screen, the options are plentiful.
Now that you have the knowledge and techniques to take screenshots on your iPhone, go ahead and get creative. Share memorable moments, document important information, and make the most out of your iPhone’s capabilities. Screenshots are not only a useful tool but also a fun and expressive way to enhance your iPhone experience.
So, grab your iPhone, give it a try, and start capturing those moments that matter!
FAQs
Q: How do I take a screenshot on an iPhone 13?
To take a screenshot on an iPhone 13, simply press the Side button and the Volume Up button simultaneously. The screen will flash, and you’ll hear a camera shutter sound, indicating that the screenshot has been captured. The screenshot can be accessed and edited through the Photos app.
Q: Can I take a screenshot on older iPhone models?
Yes, you can take a screenshot on earlier iPhone models using a similar method. Instead of the Side button and Volume Up button, you’ll need to press the Home button and the Sleep/Wake button simultaneously to capture a screenshot.
Q: Where can I find my screenshots on an iPhone?
After taking a screenshot, it is saved automatically to the Photos app in the “Screenshots” album. To access your screenshots, open the Photos app and tap on the “Albums” tab at the bottom. Then, scroll down to find the “Screenshots” album and tap on it to view all your captured screenshots.
Q: Can I edit my screenshots on an iPhone?
Yes, you can edit your screenshots on an iPhone using the built-in Markup tool. When viewing a screenshot, tap on the “Edit” button at the top right corner of the screen. This will open up a range of editing options such as cropping, adding text, drawing, and more. Once you’re satisfied with the changes, tap on “Done” to save the edited screenshot.
Q: Are there any third-party apps for taking screenshots on iPhones?
While the native screenshot feature on iPhones is comprehensive and user-friendly, there are also several third-party apps available on the App Store that offer additional screenshot functionalities. These apps often provide advanced editing features, instant sharing options, and cloud storage integration. Some popular third-party screenshot apps for iPhones include Lightshot, Awesome Screenshot, and Snagit.
