
In today’s digital age, taking selfies has become a popular trend, allowing people to capture memorable moments and share them with friends and family. While most smartphones come equipped with a front-facing camera, Apple’s iPhone stands out among the rest for its exceptional photo quality and advanced features.
Whether you’re an aspiring influencer looking to elevate your selfie game or simply want to take stunning self-portraits, this article will guide you on how to take professional selfies with your iPhone. From understanding the best lighting and angles to utilizing the built-in camera features and editing tools, we will explore the tips and tricks that will transform your selfies from average to extraordinary.
So, grab your iPhone and get ready to unlock your inner photographer as we delve into the world of professional selfies!
Inside This Article
- Techniques for Better Lighting
- Utilizing the Timer and Burst Mode
- Mastering the Angles and Poses
- Utilizing Third-Party Apps for Editing
- Conclusion
- FAQs
Techniques for Better Lighting
When it comes to taking professional selfies, lighting plays a crucial role. The right lighting can enhance your features, minimize flaws, and give your selfies a polished and professional look. Here are some techniques to help you achieve better lighting for your selfies:
1. Natural Light: The most flattering light for selfies is natural light. Find a well-lit area with plenty of indirect sunlight, like near a window or outdoors in the shade. Avoid direct sunlight as it can create harsh shadows and wash out your complexion.
2. Golden Hour: Make the most of the “golden hour,” which occurs during the first and last hour of sunlight. The soft, warm light during this time can add a beautiful glow to your selfies. Plan your photo shoots accordingly to take advantage of this magical lighting.
3. Use a Reflector: If you’re shooting indoors or in low-light conditions, consider using a reflector to bounce light onto your face. You can use a piece of white foam board or a specialized reflector to fill in shadows and create a more balanced and flattering lighting setup.
4. Ring Light: Investing in a ring light is a game-changer for selfie enthusiasts. These portable lights provide even illumination on your face, eliminating harsh shadows and giving your selfies a professional studio-like look. You can find affordable ring lights that work well with smartphones.
5. Selfie Mode: Many smartphones come with a “selfie mode” or beauty filter settings. While these options can help enhance your appearance, be mindful not to overdo it. Use the beauty filter sparingly to maintain a natural and realistic look in your selfies.
6. Experiment with Angles: Changing the angle of the light source can dramatically alter the look of your selfies. Try different positions and angles to find the most flattering lighting setup for your face. Remember, the key is to create soft, diffused light that brings out your best features.
7. LED Case: If you want to take your selfie lighting to the next level, consider getting an LED case for your phone. These cases have built-in LED lights that provide continuous and adjustable illumination, allowing you to control the lighting ambiance for your selfies.
Remember, practice makes perfect, so don’t be afraid to experiment and try different lighting setups to find what works best for you. With these techniques, you’ll be on your way to taking professional-looking selfies in no time.
Utilizing the Timer and Burst Mode
One of the most effective techniques for capturing professional selfies with an iPhone is to utilize the Timer and Burst Mode features. These features can help you achieve well-composed and natural-looking photos without the need for someone else to click the shutter for you.
By using the Timer feature, you can set a time delay before the photo is taken, giving you enough time to position yourself and strike a pose. This is especially useful when you want to be in control of the timing and capture the perfect shot.
To enable the Timer feature on your iPhone, open the Camera app, tap on the timer icon, and select the desired delay. Whether it’s a few seconds or even 10 seconds, choose the length that allows you enough time to get ready.
Once the Timer is set, prop up your iPhone on a stable surface or use a tripod to keep it steady. This will ensure that the camera remains still and the resulting photos are sharp and focused.
Alternatively, Burst Mode is another fantastic tool that can help you capture the perfect selfie. Burst Mode allows your iPhone to take a rapid series of photos with a single press and hold of the shutter button.
To activate Burst Mode, simply open the Camera app and long-press the shutter button. Your iPhone will then capture a burst of photos, allowing you to choose the best shot from the sequence later. This is particularly useful when you want to capture a candid moment or a dynamic pose.
After capturing a burst of photos, you can go through them to select the ideal shot. To view burst photos, go to your Photos app, find the burst sequence, and tap “Select.” Swipe through the photos and choose the one that highlights your best angles and expressions.
Utilizing the Timer and Burst Mode features effectively requires a bit of practice and experimentation. Don’t be afraid to try out different poses, angles, and settings to find what works best for you. Take advantage of the flexibility and convenience offered by these features to capture stunning, professional-looking selfies with your iPhone.
Mastering the Angles and Poses
Taking a professional-looking selfie is all about finding the right angles and poses that flatter your features. With a few simple tips and tricks, you can elevate your selfie game to the next level. Here are some suggestions to help you master the art of angles and poses for stunning selfies:
1. Find your best side: We all have a preferred side of our face that looks better in photos. Take some time to experiment and find which side works for you. Once you’ve identified your best side, make sure to angle your face towards the camera to highlight your best features.
2. The power of the chin: One of the secrets to a great selfie is the positioning of your chin. Avoid tilting your chin too high or too low, as it can create unflattering shadows or a double chin effect. Instead, elongate your neck and slightly push your chin forward for a defined jawline.
3. Play with different poses: It’s important to explore different poses to add variety to your selfie collection. Tilt your head slightly, try a slight smile, or experiment with different facial expressions. These small adjustments can make a big difference in the overall look and feel of your selfie.
4. Use props and accessories: Props and accessories can add interest and personality to your selfies. Whether it’s a hat, sunglasses, or a fun backdrop, incorporating these elements can make your selfies stand out. Experiment and have fun with different props to find what works best for you.
5. Consider the background: Pay attention to the background of your selfie. A cluttered or distracting background can take away from the focus on you. Opt for a simple and clean background that compliments your overall aesthetic.
6. Experiment with angles: Don’t be afraid to try different angles when taking selfies. Hold the camera slightly above or below eye level, tilt it to the side, or even experiment with a bird’s eye view. Changing the angle can change the perspective and create visually appealing and unique selfies.
Remember, mastering angles and poses takes practice. Take the time to experiment, review your selfies, and learn what works best for you. With time and practice, you’ll be able to capture professional-looking selfies that showcase your best self.
Utilizing Third-Party Apps for Editing
While the built-in editing tools on your smartphone can do wonders for enhancing your selfies, there are limitless possibilities when you venture into the world of third-party apps. These apps offer a wide range of advanced editing features that can take your selfies to the next level.
One popular app among professionals and amateurs alike is Adobe Lightroom. It provides powerful editing tools, allowing you to adjust exposure, color balance, and even remove blemishes. With its extensive selection of presets, you can effortlessly achieve various styles and moods in your selfies.
If you’re looking for more creative options, consider using VSCO. This app offers an array of vintage film-like filters that can add a unique touch to your selfies. You can also experiment with different editing tools to fine-tune details like exposure, sharpness, and saturation.
For those who want to transform their selfies into works of art, Prisma is a fantastic choice. This app uses artificial intelligence to apply artistic filters inspired by famous paintings. By simply selecting a filter, your selfie can be transformed into a stunning piece of art.
If you prefer a more intuitive and user-friendly interface, Snapseed is worth exploring. With its powerful editing tools and simple gestures, you can easily enhance lighting, adjust colors, and sharpen details in your selfies. It also offers a wide range of filters and effects to give your photos a unique look.
Lastly, Facetune is a popular choice for portrait retouching. This app allows you to smooth out skin, whiten teeth, remove imperfections, and even reshape facial features. While it’s important to maintain a natural look in your selfies, Facetune can be a valuable tool for fine-tuning and enhancing specific areas.
Remember, the key to utilizing third-party editing apps is to strike a balance between enhancing your selfies and keeping them authentic. Experiment with different apps, explore their features, and find the ones that best complement your style and vision.
By using these apps in conjunction with the lighting and posing tips mentioned earlier, you’ll be well on your way to capturing professional-quality selfies that showcase your unique personality and style.
Conclusion
With the advancements in smartphone technology, taking professional selfies with an iPhone has never been easier. By following the tips and techniques mentioned in this article, you can elevate your selfie game and capture stunning self-portraits.
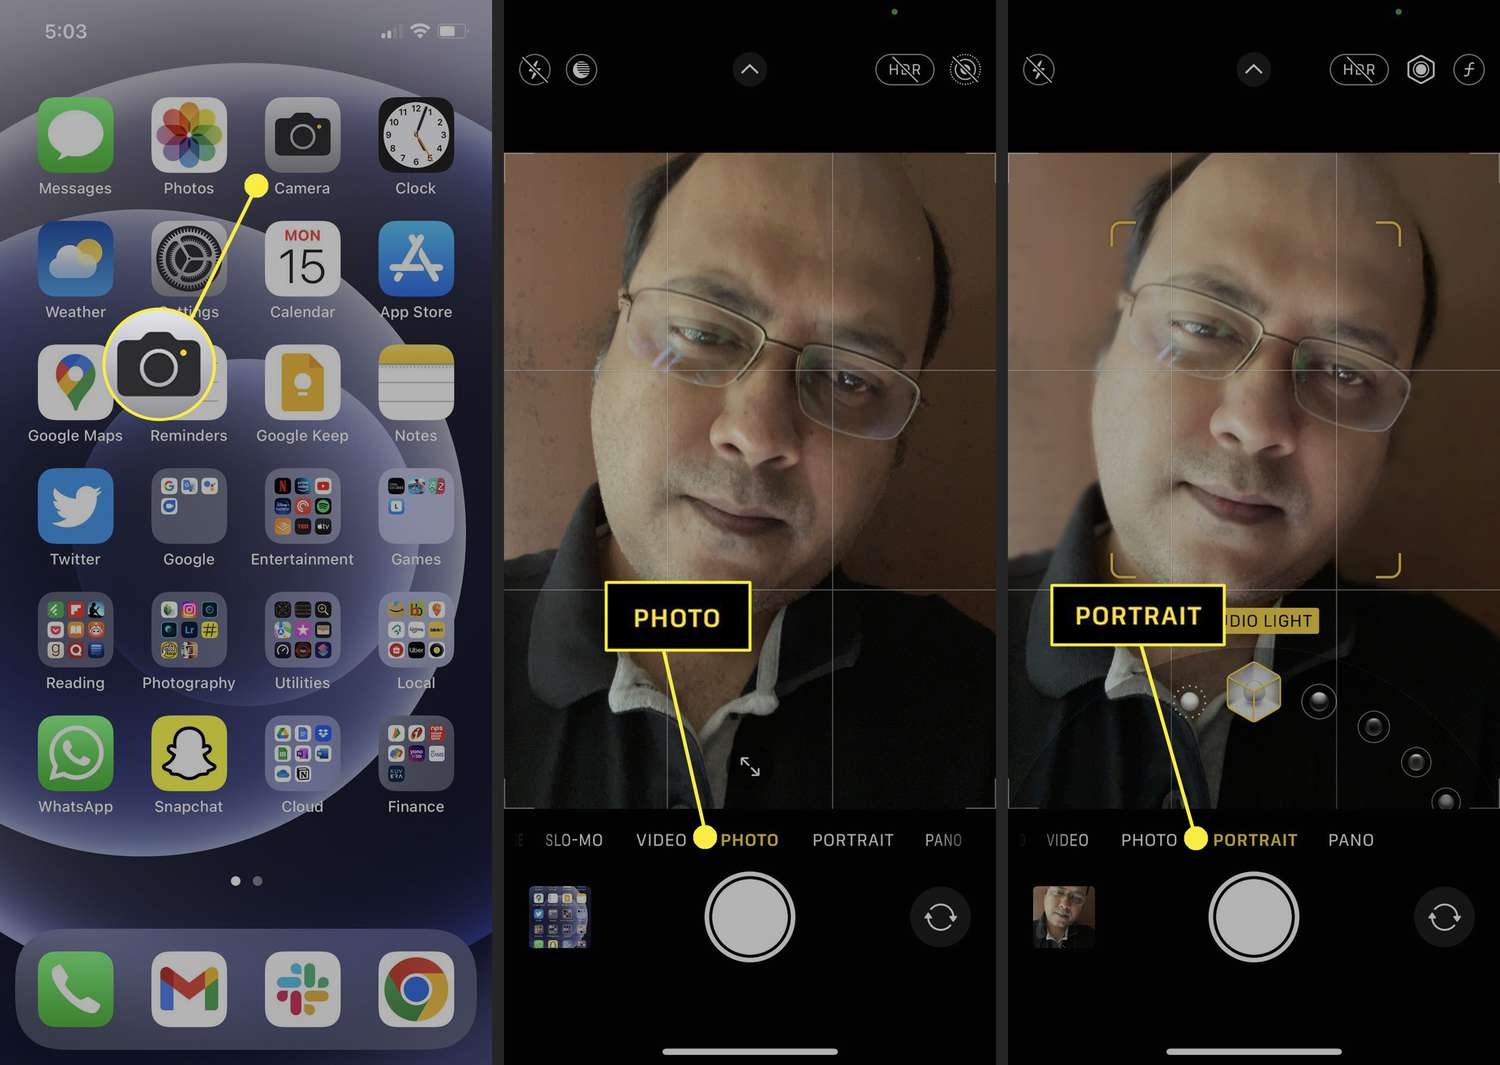
Remember to find good lighting, experiment with different angles, use the iPhone’s portrait mode, and make use of third-party apps and accessories to enhance your photos. Additionally, don’t be afraid to get creative and add personal touches to make your selfies unique.
Whether you’re a social media enthusiast, a blogger, or simply someone who wants to capture beautiful memories, these tips will help you take professional-looking selfies and stand out from the crowd.
So, grab your iPhone, find your best angle, and start snapping those incredible selfies that will impress your friends and followers!
FAQs
1. Can I take professional selfies with my iPhone?
2. What are the key features to look for in an iPhone for taking professional selfies?
3. Are there any specific settings or apps that can help me take better selfies with my iPhone?
4. How can I improve the lighting in my selfies using an iPhone?
5. Are there any tips or tricks to pose and frame shots for professional-looking selfies with an iPhone?