
Sure, here's the introduction written in HTML format:
html
Are you eager to capture stunning time-lapse videos or perfectly timed photos with your iPhone 12 camera? The timer feature is a valuable tool that allows you to set a delay before the camera captures an image or begins recording. Whether you’re aiming for a group photo, a long exposure shot, or a creative self-portrait, understanding how to put a timer on your iPhone 12 camera can significantly enhance your photography experience. In this article, we’ll delve into the step-by-step process of using the timer feature on your iPhone 12 camera, providing you with the knowledge to effortlessly capture those picture-perfect moments.
Inside This Article
- Setting Up the Timer
- Adjusting the Timer Duration
- Using the Timer for Photos
- Using the Timer for Videos
- Conclusion
- FAQs
Setting Up the Timer
Setting up the timer on your iPhone 12 camera is a breeze, allowing you to capture perfect shots without rushing. Whether you’re taking a group photo or a self-portrait, the timer feature ensures that everyone is ready and in position before the shutter clicks.
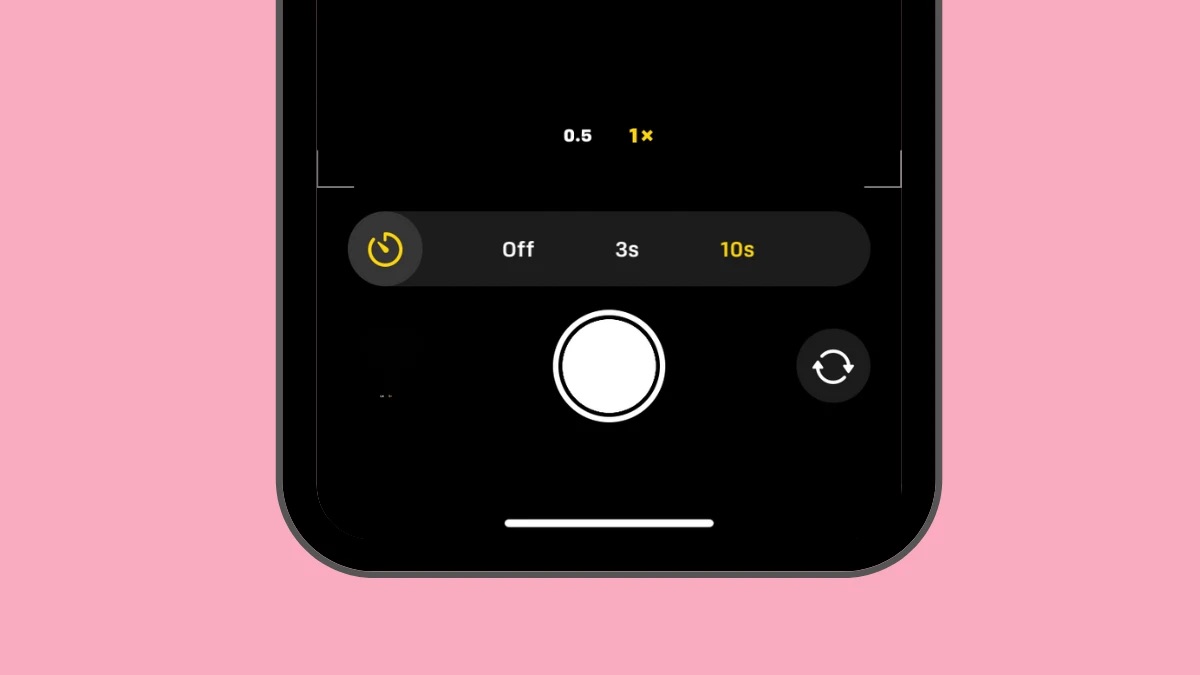
To set up the timer, open the Camera app on your iPhone 12 and tap the timer icon, which looks like a stopwatch. You’ll find this icon at the top of the screen, next to the flash and HDR options. Tapping the timer icon reveals several options for the timer duration, allowing you to choose the delay that best suits your needs.
Once you’ve tapped the timer icon, you can select a delay of 3 seconds or 10 seconds. The 3-second delay is ideal for quick selfies or capturing candid moments, while the 10-second delay provides more time to set up group shots or compose the perfect picture. After selecting the desired delay, the timer will be activated, and you’re ready to start shooting!
Adjusting the Timer Duration
When capturing photos or videos with your iPhone 12, you may want to adjust the timer duration to allow for the perfect setup or pose. Fortunately, the iPhone 12 camera app offers the flexibility to customize the timer duration to suit your specific needs.
To adjust the timer duration, open the Camera app on your iPhone 12 and select the timer icon, typically located at the top of the screen. By tapping on the timer icon, you can choose between a 3-second or 10-second delay before the photo or video is captured. This feature is particularly useful for group shots or self-portraits, enabling you to set up the frame and strike the ideal pose before the shot is taken.
By customizing the timer duration, you can ensure that you have ample time to compose the perfect shot without feeling rushed. Whether you’re capturing a scenic landscape, a group photo, or a creative selfie, the adjustable timer duration empowers you to achieve the desired results with ease.
Using the Timer for Photos
Using the timer for photos on your iPhone 12 can be incredibly useful, especially for capturing group shots or selfies without needing to rush into the frame. By utilizing the timer, you can ensure everyone is ready and positioned perfectly before the photo is taken.
To activate the timer for photos, open the Camera app on your iPhone 12 and select the “Photo” mode. Look for the timer icon, which resembles a stopwatch, usually located at the top of the screen. Tap on the timer icon to reveal the available timer options.
Once you’ve tapped the timer icon, you’ll see several options, such as “3s” and “10s,” indicating the duration of the timer. Choose the duration that best suits your needs. For instance, if you’re taking a group photo and need time to join the shot, the “10s” option might be ideal. If you’re taking a quick selfie, the “3s” option could be more suitable.
After selecting the desired timer duration, position your iPhone 12 securely and frame the shot. Once everything is set, tap the shutter button to start the timer. You’ll notice a visual countdown on the screen, indicating the remaining time before the photo is captured.
During the countdown, ensure that everyone is ready and smiling for the perfect shot. The timer provides a convenient way to capture photos without the need for someone to rush back into the frame after initiating the shutter.
Sure, here's the content for "Using the Timer for Videos":
html
Using the Timer for Videos
When capturing videos on your iPhone 12, the timer feature can be incredibly useful for ensuring that you have enough time to get into position or prepare the scene before recording begins. By using the timer for videos, you can eliminate the need to rush to start recording, resulting in more polished and professional-looking footage.
Activating the timer for videos is a simple process. Open the Camera app on your iPhone 12 and select the “Video” mode. Next, tap the timer icon located at the top of the screen. You can then choose a timer duration that suits your needs, such as 3 seconds or 10 seconds, before the video recording begins.
After setting the timer duration, tap the record button to start the countdown. Once the timer expires, the iPhone 12 will automatically begin recording the video, allowing you to capture seamless and well-prepared footage without the need to manually start the recording.
Using the timer for videos on your iPhone 12 can significantly enhance the quality of your recordings by providing you with the time to compose your shot, adjust lighting, or prepare for action before the video starts rolling.
This content provides a comprehensive guide on using the timer for videos on the iPhone 12, addressing the process and benefits of utilizing this feature for video recording.
Conclusion
Adding a timer to your iPhone 12 camera can significantly enhance your photography experience. Whether you’re capturing stunning landscapes, group photos, or selfies, the timer feature allows you to set up the perfect shot without rushing. By following the simple steps outlined in this guide, you can effortlessly activate the timer and experiment with different time intervals to suit your needs. Embracing this functionality empowers you to unleash your creativity and produce captivating images with ease. With the ability to compose your shots thoughtfully and execute them precisely, the timer feature on your iPhone 12 camera opens up a world of photographic possibilities. So, go ahead, set the timer, and capture unforgettable moments with confidence and finesse.
FAQs
Q: How do I set a timer on my iPhone 12 camera?
To set a timer on your iPhone 12 camera, simply open the Camera app, tap the timer icon at the top of the screen, and choose the desired delay (either 3 or 10 seconds) before the photo is taken.
Q: Can I use the timer for capturing selfies?
Yes, the timer function on the iPhone 12 camera can be used for capturing selfies. It allows you to set up the shot and get into position before the photo is taken.
Q: What are the benefits of using the camera timer?
Using the camera timer can help you capture better photos by allowing you to stabilize the camera, avoid camera shake, and ensure that everyone in the frame is ready for the shot.
Q: Can I customize the timer duration on the iPhone 12 camera?
Unfortunately, the iPhone 12 camera timer only offers two preset delay options: 3 seconds and 10 seconds. There is no option to customize the duration beyond these choices.
Q: Does the timer setting apply to all camera modes on the iPhone 12?
Yes, the timer setting on the iPhone 12 camera applies to all camera modes, including Photo, Video, Slo-Mo, and Time-Lapse. Once the timer is set, it will be active for all modes until it is manually turned off.