
Are you new to using a Cisco phone and feeling a bit overwhelmed? Don’t worry, we’re here to help! Using a Cisco phone may seem daunting at first, but once you familiarize yourself with its features and navigation, you’ll be making calls, managing contacts, and enjoying all its functionalities with ease.
In this comprehensive guide, we’ll walk you through the steps on how to use a Cisco phone effectively. Whether you’re in a corporate setting or a small business environment, understanding the ins and outs of your Cisco phone will not only improve your communication experience but also boost your productivity. So, let’s dive in and unlock the potential of your Cisco phone!
Inside This Article
Overview
Using a Cisco Phone can significantly enhance your communication experience. Cisco Phones are renowned for their advanced features, user-friendly interface, and seamless integration with various communication systems. Whether you are using a Cisco IP Phone or a Cisco Unified Communications Manager, this guide will provide you with an overview of how to use your Cisco Phone efficiently.
With a Cisco Phone, you can enjoy various communication capabilities, including making and receiving calls, accessing voicemail, and managing your contacts. Additionally, Cisco Phones offer features like call forwarding, call waiting, call transfer, conference calling, and many more.
Before diving into the specifics, it’s important to ensure that your Cisco Phone is properly set up. This includes connecting it to the network, configuring the necessary settings, and familiarizing yourself with the phone’s keypad and display.
Once your Cisco Phone is set up, you can start making calls to colleagues, clients, and friends. Cisco Phones offer seamless call management, allowing you to dial numbers directly, use speed dial options, or access your contacts list. With the built-in speaker and microphone, you can have clear and hands-free conversations.
When you are not available to take calls, the voicemail feature of your Cisco Phone comes to the rescue. You can easily access your voicemail through the phone’s interface or remotely through another device. The voicemail system allows callers to leave messages, which you can listen to, delete, or forward to others.
In addition to the basic functionalities, Cisco Phones offer a range of advanced features depending on the specific model and configuration. These include video calling, presence status, call recording, and integration with other business applications.
Using your Cisco Phone efficiently requires practice and familiarity. However, with this guide, you will have a solid understanding of the essential functions and features. So, let’s proceed to the next section to learn how to set up your Cisco Phone for optimal usage.
Setting Up Your Cisco Phone
Setting up your Cisco phone is the first step in getting it up and running. Whether you’re a new user or switching from a different phone model, the process is relatively straightforward.
1. Unbox your Cisco phone: Start by carefully unboxing your Cisco phone and taking out all the components. You should have the phone itself, a handset, a network cable, and a power adapter (if required).
2. Connect to the network: Use the network cable to connect your Cisco phone to your network switch or router. Make sure the cable is securely plugged into both the phone’s network port and the network device.
3. Power up the phone: If your Cisco phone requires a power adapter, connect it to the phone and plug it into a power outlet. The phone should power up and display the Cisco logo.
4. Follow the on-screen prompts: Once the phone is powered up, it will guide you through the initial setup process. Follow the on-screen prompts to configure the basic settings such as language, time zone, and network connectivity.
5. Enter your extension and credentials: Depending on your organization’s setup, you may need to enter your phone extension and credentials to connect to the telephone network. Consult your system administrator for the correct information.
6. Customize your phone settings: After the initial setup is complete, you can customize your Cisco phone to suit your preferences. This includes setting up speed dials, adjusting display settings, and configuring call forwarding, among other options.
7. Test your phone: Once you have completed the setup and customization process, it’s a good idea to test your Cisco phone by making a test call. Ensure that you can both make and receive calls successfully before using it for daily communication.
By following these steps, you can easily set up your Cisco phone and start using it for your communication needs. If you encounter any difficulties during the setup process, consult the user manual or reach out to your IT department for assistance.
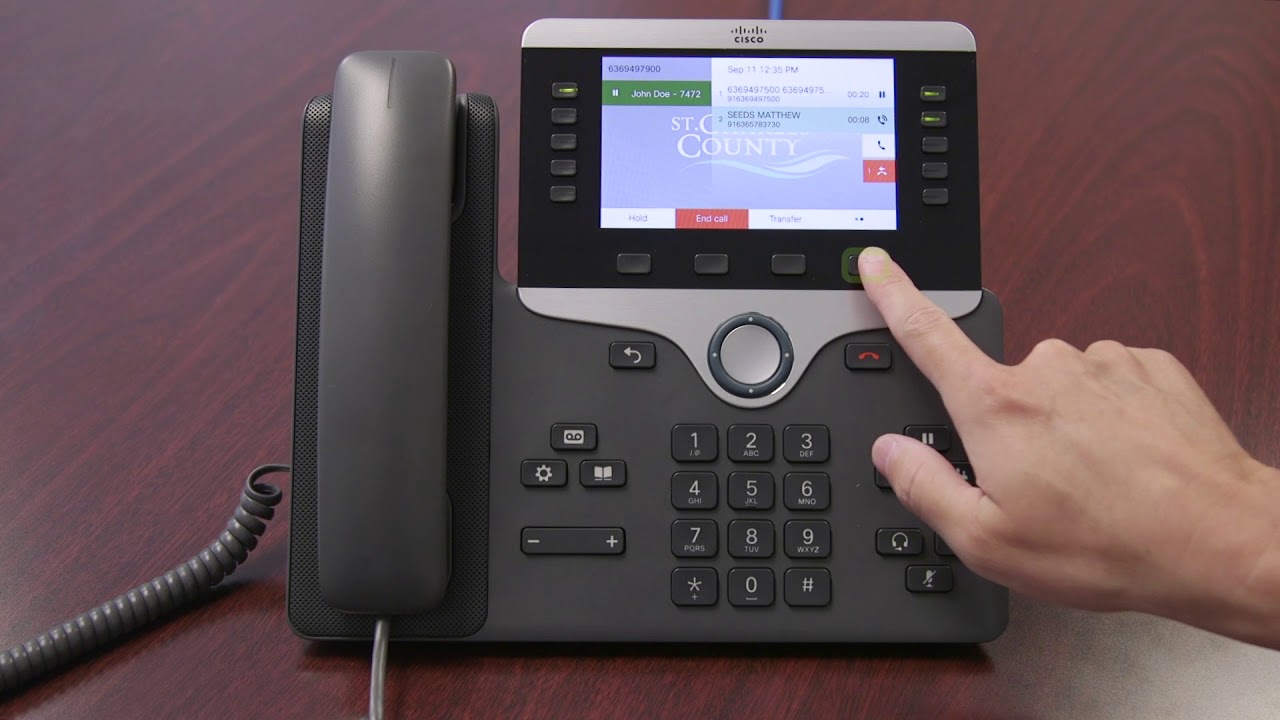
Making Calls
Now that you have set up your Cisco phone, it’s time to start making calls. Whether you want to reach out to a colleague or connect with a client, the process is simple and efficient. Follow the steps below to make a call using your Cisco phone:
- Pick up the handset: Lift the handset from the phone’s cradle, or press the speakerphone button to activate the hands-free mode.
- Dial the number: Use the keypad on your Cisco phone to enter the phone number you wish to call. Ensure that you include the appropriate country and area codes if necessary.
- Press the Call button: Once you have entered the number, press the Call button or the headset button on your phone to initiate the call. If you are using the hands-free mode, you don’t need to press any buttons; simply start speaking.
- Answering a call: When you receive an incoming call, your Cisco phone will ring or vibrate depending on the notification settings. To answer the call, lift the handset or press the Answer button on the phone’s screen.
- Adjusting the volume: During a call, you can adjust the volume by using the volume buttons located on the side of the phone. Increase or decrease the volume based on your preferences.
- Ending a call: Once you have finished the conversation, simply hang up the handset or press the End Call button on the phone’s display. The call will be disconnected, and the line will become available for the next call.
With these easy steps, you will be able to make and answer calls effortlessly using your Cisco phone. Remember to always verify the number you are dialing before initiating the call to ensure accuracy and avoid misdials. Enjoy clear and reliable communication with your Cisco phone!
Managing Voicemail
Voicemail is a valuable feature on your Cisco phone that allows you to receive and manage voice messages when you are unavailable to answer calls. Here are some tips on managing your voicemail effectively:
1. Setting up your voicemail: To begin, you will need to set up your voicemail mailbox. Follow the instructions provided by your system administrator or refer to your Cisco phone’s user manual. Typically, you will be prompted to enter a personalized greeting and set a PIN code for accessing your voicemail.
2. Checking voicemail messages: To check your voicemail messages, press the voicemail button on your Cisco phone or dial the dedicated voicemail access number. Enter your PIN code when prompted, and you will be able to listen to your messages.
3. Managing your voicemail: Once you have accessed your voicemail, you can perform several actions to manage your messages:
- Listen to messages: Use the playback controls on your Cisco phone to listen to your voicemail messages. You can pause, rewind, or fast forward to review the message.
- Delete messages: If you have listened to a message and no longer need it, you can delete it by selecting the appropriate option on your phone or using the voicemail menu.
- Save messages: If you want to keep a voicemail message for future reference, you can save it. This is especially useful for important messages or messages containing important details.
- Forward messages: You may need to forward a voicemail message to another colleague or team member. Check your Cisco phone’s user manual to learn how to forward voicemail messages.
- Manage voicemail settings: You can customize your voicemail settings, such as changing your greeting or updating your PIN code, by accessing the voicemail menu on your phone.
4. Visual voicemail: Some Cisco phones support visual voicemail, which provides a visual interface for managing your voicemail messages. This feature allows you to see a list of voicemail messages, the caller’s information, and other details directly on the phone’s screen.
5. Voicemail-to-email: Another convenient feature offered by Cisco phones is voicemail-to-email integration. With this feature enabled, your voicemail messages are automatically converted into audio files and sent to your email inbox. This allows you to access and manage your voicemail messages from your computer or mobile device.
By effectively managing your voicemail on your Cisco phone, you can stay organized, ensure important messages are not missed, and streamline your communication workflow.
Conclusion
Using a Cisco phone can greatly enhance communication efficiency in the workplace. With its advanced features and intuitive interface, it provides users with a seamless and convenient way to make and receive calls, manage contacts, and access various communication tools.
By familiarizing yourself with the different functions and settings of a Cisco phone, you can leverage its full potential to optimize your communication experience. Whether you are a professional in a corporate setting or a small business owner, having a comprehensive understanding of how to use a Cisco phone will undoubtedly benefit your day-to-day operations.
Remember to consult the user manual or reach out to the IT department for further guidance if needed. So, pick up your Cisco phone and start enjoying its robust features to streamline your communication process and boost productivity.
FAQs
1. How do I set up my Cisco phone?
Setting up your Cisco phone is a straightforward process. Start by plugging in the power cable and connecting it to your network. Once powered on, the phone will go through an initialization sequence. Follow the on-screen prompts to enter your network settings, including IP address and port details. Once configured, you will be ready to use your Cisco phone.
2. How do I make a call with my Cisco phone?
To make a call with your Cisco phone, simply pick up the handset or press the speakerphone button. Then, dial the desired phone number using the keypad. If you are calling an internal extension, you may need to enter a prefix before the extension number. Press the call button or the soft key labeled “Dial” to initiate the call.
3. Can I receive and transfer calls on my Cisco phone?
Yes, you can receive incoming calls on your Cisco phone. When someone calls your phone, it will ring, and you can answer it by picking up the handset or pressing the speakerphone button.
You can also transfer calls with your Cisco phone. During an active call, press the transfer button or soft key, then enter the extension or external number to which you want to transfer the call. Finally, hang up or press the transfer button again to complete the transfer.
4. How can I set up voicemail on my Cisco phone?
To set up voicemail on your Cisco phone, press the voicemail button or the soft key labeled “Messages”. Follow the instructional prompts to record a personalized greeting and set up a voicemail PIN. Once configured, callers can leave you voicemail messages when you are unavailable or on another call.
5. Can I customize the settings on my Cisco phone?
Yes, you can customize various settings on your Cisco phone. By accessing the phone’s menu, usually through the settings or admin button, you can adjust preferences such as ringtones, volume levels, display brightness, language, and more. Additionally, depending on your phone model, you may be able to install additional applications or integrate your Cisco phone with other devices or services.