
Are you looking to use your iPad as a phone? With the advancement in technology, it is now possible to make calls and send messages directly from your iPad using your phone number. This feature allows you to stay connected with your contacts even if your phone is not readily available. Whether you want to make a quick call, send a text message, or even use video calling, the iPad phone number functionality makes it all possible. In this article, we will guide you through the steps of setting up and using your iPad as a phone with your existing phone number. So, let’s dive in and unlock the full potential of your iPad!
Inside This Article
- Setting up Your iPad Phone Number
- Receiving Calls on Your iPad
- Making Calls from Your iPad
- Managing iPad Phone Settings
- Troubleshooting iPad Phone Number Issues
- Conclusion
- FAQs
Setting up Your iPad Phone Number
Setting up your iPad phone number allows you to make and receive calls directly from your iPad, providing you with a convenient and versatile communication tool. Here’s a step-by-step guide to help you get started:
1. Verify iCloud Account: Before setting up your iPad phone number, ensure that you have signed in to your iCloud account using the same Apple ID as your iPhone. This will enable the continuity feature, allowing seamless communication between your devices.
2. Enable Wi-Fi Calling: Wi-Fi Calling is a feature that allows you to make and receive calls over Wi-Fi, even if your iPad doesn’t have cellular connectivity. To activate this feature, go to the Settings app on your iPad, select “Phone,” and enable the “Wi-Fi Calling” option.
3. Check Carrier Support: Make sure that your cellular carrier supports iPad phone number activation. Some carriers may not offer this service or may require additional fees. Reach out to your carrier’s customer support for specific details and guidance.
4. Add iPad to iPhone’s Cellular Plan: To use your existing iPhone number on your iPad, you need to add your iPad to your iPhone’s cellular plan. Go to the Settings app on your iPhone, select “Cellular,” then “Add a Plan.” Follow the prompts to link your iPad to your iPhone’s plan.
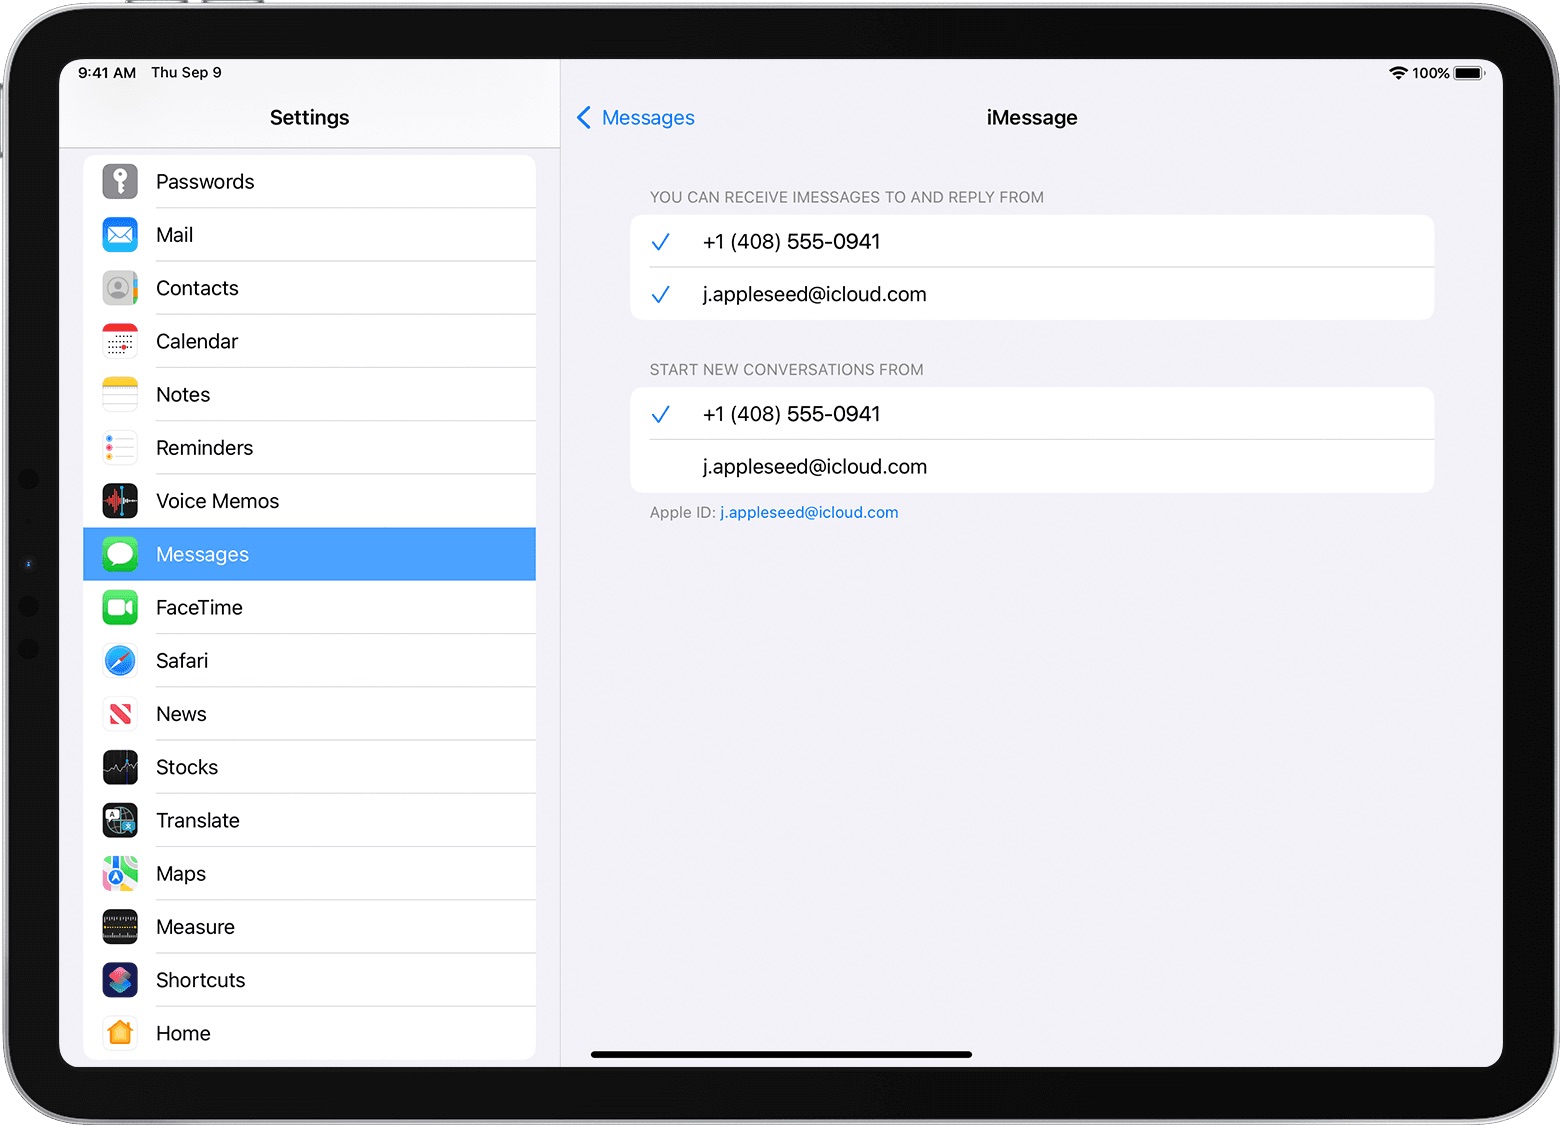
5. Set up FaceTime: FaceTime serves as an integral part of the iPad phone number setup process. Go to the Settings app on your iPad, select “FaceTime,” and ensure that your Apple ID and phone number are selected. This will allow you to make and receive FaceTime audio calls with your iPad phone number.
6. Test Incoming and Outgoing Calls: Once you have completed the setup steps, it’s crucial to test your incoming and outgoing call functionality. Use another phone to call your iPad number and check if it rings. Similarly, make a call from your iPad and verify if the call goes through successfully.
By following these steps, you can set up your iPad phone number and enjoy the convenience of making and receiving calls directly from your iPad. Remember to keep your iPad connected to Wi-Fi or have a cellular data plan to ensure uninterrupted communication.
Receiving Calls on Your iPad
One of the key advantages of using an iPad is the ability to receive phone calls, in addition to its other features. With the right settings in place, you can seamlessly answer phone calls on your iPad and enjoy the convenience of staying connected even when your iPhone is not nearby. Here’s how you can set up and manage your iPad phone number to receive calls:
1. Enable Call Forwarding: To receive calls on your iPad, you need to enable call forwarding from your iPhone. Open the Settings app on your iPhone, go to “Phone,” then “Call Forwarding.” Toggle the switch to enable call forwarding and enter your iPad’s phone number. This will redirect your incoming calls to your iPad.
2. Enable Wi-Fi Calling: To ensure a smooth calling experience on your iPad, you should also enable Wi-Fi calling. Open the Settings app on your iPad, go to “Phone,” then “Wi-Fi Calling.” Toggle the switch to enable Wi-Fi calling, and follow the instructions to set it up. This feature allows you to make and receive calls using your iPad’s internet connection, even if you have a poor cellular signal.
3. Check Do Not Disturb Settings: It’s a good idea to check your Do Not Disturb settings to make sure they won’t interfere with incoming calls. Open the Settings app on your iPad, go to “Do Not Disturb,” and ensure that “Allow Calls From” is set to “Everyone.” This ensures that your iPad will ring when receiving calls, even if it’s in Do Not Disturb mode.
4. Customize Call Audio Routing: By default, your iPad will ring when receiving calls, but you can customize the call audio routing if you prefer. Open the Settings app on your iPad, go to “Phone,” then “Audio Calls,” and choose whether you want to automatically answer calls on your iPad or have the ringtone play on both devices.
5. Use Call Relay: Apple’s Call Relay feature allows you to seamlessly transition calls between your iPhone and iPad. This means that if you answer a call on your iPad, you can easily transfer it to your iPhone without interruption. Simply tap the Handoff icon on your iPhone’s lock screen or in the multitasking view to transfer the call.
6. Test Incoming Calls: Once you have set up your iPad phone number and enabled the necessary settings, it’s a good idea to test incoming calls. Ask a friend or family member to call your iPad, and make sure the call is successfully routed to your device. Test the audio quality and ensure that you can answer the call without any issues.
With these steps, you can effectively receive phone calls on your iPad and enjoy the convenience and flexibility of staying connected. Whether you’re using your iPad for work or personal use, having the ability to receive calls ensures that you never miss an important conversation, even if your iPhone is not within reach.
Making Calls from Your iPad
If you have an iPad with cellular capabilities, you can use it to make phone calls. This can be particularly useful when your iPhone is not within reach or if you prefer the convenience of using a larger screen. Here’s a step-by-step guide on how to make calls from your iPad.
Step 1: Ensure Cellular Service
First and foremost, make sure that your iPad is connected to a cellular network. Without a cellular plan, you won’t be able to make calls from your device. To check your cellular connectivity, look for the signal bars or the LTE/3G symbol in the status bar at the top of your iPad’s screen.
Step 2: Open the Phone App
On your iPad’s home screen, locate and tap on the “Phone” app. This app looks like a green icon with a white handset. If you can’t find it, you may have placed it in a folder or moved it to a different screen. Simply use the search feature to locate the app by swiping down on your home screen and typing “Phone” in the search bar.
Step 3: Enter a Phone Number
Once the Phone app is open, you can manually enter the phone number you wish to dial using the on-screen keypad. Simply tap the number buttons to enter the digits of the phone number. You can also use the “Favorites” or “Contacts” tabs to select a contact from your saved contacts list.
Step 4: Make the Call
After entering the phone number or selecting a contact, tap the green “Call” button to initiate the call. Your iPad will connect to the cellular network and dial the number you entered. You will be able to hear the audio through the iPad’s built-in speakers and communicate using the iPad’s microphone.
Step 5: Adjust Call Settings
During the call, you can adjust the volume by using the volume buttons on the side of your iPad. You can also enable the speakerphone by tapping the “Speaker” button if you want to use the hands-free option. To end the call, tap the red “End” button on the screen.
Now that you know how to make calls from your iPad, you can take advantage of this feature to stay connected wherever you are. Whether you’re making a business call or catching up with friends and family, your iPad can serve as a convenient alternative to your iPhone for making phone calls.
Managing iPad Phone Settings
When it comes to managing your iPad phone settings, there are a few key areas to focus on. These settings allow you to customize your phone experience and optimize it to suit your needs. Whether it’s adjusting sound preferences, managing call forwarding, or setting up voicemail, here’s a guide to help you navigate through the various options.
1. Sound Settings: To manage the sound settings on your iPad phone, go to “Settings” and select “Sounds & Haptics.” Here, you can adjust the volume for ringtones, alerts, and other system sounds. Additionally, you can enable or disable the vibrate feature.
2. Notifications: Customize how you receive notifications by accessing the “Settings” app and selecting “Notifications.” From here, you can choose which apps can send you notifications and how they are displayed. You can also determine whether or not notifications will appear on your Lock Screen.
3. Do Not Disturb: The Do Not Disturb feature allows you to silence calls, alerts, and notifications when you don’t want to be bothered. To enable this setting, swipe down from the top right corner of your screen to open the Control Center. Tap on the crescent moon icon to activate Do Not Disturb mode.
4. Call Forwarding: If you want to forward calls from your iPad phone to another number, you can easily set up call forwarding in your iPad settings. Open the “Settings” app, select “Phone,” and then choose “Call Forwarding.” Enter the number you want to forward calls to, and you’re all set.
5. Cellular Data: To manage your cellular data settings, go to “Settings” and select “Mobile Data” or “Cellular.” Here, you can enable or disable cellular data for specific apps, monitor your data usage, and even set data limits to avoid unexpected charges.
6. Voicemail Setup: Setting up voicemail on your iPad phone is essential for capturing missed calls. Open the “Phone” app and tap on the “Voicemail” tab. Follow the prompts to create a voicemail greeting and set a PIN for accessing your voicemail messages.
7. Call Blocking: To block unwanted calls on your iPad phone, go to the “Phone” app and select the “Recents” tab. Find the number you want to block, tap the “i” icon next to it, and choose “Block this Caller.” You can also manage your blocked contacts by going to “Settings,” selecting “Phone,” and then choosing “Blocked Contacts.”
Remember, the settings mentioned above may vary slightly depending on the version of iOS running on your iPad. It’s always a good idea to keep your device updated to the latest software to access the most up-to-date features and settings.
Troubleshooting iPad Phone Number Issues
Having issues with your iPad Phone Number? Don’t worry, we’ve got you covered. Here are some common problems you may encounter and how to troubleshoot them.
1. No Incoming Calls: If you’re not receiving any calls on your iPad, first check if the “Do Not Disturb” mode is enabled. You can find it in the Control Center or the Settings app. Make sure it’s turned off. Additionally, ensure that your iPad is connected to a stable internet connection and that the Caller ID settings are configured correctly.
2. No Outgoing Calls: If you’re unable to make calls from your iPad, there are a few things you can check. First, ensure that you have sufficient cellular data or a Wi-Fi connection. If you’re using Wi-Fi, check if the network you’re connected to allows Wi-Fi calling. You can also try resetting the network settings on your iPad by going to Settings > General > Reset > Reset Network Settings.
3. Poor Call Quality: If you’re experiencing poor call quality on your iPad, check your internet connection. A weak Wi-Fi signal or low cellular data can affect the call quality. Consider switching to a stronger network or connecting to a different Wi-Fi network. It’s also a good idea to close any unnecessary apps running in the background, as they can consume bandwidth and affect call quality.
4. Activation Issues: If you’re having trouble activating your iPad phone number, ensure that your iPad is updated to the latest iOS version. Sometimes, a simple software update can resolve activation issues. If the problem persists, contact your cellular service provider to confirm that the iPad is compatible with their network and to ensure that your account is properly set up for the iPad phone number feature.
5. Call Forwarding Problems: If you’re experiencing issues with call forwarding on your iPad, make sure that the feature is enabled and configured correctly. You can find the call forwarding settings in the Settings app under FaceTime or Phone, depending on your iOS version. Double-check the forwarding number and make sure it’s correct. If the problem persists, try disabling and re-enabling call forwarding or contact your service provider for assistance.
6. Error Messages: If you encounter any error messages while using the iPad phone number feature, take note of the specific message and try to search online for solutions. Many error messages have specific troubleshooting steps that can help resolve the issue. If you can’t find a solution, reach out to Apple support or your cellular service provider for assistance.
Remember, if you’re still encountering issues with your iPad phone number after trying these troubleshooting steps, it’s always best to seek assistance from Apple support or your cellular service provider. They will have specialized knowledge and resources to help resolve any technical issues you may be facing.
Conclusion
Using an iPad phone number is a convenient and practical way to stay connected with friends, family, and colleagues. Whether you use it for personal or professional purposes, having a dedicated phone number on your iPad can enhance your communication experience. With the ability to make and receive calls, send text messages, and access various communication apps, your iPad can function as a versatile communication device.
By following the steps outlined in this article, you can set up and use an iPad phone number with ease. Remember to choose a reliable service provider, ensure your device is compatible, and activate the phone number on your iPad. With these key considerations in mind, you’ll be able to seamlessly integrate your iPad into your communication routine.
So, go ahead and unlock the full potential of your iPad by utilizing its phone number feature. Stay connected, stay productive, and enjoy the convenience of a dedicated phone number on your iPad!
FAQs
1. Can I use my iPad as a phone?
Yes, you can use your iPad as a phone by leveraging features such as Wi-Fi calling, FaceTime, and third-party apps like Skype or WhatsApp. With Wi-Fi calling, you can make and receive phone calls using your iPad if it is connected to a Wi-Fi network. FaceTime allows you to make audio and video calls to other Apple devices. Third-party apps like Skype and WhatsApp also provide voice and video calling capabilities.
2. How do I enable Wi-Fi calling on my iPad?
To enable Wi-Fi calling on your iPad, you need to have a compatible device that supports this feature. Go to the Settings app, select “Cellular Data” or “Mobile Data” depending on your iPad variant, and then look for the “Wi-Fi Calling” option. Toggle it on and follow the on-screen instructions to set it up with your carrier. Keep in mind that you may need to contact your carrier to activate Wi-Fi calling on your iPad.
3. Can I use my existing phone number on my iPad?
Yes, it is possible to use your existing phone number on your iPad if you have an iPhone with the same SIM card or if your carrier supports number sharing. With number sharing, you can link your iPhone and iPad so that calls and messages to your phone number can be received on both devices. This allows you to use your iPad as an extension of your iPhone for phone calls and messaging.
4. Are there any limitations when using an iPad as a phone?
While using an iPad as a phone is convenient, there are a few limitations to consider. Firstly, Wi-Fi calling requires a stable internet connection, so you may experience call quality issues if your Wi-Fi signal is weak or if you’re in an area with poor internet coverage. Additionally, not all carriers support Wi-Fi calling on iPads, so it’s important to check with your carrier beforehand. Lastly, battery life may be shorter when using your iPad as a phone compared to regular usage.
5. What other apps can I use to make phone calls on my iPad?
Aside from Wi-Fi calling and FaceTime, you can also use third-party apps like Skype, WhatsApp, Google Voice, or Viber to make phone calls on your iPad. These apps require an internet connection and allow you to call other users of the same app, as well as make international calls at affordable rates. Simply download the app from the App Store, sign in or create an account, and you’ll be able to make calls using your iPad.