
Are you eager to capture the passing of time in a visually captivating way? Look no further than your iOS 8 device. With the latest update, Apple introduced an exciting new feature that allows you to shoot stunning time-lapse videos. Whether you want to document the sunset over a picturesque landscape, the hustle and bustle of a city street, or the growth of a plant, the time-lapse feature on iOS 8 is at your disposal. In this article, we will guide you through the step-by-step process of creating breathtaking time-lapse videos with your iOS 8 device. Get ready to unleash your creativity and amaze your friends with your newfound video shooting skills. Let’s dive in!
Inside This Article
- Setting Up Your Time-Lapse Video Feature
- Adjusting the Time-Lapse Interval
- Choosing the Right Subject and Location
- Enhancing Your Time-Lapse Video with Post-Processing Techniques
- Conclusion
- FAQs
Setting Up Your Time-Lapse Video Feature
Time-lapse videos are a fantastic way to capture the passage of time and create stunning visual sequences. With the release of iOS 8, Apple introduced a built-in time-lapse video feature, making it easier than ever to create captivating time-lapse videos on your iPhone. In this guide, we’ll walk you through the steps to set up and start using this exciting feature.
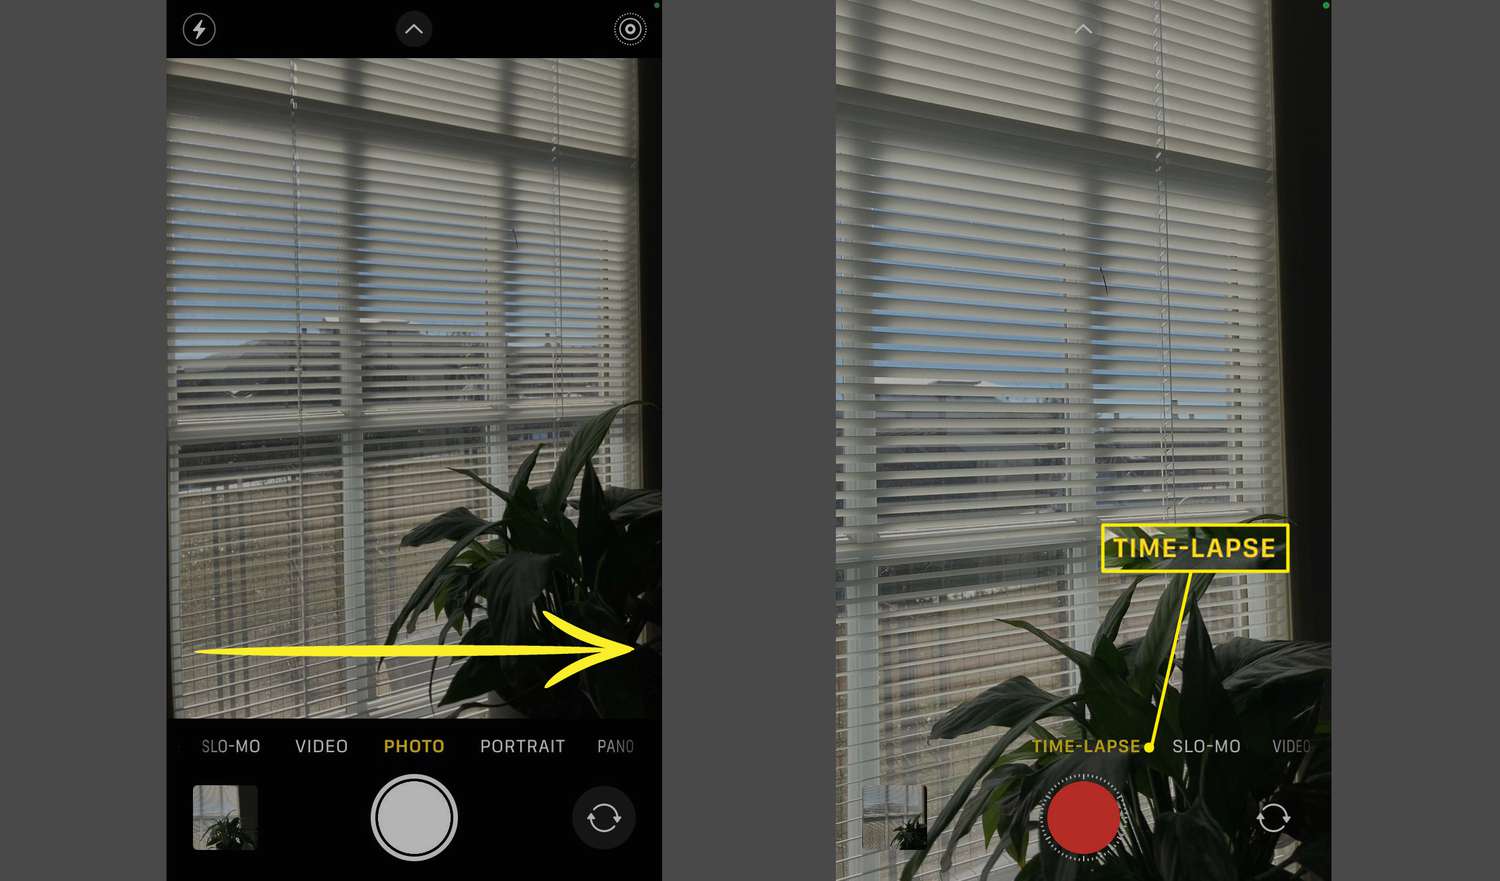
To begin, open the Camera app on your iPhone running iOS 8 or later. Swipe right until you reach the “Time-Lapse” mode. It looks like a clock face with a purple hue. Tap on the icon to access the time-lapse feature.
Once you’re in the time-lapse mode, you’ll notice a few additional controls. At the bottom, you’ll find the shutter button, which starts and stops the time-lapse recording. Above the shutter button, you’ll see the preview window, displaying a real-time preview of your time-lapse video as you capture it.
Before starting the recording, make sure your iPhone is stable and well-positioned. Time-lapse videos capture movement over an extended period, so it’s essential to keep your device steady throughout the recording process. Consider using a tripod or stabilizing device for the best results.
Now, it’s time to configure the settings for your time-lapse video. Tap on the settings icon located at the top-right corner of the screen. Here, you can adjust the duration of the time-lapse and the speed of the video playback.
The duration determines how long your iPhone will capture the time-lapse footage. You can choose between various durations, ranging from a few minutes to several hours. Keep in mind that longer durations will result in more extended time-lapse videos.
The speed setting controls the playback rate of your time-lapse video. You can experiment with different speeds to achieve the desired effect, from a slow, dramatic look to a fast-paced, energetic feel. Try selecting different speeds to see which one suits your subject and aesthetic vision.
Once you have configured the settings to your liking, you’re ready to start recording your time-lapse video. Simply tap the shutter button to begin the recording. It’s important to let the recording run for the desired duration to capture enough frames to create a smooth and engaging time-lapse sequence.
While your iPhone is capturing the time-lapse video, it’s essential to avoid any unnecessary movements or disruptions. Any slight movement or vibration can result in blurry footage and spoil the overall effect of the time-lapse. Make sure to keep your device still and undisturbed throughout the recording process.
Once you’re satisfied with the length of your time-lapse video, tap the shutter button again to stop the recording. Your time-lapse video will be automatically saved to your Camera Roll, ready to be enjoyed and shared with friends and family.
That’s it! You have now successfully set up and recorded a time-lapse video using the built-in feature in iOS 8. Feel free to experiment with different subjects, durations, and playback speeds to unleash your creativity and capture mesmerizing moments in time.
Adjusting the Time-Lapse Interval
If you want to create a captivating time-lapse video, one of the key factors to consider is adjusting the time-lapse interval. The time-lapse interval determines how often your camera captures a frame, which in turn affects the speed of the final video.
Every mobile phone has different default time-lapse interval settings, but they can usually be adjusted to suit your desired effect. To do this on iOS 8, follow the steps below:
- Open the Camera app on your iPhone.
- Swipe to the right twice to enter the Time-Lapse mode.
- Tap on the time-lapse icon in the lower-right corner to access the time-lapse settings.
- Drag the slider left or right to adjust the interval.
- Preview the changes in real-time by tapping the play button.
- Experiment with different interval settings to find the one that creates the desired effect for your time-lapse video.
It’s important to note that the ideal time-lapse interval will vary depending on the subject and the duration of the event or scene you are capturing. Generally, a shorter interval (e.g., 1 second) will result in a faster and more dynamic video, while a longer interval (e.g., 5 seconds) will create a slower and smoother effect.
Additionally, consider the pace of the action or movement occurring in your scene. If there is fast-paced action, such as a bustling city street or a bustling crowd, a shorter interval will help capture the rapid changes. On the other hand, for slow-moving subjects, like the changing colors of a sunset, a longer interval can better showcase the gradual transformation.
Remember, adjusting the time-lapse interval allows you to control the speed and rhythm of your time-lapse video, giving you the opportunity to create stunning visuals that capture the essence of a long period in just a few seconds.
Choosing the Right Subject and Location
When it comes to shooting captivating time-lapse videos, choosing the right subject and location is key. Here are some tips to help you make the best choices:
1. Consider Motion and Change: Look for subjects that exhibit interesting movement or undergo noticeable changes over time. It could be a bustling city street, a changing landscape, or even a flower blooming. The more dynamic the subject, the more captivating your time-lapse video will be.
2. Capture Vibrant Colors: Choose subjects with vibrant colors, as they tend to grab viewers’ attention. A colorful sunset, a field of wildflowers, or a bustling marketplace can all make visually stunning time-lapse videos.
3. Explore Unique Perspectives: Look for angles and perspectives that offer a fresh and unique view of your subject. This could mean getting up close and personal or finding a high vantage point. Experiment with different perspectives to add depth and interest to your time-lapse footage.
4. Plan for Proper Lighting: Consider the lighting conditions when choosing your subject and location. Soft morning or evening light can create a beautiful cinematic effect, while harsh midday sun may wash out your footage. Additionally, be mindful of the direction of the light source to add depth and dimension to your time-lapse video.
5. Research Weather Patterns: If your subject is heavily influenced by weather, research the local weather patterns before shooting. Cloud formations, storms, or seasonal changes can add drama and visual interest to your time-lapse video.
6. Incorporate Interesting Elements: Look for elements that can add visual interest to your time-lapse video. This could be anything from moving vehicles, animals, or people interacting with the scene. Incorporating these elements can create a story within your time-lapse and make it more engaging for viewers.
7. Think About Background: Consider what will be in the background of your time-lapse video. Look for aesthetically pleasing backgrounds that complement your subject. Avoid distractions or cluttered backgrounds that could take away from the main focus.
By taking these factors into account, you can choose the right subject and location that will result in a visually stunning and captivating time-lapse video.
Enhancing Your Time-Lapse Video with Post-Processing Techniques
Creating a stunning time-lapse video is just the first step. To truly make it stand out, you need to apply some post-processing techniques that will bring out the best in your footage. Here are some tips to enhance your time-lapse video:
1. Cropping and Framing: Once you have captured your time-lapse footage, consider cropping and framing it to focus on the most interesting elements. This can help eliminate any distractions and draw the viewer’s attention to the main subject.
2. Color Grading: Utilize color grading techniques to enhance the overall look and feel of your time-lapse video. Adjust the colors, brightness, and contrast to create a more visually appealing and cinematic experience.
3. Adding Filters and Effects: Experiment with different filters and effects to add a unique touch to your time-lapse video. Whether it’s a vintage look, a dreamy haze, or a dramatic vignette, these effects can elevate your video to a whole new level.
4. Stabilizing the Footage: Time-lapse videos often suffer from slight camera shake or movement. Use video stabilization software to smooth out any jerky movements and ensure a steady final result.
5. Adjusting Speed and Timing: Depending on the length and subject of your time-lapse video, you may need to adjust the speed and timing to create a more visually pleasing effect. Slow down or speed up certain parts to create a dynamic and engaging viewing experience.
6. Adding Transitions: Smooth transitions between different scenes or moments in your time-lapse video can enhance the overall flow and storytelling. Experiment with fade-ins, fade-outs, and other transition effects to create a seamless and cohesive narrative.
7. Adding Music and Sound Effects: To create a fully immersive experience, consider adding background music or sound effects to your time-lapse video. Choose a soundtrack that complements the mood and theme of your video, and sync it with the visual elements for a more impactful viewing experience.
8. Finalizing with Text and Graphics: Add text overlays, logos, or graphics to provide context or highlight specific moments in your time-lapse video. This can help convey the story or message you want to convey and make your video more engaging and informative.
9. Exporting in the Right Format: Finally, make sure to export your time-lapse video in a format that is compatible with the platform or device on which it will be viewed. Take into consideration the resolutions, aspect ratios, and file types that are best suited for the intended audience.
By utilizing these post-processing techniques, you can elevate your time-lapse video and create a visually stunning masterpiece.
Conclusion
Time-lapse videos are a captivating visual medium that can bring life and movement to your content. With the release of iOS 8, shooting time-lapse videos on your iPhone has become easier and more accessible than ever before. The built-in Camera app offers a seamless and user-friendly experience, allowing you to create stunning time-lapse videos with just a few taps.
By following the tips and techniques outlined in this article, you can capture the passage of time in a unique and engaging way. Whether you’re capturing the hustle and bustle of a cityscape, the graceful movement of clouds, or the transformation of a bustling event, time-lapse videos have the power to tell stories and captivate viewers.
So, grab your iPhone, experiment with different settings and locations, and let your creativity flow. By incorporating time-lapse videos into your content, you can take your visual storytelling to new heights!
FAQs
Q: Can I shoot time-lapse videos on my iPhone?
A: Yes, you can shoot time-lapse videos on your iPhone running on iOS 8 or later. iOS 8 introduced the native time-lapse feature in the camera app, making it easier for users to create stunning time-lapse videos without the need for third-party apps.
Q: How do I access the time-lapse feature on my iPhone?
A: To access the time-lapse feature on your iPhone, open the camera app and swipe to the right until you reach the “Time-Lapse” mode. It’s represented by a clock icon. Tap on it, and you’re ready to start capturing your time-lapse masterpiece.
Q: What settings can I adjust when shooting a time-lapse video on my iPhone?
A: When shooting a time-lapse video on your iPhone, you have control over the interval, which defines how often each frame is captured. You can adjust this interval by tapping on the screen while in time-lapse mode. Additionally, you can adjust the focus and exposure by tapping and holding on different areas of the frame.
Q: How long should my time-lapse video be?
A: The length of your time-lapse video depends on the effect you’re trying to achieve. Generally, time-lapse videos are condensed versions of real-time events, so they can range anywhere from a few seconds to several minutes. Experiment with different durations to find the one that best showcases your subject and captures the desired visual effect.
Q: Can I edit my time-lapse videos after shooting them on my iPhone?
A: Yes, you can edit your time-lapse videos after shooting them on your iPhone. iOS devices have built-in video editing tools that allow you to trim, crop, add filters, and make other adjustments to your videos. You can access these editing features by opening the Photos app, selecting your time-lapse video, and tapping on the Edit button.