
Are you looking to create stunning time-lapse videos on your iPhone? Well, you’ve come to the right place! Time-lapse videos are a fantastic way to capture the passage of time and create visually captivating content. Whether you want to document a beautiful sunset, a bustling cityscape, or the blooming of flowers, your iPhone can be a powerful tool for creating amazing time-lapse videos. In this article, we will guide you through the process of time-lapsing a video on your iPhone, step by step. We will cover everything from the essential techniques to the best apps to use. So, get ready to unleash your creativity and capture the world in motion with your trusty iPhone!
Inside This Article
- Equipment Needed
- Setting Up for Time-Lapse on iPhone
- Adjusting Time-Lapse Settings on iPhone
- Capturing the Time-Lapse Video
- Editing and Exporting the Time-Lapse on iPhone
- Conclusion
- FAQs
Equipment Needed
Before you can start creating stunning time-lapse videos on your iPhone, there are a few essential pieces of equipment you’ll need. Let’s take a look at what you should have on hand:
- iPhone: Of course, you’ll need an iPhone to capture the time-lapse footage. Any recent model, such as iPhone 8, iPhone X, iPhone SE, or newer, will work perfectly fine.
- Sturdy Tripod or Mount: To ensure stability and minimize camera shake during the extended recording period, it’s crucial to use a tripod or a mount specifically designed for smartphones. This will keep your iPhone steady and deliver smooth results.
- External Battery: Since time-lapse videos involve continuous recording over an extended period, having an external battery can help to ensure that your iPhone doesn’t run out of power halfway through. Invest in a reliable external battery pack to keep your device charged throughout the shoot.
- Camera App: While the iPhone’s native camera app can shoot time-lapse videos, using a dedicated time-lapse app can provide you with more advanced features and customization options. Consider downloading a third-party app from the App Store, such as Hyperlapse by Instagram or Lapse It, to enhance your time-lapse recording experience.
- Optional Accessories: Depending on your specific needs and creative vision, you may want to consider additional accessories such as lens attachments, iPhone stabilizers, or external microphones to enhance the quality and versatility of your time-lapse videos.
With these essential pieces of equipment, you’ll be well-equipped to capture stunning time-lapse videos on your iPhone. Now, let’s move on to the next section where we will guide you through the process of setting up for a time-lapse recording on your iPhone.
Setting Up for Time-Lapse on iPhone
If you want to capture stunning time-lapse videos on your iPhone, you’ll need to make a few essential preparations. Fortunately, setting up for a time-lapse on an iPhone is a straightforward process. In this section, we’ll walk you through the necessary steps to ensure you’re ready to capture that perfect time-lapse moment.
Firstly, find a stable surface or use a tripod to keep your iPhone steady throughout the recording. This is crucial for maintaining a consistent frame and avoiding shaky footage. If you don’t have a tripod, you can improvise by placing your iPhone on a stable platform or using a smartphone grip with adjustable legs.
Next, consider the composition of your shot. Time-lapse videos are visually captivating when there is a subject that goes through noticeable changes over time. For example, capturing the movement of clouds, the blooming of flowers, or the hustle and bustle of a busy street. Find a location or subject that will provide dynamic changes over the duration of your time-lapse.
Now that you’ve found the perfect subject, it’s time to plan the duration of your time-lapse. Think about how long you want the final video to be and how quickly you want the time-lapse effect to occur. Keep in mind that longer time-lapse videos will require more storage space on your iPhone. Plan accordingly and make sure you have enough free space.
Before you begin recording, check your iPhone’s battery level. Time-lapse videos can drain your iPhone’s battery more quickly, so it’s important to have a sufficient charge or connect your iPhone to a power source. You don’t want your battery dying in the middle of capturing an incredible time-lapse moment!
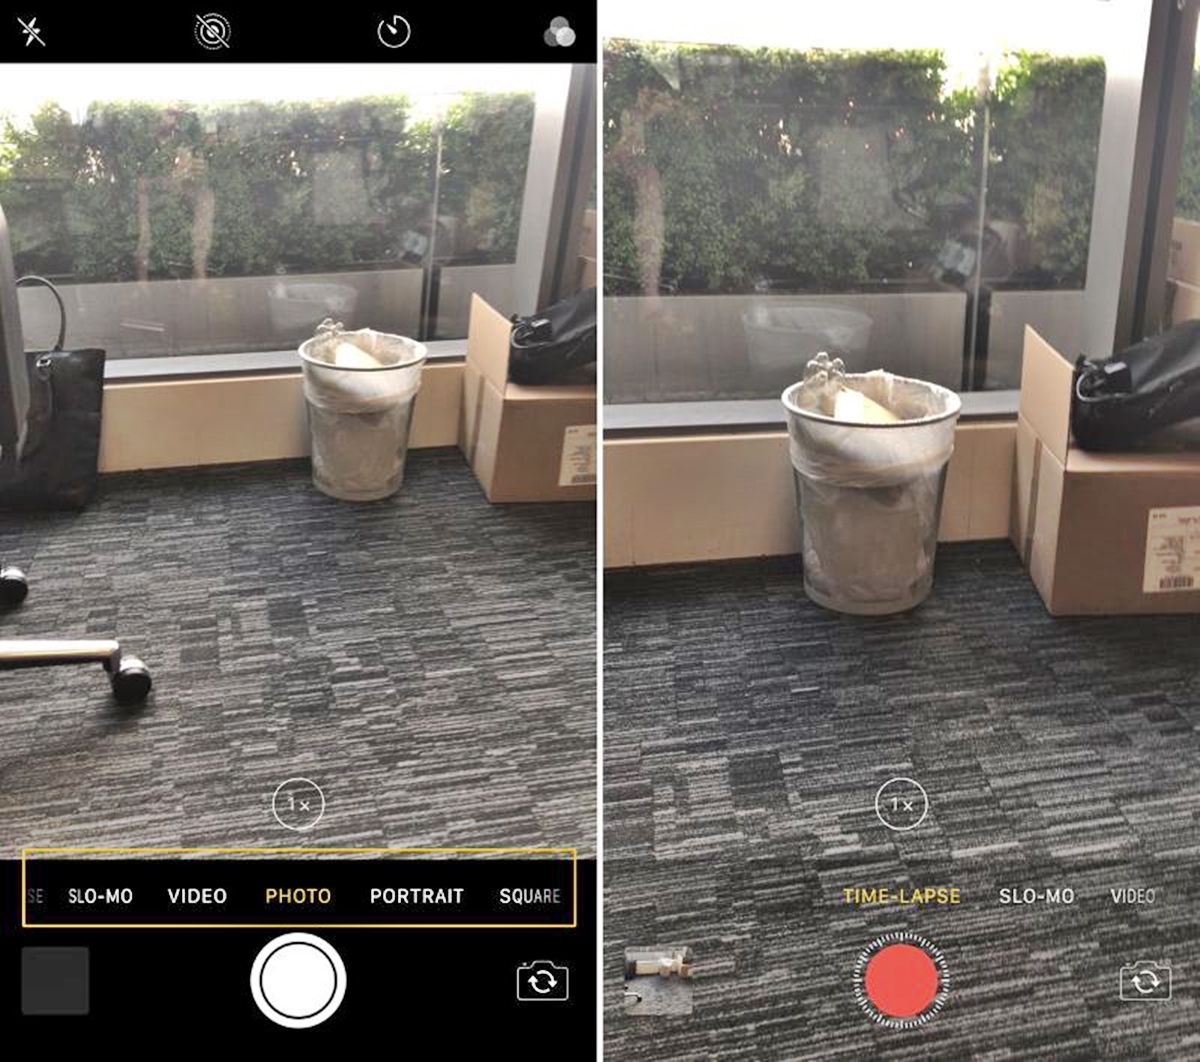
Lastly, make sure to adjust the settings on your iPhone for optimal time-lapse recording. Open the native Camera app and swipe to the “Time-Lapse” mode. You’ll notice the camera interface changes, and you’ll have access to several settings to tweak your time-lapse recording. We’ll explore these settings in more detail in the next section.
Adjusting Time-Lapse Settings on iPhone
Adjusting the time-lapse settings on your iPhone is a crucial step to ensure you capture the perfect time-lapse video. To access these settings, follow these simple steps:
1. Open the Camera app on your iPhone and swipe to the right to select the “Time-Lapse” mode.
2. Next, tap on the “Settings” icon located in the upper-right corner of the screen. This will open a menu where you can adjust various time-lapse settings.
3. The first setting you can adjust is the interval. This refers to the amount of time between each frame of the time-lapse video. By default, the interval is set to automatic, meaning the iPhone will determine the best interval based on the recording time. However, you can manually adjust the interval by tapping on the “Interval” option and selecting a specific time duration.
4. Another setting you can adjust is the playback frame rate. The frame rate determines how smooth or fast the time-lapse video will appear. The default setting is 30 fps (frames per second), but you can change it to 24 fps or 60 fps for different effects. Simply tap on the “Frame Rate” option and select your desired setting.
5. If you want to add a bit of stabilization to your time-lapse video, you can enable the “Stabilization” setting. This will use the iPhone’s built-in optical image stabilization to reduce shakiness in your footage. To enable it, simply toggle the switch next to “Stabilization” to the on position.
6. Lastly, you have the option to enable or disable the “Auto-Brightness” feature for time-lapse recordings. When enabled, the iPhone will automatically adjust the exposure and brightness levels for optimal results. If you prefer manual control over the brightness, you can disable this setting by toggling the switch next to “Auto-Brightness” to the off position.
Once you have adjusted the desired settings, you are ready to capture your time-lapse video using your iPhone. Remember to experiment with different settings to achieve the desired effect and showcase the passage of time in a captivating way.
html
Capturing the Time-Lapse Video
Once you have set up and adjusted the time-lapse settings on your iPhone, it’s time to start capturing the time-lapse video. Follow these steps to ensure you capture stunning and smooth time-lapse footage:
- Choose a stable position: Find a steady surface or use a tripod to keep your iPhone stable throughout the entire time-lapse recording. This will help avoid any unwanted camera movement or shakes.
- Compose your shot: Frame your shot by adjusting the position and angle of your iPhone’s camera. Consider the subject you want to capture and experiment with different perspectives to make your time-lapse visually engaging.
- Start recording: Tap the record button on your iPhone’s screen to begin the time-lapse recording. The duration of the recording will depend on the settings you configured earlier.
- Patience is key: Time-lapse videos are created by capturing a series of images over an extended period. Keep in mind that capturing the entire duration may take some time, so it’s important to be patient and allow the process to complete.
- Avoid interfering: While the time-lapse is in progress, try to avoid touching or moving your iPhone so as not to disrupt the stability of the shot. This could potentially result in a shaky or inconsistent time-lapse video.
- Monitor progress: It’s a good practice to periodically check the progress of your time-lapse recording. This will allow you to ensure that everything is running smoothly and make any necessary adjustments if needed.
- End the recording: Once you are satisfied with the duration and content of your time-lapse video, tap the stop button on your iPhone’s screen to end the recording.
- Review and refine: After capturing the time-lapse video, take some time to review the footage. If you are not satisfied with the results, don’t hesitate to experiment with different settings and techniques to achieve the desired outcome.
By following these steps, you can capture captivating time-lapse videos using your iPhone. Remember, practice makes perfect, so don’t be afraid to experiment and explore different subjects and locations to create stunning time-lapse footage.
Editing and Exporting the Time-Lapse on iPhone
Once you have captured a stunning time-lapse video on your iPhone, it’s time to unleash your creativity by editing and exporting it. Fortunately, with the built-in editing features of the iOS Photos app, you can transform your raw footage into a visually captivating masterpiece. Let’s dive into the steps of editing and exporting your time-lapse video on your iPhone.
1. Open the Photos app on your iPhone and locate the time-lapse video you want to edit. Tap on it to open it in full screen.
2. To trim or remove unwanted sections from your time-lapse video, tap on the “Edit” button at the top-right corner of the screen.
3. Drag the yellow handles on the timeline at the bottom of the screen to adjust the start and end points of the video. This allows you to select and keep only the most captivating parts of the time-lapse.
4. If you want to enhance the overall appearance of the video, tap on the “Filters” button (represented by three overlapping circles) at the bottom-right corner of the screen. Experiment with different filters to find the one that best suits your desired aesthetic.
5. To adjust the exposure, color, and other video attributes, tap on the “Adjustments” button (represented by three horizontal sliders) at the bottom of the screen. Here, you can fine-tune the video’s brightness, contrast, saturation, and more.
6. Add creative touches to your time-lapse video by using built-in tools like cropping, rotating, or flipping the footage. Tap on the “Crop” button (represented by a square overlapping a diagonal arrow) at the bottom-right corner of the screen to access these editing options.
7. Once you are satisfied with your edits, tap on the “Done” button at the bottom-right corner of the screen to save your changes.
8. To export and share your edited time-lapse video, tap on the share button (represented by a square with an arrow pointing out) at the bottom-left corner of the screen.
9. Select your preferred sharing method among options like AirDrop, Messages, Mail, or social media platforms. You can also save the video to your iCloud Drive or upload it to a cloud storage service.
10. If you want to showcase your time-lapse video on a bigger screen, you can connect your iPhone to a TV, monitor, or projector using an HDMI adapter or wirelessly via AirPlay.
Now that you know how to edit and export your time-lapse videos on your iPhone, the possibilities are endless. Unleash your creativity, showcase your unique perspective, and share your mesmerizing time-lapse creations with the world!
Conclusion
Time-lapse videos have become increasingly popular, allowing us to capture stunning moments and compress hours of footage into a few seconds. With the iPhone’s powerful camera capabilities and user-friendly features, creating time-lapse videos has never been easier.
In this article, we explored different methods to time-lapse a video on your iPhone. Whether you choose to use the built-in camera app, third-party apps, or edit the time-lapse footage after capturing, there’s a method that suits your needs and preferences.
By following the step-by-step instructions and considering the tips and tricks provided, you can create captivating time-lapse videos that showcase the passage of time in a visually engaging way. Don’t be afraid to experiment and let your creativity shine through.
So, grab your iPhone, find an interesting subject, and start capturing amazing moments in time-lapse videos. Share your creations with the world and let the power of time-lapse unlock a whole new level of storytelling and visual expression.
FAQs
Q: Can I time-lapse a video on my iPhone?
A: Absolutely! The iPhone has a built-in time-lapse feature that allows you to capture stunning time-lapse videos with just a few taps.
Q: How do I access the time-lapse feature on my iPhone?
A: To access the time-lapse feature, open the Camera app on your iPhone and slide the capture mode selector to the right until you reach “Time-Lapse.” You can then start recording your time-lapse video by tapping the record button.
Q: Are there any settings I can adjust for my time-lapse videos on iPhone?
A: Absolutely! While capturing a time-lapse video on your iPhone, you can tap the screen to adjust the exposure and focus. This allows you to control the brightness and sharpness of your footage. Additionally, you can adjust the playback speed of your time-lapse video by using third-party apps or editing software.
Q: How long should I record a time-lapse video on my iPhone?
A: The duration of your time-lapse video will depend on the subject and effect you want to achieve. Generally, it’s recommended to record for at least a few minutes to capture noticeable changes. However, you can record for several hours or even days if you want to capture longer-term changes.
Q: Can I edit my time-lapse videos on iPhone before sharing them?
A: Absolutely! After capturing a time-lapse video on your iPhone, you can use various editing apps, such as iMovie or Adobe Premiere Rush, to trim unwanted frames, adjust the speed, add transitions, and apply filters. These edits can help you enhance the overall look and feel of your time-lapse video before sharing it with others.