
Do you want to capture stunning time lapse videos on your iPhone? Look no further as we have got you covered! In this comprehensive guide, we will walk you through the step-by-step process of creating mesmerizing time lapse videos using your iPhone. Time lapse videos allow you to condense hours or even days into a short and captivating cinematic experience. Whether you want to capture the beauty of a sunrise, the hustle and bustle of a busy city, or the blooming of a flower, your iPhone with its powerful camera capabilities is all you need. So grab your iPhone, unleash your creativity, and let’s dive into the world of creating incredible time lapse videos!
Inside This Article
- How to Do a Time Lapse Video on iPhone
- Understanding Time Lapse Photography
- – What is time lapse photography?
- – Why use time lapse in your videos?
- – Benefits and applications of time lapse videos
- Preparing Your iPhone
- Ensure your iPhone is fully charged
- Clear storage space on your iPhone
- Adjust the settings for optimal time lapse recording
- Use a stable tripod or mount to keep your iPhone steady
- Choosing the Right Subject
- – Finding interesting and dynamic subjects for time lapse videos- Consider the movement and changes in the subject over time- Examples of suitable subjects for time lapse videos on iPhone
- Setting Up the Time Lapse
- – Open the Camera app on your iPhone- Swipe to the “Time Lapse” mode- Adjust exposure and focus settings if necessary- Position and frame your shot- Start recording the time lapse video
- Tips for Shooting Great Time Lapses
- Find the right interval for capturing frames
- Use additional accessories for more creative time lapses
- Consider lighting conditions and weather changes
- Experiment with different angles and perspectives
- Avoid unnecessary camera movements during recording
- Editing and Sharing Your Time Lapse Video
- – Use the built-in editing tools in the Photos app- Trim, crop, and enhance your time lapse video- Add music or audio to your time lapse video- Export and share your time lapse video on social media platforms
- Troubleshooting and Common Issues
- Addressing issues with exposure and lighting
- Dealing with camera shake or blurriness
- Tackling storage limitations and space management
- Troubleshooting app crashes or freezes
- Conclusion
- FAQs
How to Do a Time Lapse Video on iPhone
Are you looking to capture stunning time lapse videos with your iPhone? Look no further! With the advanced camera capabilities of the iPhone, creating captivating time lapse videos has never been easier. In this guide, we’ll walk you through the step-by-step process of how to do a time lapse video on iPhone, from setting up your device to finalizing your masterpiece.
Setting Up Your iPhone for Time Lapse Recording: Exploring the Camera App Settings
The first step in creating a time lapse video is to set up your iPhone’s camera. Open the Camera app and swipe left to select the “Time-Lapse” mode. This mode is ideal for capturing long periods of time in a condensed video format. Once selected, you can explore the various settings to customize your time lapse video.
Adjust the exposure and focus by tapping on different areas of the screen. This ensures that your time lapse video remains clear and properly lit throughout. Consider using a tripod or stabilizing your iPhone to avoid any unwanted shaking or movement during the recording process.
Choosing the Right Subject for Your Time Lapse: Finding Interesting Movements or Changes
The key to a truly mesmerizing time lapse video is choosing the right subject. Look for scenes with interesting movements, changes, or transformations. Natural landscapes, bustling city streets, or even the blooming of flowers are all great options.
Consider the overall duration of your time lapse video and how the subject will evolve over that time. It’s also important to pay attention to lighting conditions and how they may impact the final result. Experiment with different angles and perspectives to capture unique and visually striking footage.
Adjusting the Time Lapse Interval: Determining the Duration between Each Frame
Another crucial aspect of creating a time lapse video is selecting the appropriate interval between each frame. The interval determines the speed at which time is condensed in your video. For slower subjects or longer videos, a larger interval is recommended. Similarly, for faster subjects or shorter videos, a smaller interval works best.
Typically, intervals of 1-2 seconds produce smooth and seamless time lapse videos. However, feel free to experiment and adjust the interval based on the subject and desired effect. Remember to keep an eye on your iPhone’s battery level, as longer intervals can impact battery consumption.
Capturing the Time Lapse Video: Tips for Steady Shots and Optimal Results
Once you have set up your iPhone and selected the subject and interval, it’s time to start capturing your time lapse video. Make sure your device is stable and positioned correctly to avoid unnecessary movements or vibrations.
Depending on the duration of your time lapse video, it may take several minutes or even hours to capture all the frames. Therefore, it’s crucial to have sufficient battery life and storage space on your iPhone. Consider using external charging solutions or transferring files to free up space if needed.
After capturing all the frames, you can edit and finalize your time lapse video using various applications available on the App Store. These apps provide additional features like adjusting playback speed, adding music or filters, and exporting the video in different formats.
So, what are you waiting for? Grab your iPhone, find an interesting subject, and start creating stunning time lapse videos that will impress your friends and family. With a bit of practice and experimentation, you’ll be capturing breathtaking moments in no time!
Understanding Time Lapse Photography
Time lapse photography is a technique that allows you to capture a sequence of images at predetermined intervals and then combine them into a video. It’s a fascinating way to compress time and showcase the movement or changes that occur over an extended period. Whether you want to capture a beautiful sunset, a bustling cityscape, or the blooming of flowers, time lapse photography can add depth and visual interest to your videos.
Time lapse videos are created by taking a series of still photos and playing them back at a higher speed than they were recorded. This creates a mesmerizing effect, showing the passage of time in a condensed format. By condensing hours, days, or even months into just a few seconds or minutes, time lapse videos can reveal patterns, transformations, and subtle details that are not immediately visible to the naked eye.
One of the key elements of time lapse photography is the time interval between each frame. This interval determines the speed at which the action or change in your subject will appear in the final video. For example, a shorter interval will result in a faster-paced video, whereas a longer interval will slow down the motion. Choosing the right interval is crucial to achieving the desired effect in your time lapse video.
The other important factor to consider is the duration of the time lapse. Depending on the subject and the desired outcome, you may want to capture a time lapse video over a few minutes, several hours, or even days. Planning and understanding the duration of your time lapse will help you determine the number of frames needed and the overall length of your final video.
Now that you have a better understanding of time lapse photography, it’s time to dive into the exciting world of capturing stunning time lapse videos on your iPhone. In the next sections, we will explore how to set up your iPhone for time lapse recording, choose the right subject, adjust the time lapse interval, and capture the perfect time lapse video.
– What is time lapse photography?
Time lapse photography is a technique that involves capturing a series of photos or frames at regular intervals and then stitching them together to create a video sequence. The intervals between the frames can range from a few seconds to minutes, hours, or even days. When played back at a high speed, the video reveals the passage of time and compresses long periods into a short and visually captivating clip.
– Why use time lapse in your videos?
Time lapse adds a unique and dynamic element to your videos and can be used to showcase the gradual changes and movements in a scene that may go unnoticed in real-time. It allows you to condense hours, days, or weeks into a few seconds, providing a new perspective and captivating visual experience for your audience. Time lapse can be an effective storytelling tool, emphasizing the passage of time, capturing the transformation of a subject, or highlighting the patterns and rhythms of nature.
– Benefits and applications of time lapse videos
Time lapse videos offer a multitude of benefits and applications in various fields:
- Construction and Architecture: Time lapse is a valuable tool for documenting the progress of construction projects. It can capture the entire building process, showcasing the transformation from start to finish. Architects and contractors can use these videos in project presentations, marketing materials, and for monitoring and analyzing the construction process.
- Landscape and Nature: Time lapse is ideal for capturing the beauty and changes in nature. It allows you to showcase the blooming of flowers, the movement of clouds, the transition of seasons, and the stunning sunsets. These videos can be used in nature documentaries, travel videos, or to simply appreciate the awe-inspiring wonders of the natural world.
- Astrophotography: Time lapse is widely used in astrophotography to capture the movement of stars, the rotation of the Earth, and the mesmerizing patterns created by the night sky. It can create stunning visuals of star trails, capturing the motion of celestial bodies and the elusive beauty of the night.
- Event Coverage: Time lapse can be a creative way to capture the energy and atmosphere of events such as concerts, festivals, and sports games. It allows viewers to experience the highlights and essence of the event in a condensed and visually dynamic way.
- Artistic Expression: Time lapse provides artists, filmmakers, and photographers with a unique medium of self-expression. It enables the creation of visually stunning and imaginative videos, exploring concepts such as the passage of time, transformation, and the interplay of light and shadow.
Overall, time lapse videos offer a creative and engaging way to capture and showcase the passage of time and the dynamic changes in our world. Whether for documenting construction projects, capturing the beauty of nature, or adding an artistic touch to your videos, time lapse photography has become an increasingly popular technique with endless possibilities.
Preparing Your iPhone
Before you dive into creating a stunning time lapse video on your iPhone, it’s essential to ensure that your device is properly prepared. By following a few simple steps, you can optimize your iPhone’s settings and enhance the quality of your time lapse footage.
1. Check Your Battery: Time lapse videos can be time-consuming to capture, so it’s important to make sure your iPhone has sufficient battery life. Consider charging it fully or connecting it to a power source during the recording to prevent any interruptions.
2. Free Up Storage Space: Time lapse videos can consume a significant amount of storage space, especially if you plan to record for an extended period. Before starting the recording, delete any unnecessary files or apps to create sufficient storage capacity for your footage.
3. Enable Do Not Disturb: To minimize disruptions while recording your time lapse video, enable the “Do Not Disturb” mode on your iPhone. This will prevent notifications, calls, and messages from appearing on your screen and potentially ruining your footage.
4. Set Your iPhone on a Stable Surface: To achieve steady shots and avoid camera shake, it’s essential to place your iPhone on a stable surface or use a tripod. This will ensure that the frame remains consistent throughout the time lapse recording, resulting in smoother and more professional-looking footage.
5. Clean the Camera Lens: A smudged or dirty camera lens can negatively impact the quality of your time lapse video. Before you start recording, use a microfiber cloth or lens cleaning solution to gently clean the lens and remove any fingerprints, dust, or smudges.
6. Disable Auto-Lock: By disabling the auto-lock feature on your iPhone, you can prevent the screen from timing out and going dark during the time lapse recording. This is particularly helpful when recording longer time lapse videos to ensure that there are no interruptions or gaps in the footage.
By following these simple steps, you can prepare your iPhone for a seamless and successful time lapse video recording experience. With your device optimized and ready to go, you can now move on to the next stage of creating your captivating time lapse masterpiece!
Ensure your iPhone is fully charged
Before starting a time lapse recording on your iPhone, it is essential to ensure that your device has a full battery charge. Time lapse videos typically require an extended period of recording, which can drain your battery quickly. By having a full charge, you can avoid any interruptions or loss of footage due to a depleted battery.
Clear storage space on your iPhone
Time lapse videos can generate large file sizes as they capture multiple frames over an extended period. To avoid running out of storage space during the recording, it’s important to free up some space on your iPhone. Delete any unnecessary photos, videos, or apps that are taking up valuable storage. By doing so, you’ll have enough space to capture your time lapse without worrying about storage limitations.
Adjust the settings for optimal time lapse recording
The Camera app on your iPhone offers various settings to customize your time lapse recording. To access these settings, open the Camera app and swipe to the “Time Lapse” mode. Here, you can adjust the interval between each frame, which determines the speed of your time lapse video. Experiment with different intervals to achieve the desired effect. Additionally, consider enabling the “Exposure Lock” feature to maintain consistent lighting throughout the recording.
Use a stable tripod or mount to keep your iPhone steady
To ensure smooth and stable footage for your time lapse video, it’s crucial to keep your iPhone steady throughout the recording. Any movement or vibrations can result in shaky footage that may detract from the overall quality. Invest in a stable tripod or mount specifically designed for iPhones. This will help eliminate any unwanted movement and provide a solid foundation for your device. Alternatively, you can find creative ways to stabilize your iPhone by using everyday objects such as books or a bean bag.
Choosing the Right Subject
When it comes to creating a captivating time lapse video on your iPhone, choosing the right subject is crucial. The subject you choose will determine the overall impact and interest of your time lapse video. Here are some tips on how to select the perfect subject:
- Look for Dynamic Movements: Opt for subjects that have interesting movements or changes over a period of time. This could include people walking in a crowded street, clouds moving across the sky, or a flower blooming.
- Consider Environmental Changes: Choose subjects that showcase the changing seasons, such as leaves changing colors in the fall or snow melting in the spring. These environmental changes can add depth and visual interest to your time lapse video.
- Focus on Natural Landscapes: Nature provides an abundance of beautiful and constantly evolving subjects. Whether it’s a sunset over the ocean, waves crashing on the shore, or a starry night sky, natural landscapes can create stunning time lapse videos.
- Explore Urban Scenes: Urban environments are full of movement and activity, providing ample opportunities for captivating time lapse videos. Consider capturing the hustle and bustle of a city street, the traffic flow of a busy intersection, or the changing lights of a cityscape at night.
- Experiment with Still Life: While dynamic movements are often the go-to for time lapse videos, don’t discount the power of still life subjects. Set up a tripod and document the gradual decay of a piece of fruit or the melting of an ice cube for a unique and visually intriguing time lapse video.
Remember, the key is to choose a subject that holds your interest and has the potential to captivate your audience. Experiment with different subjects and don’t be afraid to think outside the box. The more unique and visually compelling your subject is, the more impressive your time lapse video will be.
– Finding interesting and dynamic subjects for time lapse videos- Consider the movement and changes in the subject over time- Examples of suitable subjects for time lapse videos on iPhone
When it comes to creating captivating time lapse videos on your iPhone, finding the right subject is crucial. To create an engaging and dynamic video, it’s important to consider the movement and changes that occur in the subject over time. Here are some tips for finding interesting subjects for your time lapse videos:
- Cityscapes and Traffic: Urban environments provide a plethora of captivating subjects for time lapse videos. From bustling street traffic to the changing lights of a city skyline, capturing the movement and energy of a city can result in stunning time lapse footage.
- Nature and Landscapes: Natural landscapes offer a variety of subjects that change and evolve over time. From sunrise to sunset, blooming flowers to shifting clouds, capturing the beauty and transformation of nature can create breathtaking time lapse videos.
- Construction Sites: Construction sites are constantly buzzing with activity, making them interesting subjects for time lapse videos. You can document the progress of a building being constructed, capturing the various stages and changes that occur over time.
- Weather Phenomena: Weather events such as storms, sunsets, or cloud formations can make for visually stunning time lapses. By capturing the changing sky or dramatic weather conditions, you can create captivating videos that demonstrate the power and beauty of nature.
- Public Events: Whether it’s a concert, a festival, or a sporting event, capturing the excitement and energy of a public gathering through time lapse videos can be incredibly engaging. Showcase the crowd movement, stage setups, or performer actions to create a captivating visual story.
Remember, the key is to choose subjects that have noticeable movements or changes over time. Before you start recording, consider the duration of your time lapse and how the subject will transform during that timeframe. With the right subject and careful planning, you can create mesmerizing time lapse videos using your iPhone.
Setting Up the Time Lapse
Before you start recording your time lapse video on your iPhone, it’s crucial to set up the necessary settings to ensure the best results. Here are the steps to follow:
Step 1: Open the Camera App
To begin, locate the Camera app on your iPhone and open it. The Camera app is usually found on the home screen or in the app drawer.
Step 2: Select the Time Lapse Mode
Once you have the Camera app open, swipe left on the camera modes at the bottom of the screen until you find the “Time Lapse” mode. Tap on it to select it as your recording mode.
Step 3: Adjust the Time Lapse Interval
Next, you need to set the time lapse interval, which determines the duration between each frame of your video. Tap on the clock icon to the right of the shutter button, and you’ll see a slider that allows you to adjust the interval. The default setting is usually one frame every few seconds, but you can increase or decrease the interval as desired.
Step 4: Frame Your Shot
Now it’s time to frame your shot. Look for interesting movements or changes in the scene that you want to capture in your time lapse video. Consider elements like clouds moving across the sky, traffic flowing on a busy street, or people bustling in a city square.
Step 5: Stabilize Your iPhone
For the best results, it’s important to stabilize your iPhone during the time lapse recording. You can use a tripod or a stable surface to keep your iPhone steady. Alternatively, you can use accessories like a phone grip or a mini tripod designed specifically for smartphones.
Step 6: Start Recording
Once you have everything set up, it’s time to start recording your time lapse video. Tap the red record button to begin the recording. The Camera app will continue capturing frames based on the interval you set until you stop the recording.
Step 7: Monitor the Progress
While recording, you can monitor the progress of your time lapse video by glancing at the elapsed time on the screen. This will give you an idea of how long your final video will be.
Step 8: Stop the Recording
When you’re satisfied with the length of your time lapse video, tap the red record button again to stop the recording. The Camera app will automatically save the video to your Photos app.
By following these steps, you can easily set up your iPhone for time lapse recording and capture captivating videos of dynamic scenes or events. Remember to experiment with different time lapse intervals and subjects to unleash your creativity and produce stunning visuals.
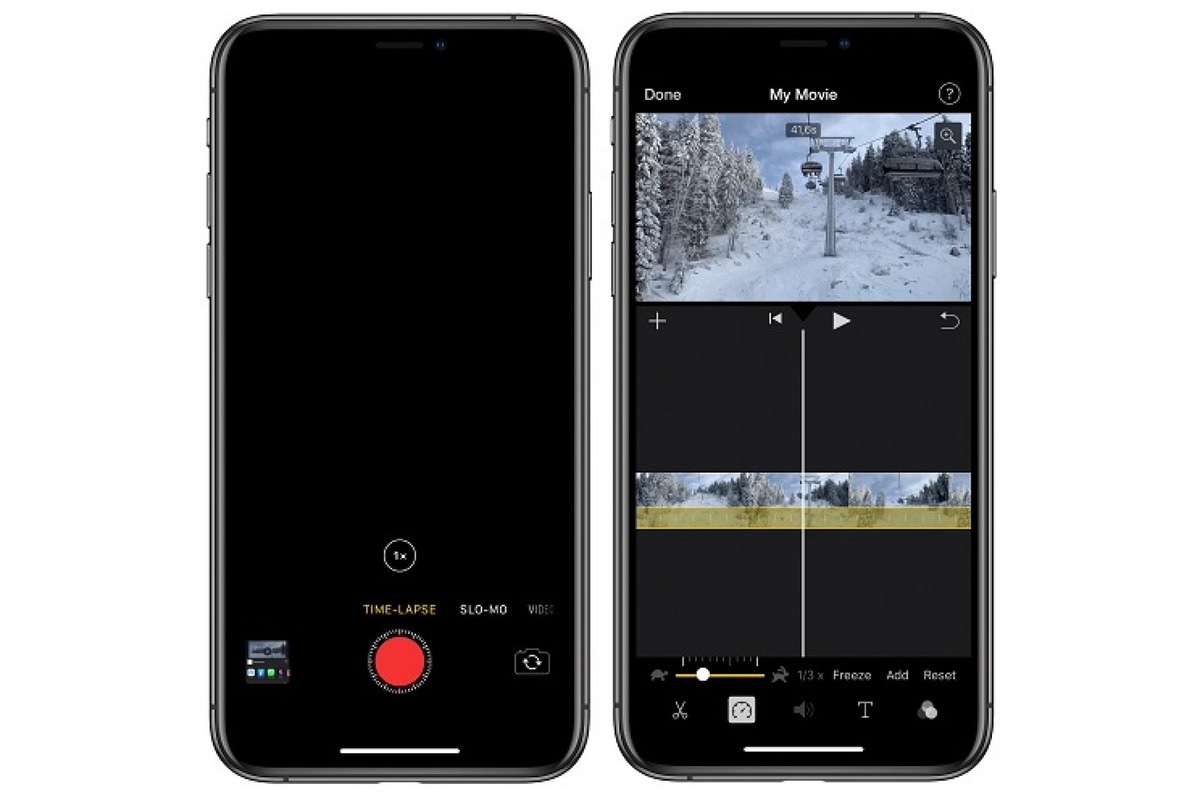
– Open the Camera app on your iPhone- Swipe to the “Time Lapse” mode- Adjust exposure and focus settings if necessary- Position and frame your shot- Start recording the time lapse video
Creating a time lapse video on your iPhone is an excellent way to capture the passage of time and add a creative touch to your videos. With just a few simple steps, you can transform ordinary moments into captivating sequences. Here’s how to do a time lapse video on your iPhone:
Step 1: Open the Camera app on your iPhone. You can find it on your home screen or swipe left from the lock screen to access it quickly.
Step 2: Once you’re in the Camera app, swipe to the “Time Lapse” mode. This mode is represented by a series of concentric circles and can be found by scrolling through the different shooting options at the bottom of the screen.
Step 3: Adjust exposure and focus settings if necessary. By default, the iPhone’s camera will automatically adjust these settings for you. However, if you’re shooting in a challenging lighting situation or want to emphasize a particular subject, you can manually adjust the exposure and focus. Simply tap on the screen where you want to set the focus and exposure, and the camera will adjust accordingly.
Step 4: Position and frame your shot. Before you start recording, take a moment to consider the composition of your time lapse video. Look for interesting movements or changes in your environment that can be captured over an extended period. Consider factors such as the angle, the framing, and the stability of the shot.
Step 5: Start recording the time lapse video. Once you’re satisfied with your shot, simply tap the red record button to begin recording the time lapse video. The camera will automatically capture a series of photos at regular intervals and stitch them together to create a smooth, accelerated sequence.
Remember, time lapse videos are most effective when capturing gradual changes, such as clouds moving across the sky, traffic patterns, or construction projects. Get creative, experiment with different subjects, and have fun exploring the world of time lapse photography on your iPhone.
Tips for Shooting Great Time Lapses
Shooting a time lapse video can be a captivating way to capture the passage of time and create stunning visuals. To ensure that your time lapse turns out to be a masterpiece, here are five expert tips:
1. Choose the right location: Select a location that offers interesting movements or changes over time. A bustling cityscape, a scenic sunset, or even a blooming flower can make for captivating time lapse footage. Look for elements that will add visual interest and keep viewers engaged.
2. Use a tripod or stabilizer: Stability is crucial for creating smooth and professional-looking time lapses. Invest in a sturdy tripod or consider using a stabilizer to ensure that your shots are steady and free from any unwanted camera movement. This will result in a cleaner and more polished final video.
3. Set the right time lapse interval: The interval between each frame determines the speed at which your time lapse video will play. Experiment with different intervals to find the right balance. For slower movements, a longer interval works well, while faster actions may require a shorter interval. Play around and find what works best for your specific subject.
4. Pay attention to lighting conditions: Lighting plays a crucial role in the overall visual quality of your time lapse. Avoid shooting in harsh midday sunlight, as it can create harsh shadows and overexposed areas. Opt for early morning or late afternoon when the lighting is softer and more evenly distributed. If shooting at night, consider using additional lighting sources to highlight key elements.
5. Keep your battery and memory in check: Time lapse videos typically require a long recording time, which can quickly drain your smartphone battery and take up a significant amount of storage. Make sure to charge your phone fully before starting and consider using an external power source if needed. Additionally, ensure that you have enough free space on your device or use cloud storage options to avoid running out of storage mid-recording.
With these tips in mind, you’re now equipped to shoot impressive time lapse videos on your iPhone. Remember, practice makes perfect, so don’t be afraid to experiment and refine your techniques. Happy shooting!
Find the right interval for capturing frames
When creating a time lapse video on your iPhone, one of the key considerations is determining the interval between each frame. This interval will determine the overall speed and flow of your time lapse. Finding the right interval depends on the subject you are capturing and the desired effect you want to achieve. For example, shorter intervals, such as one frame per second, will result in a faster and more dynamic time lapse, while longer intervals, such as one frame per minute, will create a slower and more gradual progression.
Experiment with different intervals to find the one that best suits your subject and the story you want to tell. Keep in mind that longer intervals can be useful for capturing slow-moving subjects or extended events, while shorter intervals are ideal for capturing fast-paced actions or quick changes.
Use additional accessories for more creative time lapses
While the built-in camera on your iPhone is capable of capturing impressive time lapse videos, there are various accessories available that can enhance your creativity and the quality of your footage. Consider using external lenses, such as wide-angle or fisheye lenses, to capture a wider field of view and add depth to your time lapse.
Additionally, tripods or mobile phone stabilizers can help you achieve steady shots and eliminate any unwanted shakes or movements. This is especially important when capturing longer time lapses, as even the slightest camera movement can be magnified and affect the overall quality of the video. Invest in a sturdy tripod or a mobile phone stabilizer to ensure professional-looking and smooth time lapse footage.
Consider lighting conditions and weather changes
Lighting conditions play a crucial role in the outcome of your time lapse video. Pay attention to the natural lighting during the time of day you plan to shoot. Golden hours, which occur shortly after sunrise and before sunset, often result in stunning time lapse footage with warm and soft light.
However, if you want to capture dramatic weather changes or the movement of clouds, shooting during different times of the day can yield captivating results. Keep in mind that unpredictable weather conditions can add an exciting element to your time lapses, so be prepared to adapt and make the most of unexpected situations.
Experiment with different angles and perspectives
Don’t be afraid to get creative with your time lapse videos. Explore different angles and perspectives to add visual interest and variety to your footage. Try capturing time lapses from low angles or bird’s eye views to provide a unique and fresh perspective.
Move around and change your shooting location to capture the subject from different angles. This will help create a more dynamic and engaging time lapse video. Remember, experimentation is key here, so don’t hesitate to try new ideas and unexpected angles to make your time lapses stand out.
Avoid unnecessary camera movements during recording
When recording a time lapse video, it is important to keep your iPhone as steady as possible. Avoid unnecessary camera movements, such as panning or zooming, as they can introduce distractions and affect the overall quality of the footage.
If you need to adjust the composition or frame during the time lapse, do it gradually to maintain smooth transitions. Sudden movements can create jarring visual effects that may not fit the aesthetic you’re aiming for.
Remember, the goal of a time lapse video is to capture the passage of time and showcase captivating movements or changes. Keeping the camera still will allow the subject to be the main focus of the video, resulting in a more visually appealing and professional-looking time lapse.
Editing and Sharing Your Time Lapse Video
Once you’ve captured an amazing time lapse video on your iPhone, it’s time to edit and share your creation with the world. Fortunately, there are several ways you can enhance and customize your time lapse footage right on your device.
1. Trim and Cut: If your time lapse video is longer than you’d like, you can easily trim and cut it down to the desired length. Open the Photos app, select your time lapse video, tap on “Edit,” and use the yellow handles to trim the beginning and end of the video.
2. Adjust Speed: Want to create a slow-motion effect or speed up the action in your time lapse video? Tap on the speedometer icon in the Photos app and experiment with different speed options to achieve the desired effect. This can add a dramatic touch to your footage.
3. Add Music and Effects: Enhance the mood of your time lapse video by adding music or sound effects. You can use a variety of apps like iMovie or Quik to easily overlay music and apply special effects. Be sure to choose a soundtrack that complements the theme and atmosphere of your footage.
4. Stabilize Shaky Footage: If your time lapse video has some shaky moments, you can use editing tools to stabilize it. Apps like Hyperlapse or Lapse It provide stabilization features that can greatly improve the overall quality of your video.
5. Share Your Creation: Once you’re satisfied with the edits, it’s time to share your time lapse video with others. You can easily upload your video to social media platforms like Instagram, Facebook, or YouTube directly from your iPhone. Just tap on the share icon in the Photos app and choose the platform you want to share it on.
Remember, editing is a creative process, and there are countless possibilities to make your time lapse video unique. Experiment with different techniques, effects, and music to create a visually stunning and engaging final product.
– Use the built-in editing tools in the Photos app- Trim, crop, and enhance your time lapse video- Add music or audio to your time lapse video- Export and share your time lapse video on social media platforms
Once you have captured a stunning time lapse video on your iPhone, you may want to fine-tune and customize it before sharing it with the world. Luckily, the Photos app on your iPhone offers a range of built-in editing tools to help you enhance your time lapse footage. Here are some tips to make the most out of these editing features:
1. Trim: In the Photos app, you can easily trim the beginning and end of your time lapse video to remove any unwanted footage. Simply open the video, tap on “Edit,” and then drag the handles on the timeline to adjust the start and end points of your video.
2. Crop: If you want to change the aspect ratio of your time lapse video or focus on a specific area, you can use the crop tool. Tap on “Edit,” select the “Crop” option, and then adjust the frame to your desired composition.
3. Enhance: To make your time lapse video even more visually appealing, you can enhance the colors, brightness, and contrast. In the editing menu, tap on the “Adjustments” icon and experiment with the different settings until you achieve the desired look.
4. Add music or audio: The Photos app allows you to add a soundtrack or audio to your time lapse video. Tap on “Edit,” select the “Music” option, and choose a track from your music library. You can adjust the volume and trim the audio to sync it perfectly with your time lapse footage.
5. Export and share: Once you are satisfied with the edits, it’s time to share your masterpiece with the world. Tap on the “Share” button, choose the desired social media platform, and follow the prompts to post your time lapse video. You can also export the video to your Camera Roll or send it via email or messaging apps.
By utilizing these editing tools in the Photos app, you can transform your raw time lapse footage into a polished and captivating video that will impress your friends and followers on social media.
Troubleshooting and Common Issues
If you are experiencing any problems while attempting to do a time lapse video on your iPhone, you’re not alone. Here are some common issues that users may encounter and troubleshooting tips to help you overcome them:
1. Lack of Storage Space: Time lapse videos can take up a lot of storage space on your iPhone. If you receive a notification that you don’t have enough space, try deleting unnecessary files or apps to free up storage. Alternatively, you can transfer your existing videos to a computer or cloud storage to make room for new recordings.
2. Shaky Footage: Keeping your iPhone stable during the entire time lapse recording is crucial to avoid shaky footage. Consider using a tripod or stabilizing device to ensure a steady capture. You can also enable the “Steady” mode in the Camera app by tapping on the screen and holding to lock the focus and exposure.
3. Overexposure or Underexposure: In some cases, the lighting conditions may cause your time lapse video to be overexposed (too bright) or underexposed (too dark). To address this, tap on the screen while recording and adjust the exposure slider to achieve the desired brightness. Additionally, try recording during different times of the day to find the optimal lighting conditions.
4. Inconsistent Frame Rates: If you notice that your time lapse video has inconsistent frame rates, resulting in a jumpy or uneven playback, ensure that the “Auto-Brightness” feature on your iPhone is turned off. This can sometimes cause fluctuations in the exposure levels, leading to inconsistencies in the recording. Adjusting the exposure manually can help maintain a consistent frame rate.
5. Blurry Images: Blurriness in your time lapse video can be caused by various factors, such as camera movement, low light conditions, or using a slow shutter speed. To improve image clarity, use a tripod or stable surface when recording, ensure sufficient lighting, and avoid using slow shutter speeds in low light situations.
6. Long Recording Time: Time lapse videos can often require a significant amount of time to capture, especially if you want to create a lengthy video. Keep in mind that the longer the recording, the more battery power it will consume. To prevent running out of battery during the recording, it is recommended to connect your iPhone to a power source or use a battery pack.
7. Insufficient Memory Processing: Performing intense tasks like time lapse recording can sometimes overwhelm your iPhone’s memory processing capabilities. If you encounter frequent crashes or freezes during the recording, try closing unnecessary apps running in the background and clearing your device’s RAM by restarting it.
By addressing these common issues and following the troubleshooting tips mentioned above, you can overcome any obstacles and successfully create stunning time lapse videos on your iPhone.
Addressing issues with exposure and lighting
When shooting a time lapse video on your iPhone, it’s important to consider the exposure and lighting conditions. If your subject is in a high-contrast setting with bright highlights and deep shadows, the camera’s automatic settings may not provide the desired results. To address this issue:
- Tap on the subject on your iPhone’s screen to adjust the exposure and focus manually.
- Consider using an external light source, such as a portable LED panel or reflector, to enhance the lighting and balance the exposure.
Dealing with camera shake or blurriness
Camera shake or blurriness can be a common challenge when shooting a time lapse video. To minimize these issues:
- Use a tripod or a stabilizing accessory to keep your iPhone steady during the recording.
- Enable the “Grid” feature on the camera app to help you align the shot and ensure stability.
- Avoid touching the screen or pressing the volume button when recording, as it can introduce unwanted movement or vibration.
Tackling storage limitations and space management
Time lapse videos can consume a significant amount of storage space on your iPhone. To overcome storage limitations:
- Prioritize shooting in a lower resolution or frame size to reduce file sizes.
- Regularly offload or transfer the recorded time lapse videos to a computer or external storage device to free up space on your iPhone.
- Consider using cloud storage services or apps to automatically back up your time lapse videos and free up storage on your device.
Troubleshooting app crashes or freezes
If you encounter app crashes or freezes during the time lapse recording process, here are a few troubleshooting steps you can try:
- Close any unnecessary background apps to free up system resources.
- Restart your iPhone to refresh the device’s memory.
- Update the camera app to the latest version to ensure compatibility with your device’s operating system.
- If the issue persists, try using a different camera app specifically designed for time lapse recording.
Remember to refer to the full article for more detailed instructions and explanations on each step.
Conclusion
In conclusion, capturing a stunning time-lapse video on your iPhone is incredibly easy and accessible. With the built-in camera features and the wide range of time-lapse apps available, you have all the tools at your fingertips to bring your creative vision to life. Whether you want to capture the breathtaking sunset, the bustling cityscape, or the blooming of flowers, the time-lapse technique adds a unique and captivating element to your videos.
By following the simple steps outlined in this article, you can unleash your creativity and create professional-looking time-lapse videos that will impress your friends, family, and social media followers. So, next time you find yourself in a picturesque location or witnessing a fascinating event, don’t forget to take out your iPhone and capture the passage of time with a time-lapse video.
Remember to experiment with different settings, angles, and subjects to truly showcase the beauty and transformation that time-lapse videos can offer. So go ahead, grab your iPhone, and let your imagination run wild!
FAQs
Q: Can I do a time lapse video on my iPhone?
Yes, absolutely! In fact, capturing time lapse videos on your iPhone is incredibly easy and requires no additional equipment.
Q: How do I access the time lapse feature on my iPhone?
To access the time lapse feature on your iPhone, simply open the Camera app and swipe right until you reach the “Time Lapse” mode. It’s represented by a stopwatch icon.
Q: What is the difference between time lapse and regular video recording?
The main difference between time lapse and regular video recording is that time lapse condenses a period of time into a shorter video clip. It captures and speeds up a series of frames taken at regular intervals, resulting in a fast-paced and visually captivating video.
Q: Can I customize the time interval between frames in a time lapse video?
Yes, you can! When you’re in the time lapse mode, you can adjust the time interval between frames by tapping on the screen. This allows you to control how fast or slow the time lapse effect will be. You can choose intervals ranging from a few seconds to several minutes.
Q: How long should I make a time lapse video?
The length of your time lapse video will depend on the subject and the effect you want to achieve. Keep in mind that time lapse videos condense a significant amount of time into a shorter video clip. As a general guideline, a time lapse video that’s around 10-30 seconds long tends to be engaging and captivating.
Q: Can I edit my time lapse video after capturing it?
Yes, you can edit your time lapse video after capturing it. You can use the built-in editing features of the Photos app on your iPhone to trim, apply filters, add music, and make further adjustments to your video to enhance its overall look and feel.