
Are you looking to set up a wireless IP camera system for your home or office? With the advancements in technology, it has become easier than ever to monitor your space remotely. Whether you want to keep an eye on your property while you’re away or ensure the safety of your loved ones, a wireless IP camera system can provide you with the peace of mind you need.
In this article, we will guide you through the process of setting up a wireless IP camera system step by step. From choosing the right equipment to configuring the system for optimal performance, we will cover everything you need to know. So, let’s dive in and learn how to set up a wireless IP camera system!
Inside This Article
- Overview of Wireless IP Camera Systems
- Choosing the Right Wireless IP Camera
- Setting Up the Wireless IP Camera Hardware
- Configuring the Wireless IP Camera Software
- Conclusion
- FAQs
Overview of Wireless IP Camera Systems
Wireless IP camera systems have revolutionized the way we monitor and secure our homes and businesses. With their advanced technology, these cameras provide high-quality video surveillance and real-time monitoring without the need for complex wiring installations. By utilizing Wi-Fi or other wireless communication protocols, these cameras can be easily set up and accessed remotely from your smartphone, tablet, or computer.
These systems consist of two main components: the camera itself and the receiver or network video recorder (NVR) that captures and stores the footage. The camera captures video footage and transmits it wirelessly to the receiver or NVR, which in turn can be connected to a monitor or accessed through a network for remote viewing.
One of the key advantages of wireless IP camera systems is their flexibility in placement. Without the need for physical wires, these cameras can be installed in various locations within your property, both indoors and outdoors. This allows you to cover a wider area and capture multiple angles for comprehensive surveillance.
Additionally, wireless IP camera systems offer features like motion detection, night vision, and two-way audio communication. The motion detection feature alerts you whenever there is movement detected in the camera’s field of view, providing you with real-time notifications. The night vision capability enables clear monitoring even in low-light or dark conditions. With two-way audio, you can communicate with people near the camera, like visitors or intruders, allowing for enhanced security and convenience.
Moreover, these systems often come with mobile apps or software interfaces that allow you to easily access and control the cameras from your smartphone or computer. You can remotely view live video feeds, playback recorded footage, adjust camera settings, and receive alerts on your mobile device, providing you with peace of mind even when you are away from your property.
As technology continues to advance, wireless IP camera systems have become more affordable and accessible for both residential and commercial users. They offer a convenient and effective solution for monitoring and securing your property, providing you with valuable peace of mind and enhanced security.
Choosing the Right Wireless IP Camera
When it comes to setting up a wireless IP camera system, one of the most crucial steps is choosing the right camera. With so many options available in the market, it can be overwhelming to make the right choice. However, with some knowledge and careful consideration, you can find the perfect camera that meets your specific needs. Here are a few factors to keep in mind:
- Resolution: The resolution of the camera determines the image quality. Look for cameras with high resolution, such as 1080p or even 4K, for clear and detailed footage.
- Field of View: Consider the field of view you require. If you want to monitor a wide area, opt for a camera with a wide-angle lens or a pan-tilt-zoom (PTZ) functionality.
- Indoor or Outdoor Use: Determine if you need the camera for indoor or outdoor surveillance. Outdoor cameras should be weatherproof and have a high ingress protection (IP) rating to withstand the elements.
- Night Vision: If you need to monitor in low-light conditions or at night, choose a camera with infrared (IR) night vision capability. Look for cameras with a decent range for effective monitoring.
- Power Source: Decide whether you prefer a camera that runs on battery power or one that needs to be plugged into a power source. Battery-powered cameras offer flexibility in terms of installation locations.
- Storage: Consider how you want to store the recordings. Some cameras offer onboard storage, while others rely on cloud storage or external devices like microSD cards or network-attached storage (NAS) devices.
- Wireless Connectivity: Ensure that the camera supports the wireless connectivity options you require, such as Wi-Fi or Bluetooth. This will allow you to connect the camera to your network without the hassle of running Ethernet cables.
- Additional Features: Look for additional features that may be important to you, such as two-way audio for communication, motion detection, mobile app support, or integration with smart home systems.
By considering these factors and assessing your specific requirements, you can confidently choose a wireless IP camera that suits your needs. Don’t forget to read reviews and compare different models to ensure you make an informed decision.
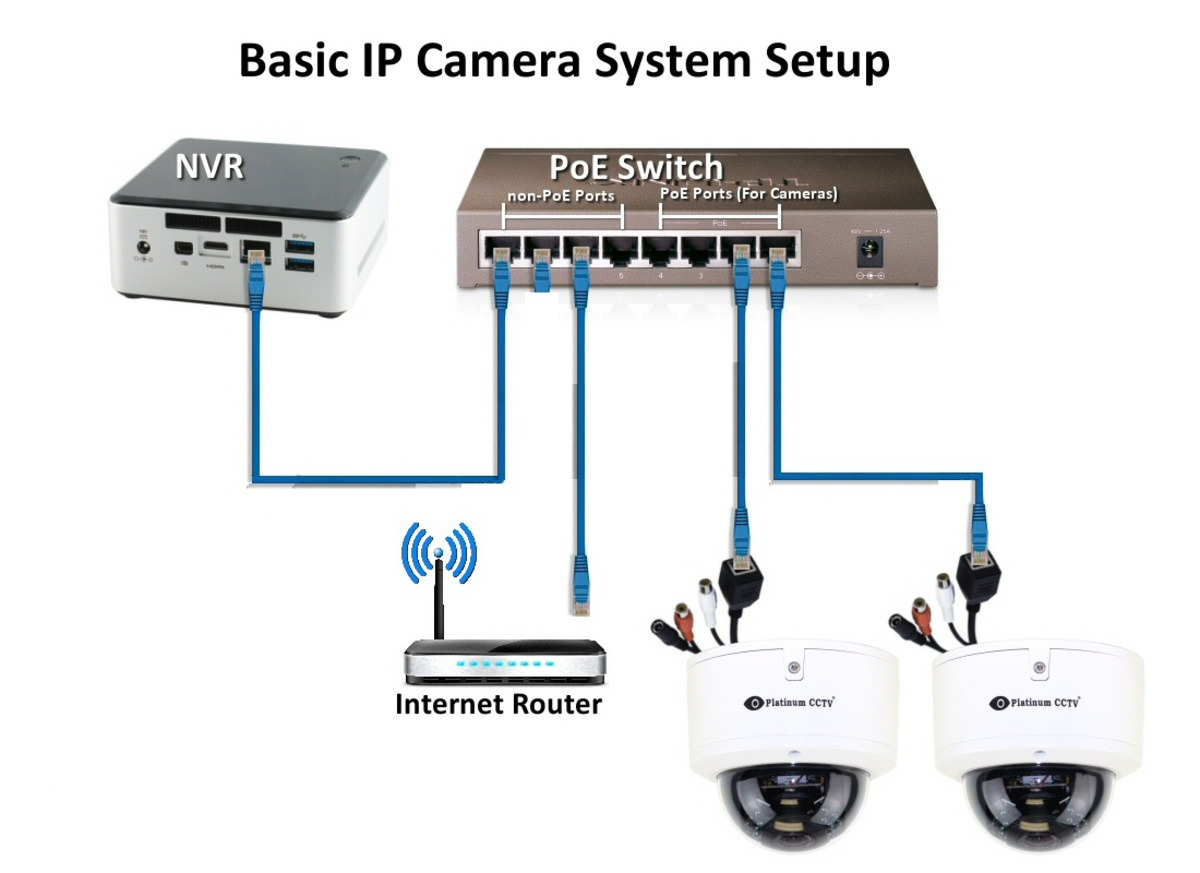
Setting Up the Wireless IP Camera Hardware
Setting up the hardware for your wireless IP camera is an essential step in ensuring the smooth functioning of your surveillance system. Here are the steps to follow:
1. Choose the Right Location: Before installing the camera, carefully select the optimal location for it. Consider factors such as the field of view, accessibility to power outlets, and potential obstructions. Ensure that the camera is positioned to capture the desired area effectively.
2. Mount the Camera: Once you’ve identified the ideal location, mount the camera securely using the provided mounting brackets or screws. Ensure that the camera is positioned at the desired angle and is stable to avoid any movement or misalignment.
3. Connect the Power Supply: After mounting, connect the power supply to the camera. Depending on the camera model, this may involve plugging it into a power outlet or using Power over Ethernet (PoE) to deliver power through the network cable.
4. Establish a Network Connection: To enable wireless connectivity, configure the camera to connect to your Wi-Fi network. Follow the instructions specific to your camera model to access the network settings and enter the required credentials.
5. Adjust Settings: Once the camera is connected to the network, access its configuration interface through a web browser or dedicated software. Set up preferences such as resolution, image quality, motion detection sensitivity, and any other features offered by your camera.
6. Test the Camera: Before completing the setup process, it’s crucial to test the camera to ensure it’s functioning correctly. Use the camera’s live view feature to verify that the video feed is clear and that all settings are applied as desired.
7. Consider Additional Equipment: Depending on your surveillance needs, you may want to consider additional equipment such as a Network Video Recorder (NVR) or a Cloud Storage solution. These can enhance the functionality and storage capacity of your wireless IP camera system.
By following these steps, you can effectively set up the hardware for your wireless IP camera system. Remember to refer to the manufacturer’s instructions for specific details and troubleshooting guidance, if needed.
Configuring the Wireless IP Camera Software
Once you have successfully set up the hardware for your wireless IP camera system, the next step is to configure the software to ensure smooth and efficient operation. This involves connecting the camera to your network, accessing the camera’s settings, and customizing various parameters to meet your specific needs.
The exact process may vary depending on the brand and model of your wireless IP camera, but here are some general steps to guide you through the software configuration:
- Begin by connecting the camera to your local network. Most wireless IP cameras have an Ethernet port for this purpose. Simply plug in the Ethernet cable from the camera to your router or modem.
- Access the camera’s web interface. To do this, you need to know the camera’s IP address. You can find this information in the camera’s user manual or by using software tools like IP Scanner.
- Open a web browser on a computer or mobile device that is on the same network as the camera. Enter the camera’s IP address in the address bar and press Enter.
- You will be prompted to enter a username and password to log in to the camera’s web interface. Refer to the camera’s user manual for the default credentials or any specific instructions for creating a new account.
- Once logged in, you will have access to the camera’s settings. This includes options to configure video resolution, frame rate, recording schedules, motion detection, and more.
- Adjust the settings according to your preferences. For example, you may want to set the camera to record continuously or only when motion is detected. You can also choose to receive email or push notifications when an event occurs.
- If you plan to access the camera remotely, enable remote access and set up port forwarding on your router. This will allow you to view the camera’s feed and control settings from anywhere with an internet connection.
- Ensure that the camera’s firmware is up to date. Manufacturers often release firmware updates to fix bugs and enhance performance. Check the manufacturer’s website regularly for any available updates and follow their instructions for installing them.
Remember to save your changes after configuring the camera’s settings. This will ensure that the changes take effect and are applied to the camera’s operation.
Keep in mind that some wireless IP cameras may have additional features or settings that are not covered in this general guide. Refer to the camera’s user manual or the manufacturer’s website for detailed instructions specific to your camera model.
Conclusion
Setting up a wireless IP camera system has never been easier or more accessible. With advancements in technology, you can now easily monitor your home or office from anywhere, using just your smartphone or computer. Whether you are concerned about the security of your property or simply want to keep an eye on your loved ones, a wireless IP camera system provides a reliable and convenient solution.
By following the step-by-step guide outlined in this article, you can confidently set up your wireless IP camera system and begin monitoring in no time. Remember to choose the right cameras for your needs, securely connect your cameras to your network, and configure the settings to suit your preferences. With the ability to access live feeds, receive alerts, and store footage, a wireless IP camera system offers peace of mind and enhanced security.
So why wait? Take control of your surveillance needs and invest in a wireless IP camera system today. Protect your loved ones, deter potential intruders, and enjoy the convenience of remote monitoring – all with the help of a wireless IP camera system.
FAQs
Q: Can I set up a wireless IP camera system without professional help?
A: Yes, setting up a wireless IP camera system is relatively easy and can be done without professional assistance. Most modern wireless IP cameras come with intuitive setup instructions and user-friendly apps, making the installation process convenient for homeowners or business owners.
Q: What are the advantages of a wireless IP camera system?
A: Wireless IP camera systems offer several advantages over traditional wired systems. They eliminate the need for complicated wiring installations, making them easier to set up and move around if needed. Wireless cameras also provide flexibility in terms of camera placement and reduce the risk of cables being damaged or tampered with. Additionally, wireless IP cameras often offer remote access and monitoring capabilities via smartphone apps or computer software.
Q: Is it necessary to have a Wi-Fi network to use a wireless IP camera system?
A: Yes, a Wi-Fi network is required to connect and access a wireless IP camera system. These cameras transmit data wirelessly through the network, allowing users to view live footage or record videos remotely. Without a Wi-Fi network, the wireless IP camera system would not function properly.
Q: Can I view the camera feed from outside my home or office?
A: Yes, one of the significant advantages of wireless IP camera systems is the ability to view the camera feed remotely. As long as you have a stable internet connection, you can access the camera’s live feed from anywhere in the world using your smartphone, tablet, or computer. Most wireless IP cameras come with dedicated mobile apps or software that allow for seamless remote viewing.
Q: Are wireless IP camera systems secure?
A: Wireless IP camera systems come with built-in security features, such as encryption protocols and password protection, to ensure the safety of your camera feed. However, it is crucial to take additional precautions to enhance security. This includes using strong passwords, regularly updating firmware, keeping the camera software up to date, and enabling any available security features provided by the camera manufacturer.