
Are you looking to enhance the security of your property? Adding a wireless camera to your DVR system is a great way to achieve that. With advances in technology, it has never been easier to set up a surveillance system that provides round-the-clock monitoring. Whether you want to keep an eye on your home, office, or any other space, a wireless camera connected to a DVR offers convenience, flexibility, and peace of mind.
In this article, we will guide you through the process of adding a wireless camera to your existing DVR system. We will cover the necessary equipment, the steps involved in connecting the camera, and provide tips for optimal setup and performance. By the end, you’ll have all the information you need to effectively integrate a wireless camera into your DVR and maximize your security measures.
Inside This Article
- Understanding the Basics of Wireless Cameras and DVRs
- Steps to Add a Wireless Camera to a DVR
- Troubleshooting Common Issues with Wireless Cameras and DVRs
- Conclusion
- FAQs
Understanding the Basics of Wireless Cameras and DVRs
Wireless cameras and DVRs are essential components of modern security systems. They provide an effective and convenient way to monitor and record activities in homes, offices, and public spaces. With wireless technology, these devices eliminate the need for complex wiring, allowing for flexible installation and seamless integration into any environment.
Wireless cameras, also known as IP cameras, use Wi-Fi or other wireless protocols to transmit video and audio signals to a receiver or a network video recorder (NVR). These cameras come in a variety of types, including indoor, outdoor, dome, bullet, and PTZ (pan-tilt-zoom) cameras. They are equipped with high-resolution sensors, infrared night vision, motion detection, and remote access capabilities.
DVRs, or digital video recorders, are devices that capture and store video footage from connected cameras. They offer features like scheduled recording, motion-triggered recording, and the ability to view live and recorded footage remotely. In addition, some DVRs have advanced functionalities such as facial recognition, license plate recognition, and integration with smart home systems.
One of the key advantages of wireless cameras and DVRs is their flexibility in terms of installation. Unlike traditional wired cameras, wireless cameras can be placed virtually anywhere within the Wi-Fi range. This makes them ideal for monitoring large areas or hard-to-reach locations. Additionally, wireless cameras can be easily moved or repositioned without the need for rewiring.
Another benefit is the ease of setup. With wireless cameras, you don’t have to deal with the hassle of running cables through walls, ceilings, or floors. Simply connect the camera to a power source, sync it with your wireless network, and you’re ready to go. Setting up a DVR involves connecting it to your network and configuring the recording settings.
However, it’s important to note that wireless cameras and DVRs have some limitations. The quality of the video feed and the stability of the connection can be affected by factors such as distance from the router, interference from other devices, and the number of connected cameras. To ensure optimal performance, it’s recommended to position the cameras within a reasonable distance from the router and avoid obstacles that may interfere with the signal.
Steps to Add a Wireless Camera to a DVR
Adding a wireless camera to a DVR can provide you with enhanced security and peace of mind. Whether you are monitoring your home, office, or any other premises, this guide will walk you through the steps to successfully connect a wireless camera to a DVR. Here are the essential steps:
- Choose a compatible wireless camera: Before you begin, ensure that the wireless camera you choose is compatible with your DVR system. Check the specifications and requirements of both the camera and the DVR to avoid any compatibility issues.
- Connect the camera to a power source: Start by connecting the wireless camera to a power source. This can be done by plugging in the power adapter that came with the camera into a nearby electrical outlet. Make sure the camera is receiving power before proceeding to the next step.
- Enable Wi-Fi connection on the camera: Most wireless cameras have built-in Wi-Fi capabilities. Consult the camera’s user manual to find out how to enable the Wi-Fi connection. This step varies depending on the camera model, but generally involves accessing the camera’s settings and connecting it to your home or office Wi-Fi network.
- Configure the camera settings: Once the Wi-Fi connection is established, you will need to configure the camera settings. This may include setting up the camera’s motion detection, adjusting the video quality, and assigning a unique name or ID to the camera for identification purposes.
- Locate the DVR’s Wi-Fi settings: Next, locate the Wi-Fi settings on your DVR system. This can usually be found in the system settings or network settings menu. Consult the DVR’s user manual for specific instructions on accessing the Wi-Fi settings.
- Connect the DVR to your Wi-Fi network: Follow the instructions provided by the DVR to connect it to your Wi-Fi network. This typically involves selecting your network from a list of available networks and entering the Wi-Fi password. Once connected, the DVR will establish a wireless connection with your network.
- Pair the camera with the DVR: After the DVR is connected to your Wi-Fi network, it’s time to pair the camera with the DVR. Access the camera settings on the DVR system and follow the on-screen instructions to add the camera. This process may vary depending on the DVR model, so refer to the user manual for detailed instructions.
- Verify the camera connection: Once the camera is paired with the DVR, verify the camera connection by accessing the live video feed on the DVR monitor. Check if the camera is displaying the desired view and ensure that the footage is being recorded properly. Make any necessary adjustments to the camera position or settings if needed.
By following these steps, you can easily add a wireless camera to a DVR system. Remember to consult the user manuals of both the camera and the DVR for specific instructions and troubleshooting tips. With your wireless camera successfully added to the DVR, you can enjoy enhanced security and monitoring capabilities for your property.
Troubleshooting Common Issues with Wireless Cameras and DVRs
Wireless cameras and DVRs offer a convenient and flexible solution for home and business security. However, like any other electronic device, they can encounter issues that may affect their functionality. In this section, we will discuss some common problems that you may face when using wireless cameras and DVRs, and provide troubleshooting tips to help you resolve these issues.
1. Poor Signal or Weak Connection: One of the most common issues faced with wireless cameras is a weak or unstable signal. This can result in blurry or pixelated images, frequent signal dropouts, or even difficulty in establishing a connection. To troubleshoot this issue, try the following:
- Check the antenna on both the camera and the DVR to ensure they are properly connected and fully extended.
- Place the camera and DVR closer to each other to minimize any obstruction or interference.
- Ensure that there are no electronic devices or walls blocking the signal between the camera and the DVR.
- Consider using a Wi-Fi signal booster or range extender to improve the signal strength.
2. Inadequate Power Supply: Another common issue is the camera or DVR not receiving enough power. This can result in the camera not turning on or frequent power outages. To troubleshoot this issue, try the following:
- Check the power cables and connectors to ensure they are properly connected and not damaged.
- Make sure that the power source is supplying sufficient power to the camera and DVR.
- Consider using a higher-rated power supply or an uninterrupted power supply (UPS) to ensure a stable power source.
3. Interference from Other Devices: Wireless cameras can sometimes experience interference from other electronic devices, such as cordless phones or Wi-Fi routers. This can result in distorted video quality or signal loss. To troubleshoot this issue, try the following:
- Move the camera and DVR away from other electronic devices that may be causing interference.
- Change the channel or frequency settings on the camera and DVR to avoid conflicts with other devices.
- Consider using devices that operate on the 5GHz frequency band, as it is less prone to interference from other devices.
4. Incorrect Network Configuration: If you are trying to access the camera remotely or view the footage on a smartphone or computer, incorrect network configuration can be a common issue. To troubleshoot this issue, try the following:
- Check the network settings on the camera and DVR to ensure they are properly configured for remote access.
- Verify that the port forwarding or DDNS settings are correctly set up on your router to allow external access to the camera.
- Restart the camera and DVR, as well as the router and modem, to refresh the network connections.
By following these troubleshooting tips, you can overcome common issues that may arise with wireless cameras and DVRs. Remember to refer to the user manual or contact the manufacturer’s support if you require further assistance in resolving these issues. With proper troubleshooting and maintenance, you can ensure the optimal performance of your wireless camera and DVR system.
Conclusion
Adding a wireless camera to your DVR system is a great way to enhance the security of your home or business. It allows you to expand your surveillance coverage and monitor multiple areas without the limitations of hardwired connections. By following the steps outlined in this guide, you can easily set up and integrate a wireless camera into your existing DVR system.
Remember, when choosing a wireless camera, opt for one that is compatible with your DVR system and offers reliable connectivity. Take the time to properly position and configure the camera to ensure clear and optimal video capture. Regularly check and maintain your wireless camera setup to ensure uninterrupted surveillance.
With a wireless camera added to your DVR system, you can have peace of mind knowing that you have an extra layer of security in place. Enjoy the convenience and flexibility that wireless technology offers, and protect your property and loved ones with ease.
FAQs
1. Can I add a wireless camera to my DVR system?
Yes, you can add a wireless camera to your DVR system. Most DVR systems have the capability to support both wired and wireless cameras. You will need to make sure that your DVR is compatible with wireless cameras and follow the manufacturer’s instructions for pairing and setting up the wireless camera with your DVR.
2. Do I need any additional equipment to connect a wireless camera to my DVR?
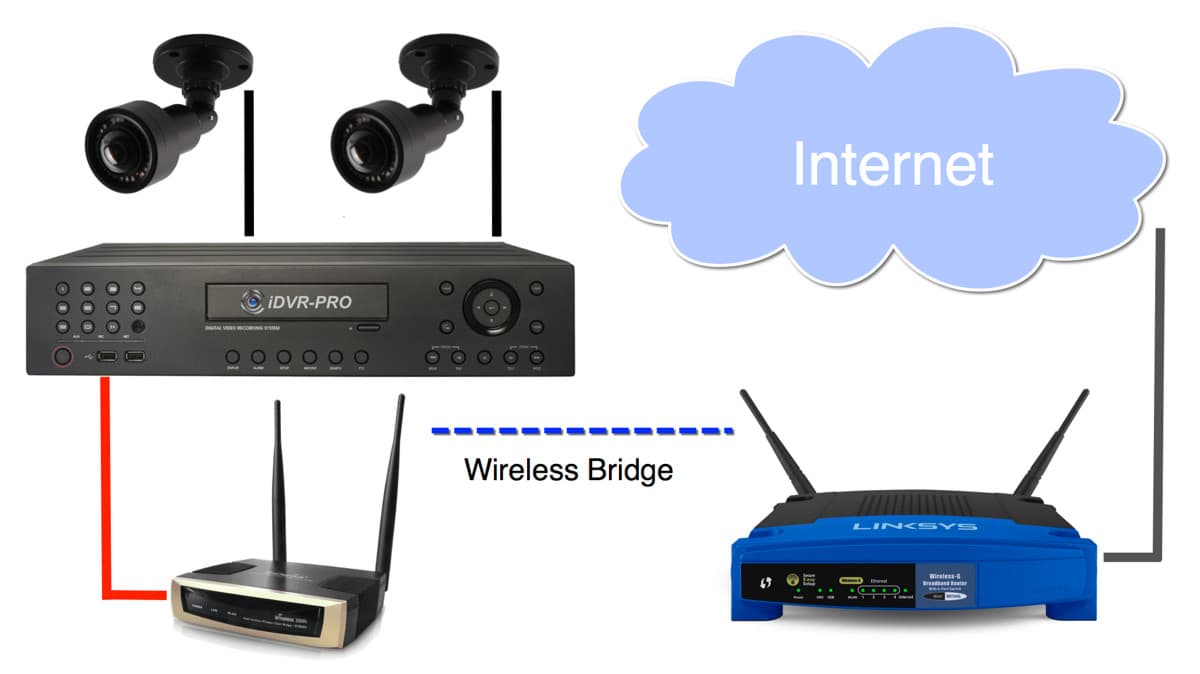
To connect a wireless camera to your DVR, you will need a wireless receiver that is compatible with your DVR. The wireless receiver acts as a bridge between the wireless camera and the DVR, allowing the video feed from the camera to be transmitted wirelessly to the DVR for recording and monitoring.
3. How far can a wireless camera be from the DVR?
The range at which a wireless camera can be from the DVR depends on various factors such as the quality of the wireless transmission, any obstacles in the signal path, and the specific wireless technology used. In general, most wireless cameras can operate within a range of 100 to 300 feet from the DVR. However, it is recommended to check the specifications of your wireless camera and DVR system for specific range details.
4. Can I use multiple wireless cameras with my DVR?
Yes, you can use multiple wireless cameras with your DVR. Most DVR systems support multiple camera inputs, allowing you to connect and record from multiple cameras simultaneously. However, it’s important to ensure that your DVR has enough available channels to accommodate the number of wireless cameras you want to connect. Additionally, you may need to adjust the settings on your DVR to configure and manage multiple camera feeds.
5. Are wireless cameras as reliable as wired cameras for surveillance purposes?
Wireless cameras have come a long way in terms of reliability, but they still have some limitations compared to wired cameras. Wired cameras typically provide a more stable and consistent video feed since they are directly connected to the DVR through cables. Wireless cameras, on the other hand, may be more susceptible to signal interference or degradation due to factors like distance or obstacles. However, advancements in wireless technology have greatly improved the reliability of wireless cameras, and they can be a viable option for many surveillance applications.