
Are you looking to connect your CCTV DVR to a wireless router? With the advancements in technology, it has become easier than ever to monitor and secure your property with a CCTV system. By connecting your CCTV DVR to a wireless router, you can access the live feed and recordings from your cameras remotely, allowing you to keep an eye on your home or business from anywhere in the world. In this article, we will guide you through the process of connecting your CCTV DVR to a wireless router, step by step. Whether you’re a tech-savvy individual or a beginner, we’ve got you covered. So, let’s dive in and get your CCTV system connected to a wireless network!
Inside This Article
- Overview of CCTV DVR and Wireless Router
- Step 1: Check Compatibility of CCTV DVR and Wireless Router
- Step 2: Connect CCTV DVR to the Wireless Router via Ethernet Cable
- Step 3: Configure Network Settings on the CCTV DVR
- Step 4: Connect Remote Viewing Devices to the Wireless Network
- Troubleshooting Tips for Connecting CCTV DVR to Wireless Router
- Conclusion
- FAQs
Overview of CCTV DVR and Wireless Router
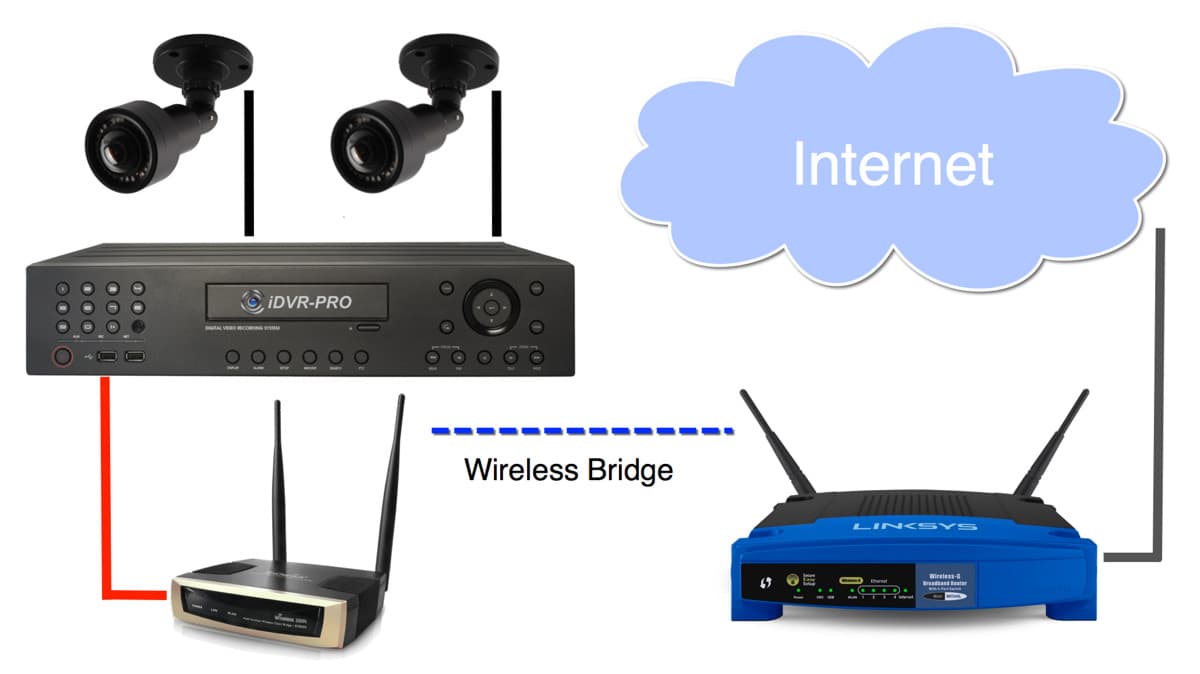
When it comes to securing your property, installing a Closed Circuit Television (CCTV) system is one of the most effective measures you can take. A CCTV system allows you to monitor your property and deter potential intruders. To access the live feed and recorded footage, you need to connect your CCTV Digital Video Recorder (DVR) to a wireless router.
A wireless router is a device that creates a local area network (LAN) and connects multiple devices to the internet without the need for physical cables. It acts as a central hub, enabling communication between your CCTV DVR and other devices like smartphones, tablets, or computers for remote viewing.
By connecting your CCTV DVR to a wireless router, you can access the live feed and recorded footage from anywhere in the world using various devices. This allows you to keep an eye on your property in real-time or review footage at a later time for security purposes.
Before you start connecting your CCTV DVR to a wireless router, it’s important to ensure compatibility between the two devices. Check the specifications of your DVR and router to see if they support the same network protocols and frequencies. This will ensure a seamless connection and optimal performance.
Once you’ve confirmed compatibility, you can proceed with the connection process. Start by obtaining an Ethernet cable and connecting one end to the Ethernet port on your CCTV DVR. The other end of the cable will be connected to one of the LAN ports on the wireless router.
After the physical connection is established, you need to configure the network settings on the CCTV DVR. This involves accessing the DVR’s interface through a web browser or dedicated software and entering the relevant network information, such as the IP address, subnet mask, default gateway, and DNS servers.
Once the network settings are configured, you can connect your remote viewing devices, such as smartphones or computers, to the wireless network created by the router. Download the appropriate app or software for your CCTV DVR model and follow the instructions to connect your devices to the system.
Should you encounter any issues during the connection process, there are a few troubleshooting tips you can try. Ensure that your wireless router has a stable internet connection and that the DHCP (Dynamic Host Configuration Protocol) is enabled. You may also need to check the port forwarding settings on your router to allow remote access to your CCTV DVR.
Step 1: Check Compatibility of CCTV DVR and Wireless Router
Before attempting to connect your CCTV DVR to a wireless router, it is important to ensure compatibility between the devices. This step is crucial as it will determine whether or not you can establish a successful connection.
Firstly, check the specifications of your CCTV DVR to see if it supports wireless connectivity. Some older models may only have Ethernet ports, which would require a different method of connection.
Next, verify the compatibility of your wireless router. Look for the Wi-Fi standards supported by the router, such as 802.11n or 802.11ac. It is recommended to have a router that supports at least 802.11n for a stable and reliable connection.
Furthermore, check if your wireless router supports WPS (Wi-Fi Protected Setup). This feature allows for easier and quicker connection establishment. If both your CCTV DVR and router support WPS, it will simplify the configuration process.
Lastly, consider the distance between the CCTV DVR and the wireless router. If they are too far apart, the signal strength may be weak, resulting in a poor connection. It is recommended to have the devices within a reasonable proximity for optimal performance.
By checking the compatibility of your CCTV DVR and wireless router, you can ensure that they are capable of establishing a successful connection, making the rest of the setup process smoother and more efficient.
Step 2: Connect CCTV DVR to the Wireless Router via Ethernet Cable
Connecting your CCTV DVR to the wireless router is an important step in setting up your surveillance system. By establishing this connection, you enable the DVR to access the internet, allowing you to monitor your security cameras remotely. Follow the steps below to connect your CCTV DVR to the wireless router using an Ethernet cable.
1. Locate the Ethernet port on the back of your CCTV DVR. This port looks similar to a telephone jack, but it is slightly larger and has a wider opening.
2. Connect one end of the Ethernet cable to the Ethernet port on the back of the CCTV DVR. Ensure that the cable is securely inserted into the port.
3. Now, locate an available Ethernet port on your wireless router. These ports are typically labeled LAN or Ethernet and are usually located on the back or the side of the router.
4. Connect the other end of the Ethernet cable to the Ethernet port on the wireless router. Again, make sure the cable is firmly connected to the port.
5. In some cases, you may need to power on your CCTV DVR and wireless router if they are not already turned on. Refer to the user manuals for your specific devices for instructions on powering them on if needed.
6. Once the Ethernet cable is connected to both the CCTV DVR and the wireless router, the two devices will establish a wired connection. This connection allows the CCTV DVR to transmit and receive data over the network.
7. Lastly, ensure that the Ethernet connection is active and working properly. Check the indicator lights on both the CCTV DVR and the wireless router. The lights should show a solid connection, typically indicated by a steady green or amber light.
By connecting your CCTV DVR to the wireless router via an Ethernet cable, you have established a stable and reliable connection. This connection enables your surveillance system to operate seamlessly and allows you to access and monitor your cameras remotely.
Step 3: Configure Network Settings on the CCTV DVR
Configuring the network settings on your CCTV DVR is a crucial step in connecting it to your wireless router. By correctly setting up the network parameters, you can ensure that your DVR can communicate with the router and enable remote viewing of your security cameras. Follow these steps to configure the network settings on your CCTV DVR:
1. Access the DVR’s settings menu: Start by connecting a monitor to the CCTV DVR and logging into its configuration interface. Typically, this is done using a mouse connected to the DVR’s USB port. Once logged in, navigate to the network settings section.
2. Obtain the DHCP or static IP address: Depending on your network setup, you can choose to assign a dynamic IP address (using DHCP) or a static IP address to the DVR. If you’re opting for a static IP, make sure to assign an IP address within the same subnet as your wireless router.
3. Set the subnet mask and default gateway: The subnet mask should match the network configuration of your wireless router. Similarly, enter the IP address of your router as the default gateway. These settings ensure proper communication between the DVR and the router.
4. Configure DNS settings: Enter the IP address of your preferred DNS server. This is usually your internet service provider’s DNS server or a public DNS server such as Google DNS (8.8.8.8) or Cloudflare DNS (1.1.1.1).
5. Enable port forwarding (if necessary): If you want to access your CCTV DVR remotely over the internet, you’ll need to set up port forwarding on your router. This allows incoming connections to reach the DVR. Refer to your router’s manual or online guides for detailed port forwarding instructions.
6. Save the settings and restart the DVR: Once you have configured all the necessary network settings, save the changes and restart the CCTV DVR. This ensures that the new configuration takes effect.
After completing these steps, your CCTV DVR should be successfully connected to your wireless router. You can now access the DVR and view your security camera footage remotely using a smartphone, tablet, or computer connected to the same network. Remember to check the manufacturer’s instructions for any specific settings or requirements for your particular CCTV DVR model.
Step 4: Connect Remote Viewing Devices to the Wireless Network
Once you have successfully connected your CCTV DVR to the wireless router, the next step is to connect your remote viewing devices such as smartphones, tablets, or laptops to the same wireless network. This will allow you to access and monitor the CCTV footage from anywhere with an internet connection.
To connect your remote viewing device to the wireless network, follow these simple steps:
1. Make sure that your remote viewing device is connected to the same Wi-Fi network as the CCTV DVR. You can do this by going to the Wi-Fi settings on your device and selecting the network name that corresponds to the one you set up for your CCTV system.
2. Once connected to the Wi-Fi network, you may need to install a mobile app or software provided by the CCTV manufacturer. This will allow you to access the CCTV footage and control the system remotely. Visit the manufacturer’s website or app store to download and install the necessary software.
3. Open the app or software on your remote viewing device and follow the on-screen instructions to set up the CCTV system. You may need to enter the IP address or device ID of your CCTV DVR to establish a connection.
4. Once the connection is established, you should be able to view live video feeds from your CCTV cameras and access recorded footage from your remote viewing device. You can also customize settings such as motion detection, notifications, and playback controls through the app or software.
5. Finally, test the remote viewing connection by accessing the CCTV system from a remote location using your mobile data or a different Wi-Fi network. This will ensure that you can monitor your CCTV cameras seamlessly, even when you are not at the premises.
Keep in mind that the process of connecting remote viewing devices may vary depending on the brand and model of your CCTV DVR. Refer to the manufacturer’s instructions or consult their customer support if you encounter any difficulties during the setup process.
With your remote viewing devices now connected to the wireless network, you can enjoy the peace of mind knowing that you can monitor your CCTV system anytime, anywhere. Whether you are at work, on vacation, or simply away from home, you can keep an eye on your property and loved ones with just a few taps on your smartphone or tablet.
Troubleshooting Tips for Connecting CCTV DVR to Wireless Router
Connecting a CCTV DVR to a wireless router can sometimes be a challenging task. If you’re experiencing difficulties in establishing a stable connection, here are some troubleshooting tips that can help you resolve the issue.
1. Check Network Settings: Ensure that the network settings on your DVR and wireless router are correctly configured. Double-check the IP addresses, subnet masks, and gateway settings to make sure they match.
2. Signal Strength: Weak Wi-Fi signal can cause connectivity problems. Place your router and DVR in close proximity to improve the signal strength. You can also consider using a Wi-Fi range extender to boost the signal in the area where the DVR is located.
3. Update Firmware: Outdated firmware can lead to compatibility issues. Make sure both your DVR and wireless router have the latest firmware installed. Check the manufacturer’s website for updates and follow the instructions to update the firmware.
4. Security Settings: Verify that the security settings on your wireless router do not block the DVR’s connection. Make sure that the security protocol (WEP, WPA, WPA2) and the password set on the router match the settings on the DVR.
5. Port Forwarding: If you are using remote viewing or accessing your CCTV footage from outside the local network, you may need to set up port forwarding on your router. Refer to the DVR’s documentation for the required ports and configure the router accordingly.
6. Check Ethernet Cable: Inspect the Ethernet cable that connects the DVR to the router. A faulty or loose cable can cause intermittent connectivity issues. Try using a different cable or ensuring that the existing cable is plugged in securely at both ends.
7. Power Cycling: Sometimes, a simple power cycle can resolve connectivity problems. Turn off both your DVR and wireless router, unplug them from the power source, wait for a minute, and then restart them.
8. Disable Firewall: Temporarily disable the firewall on your wireless router, as it can sometimes interfere with the DVR’s connection. If the connection is successful with the firewall turned off, adjust the firewall settings to allow the DVR’s traffic.
9. Professional Assistance: If you have exhausted all troubleshooting steps and are still unable to connect the CCTV DVR to the wireless router, it may be time to seek professional help. Contact the support team or technician for your DVR or wireless router for further assistance.
By following these troubleshooting tips, you should be able to overcome most connectivity issues when connecting your CCTV DVR to a wireless router. Remember to double-check your network settings, ensure a strong Wi-Fi signal, and keep your firmware up to date for a smooth and reliable connection.
Conclusion
Connecting your CCTV DVR to a wireless router is a crucial step in ensuring the security and accessibility of your surveillance system. By following the step-by-step instructions provided in this article, you can successfully establish a wireless connection and enjoy remote viewing capabilities.
Remember to consider the placement of your DVR and router for optimal signal strength and stability. Additionally, always prioritize security by using strong passwords and enabling encryption on your wireless network.
With a wireless connection, you can monitor your premises from anywhere using a smartphone, tablet, or computer. This provides you with peace of mind, knowing that you can keep an eye on your property and loved ones even when you’re not physically present.
So, take the plunge and connect your CCTV DVR to a wireless router today. Enjoy the convenience, flexibility, and enhanced security that wireless connectivity brings to your surveillance system.
FAQs
Do I need a wireless router to connect my CCTV DVR to the internet?
Yes, a wireless router is necessary to connect your CCTV DVR to the internet. A wireless router allows you to create a wireless network within your home or business premises and provides the means for your CCTV DVR to connect to the internet wirelessly.
Can I connect my CCTV DVR to a wired router instead of a wireless one?
Yes, you can connect your CCTV DVR to a wired router. While a wireless router offers the convenience of a wireless connection, a wired router can provide a more stable and reliable connection for your CCTV DVR. Simply connect your CCTV DVR to the wired router using an Ethernet cable.
What are the benefits of connecting my CCTV DVR to a wireless router?
Connecting your CCTV DVR to a wireless router offers several benefits. Firstly, it allows you to access live video feeds and recorded footage remotely from any location with an internet connection. Additionally, you can receive real-time alerts and notifications on your mobile device when motion is detected by the CCTV cameras. It also eliminates the need for running Ethernet cables around your premises, providing a more flexible installation.
Can I connect multiple CCTV DVRs to the same wireless router?
Yes, you can connect multiple CCTV DVRs to the same wireless router. Most wireless routers have multiple Ethernet ports, allowing you to connect multiple devices, including CCTV DVRs, to the same router. However, it’s important to ensure that your router can handle the bandwidth requirements of all the connected devices.
Do I need any additional equipment to connect my CCTV DVR to a wireless router?
In most cases, you will need a wireless network adapter to connect your CCTV DVR to a wireless router. The wireless network adapter acts as a bridge between the CCTV DVR and the wireless router, enabling the DVR to establish a wireless connection. Some CCTV DVRs may have built-in wireless capabilities, eliminating the need for an additional network adapter.