
Are you looking to delve into the inner workings of your Samsung wireless charger? Wondering how to take it apart for repair or customization purposes? Look no further, as in this article, we will guide you through the step-by-step process of disassembling a Samsung wireless charger. Now You Know, an expert in cell phone technology, will provide you with all the insights you need to successfully take apart your Samsung wireless charger. Whether you’re a tech enthusiast or simply curious about the inner workings of your devices, this article will equip you with the knowledge to explore the intricacies of your Samsung wireless charger. So, grab your tools and let’s get started on this exciting DIY adventure!
Inside This Article
- Tools Required
- Step 1: Preparation
- Step 2: Removing the Back Cover
- Step 3: Removing Internal Components
- Step 4: Disassembling the Coil and Housing
- Conclusion
- FAQs
Tools Required
In order to successfully take apart a Samsung wireless charger, you will need a few handy tools to assist you. These tools include:
- Screwdriver: A small Phillips screwdriver will be necessary to remove screws securing components in the wireless charger.
- Spudger: A spudger or a similar prying tool is essential for gently lifting and separating delicate parts without causing damage.
- Heat gun or hair dryer: In some cases, heat may be required to soften adhesives or loosen tightly fitted components, and a heat gun or hair dryer can be used for this purpose.
- Plastic pry tool: A plastic pry tool is essential for safely prying open the wireless charger without scratching or damaging the surface.
Having these tools on hand will make the process of disassembling the Samsung wireless charger much easier and ensure that you can safely navigate through the intricate parts.
Step 1: Preparation
Before you begin taking apart your Samsung wireless charger, it’s important to go through a few essential preparation steps. Follow these instructions carefully to ensure a smooth disassembly process:
1. Unplug the wireless charger from the power source. This is a crucial first step to avoid any electrical accidents or mishaps during the disassembly process.
2. Ensure that the charger is cool to touch before proceeding. As the charger operates by generating a small amount of heat, it’s essential to allow it to cool down before you start taking it apart. This will protect you from burns or discomfort during the process.
3. Place the charger on a clean and flat surface. To ensure stability and prevent any accidental slips or damage to the charger or its components, it’s best to work on a clean and flat surface. This will provide a comfortable and secure workspace for disassembling the wireless charger.
By following these preparation steps, you can create a safe and organized environment to efficiently take apart your Samsung wireless charger. Now that everything is set, let’s move on to the next steps in disassembling your device!
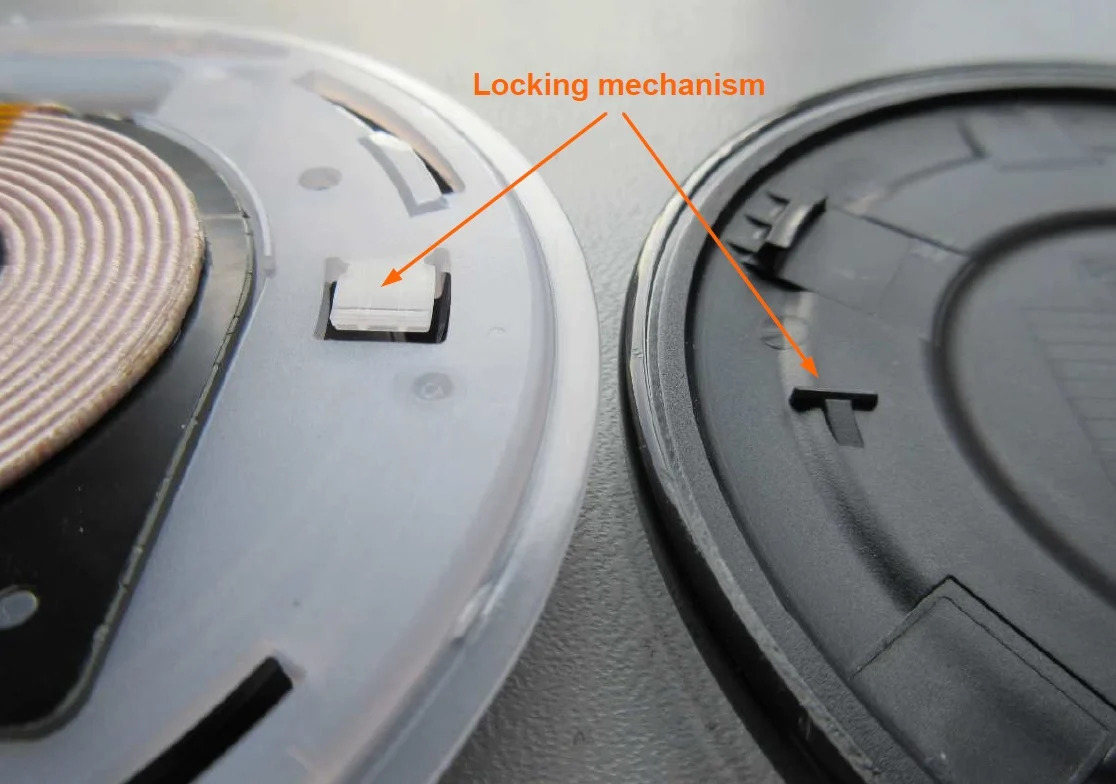
Step 2: Removing the Back Cover
Start by using a plastic pry tool to gently lift the back cover of the charger. Insert the pry tool into the small gap between the back cover and the main body. Be careful to avoid applying excessive force that could damage the charger.
Once the pry tool is inserted, carefully pry around the edges of the back cover. The goal is to release the clips that are holding the back cover in place. Take your time and work systematically, making sure to release all the clips before attempting to lift the back cover.
Once you have successfully released all the clips, you can now lift the back cover off the charger. Be gentle and ensure that no cables or connectors are still attached to the cover. If any cables are in the way, disconnect them before lifting the back cover completely.
With the back cover removed, you now have access to the internal components of the wireless charger. The next steps will guide you through removing these components to further disassemble the charger.
Step 3: Removing Internal Components
After successfully removing the back cover, it’s time to delve deeper into the wireless charger to access its internal components. This step requires locating and removing the screws that secure these components. Here’s how to proceed:
1. Begin by carefully examining the charger to identify the screws holding the internal components in place. These screws vary in size and location, so make sure to inspect the charger thoroughly. Once located, use a screwdriver appropriate for the screw’s size to remove them. Remember to keep the screws organized and in a safe place to prevent loss or confusion later on.
2. Once the screws are removed, gently lift the component board or circuit board out of the charger. Take care not to exert too much force, as the board may be attached with adhesive or small clips. Slow and delicate movements will help prevent accidental damage to the board or its connections.
3. As you lift the board, you may encounter cables or connectors attached to it. Take note of their positions and connections, and carefully disconnect them. Depending on the charger’s design, there may be multiple cables or connectors to detach. Use your fingers or a small pry tool, such as a spudger, to disconnect these components one by one.
4. In some cases, you may find additional screws or clips holding specific components in place within the charger. These components could include LED indicators, power buttons, or other internal elements. Make sure to remove any additional screws or release any clips that are holding these components in position. This will allow for further disassembling if necessary.
By following these steps, you can successfully remove the internal components of your Samsung wireless charger. Remember to exercise caution and take your time during this process to ensure that no damage is caused to the components themselves or other parts of the charger.
Step 4: Disassembling the Coil and Housing
Once you have successfully removed the back cover and detached the internal components of your Samsung wireless charger, it’s time to disassemble the coil and housing. Taking this step requires a delicate touch and attention to detail, ensuring that you handle each component with care to avoid any damage or breakage. Here is a step-by-step guide on how to disassemble the coil and housing:
1. Carefully lift the wireless charging coil from its position. The coil is responsible for transferring power wirelessly to your device, and it’s essential to handle it gently. Avoid putting excessive pressure on the coil to prevent any damage.
2. Ensure that any adhesive or screws securing the coil are removed beforehand. Some wireless chargers may have adhesive backing or screws holding the coil in place. Carefully inspect the coil and remove any fasteners or adhesive materials before attempting to lift it.
3. For the housing, gently pry open any clips or separable sections. The housing contains various components of the wireless charger, including LED indicators and power buttons. Use a plastic pry tool or your fingers to carefully separate the housing sections, releasing any clips that may be holding them together.
4. Take apart the inner housing components, such as LED indicators or power buttons, as necessary. Once you have accessed the inner housing, you might need to further disassemble it to access specific components. This can include removing screws, disconnecting cables, or unclipping certain parts. Handle each component with care, ensuring you keep track of the disassembly process for easy reassembly later.
By following these steps, you can successfully disassemble the coil and housing of your Samsung wireless charger. Remember to exercise caution and avoid rushing the process. Take your time to carefully remove each component, and if needed, refer to detailed instructions or seek professional guidance to ensure you perform the disassembly correctly.
Throughout this article, we’ve explored the process of taking apart a Samsung wireless charger. We’ve discussed the tools you’ll need, the steps you should follow, and the precautions to keep in mind. By providing a comprehensive guide, we hope to have empowered you to dismantle your Samsung wireless charger confidently.
Taking apart your wireless charger can be a useful skill. Whether you’re looking to troubleshoot a problem, make repairs, or simply to satisfy your curiosity, now you have the knowledge to do so. Remember to always proceed with caution and follow safety guidelines when working with electronic devices.
By understanding the inner workings of your wireless charger, you can gain a deeper appreciation for the technology that powers your mobile devices. Finally, taking apart your Samsung wireless charger allows you to make repairs or modifications if necessary, ensuring that your charger continues to deliver reliable performance for years to come.
FAQs
Q: Can I take apart my Samsung wireless charger?
A: Yes, you can take apart your Samsung wireless charger, but it is not recommended unless you have experience with electronics and understand the potential risks involved. Disassembling the charger may void any warranty, and improper handling can damage the internal components or pose a safety hazard.
Q: Why would I want to take apart my Samsung wireless charger?
A: There could be several reasons why you would want to take apart your Samsung wireless charger. Perhaps you are experiencing issues with its functionality and want to inspect the internal components for any visible damage. Alternatively, you may be interested in modifying or upgrading certain aspects of the charger.
Q: What tools do I need to take apart my Samsung wireless charger?
A: To disassemble a Samsung wireless charger, you will typically need a small Phillips-head screwdriver, a plastic opening tool or spudger, and possibly a prying tool. These tools will help you remove any screws or clips that hold the charger’s casing together without causing unnecessary damage.
Q: Is it safe to take apart my Samsung wireless charger?
A: Disassembling a Samsung wireless charger can be safe if done properly by someone with the necessary knowledge and skills. However, it is essential to exercise caution and take necessary precautions, such as unplugging the charger from the power source and wearing protective gloves, to avoid electric shocks or injury. If you are unsure or uncomfortable with the process, it is best to seek professional help.
Q: Are there any risks involved in taking apart my Samsung wireless charger?
A: Yes, there are risks associated with taking apart a Samsung wireless charger. Mishandling the internal components or using improper tools can lead to damage to the charger or even injury. Furthermore, disassembling the charger may void any warranty coverage, so it is crucial to consider these factors before proceeding.