
Are you looking for a hassle-free way to transfer your Nintendo 3DS SD card data? Look no further! In this comprehensive guide, we will walk you through the step-by-step process of transferring your valuable data from one SD card to another. Whether you need to upgrade to a larger capacity card or simply want to backup your important game saves and downloaded content, this article has got you covered.
Transferring data on your Nintendo 3DS is essential, especially when you want to preserve your hard-earned progress in games and cherished memories. By following the instructions laid out in this guide, you’ll be able to seamlessly transfer your SD card data, ensuring that you never have to worry about losing your valuable collection of games, save files, or other multimedia content.
Inside This Article
- Overview of Nintendo 3DS SD Card Transfer
- Preparing for Data Transfer
- Transferring Data from the Old SD Card
- Transferring Data to the New SD Card – Copying the Nintendo 3DS folder from the computer to the new SD card – Ejecting the new SD card and inserting it into the Nintendo 3DS
- Verifying the Data Transfer- Switching on the Nintendo 3DS and checking for transferred data- Testing game saves and downloaded content- Troubleshooting common issues
- Additional Considerations and Tips
- Conclusion
- FAQs
Overview of Nintendo 3DS SD Card Transfer
The Nintendo 3DS is a popular handheld gaming console that allows users to play their favorite games while on the go. One of the key features of the Nintendo 3DS is the ability to store game data, including game saves, downloaded content, and system settings, on an SD card. This makes it easier to transfer data between consoles or to upgrade to a larger memory card.
Transferring data from one SD card to another is a simple process that involves several steps. First, you need to ensure that the new SD card you want to transfer data to is compatible with the Nintendo 3DS. This can usually be checked by referring to the compatibility list provided by Nintendo.
Next, you will need to format the new SD card to prepare it for data transfer. Formatting the SD card will erase any existing data, so it is important to back up all important files before proceeding. This can be done by connecting the old SD card to a computer and copying the entire Nintendo 3DS folder to a safe location.
Once the new SD card is formatted and ready, you can start the process of transferring data from the old SD card. This involves inserting the old SD card into a computer and copying the Nintendo 3DS folder to the computer’s hard drive. It is important to make sure that you are copying the entire folder and not just individual files.
Once the copying process is complete, you can safely remove the old SD card from the computer and insert the new SD card. The next step is to copy the Nintendo 3DS folder from the computer’s hard drive to the new SD card. Again, make sure to copy the entire folder to ensure that all game data and system settings are transferred.
After the data transfer is complete, eject the new SD card from the computer and insert it into the Nintendo 3DS console. To verify that the transfer was successful, power on the console and check for the transferred data. You should see your game saves, downloaded content, and system settings intact on the new SD card.
It is important to note that after transferring data to the new SD card, you may need to update the Nintendo 3DS firmware to ensure compatibility with the new card. This can be done by accessing the system settings on the console and checking for any available updates.
Managing and organizing data on the SD card is also essential to keep the Nintendo 3DS running smoothly. Regularly deleting unused files and organizing game saves can help optimize storage space and prevent any performance issues.
Preparing for Data Transfer
Before transferring data from your old SD card to a new one on your Nintendo 3DS, it’s essential to go through a few necessary steps to ensure a smooth and successful transfer process. In this section, we’ll discuss how to check the compatibility of SD cards, format the new card, and back up your Nintendo 3DS data.
Checking compatibility of SD cards
The first step is to ensure that the new SD card you intend to use for the data transfer is compatible with your Nintendo 3DS. Nintendo recommends using SD cards with a capacity of up to 32GB. It’s important to note that the Nintendo 3DS supports SDHC cards up to 32GB, while the New Nintendo 3DS models can handle SDXC cards with capacities up to 128GB.
Check the packaging or product specifications of the new SD card to verify its compatibility. If in doubt, you can also consult the manufacturer’s website or contact their support for further clarification.
Formatting the new SD card
Before using a new SD card with your Nintendo 3DS, it’s necessary to format it in a specific way to ensure compatibility and optimal performance. Formatting the card will erase any existing data, so make sure to back up any important files before proceeding.
To format the new SD card, insert it into your computer’s SD card reader or use an external SD card reader if your computer doesn’t have one. Open the file explorer and navigate to the SD card. Right-click on the SD card and select the “Format” option.
In the format window, select the “FAT32” file system option and ensure that the allocation unit size is set to the default value. Click on “Start” to initiate the formatting process. Once the formatting is complete, the new SD card is ready for use with your Nintendo 3DS.
Backing up Nintendo 3DS data
Before proceeding with the data transfer, it’s highly recommended to create a backup of your Nintendo 3DS data to ensure that no valuable information is lost in the process. The backup will include your game saves, downloaded content, and any additional data stored on the SD card.
To back up your Nintendo 3DS data, insert the old SD card into your computer’s SD card reader. Open the file explorer, navigate to the SD card, and locate the “Nintendo 3DS” folder. Copy this folder to a safe location on your computer, such as a different hard drive or an external storage device.
Ensure that the backup is complete and that you have successfully copied all the necessary files. This backup will serve as an additional safeguard in case anything goes wrong during the data transfer process.
With these preparations complete, you’re now ready to proceed with transferring data from your old SD card to the new one on your Nintendo 3DS. In the next section, we’ll guide you through the step-by-step process of transferring the data to ensure a seamless transition.
Transferring Data from the Old SD Card
When it comes to transferring data from the old SD card of your Nintendo 3DS, the first step is to insert the old SD card into a computer. Find the SD card slot on your computer and gently insert the old SD card into it. Make sure the card is correctly aligned and seated properly to avoid any damage.
Once the old SD card is successfully inserted, the next step is to copy the Nintendo 3DS folder to the computer. Navigate to the location where the SD card is mounted on your computer. Identify the Nintendo 3DS folder, which contains all your game saves, downloaded content, and other data.
To copy the Nintendo 3DS folder, simply select it and right-click to bring up the context menu. Choose the “Copy” option to copy the folder to your computer. Alternatively, you can use the keyboard shortcut “Ctrl+C” (or “Command+C” on Mac) to copy the folder.
Once the Nintendo 3DS folder is successfully copied to your computer, it’s time to eject the old SD card. Safely eject the SD card from your computer to ensure that all data is properly saved and no files are lost or corrupted. Once ejected, remove the old SD card from the computer.
With the old SD card removed, you can now proceed to insert the new SD card into your Nintendo 3DS. Make sure to insert the new SD card in the correct orientation to avoid any complications. Gently slide the new SD card into the SD card slot until it clicks into place.
Transferring Data to the New SD Card – Copying the Nintendo 3DS folder from the computer to the new SD card – Ejecting the new SD card and inserting it into the Nintendo 3DS
Once you have successfully copied the Nintendo 3DS folder from the old SD card to your computer, it’s time to transfer the data to the new SD card. Follow these steps to complete the process:
1. Obtain a new SD card that is compatible with your Nintendo 3DS. Make sure to check the recommended specifications for the SD card, such as storage capacity and speed, to ensure optimal performance.
2. Connect the new SD card to your computer using an SD card reader or an adapter. It should appear as a removable storage device on your computer.
3. Locate the Nintendo 3DS folder that you previously copied to your computer. This folder contains all the necessary data, including game saves, downloaded content, and system settings.
4. Copy the entire Nintendo 3DS folder from your computer and paste it into the root directory of the new SD card. Ensure that you are copying the folder itself, not just its contents.
5. Safely eject the new SD card from your computer to ensure that all the data is properly saved. Insert the new SD card into your Nintendo 3DS, ensuring that it is inserted correctly and securely.
6. Power on your Nintendo 3DS and navigate to the System Settings. Select Data Management and then select Nintendo 3DS. You should see the transferred data, including your game saves and downloaded content, displayed on the screen.
7. Test a few games and applications to ensure that the transferred data is functioning correctly. Load a previously saved game and see if the progress has been successfully transferred.
8. If you encounter any issues or errors during the data transfer, refer to the troubleshooting section of the Nintendo 3DS user manual or consult the official Nintendo support website for assistance.
With the data successfully transferred to the new SD card, you can now enjoy your favorite games and content on your Nintendo 3DS without any interruptions. Remember to keep your old SD card in a safe place as a backup, just in case you ever need to access the data again.
Verifying the Data Transfer- Switching on the Nintendo 3DS and checking for transferred data- Testing game saves and downloaded content- Troubleshooting common issues
After successfully transferring the data from the old SD card to the new one, it’s important to verify that the transfer was completed properly. Here are the steps to follow for verifying the data transfer on your Nintendo 3DS:
1. Switching on the Nintendo 3DS: Insert the new SD card into your Nintendo 3DS and power it on. Ensure that the SD card is inserted correctly and securely. The 3DS will detect the new SD card and will check for any transferred data.
2. Checking for transferred data: Navigate to the various sections of your Nintendo 3DS, such as the Home Menu, games, apps, and settings. Look for any transferred data, including game saves, downloaded content, and any additional files or folders. It’s important to check each section thoroughly to ensure that all transferred data is present.
3. Testing game saves and downloaded content: Select a game that you transferred from the old SD card to the new one and load it. Check if all the progress and game saves are intact. Play a level or continue from where you left off to make sure everything is working properly. Similarly, test any downloaded content or applications to ensure they are functioning correctly.
4. Troubleshooting common issues: If you encounter any issues or if certain data is missing or not working as expected, there are a few troubleshooting steps you can try. First, double-check that the data was transferred correctly by repeating the transfer process, ensuring that you didn’t miss any files. If the issue persists, try restarting your Nintendo 3DS or contacting Nintendo support for further assistance.
Remember, verifying the data transfer is crucial to ensure that all your important game saves and downloaded content are successfully transferred to the new SD card. By following these steps and thoroughly checking the transferred data, you can be confident that everything is in place and ready to enjoy on your Nintendo 3DS.
Additional Considerations and Tips
When it comes to transferring data on your Nintendo 3DS SD card, there are a few additional considerations and tips to keep in mind. These include removing and inserting SD cards correctly, updating the Nintendo 3DS firmware if required, and managing and organizing data on the SD card.
Removing and Inserting SD Cards Correctly
Before removing or inserting an SD card into your Nintendo 3DS, it’s important to turn off the device first. This ensures that all data is properly saved and prevents any potential damage to the SD card or the console.
To remove the SD card, locate the cover on the back of your Nintendo 3DS. Carefully open it, then gently push down on the card until it pops out. Avoid touching the gold contacts on the card to prevent any damage or interference with the data.
When inserting the SD card, carefully align it with the slot and gently push it in until it clicks into place. Make sure that the card is fully inserted and secure before closing the cover.
Updating the Nintendo 3DS Firmware if Required
Regularly updating the firmware on your Nintendo 3DS is important to ensure compatibility, stability, and access to new features. Firmware updates often include bug fixes, improved performance, and enhanced security.
To check for firmware updates, go to the system settings menu on your Nintendo 3DS. Select “System Update” and follow the on-screen prompts to download and install any available updates. It’s recommended to have the device connected to a stable internet connection during the update process.
Managing and Organizing Data on the SD Card
As you transfer data to the new SD card, it’s a good practice to manage and organize your files for easier navigation and accessibility. You can create folders to categorize your games, applications, and other content.
To create a new folder on your Nintendo 3DS, select the “System Settings” menu, then choose “Data Management.” From there, select “Nintendo 3DS,” followed by “Software,” and then “Create Folders.” You can assign a name to the folder and move your files accordingly.
Additionally, regularly backing up your SD card data to a computer or cloud storage can provide an extra layer of protection for your valuable information. This way, if anything should happen to your SD card, you still have a copy of your data.
By keeping these additional considerations and tips in mind, you can ensure a smooth and successful transfer of data on your Nintendo 3DS SD card. Remember to handle the SD card with care, stay updated with firmware updates, and maintain an organized file structure to make the most of your gaming experience.
Conclusion
Transferring data from one Nintendo 3DS SD card to another may seem like a daunting task, but with the right steps, it can be a hassle-free process. By following the instructions provided in this guide, you can ensure that all your valuable games, data, and saves are safely transferred to a new SD card.
Remember the importance of backing up your data before starting the transfer process to avoid any potential loss. Additionally, make sure you have the necessary tools, such as a computer and an SD card reader, to facilitate the transfer. Taking these precautions will help ensure a smooth and successful data transfer.
Now that you’ve learned how to transfer Nintendo 3DS SD card data, you can confidently upgrade your SD card and continue enjoying your favorite games without losing any progress. Happy gaming!
FAQs
Q: Can I transfer data from one Nintendo 3DS SD card to another?
Yes, you can transfer data from one Nintendo 3DS SD card to another. This can be useful when you want to upgrade your SD card or if you want to transfer your data to a different 3DS system.
Q: How do I transfer my data to a new SD card?
To transfer your data to a new SD card, you will need to follow these steps:
- Start by turning off your Nintendo 3DS system.
- Remove the old SD card from your 3DS system.
- Insert the new SD card into your 3DS system.
- Turn on your Nintendo 3DS system.
- Go to System Settings in the HOME Menu.
- Select Data Management and then select the option to Transfer Save Data.
- Follow the on-screen instructions to complete the transfer process.
Q: Will all my games and saves be transferred to the new SD card?
Yes, when you transfer your data to a new SD card, all your games and save data will be transferred as well. This includes any downloaded games, game updates, and game saves.
Q: What will happen to the data on the old SD card?
The data on the old SD card will remain intact, as it is not deleted or erased during the transfer process. However, it is always recommended to keep a backup of your data in case of any unforeseen circumstances.
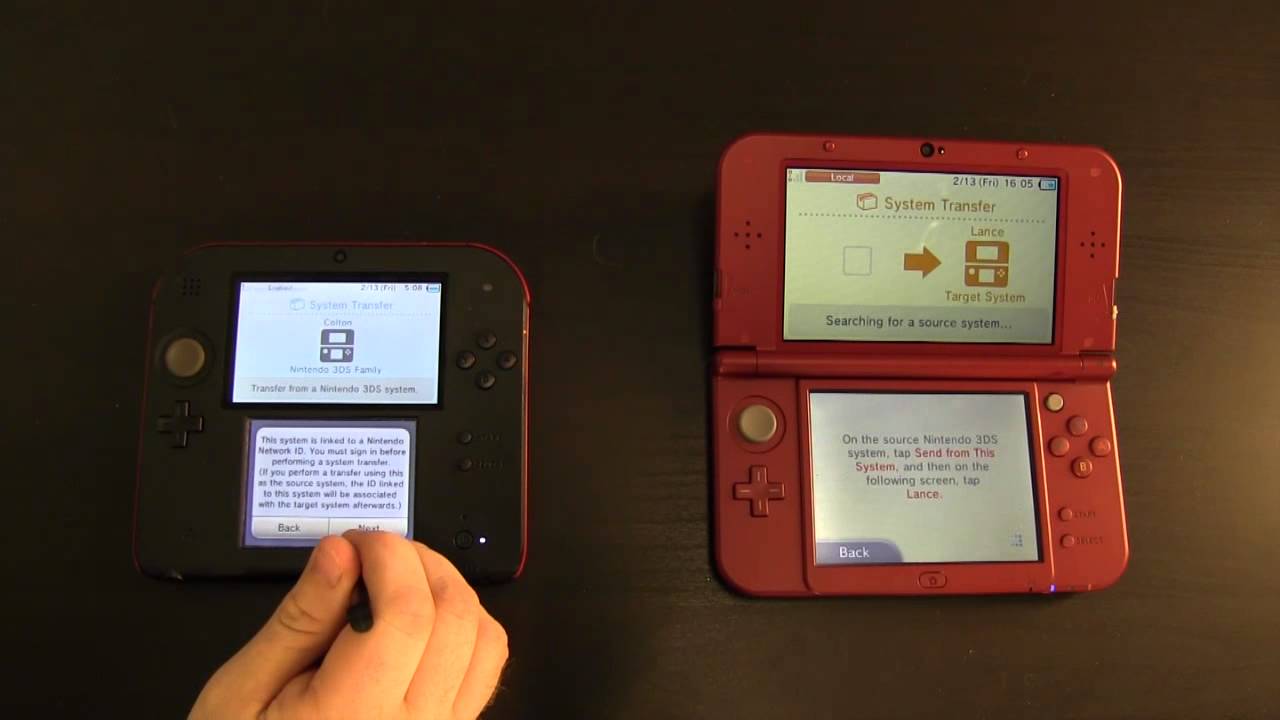
Q: Can I transfer data from my Nintendo 3DS to a different 3DS system?
Yes, you can transfer data from one Nintendo 3DS system to another. This includes transferring games, save data, and other system settings. To do this, you will need to use the System Transfer feature in the System Settings of both consoles. Follow the on-screen instructions to complete the transfer process.