
The Moto G Plus is a popular smartphone known for its impressive features and performance. One essential aspect of setting up this device is installing the SIM card correctly. Whether you're a new owner of the Moto G Plus or simply need a refresher, understanding how to install the SIM card is crucial for accessing the phone's full functionality. In this comprehensive guide, we'll walk you through the step-by-step process of installing a SIM card in the Moto G Plus, ensuring that you can seamlessly connect to your mobile network and enjoy all the capabilities this device has to offer. So, let's dive in and get your Moto G Plus ready for action!
Inside This Article
- Checking Compatibility
- Removing the SIM Tray
- Inserting the SIM Card
- Replacing the SIM Tray
- Powering on the Device
- Conclusion
- FAQs
Checking Compatibility
Before you proceed with installing a SIM card in your Moto G Plus, it’s crucial to ensure that your device is compatible with the SIM card you intend to use. The Moto G Plus is designed to work with nano-SIM cards, so it’s essential to verify that your SIM card is of the correct size. If your SIM card is larger, such as a micro-SIM or standard SIM, you will need to contact your mobile service provider to obtain a suitable nano-SIM card.
Additionally, it’s important to confirm that your Moto G Plus is unlocked or compatible with the network you intend to use. If your device is locked to a specific carrier, you may need to unlock it before using a SIM card from a different carrier. This can typically be done by contacting your current carrier and requesting an unlock code. Once your device is unlocked, you’ll be able to use it with SIM cards from various carriers, providing greater flexibility and freedom.
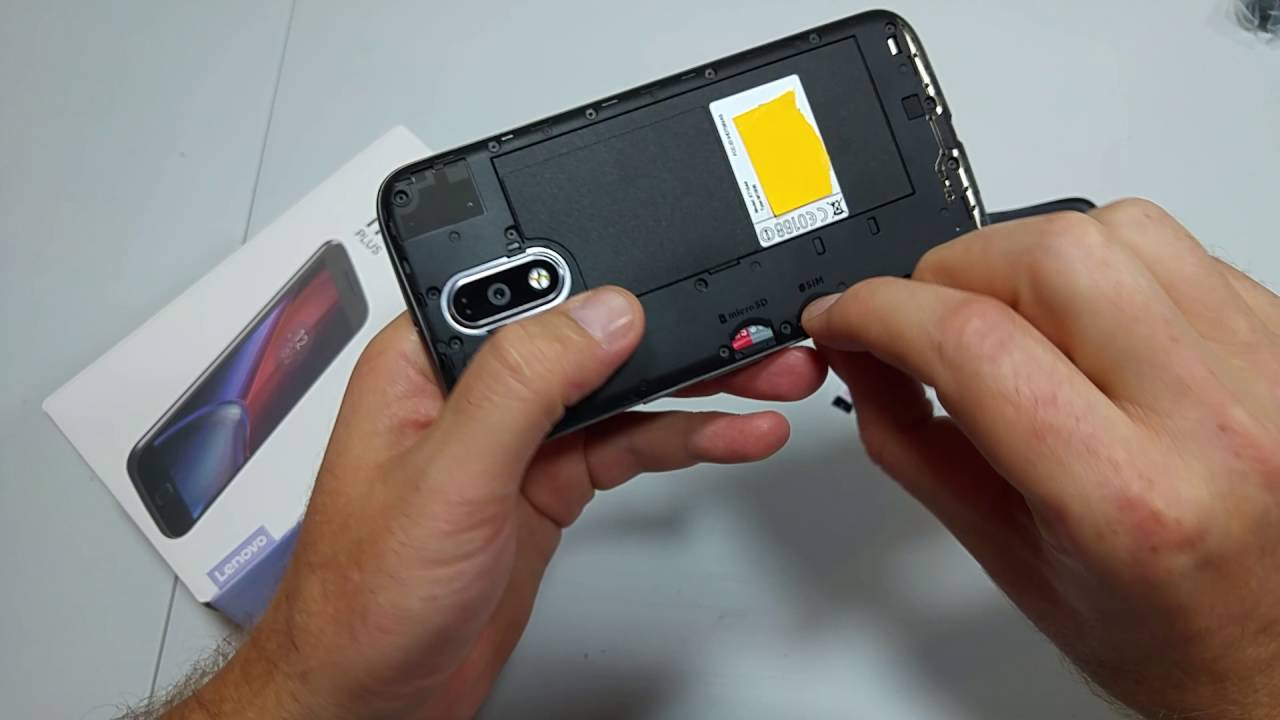
Removing the SIM Tray
Before you can install a SIM card in your Moto G Plus, you’ll need to access the SIM tray. The SIM tray is a small, recessed slot typically located on the side of the phone. It’s important to note that the location of the SIM tray may vary depending on the specific model of the Moto G Plus.
To access the SIM tray, you’ll need to use the SIM tray ejection tool that came with your device. This tool is a small, metal pin that allows you to safely eject the SIM tray without causing any damage to the phone. If you can’t find the ejection tool, a paperclip can be used as an alternative.
Once you have the SIM tray ejection tool in hand, locate the small pinhole on the side of your Moto G Plus. Gently insert the tool into the pinhole and apply a small amount of pressure. This will cause the SIM tray to partially eject from the phone, allowing you to remove it completely with ease.
Inserting the SIM Card
Once you have the SIM card ready, it’s time to insert it into your Moto G Plus. The SIM card slot is typically located on the side of the phone. You will need the SIM ejection tool provided with the device or a small paperclip to open the SIM tray.
Insert the SIM ejection tool into the small hole on the SIM card tray and gently press to release the tray. Carefully pull out the tray and place the SIM card on it. Ensure that the gold contacts on the SIM card are facing down and aligned with the contacts on the tray.
Once the SIM card is in place, gently slide the tray back into the slot until it is securely in place. Be cautious not to force the tray, as this could damage the SIM card or the phone. Once the tray is back in, power on your Moto G Plus and you should be ready to go!
Replacing the SIM Tray
Once you’ve successfully inserted the SIM card into your Moto G Plus, it’s time to replace the SIM tray. Carefully align the tray with the slot, ensuring it fits snugly and sits flush with the device’s frame. Take a moment to inspect the tray, ensuring it’s free from any obstructions or debris that could hinder its proper placement.
Gently slide the SIM tray back into the slot, applying light pressure to ensure it glides in smoothly. Be mindful not to force it, as this could potentially damage the tray or the device. Once the tray is securely in place, give it a gentle push to ensure it’s properly seated and level with the frame.
With the SIM tray securely back in place, you’re one step closer to completing the SIM card installation process. This final step sets the stage for powering on your Moto G Plus and enjoying the full functionality of your smartphone with the newly installed SIM card.
Sure, I can help with that. Here's the content for "Powering on the Device" section:
html
Powering on the Device
Once you have successfully inserted the SIM card and replaced the SIM tray, it’s time to power on your Moto G Plus. Press and hold the power button, which is typically located on the right side of the device, until you see the Moto logo appear on the screen.
After the logo appears, the device will go through the initial startup process. This may take a few moments as the phone initializes the SIM card and establishes a connection with your carrier’s network. Once the device has completed the startup process, you’ll be prompted to set up your phone and configure any additional settings.
Follow the on-screen instructions to complete the setup process, including connecting to a Wi-Fi network, signing in with your Google account, and customizing your preferences. Once the setup is complete, your Moto G Plus will be ready for use, and you’ll be able to make calls, send messages, and enjoy all the features of your new smartphone.
Conclusion
Installing a SIM card in your Moto G Plus is a straightforward process that allows you to enjoy the full functionality of your smartphone. By following the simple steps outlined in this guide, you can easily insert or replace your SIM card, ensuring that your device stays connected and ready for use. Whether you’re upgrading to a new phone or simply need to switch out your SIM card, understanding how to perform this task empowers you to make the most of your device’s capabilities. With the SIM card securely in place, you can now enjoy seamless communication, access to mobile data, and a wide range of features that enhance your overall smartphone experience.
Sure, here are the FAQs along with the HTML formatting:
html
FAQs
Q: Can I use any SIM card in Moto G Plus?
A: Moto G Plus is compatible with most major carriers, so you should be able to use your existing SIM card. However, it’s always best to check with your carrier for compatibility before making any changes.
Q: Do I need a SIM card to use Moto G Plus?
A: Yes, a SIM card is required to use Moto G Plus for making calls, sending texts, and accessing mobile data.
Q: How do I know which way to insert the SIM card into Moto G Plus?
A: The SIM card tray on Moto G Plus is designed to accept the SIM card in a specific orientation. You can refer to the user manual or look for the markings on the SIM card tray to ensure you insert it correctly.
Q: Can I install a microSD card and a SIM card at the same time in Moto G Plus?
A: Yes, Moto G Plus features a dedicated slot for the microSD card and a separate slot for the SIM card, allowing you to use both simultaneously.
Q: What should I do if my Moto G Plus doesn’t recognize the SIM card?
A: If your Moto G Plus doesn’t recognize the SIM card, you can try reinserting the SIM card, restarting the device, or contacting customer support for further assistance.