
In today’s digitally-driven world, near field communication (NFC) technology has become an integral part of our daily lives. NFC tags are small stickers or cards that contain embedded chips, allowing them to interact with smartphones and other NFC-enabled devices. These tags can store information such as website URLs, contact details, or even trigger specific actions when tapped with an NFC-enabled device.
While NFC tags offer convenience and versatility, what happens when you need to erase the data stored on them? Whether you want to reuse the tag for a different purpose or simply clear out personal information, it’s important to know how to erase an NFC tag correctly. In this article, we will explore different methods and techniques for erasing NFC tags, ensuring you can effectively manage and reset these essential digital assistants.
Inside This Article
- What is an NFC Tag?
- Methods to Erase an NFC Tag
- Method 1: Using an NFC-enabled smartphone
- Method 2: Using an NFC Writer/Reader
- Method 3: Using specialized software and hardware
- Conclusion
- FAQs
What is an NFC Tag?
An NFC (Near Field Communication) tag is a small, passive device that contains information or instructions that can be read by an NFC-enabled smartphone or other NFC-compatible devices.
These tags use the same underlying technology as contactless payment systems, allowing for quick and convenient communication between devices over short distances.
NFC tags come in various forms, such as stickers, cards, or keychains, and they can be programmed with different types of data depending on their intended use.
Common uses for NFC tags include:
- Triggering actions on a smartphone, such as opening a specific app or adjusting settings.
- Sharing contact information or website URLs through a simple tap.
- Providing access to public transportation or events through contactless ticketing.
- Enabling contactless payments through digital wallets like Apple Pay or Google Pay.
- Controlling smart home devices, such as turning on/off lights or adjusting thermostats.
NFC tags are versatile and can be used in a wide range of applications, simplifying the way we interact with technology and enhancing the overall user experience.
Methods to Erase an NFC Tag
If you have an NFC tag that you no longer need or want to use, you may be wondering how to erase its contents. Luckily, there are several methods you can use to erase an NFC tag, depending on the tools and devices you have available. In this article, we will explore three common methods that you can use to erase an NFC tag.
Method 1: Using an NFC-enabled smartphone
If you have an NFC-enabled smartphone, you can easily erase an NFC tag using your device. To do this, simply follow these steps:
- Unlock your smartphone and navigate to the home screen.
- Open the settings menu and look for the NFC settings.
- Enable the NFC feature if it is not already enabled.
- Place your smartphone close to the NFC tag you want to erase.
- Wait for your smartphone to detect the NFC tag.
- Once the NFC tag is detected, you should see options or prompts on your smartphone screen.
- Select the option to erase the NFC tag. This option may vary depending on your smartphone model and operating system.
- Follow the on-screen instructions to complete the erasure process.
Method 2: Using an NFC Writer/Reader
If you don’t have an NFC-enabled smartphone or prefer a more specialized approach, you can use an NFC writer/reader to erase an NFC tag. NFC writer/readers are devices specifically designed to read, write, and erase data on NFC tags. Here’s how you can use an NFC writer/reader to erase an NFC tag:
- Connect the NFC writer/reader device to a compatible device, such as a computer or smartphone.
- Open the NFC writer/reader software or app on your device.
- Ensure that the NFC writer/reader is in writing or erasing mode.
- Place the NFC tag on the NFC writer/reader.
- Follow the instructions provided by the software or app to erase the NFC tag.
- Once the erasure is complete, the NFC tag will be blank and ready for reuse.
Method 3: Using specialized software and hardware
If you require more advanced control over the erasure process or need to erase multiple NFC tags simultaneously, you can consider using specialized software and hardware solutions. These solutions often provide advanced features and customization options. However, they are more suitable for professional or high-volume NFC tag management. If you decide to use specialized software and hardware, it’s recommended to refer to the user guide or documentation provided by the manufacturer for detailed instructions on how to erase an NFC tag.
By using one of these methods, you can easily erase the contents of an NFC tag and repurpose it for different applications. Whether you have an NFC-enabled smartphone or prefer using specialized devices, there is a method available to suit your needs. So go ahead and erase those NFC tags with confidence!
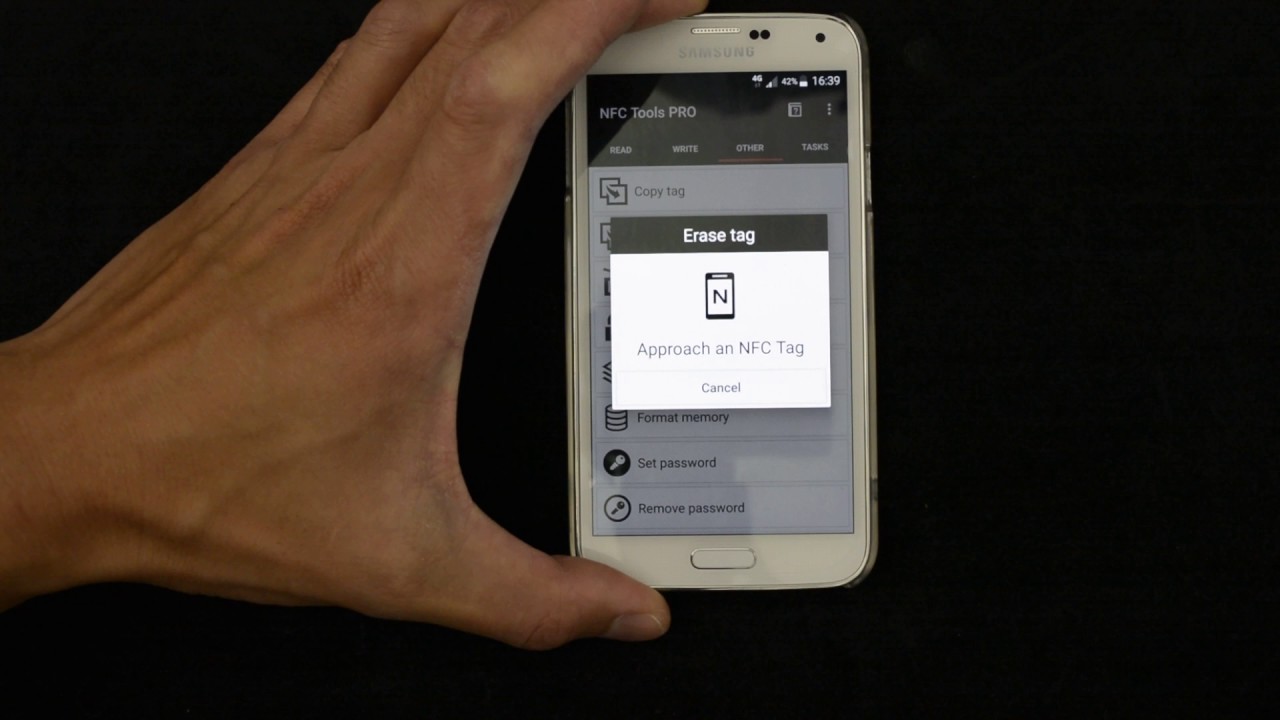
Method 1: Using an NFC-enabled smartphone
One of the easiest ways to erase an NFC tag is by using an NFC-enabled smartphone. NFC, or Near Field Communication, is a technology that allows devices to communicate wirelessly within close proximity. Many smartphones today come equipped with NFC capabilities, making it convenient to interact with various NFC-enabled objects.
To erase an NFC tag using your smartphone, you first need to ensure that NFC is enabled on your device. This can usually be done by going to your phone’s settings and finding the NFC option. Once enabled, you are ready to erase the tag.
Next, hold your smartphone close to the NFC tag you want to erase. Make sure the back of your phone, where the NFC antenna is located, is touching or in close proximity to the tag. The phone will detect the tag and initiate the communication.
Depending on the type of smartphone and its operating system, different options may be available to interact with the NFC tag. Look for options like “Write” or “Erase” when the tag is detected. Tap on the appropriate option to begin the erasing process.
After initiating the erasing process, your smartphone will send a command to the NFC tag to erase its data. This process should only take a few seconds. Once the erasing is complete, you will receive a confirmation message on your smartphone screen.
It’s important to note that not all smartphones have the same NFC capabilities or features. Some devices may have different settings or options for interacting with NFC tags. Refer to your smartphone’s user manual or support documentation for specific instructions on erasing NFC tags.
Using an NFC-enabled smartphone to erase an NFC tag is a convenient and efficient method. It allows you to quickly clear the data on the tag without the need for any additional hardware or software. Make sure to follow the instructions specific to your smartphone to ensure successful erasing of the tag.
Method 2: Using an NFC Writer/Reader
If you don’t have an NFC-enabled smartphone or prefer a more dedicated approach, using an NFC writer/reader is another effective method to erase an NFC tag. NFC writer/reader devices are specifically designed to interact with NFC tags and provide more control over the erasing process. Here’s a step-by-step guide on how to erase an NFC tag using an NFC writer/reader:
1. Obtain an NFC writer/reader device: First, you’ll need to acquire an NFC writer/reader device. These devices can be found online or at electronic stores. Look for one that is compatible with the type of NFC tag you want to erase.
2. Connect the NFC writer/reader: Depending on the device, you may need to connect it to a computer or mobile device via USB or Bluetooth. Follow the manufacturer’s instructions to establish the connection.
3. Launch the NFC writer/reader software: Once the device is connected, launch the corresponding NFC writer/reader software. This software will allow you to interact with the NFC tag and perform various operations, including erasing the data.
4. Identify the NFC tag: Place the NFC tag close to the writer/reader device. The software should detect the tag and display its information, such as tag type and stored data.
5. Select the erase option: Within the NFC writer/reader software, locate the option to erase the tag. This can typically be found in the menu or toolbar. Click on the erase option to initiate the erasing process.
6. Confirm the erase action: The software will prompt you to confirm the erase action. Double-check that you have selected the correct tag for erasing, as this action is irreversible. Confirm the erase action to proceed.
7. Erase the NFC tag: Once you have confirmed the erase action, the NFC writer/reader device will send the necessary commands to the tag, effectively erasing all stored data. The process may take a few seconds or longer, depending on the size of the data on the tag.
8. Verify the erasure: After the erasing process is complete, the software should indicate that the tag has been successfully erased. You can also use the writer/reader device to re-scan the tag and verify that no data remains.
9. Safely disconnect the NFC writer/reader: Once you have finished erasing the NFC tag, safely disconnect the writer/reader device from your computer or mobile device as per the manufacturer’s instructions.
By using an NFC writer/reader, you have more control and flexibility in erasing NFC tags. Whether you need to erase personal data from a tag or prepare it for use in a different application, an NFC writer/reader makes the process straightforward and efficient.
Method 3: Using specialized software and hardware
If you’re looking for a more advanced and precise method to erase an NFC tag, you can turn to specialized software and hardware options. These tools offer greater control and flexibility in managing your NFC tags. Here’s how they work:
1. Choose the right software: Look for NFC tag management software that allows you to erase tags. There are various options available, such as NFC Tools, TagWriter, or NXP TagWriter. These software programs provide a user-friendly interface and a range of features to manipulate NFC tags.
2. Connect your hardware: To use these software programs, you’ll need specialized hardware like an NFC writer/reader or a programmable NFC tag writer. These devices connect to your computer via USB or Bluetooth, allowing you to interact with and erase the NFC tags.
3. Install and launch the software: Once you have the software and hardware, follow the instructions provided to install the software on your computer. Once installed, launch the software program to begin erasing NFC tags.
4. Connect the NFC writer/reader: Connect your NFC writer/reader to your computer using the provided USB or Bluetooth connection. Ensure that it is properly recognized by the software program.
5. Select and erase the NFC tag: Use the software interface to identify and select the specific NFC tag you wish to erase. The software will recognize the tag and provide the option to erase it. Click on the erase function to initiate the process.
6. Verify the erasure: Once the erasure process is complete, the software program will provide a notification or confirmation. It’s essential to verify that the tag has been successfully erased by attempting to read it with an NFC-enabled smartphone or NFC writer before reusing it.
Using specialized software and hardware provides a more advanced approach to erasing NFC tags. This method is recommended for individuals who require greater control and precision in managing their NFC tags, such as businesses or organizations that deal with a large number of tags.
Remember to follow the instructions provided by the software and hardware manufacturers to ensure safe and efficient erasure of the NFC tags.
In conclusion, learning how to erase an NFC tag is a valuable skill for those seeking to manage and reuse NFC tags efficiently. By following the steps outlined in this guide, you can ensure your NFC tags are ready to be programmed with new information or reused for different purposes. Whether you want to reset an NFC tag for personal use or for business applications, the process is relatively simple and can be done with the help of NFC-enabled smartphones or specialized apps.
Remember to take caution when erasing NFC tags, as it is a permanent action and cannot be undone. Always double-check your tags and verify that you have the correct ones selected before proceeding. With the ability to reset and reuse NFC tags, you can unlock endless possibilities and streamline your digital interactions. So go ahead, explore the world of NFC technology, and make the most out of your digital wallet and other NFC-enabled devices!
FAQs
Q: Can I erase an NFC tag?
A: Yes, NFC tags can be erased and rewritten multiple times, allowing you to update the information or reuse the tag for different purposes.
Q: How do I erase an NFC tag?
A: To erase an NFC tag, you will typically need a smartphone or device with NFC capability. Simply open the NFC settings on your device, locate the option to erase or format the tag, and follow the on-screen instructions.
Q: Will erasing an NFC tag delete all its contents?
A: Yes, erasing an NFC tag will delete all the data stored on it. Therefore, it is important to make sure you have a backup of any important information before proceeding with the erasure.
Q: Can I selectively erase specific data from an NFC tag?
A: No, erasing an NFC tag will remove all the data stored on it. If you only want to update certain information, you will need to rewrite the tag with the desired data, effectively replacing the previous contents.
Q: Are there any limitations to erasing NFC tags?
A: While NFC tags can be erased and rewritten multiple times, they do have a limited number of write cycles. The exact number of cycles depends on the type and quality of the tag. It is recommended to use high-quality NFC tags to ensure they can withstand frequent erasure and rewriting.