
Are you struggling to remove the SIM card from your iPhone? Don’t worry, you’re not alone! Many people find it challenging to figure out the correct method to take the SIM card out of their iPhones. Whether you’re upgrading to a new device or simply need to swap out your SIM card, knowing how to safely remove it is crucial. In this article, we will guide you through the step-by-step process of taking the SIM card out of your iPhone. From locating the SIM card slot to using the proper tools, we’ve got you covered. So, let’s dive in and learn how to remove the SIM card from your iPhone hassle-free!
Inside This Article
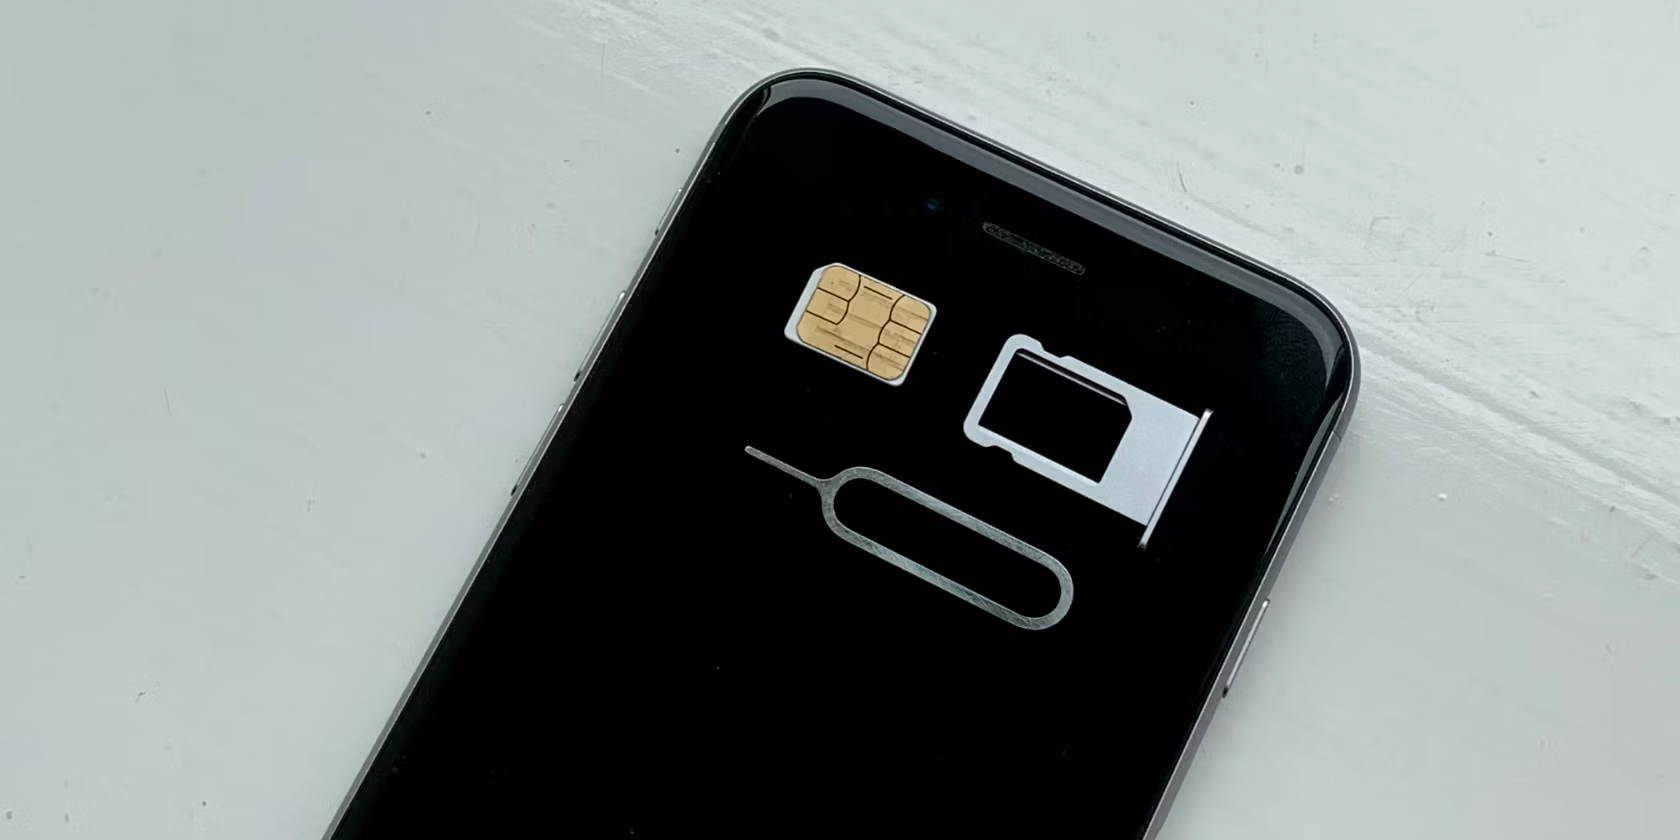
- Method 1: Using the SIM Card Ejector Tool
- # 1. Locate the SIM card tray
- # 2. Insert the SIM card ejector tool
- # 3. Push the tool to eject the SIM card tray
- # 4. Remove the SIM card from the tray
- Method 2: Using a Paperclip
- Straighten a paperclip
- # 2. Locate the SIM card tray
- # 3. Insert the straightened paperclip into the hole on the tray
- Gently push to eject the SIM card tray and remove the SIM card
- Method 3: Using Sticky Tape
- # 1. Cut a small piece of sticky tape
- # 2. Fold the tape and create a tab
- # 3. Locate the SIM card tray
- # 4. Stick the tape tab to the SIM card and gently pull to remove it
- Conclusion
- FAQs
Method 1: Using the SIM Card Ejector Tool
If you’re looking to remove the SIM card from your iPhone, using a SIM card ejector tool is one of the easiest and most straightforward methods. This handy tool is specifically designed to safely and efficiently eject the SIM card tray without causing any damage to your device.
Here’s a step-by-step guide on how to use the SIM card ejector tool:
- Locate the SIM card tray: On most iPhone models, the SIM card tray is located on the side of the device. Look for a small pinhole or a small rectangular slot.
- Insert the SIM card ejector tool: Take the SIM card ejector tool that came with your iPhone or use a small paperclip as a substitute. Insert the tool into the pinhole or slot.
- Push the tool to eject the SIM card tray: Apply gentle pressure and push the tool into the pinhole or slot. You should feel some resistance initially, but with a little more pressure, the SIM card tray will pop out.
- Remove the SIM card from the tray: Once the SIM card tray is ejected, carefully remove it from the device. You can then take out the SIM card from the tray by gently pushing it out or using your fingers to slide it out.
It’s important to note that before removing the SIM card, it’s recommended to turn off your iPhone to prevent any potential damage to your device or the SIM card itself. Additionally, ensure that you handle the SIM card with care, avoiding any bending or scratching that could render it unusable.
This method is quick, convenient, and requires minimal effort. It’s a foolproof way to safely remove your SIM card whenever you need to switch devices, upgrade your phone, or troubleshoot any SIM card-related issues.
# 1. Locate the SIM card tray
When it comes to taking out the SIM card from your iPhone, the first step is to locate the SIM card tray. The SIM card tray is usually located on the side or top of the device, depending on the iPhone model. It is a small, rectangular slot that securely holds the SIM card. The exact location of the SIM card tray can vary depending on the iPhone model, so it’s important to familiarize yourself with your specific device.
To find the SIM card tray, start by examining the sides or top of your iPhone. Look for a small hole or a slot with a pinhole-sized opening. This is where the SIM card tray is located. On newer iPhone models, such as the iPhone X and newer, the SIM card tray may be located on the side of the device. On older models, like the iPhone 6 and 7, the SIM card tray is typically found on the top edge.
Once you have located the SIM card tray, you’re ready to proceed to the next step of removing the SIM card. Remember, it’s crucial to handle the SIM card with care and avoid damaging it. By following the correct procedure, you can safely take out the SIM card from your iPhone, whether for swapping it with a new one or any other reason.
# 2. Insert the SIM card ejector tool
Once you have located the SIM card tray, it’s time to use the handy SIM card ejector tool that usually comes with your iPhone. This small metal tool is designed specifically for the purpose of ejecting the SIM card tray. Here’s how you can use it:
1. Take the SIM card ejector tool and hold it firmly in your hand. It usually has a small loop or hole at one end for easy handling.
2. Identify the small pinhole on the side or top of your iPhone where the SIM card tray is located. This pinhole is usually marked with a small symbol that looks like a SIM card.
3. Insert the pointed end of the SIM card ejector tool into the pinhole. Apply gentle pressure and push it in until you feel a slight resistance.
4. Once you feel the resistance, continue pushing the tool until the SIM card tray pops out slightly. You should be able to see a small gap between the tray and the iPhone.
5. Use your fingers to carefully pull out the SIM card tray. Be gentle to avoid any damage to the tray or the iPhone.
In case you don’t have a SIM card ejector tool, don’t worry! There are alternative methods you can use to remove the SIM card from your iPhone, which we’ll cover in the next section.
# 3. Push the tool to eject the SIM card tray
Once you have inserted the SIM card ejector tool into the hole on the SIM card tray, gently push the tool inward. This will activate the mechanism that will pop the tray out of the iPhone. Be careful not to apply too much force while pushing the tool to avoid any damage to the tray or the device.
As you push the tool, you may feel a slight resistance before the tray pops out. This is normal, and it indicates that the tray has been released from its locked position. Keep applying gentle pressure until the tray is fully ejected.
When the SIM card tray is fully ejected, you can remove the tool from the hole and set it aside. Take a moment to visually inspect the tray to ensure that it is fully extended and not partially stuck. If you notice any resistance or if the tray doesn’t fully extend, do not force it. Instead, try gently pushing the tool again to release it.
Once the tray is fully ejected, you can easily access the SIM card. Carefully remove the SIM card from the tray by gently sliding it out or using your fingertips to lift it out. Take note of the orientation of the SIM card to ensure that you insert it correctly when you are ready to put it back in.
It is important to handle the SIM card with care to avoid any damage to the delicate chip or the connectors. Avoid touching the metal contacts on the SIM card and store it in a safe place when it is not in use.
With the SIM card removed, you can now proceed with whatever task you had in mind, such as replacing the SIM card with a new one or transferring it to another device. Be sure to only insert a compatible SIM card that is provided by your mobile network provider.
Once you have finished handling the SIM card, carefully align the SIM card tray with the slot on your iPhone. Gently push the tray back into the device until it is fully inserted and flush with the side of the iPhone.
Make sure the tray is securely in place and does not wobble or feel loose. If it doesn’t fully insert or feels loose, remove the tray and try again. It is crucial to ensure the proper installation of the SIM card tray to prevent any issues or connectivity problems.
Now that you have successfully removed the SIM card from your iPhone, you can proceed with your next steps, whether it is transferring the SIM card to a new phone, replacing it with a new one, or simply storing it for safekeeping.
# 4. Remove the SIM card from the tray
Once you have successfully ejected the SIM card tray using either the SIM card ejector tool or a paperclip, you can proceed to remove the SIM card from the tray. Follow these steps:
1. Hold the SIM card tray firmly in one hand to prevent it from slipping or dropping.
2. Gently tilt the tray to a horizontal position, making it easier to access the SIM card slot.
3. Locate the SIM card within the tray. It is a small rectangular card that fits into a slot designed for it.
4. Using your thumb and index finger, carefully pick up the SIM card from the tray.
5. Be cautious not to touch the metal contacts on the SIM card as they can be sensitive and easily damaged.
6. Once you have a firm grip on the SIM card, slowly pull it out of the tray.
7. Take a moment to examine the SIM card for any damages or signs of wear and tear.
8. If you plan on replacing the SIM card with a new one, ensure that it is properly aligned before inserting it into the tray.
9. Store the old SIM card in a safe place or dispose of it according to your local waste management regulations.
By following these steps, you can safely remove the SIM card from the tray without causing any damage to the card or the iPhone.
Method 2: Using a Paperclip
If you don’t have a SIM card ejector tool handy, don’t worry! Another common method to remove the SIM card from your iPhone is by using a paperclip. This is a convenient and easily accessible option that can save the day when you need to swap out your SIM card.
Here’s how you can use a paperclip to remove the SIM card from your iPhone:
- Straighten a paperclip: Start by taking a regular paperclip and straightening it out. Ensure that it is long enough to reach the SIM card tray without getting stuck.
- Locate the SIM card tray: Take a close look at your iPhone and find the SIM card tray. The location may vary depending on the model, but it is typically located on the side or top of the device. Refer to your iPhone’s user manual for specific instructions.
- Insert the straightened paperclip into the hole on the tray: Once you have located the SIM card tray, you will notice a small hole next to it. Insert the straightened end of the paperclip into this hole. Apply gentle pressure to make sure it goes inside.
- Gently push to eject the SIM card tray and remove the SIM card: Push the paperclip gently into the hole until you feel some resistance. Then, push a little further until the SIM card tray pops out. Carefully pull out the tray and remove the SIM card from it.
It is important to note that you should always exercise caution when using a paperclip to eject the SIM card tray. Be gentle and avoid applying excessive force, as this could potentially damage your iPhone. If you encounter any difficulty, it may be best to seek professional assistance.
Overall, using a paperclip is a simple and effective method to remove the SIM card from your iPhone when you don’t have a specialized ejector tool. Just make sure to follow the steps carefully and handle your iPhone with care!
Straighten a paperclip
If you don’t have a SIM card ejector tool handy, you can use a paperclip as an alternative. Here’s how:
1. Take a standard-sized paperclip and unfold it. Make sure it is completely straightened.
2. Locate the SIM card tray on your iPhone. It is usually located on the side or top of the device, depending on the model.
3. Insert the straightened end of the paperclip into the small hole on the SIM card tray. Apply gentle pressure until you feel a slight resistance.
4. Now, use your thumb or finger to gently push the paperclip further into the hole. This will cause the SIM card tray to pop out slightly.
5. Carefully pull out the SIM card tray by using your fingers or gently gripping it with your thumb and forefinger.
6. Once the SIM card tray is fully ejected, you can remove the SIM card from the tray by gently sliding it out or pushing it from the back.
7. Take a moment to inspect the SIM card for any damage or debris. If necessary, clean the SIM card with a soft cloth or alcohol wipe before reinserting it into the tray.
8. To put the SIM card tray back into your iPhone, align the tray with the slot and gently push it back until it is flush with the device.
9. Ensure that the tray is securely in place before powering on your iPhone.
It’s important to note that while using a paperclip is a handy DIY method to remove the SIM card from your iPhone, it’s always recommended to use the proper SIM card ejector tool whenever possible. This helps avoid any accidental damage to the SIM card or the internal components of your iPhone.
Now that you know how to straighten a paperclip and use it to remove the SIM card from your iPhone, you can easily switch SIM cards or troubleshoot any issues related to your cellular connectivity.
# 2. Locate the SIM card tray
Before removing the SIM card from your iPhone, you need to locate the SIM card tray. The SIM card tray is a small slot on the side or top of your iPhone, depending on the model. Apple has placed the SIM card tray in different locations over the years, so it’s important to know where to look.
If you have an iPhone 6 or older model, you will find the SIM card tray on the right side of the device. It is a small rectangular slot with a tiny hole next to it. The iPhone 6s and 6s Plus also have the SIM card tray on the right side, but with the addition of the “S” logo on the surface of the tray.
For the iPhone 7 and 7 Plus, the SIM card tray is located on the right side as well. However, there is no “S” logo on the tray. Instead, you’ll find the slot with a small hole and a faint outline of the tray beneath the volume buttons.
Starting from the iPhone 8 and iPhone X series, including the iPhone XR, XS, and XS Max, Apple moved the SIM card tray to the left side of the device. On these models, the SIM card tray is located near the volume buttons, and you’ll find it by looking for the small hole and the indentation on the tray.
Once you’ve located the SIM card tray, you’re ready to proceed with removing the SIM card from your iPhone.
# 3. Insert the straightened paperclip into the hole on the tray
Once you have straightened out the paperclip, the next step is to locate the SIM card tray on your iPhone. The SIM card tray is usually located on the side or top of your iPhone, depending on the model. It is a small, rectangular slot that can be easily identified by a small hole next to it.
Take the straightened end of the paperclip and carefully insert it into the hole on the SIM card tray. Make sure you insert the paperclip straight into the hole and apply gentle pressure. You should feel some resistance, but be careful not to use excessive force as it could damage your iPhone.
As you insert the paperclip, you will notice that the SIM card tray starts to pop out slightly. Keep pushing gently until the tray is fully ejected from the iPhone. Once the tray is out, you can remove the paperclip from the hole and set it aside.
With the tray fully ejected, you can easily access the SIM card. You will see a small slot inside the tray where the SIM card is placed. Carefully remove the old SIM card if there is one and replace it with a new one if needed. Make sure to align the notched corner of the SIM card with the corner of the tray to ensure it fits properly.
Once you have inserted the new SIM card or reinserted the old one, gently push the SIM card tray back into the iPhone. You will hear a click sound when the tray is securely inserted. Ensure that the tray is fully flush with the side of the iPhone and that it sits snugly in its place.
That’s it! You have successfully inserted the straightened paperclip into the hole on the SIM card tray and replaced or reinserted the SIM card in your iPhone. You can now power on your iPhone and ensure that it recognizes the new SIM card or connects to the network with the existing SIM card.
Gently push to eject the SIM card tray and remove the SIM card
Once you have located the SIM card tray and inserted the SIM card ejector tool or paperclip into the designated hole, it’s time to gently push to eject the tray and remove the SIM card. Applying a slight amount of pressure will activate the mechanism inside the iPhone, causing the tray to pop out.
Ensure that you are exerting a gentle force to prevent any damage to both the tray and the SIM card. Too much pressure could potentially cause the tray to become stuck or the SIM card to be dislodged from its slot.
Once the tray is ejected, carefully pull it out from the iPhone. Take note of the orientation of the SIM card inside the tray to ensure correct placement during reinsertion.
With the tray in hand, you can now remove the SIM card. Simply slide it out of the tray using your fingers, being cautious not to touch the metal contact points on the SIM card itself.
Inspect the SIM card for any signs of damage or wear. If it appears to be in good condition, you can either replace it with a new SIM card or keep it safe for future use.
Before reinserting the tray, ensure that the SIM card slot inside the iPhone is clean and free from any debris. This will ensure a proper connection and prevent any issues with signal reception.
Once you are ready to reinsert the tray, align it with the slot and gently push it back into place until it clicks securely. Ensure that the tray is fully inserted and flush with the side of the iPhone to maintain the device’s water and dust resistance.
With the SIM card successfully removed from your iPhone, you can now proceed with any necessary actions, such as transferring the SIM card to another device or replacing it with a new one.
Method 3: Using Sticky Tape
Using sticky tape is another simple and effective method to remove a SIM card from an iPhone. This method can be especially useful if you don’t have a SIM card ejector tool or a paperclip on hand. Here’s how you can use sticky tape to safely remove your SIM card:
1. Cut a small piece of sticky tape: Start by cutting a small piece of sticky tape, approximately 1 to 2 inches long. Make sure that the tape is sticky enough to hold the SIM card securely.
2. Fold the tape and create a tab: Take the small piece of sticky tape and fold it in half, sticky-side out. This will create a tab-like shape that you can easily grip onto later when removing the SIM card.
3. Locate the SIM card tray: On your iPhone, locate the SIM card tray. The position of the SIM card tray may vary depending on the iPhone model, but it is usually located on the side or the top of the device.
4. Stick the tape tab to the SIM card and gently pull to remove it: Take the folded piece of tape with the sticky side facing out and carefully press it onto the SIM card. Make sure it adheres firmly. Once the tape is securely attached to the SIM card, gently pull on the tape tab to gradually and smoothly remove the SIM card from the tray.
Using sticky tape as a makeshift SIM card removal tool is a handy solution when you don’t have the proper tools readily available. It provides a secure grip and reduces the risk of accidentally dropping or misplacing the SIM card during the removal process.
Remember to handle the SIM card with care and avoid touching the metal contacts to prevent any damage. Once you have successfully removed the SIM card using sticky tape, you can insert it into another device or store it safely until you need to use it again.
# 1. Cut a small piece of sticky tape
One of the alternative methods to take the SIM card out of an iPhone is by using sticky tape. This method is especially useful if you don’t have a SIM card ejector tool or a paperclip handy.
To begin, you will need to cut a small piece of sticky tape. It’s best to use a clear tape so that you can see the SIM card through it. Make sure the piece of tape is just large enough to cover the SIM card.
Next, fold the tape in half, creating a tab that you can hold onto. This will make it easier to handle and remove the SIM card from the tray.
Now, locate the SIM card tray on your iPhone. This can typically be found on the side or top of the device, depending on the model.
Place the sticky tape tab onto the surface of the SIM card. Make sure it adheres firmly to the surface.
Gently pull on the tape tab to remove the SIM card from the tray. The tape will provide enough grip to easily slide the SIM card out.
Be cautious while pulling the tape, as you don’t want to damage the SIM card or the SIM card tray.
Once the SIM card is removed, carefully detach the tape from the card and discard it.
This method can be an effective solution when you don’t have the proper tools handy. However, it’s important to note that using sticky tape can leave residue on the SIM card or the tray. To avoid any complications, it’s best to clean the SIM card and tray after removing the tape.
# 2. Fold the tape and create a tab
Once you have cut a small piece of sticky tape, it’s time to fold it and create a tab. Start by holding the tape between your fingers, sticky side up. Then, fold one end of the tape towards the center, leaving a small portion of the sticky side exposed.
Next, fold the other end of the tape towards the center, overlapping it slightly with the first fold. This will create a tab-like shape, making it easier to handle and remove the SIM card from the tray.
Make sure that the sticky side of the tape is facing outwards, as this is what will allow the tape to adhere to the SIM card. The tab should be large enough for you to grip comfortably, but not too large that it becomes difficult to maneuver.
Now that you have folded the tape and created a tab, you are ready to use it to remove the SIM card from the tray. This method is a simple and effective alternative if you don’t have access to a SIM card ejector tool or a paperclip.
# 3. Locate the SIM card tray
Before you can remove the SIM card from your iPhone, you first need to locate the SIM card tray. This tray is where the SIM card is inserted and removed from the device. The location of the tray depends on the iPhone model you have.
If you have an iPhone with a physical home button, such as the iPhone 8 or earlier models, you will find the SIM card tray on the right side of the device. It will be a small rectangular slot with a small hole next to it.
For newer iPhones without a physical home button, such as the iPhone X, XS, XR, 11, or 12 models, the SIM card tray is located on the right side of the device, near the bottom. The tray will also have a small hole next to it.
To locate the SIM card tray, carefully inspect the sides of your iPhone until you find a small slot or port with a hole next to it. This is where you will insert the SIM card ejector tool or paperclip to remove the tray and access the SIM card.
# 4. Stick the tape tab to the SIM card and gently pull to remove it
If you don’t have a SIM card ejector tool or a paperclip on hand, don’t worry! There is still another method you can use to safely remove the SIM card from your iPhone. This method involves using sticky tape to create a tab that allows you to easily pull out the SIM card from the tray.
Here’s how you can do it:
- Cut a small piece of sticky tape, around 1 inch in length.
- Fold the tape in half, sticky side out, to create a tab that you can grip.
- Locate the SIM card tray on your iPhone, usually found on the side or top of the device.
- Stick the tape tab to the SIM card, ensuring that it adheres firmly.
- Gently pull on the tape tab to slowly and smoothly remove the SIM card from the tray.
It’s important to exert a gentle and steady pull when using this method to avoid damaging the SIM card or the tray. If you encounter any resistance, stop pulling immediately and reassess the position of the tape to ensure proper adhesive contact with the SIM card. The goal is to smoothly and securely remove the SIM card without causing any harm.
Once you have successfully removed the SIM card, be sure to store it in a safe place. You can use the same method to reinsert the SIM card back into the tray when needed. Remember, taking proper care of your SIM card is crucial to maintain a stable and reliable cellular connection on your iPhone.
This method is a handy alternative when you don’t have access to a SIM card ejector tool or a paperclip. With just a small piece of sticky tape, you can safely and easily remove your SIM card from your iPhone without any hassle.
Conclusion
Removing the SIM card from an iPhone is a simple process that can be done by following a few easy steps. By using a paperclip or SIM card removal tool, you can safely eject the SIM card tray and take out the SIM card. This allows you to switch to a new SIM card or transfer your existing SIM card to a different device.
Whether you’re upgrading your iPhone, switching carriers, or traveling internationally, knowing how to remove your SIM card is essential. Remember to turn off your iPhone before removing the SIM card, and handle the tray and card with care to avoid any damage. With these steps, you’ll be able to easily take out your iPhone’s SIM card whenever you need to.
So, the next time you find yourself in need of removing your SIM card from your iPhone, don’t worry! It’s a straightforward process that you can easily accomplish in just a few minutes. Follow the steps outlined in this article and enjoy the flexibility and freedom that comes with managing your SIM card in your iPhone.
FAQs
Q: How do you take the SIM card out of an iPhone?
A: Removing the SIM card from an iPhone is a straightforward process. Simply locate the SIM card tray on the side of your iPhone, insert a SIM card removal tool or a straightened paperclip into the small hole next to the tray, and gently push to release the tray. Once the tray pops out, carefully lift it out of the iPhone, remove the existing SIM card, and place the new SIM card in the tray. Finally, reinsert the tray into the iPhone until it clicks into place.
Q: Can I use any SIM card with an iPhone?
A: iPhones are usually sold locked to a specific carrier, meaning they only work with SIM cards from that particular carrier. However, many carriers offer services to unlock iPhones, allowing you to use SIM cards from other carriers. It’s important to check with your carrier or the iPhone’s manufacturer to determine if your device is eligible for unlocking.
Q: Is it possible to transfer data from one SIM card to another?
A: No, it is not possible to directly transfer data from one SIM card to another. SIM cards store basic information, such as phone numbers and contacts, but do not contain any substantial data, such as photos, videos, or apps. To transfer data, you’ll need to back up your iPhone to iCloud or your computer, switch the SIM cards, and then restore the backup onto the new iPhone.
Q: What should I do if my SIM card gets stuck in the iPhone?
A: If your SIM card gets stuck in the iPhone, do not attempt to forcefully remove it as it may cause damage to both the SIM card and the iPhone. Instead, gently try to push the SIM card back into the slot using a SIM card removal tool or a straightened paperclip. If that doesn’t work, it’s best to take your iPhone to an authorized service provider who can safely remove the stuck SIM card for you.
Q: Can I use an iPhone without a SIM card?
A: Yes, it is possible to use an iPhone without a SIM card. If you don’t have a SIM card, you can still use the iPhone for various functions, such as connecting to Wi-Fi, browsing the internet, using apps, and even making emergency calls. However, certain features that rely on cellular connectivity, such as calls, messages, and cellular data, will not be available without a SIM card inserted.