
Are you excited about getting your hands on the latest iPhone 13? One of the first things you’ll need to do when you acquire this sleek and powerful device is to insert a SIM card. The SIM card is an essential component that allows your iPhone to connect to a cellular network and make calls, send texts, and access the internet. While the process might seem straightforward, each new iPhone model has its unique SIM card slot design, and it’s always good to be aware of the correct method to avoid any mishaps. In this article, we will guide you through the step-by-step process of putting a SIM card in the new iPhone 13, ensuring that you can activate your device and start using it to its full potential in no time.
Inside This Article
- Inserting the SIM Card in iPhone 13
- Frequently Asked Questions
- Gather the necessary tools
- Locate the SIM card tray
- Remove the SIM card tray
- Insert the SIM card into the tray
- Conclusion
- FAQs
Inserting the SIM Card in iPhone 13
Are you excited about getting your hands on the latest iPhone 13? Before you can start using all the amazing features, you’ll need to insert your SIM card. Follow these simple steps to easily insert the SIM card in your iPhone 13.
1. Gather the necessary tools
Before you begin, make sure you have the necessary tools handy. You will need a SIM card ejector tool or a small paperclip. This tool is essential for opening the SIM card tray on your iPhone 13.
2. Locate the SIM card tray
Next, locate the SIM card tray on your iPhone 13. The SIM card tray is typically located on the right side of the device. Look for a small pinhole near the edge of your iPhone.
3. Remove the SIM card tray
Insert the SIM card ejector tool or unbent paperclip into the pinhole and apply gentle pressure. This will release the SIM card tray from its locked position. Once the tray pops out, carefully pull it out of the device.
4. Insert the SIM card into the tray
Take your SIM card and align it with the SIM card tray. Ensure that the gold contacts on the SIM card are facing down and in the correct orientation. Gently place the SIM card onto the tray, making sure it fits securely into the designated slot.
Once the SIM card is in place, carefully slide the tray back into the iPhone 13 until it clicks back into position. Make sure it is flush with the device’s side and securely locked.
That’s it! You’ve successfully inserted the SIM card into your iPhone 13. Now you can power on your device and enjoy all the features and functionalities that the iPhone 13 has to offer.
Frequently Asked Questions
1. Do I need to insert a SIM card to use an iPhone 13?
Yes, in order to make calls, send text messages, and connect to cellular networks, you will need to insert a valid SIM card into your iPhone 13.
2. Can I use the same SIM card from my old phone in the iPhone 13?
If your old phone uses the same type of SIM card as the iPhone 13 (Nano-SIM), you should be able to transfer your existing SIM card to the new device. However, if your old phone uses a different size SIM card, you may need to contact your mobile carrier for a new SIM card.
3. Can I use my iPhone 13 without a SIM card?
While you can use an iPhone 13 without a SIM card, you will be limited to using only the device’s Wi-Fi capabilities. You won’t be able to make calls, send text messages, or access cellular data without a SIM card.
4. How do I remove the SIM card from my iPhone 13?
To remove the SIM card from your iPhone 13, follow the same steps mentioned above. Insert the SIM card ejector tool or a paperclip into the pinhole and gently push to release the SIM card tray. Then, simply slide out the tray and carefully remove the SIM card.
By following these simple instructions, you can quickly and easily insert and remove the SIM card in your iPhone 13. Now you can stay connected and enjoy all the features of your new device!
Gather the necessary tools
Before you can insert a SIM card into your iPhone 13, you will need to gather a few essential tools. Here’s what you will need:
– Your iPhone 13: Make sure you have your iPhone 13 nearby. It’s important to have the device on hand so you can access the SIM card tray.
– SIM card: Ensure you have a compatible SIM card that you want to insert into your iPhone 13. Make sure the SIM card is activated and ready for use.
– SIM card ejector tool: Apple provides a SIM card ejector tool with your iPhone 13. This tool is small and pin-like, used to open the SIM card tray. If you can’t find the ejector tool, you can use a small paper clip or a pin as a substitute.
Once you have gathered these tools, you will be ready to proceed with the next steps of inserting the SIM card into your iPhone 13.
Locate the SIM card tray
Before you can insert the SIM card into your iPhone 13, you need to locate the SIM card tray. The SIM card tray is typically situated on the side of the device, either on the right or left edge depending on the iPhone model.
To find the SIM card tray on your iPhone 13, start by holding the device with the front screen facing you. Look for a small indentation or a tiny hole on the side of the phone. This is where the SIM card tray is located.
Once you have identified the location of the tray, gently insert the SIM card ejection tool or a small paperclip into the provided hole. Apply light pressure until the tray pops out slightly.
Use your fingers to carefully pull the tray out completely. It’s essential to handle the tray and SIM card with care to avoid any damage. Take a moment to familiarize yourself with the orientation of the tray, as it is important to insert the SIM card correctly.
Now that you have successfully located the SIM card tray, you are ready to move on to the next step of inserting the SIM card into your iPhone 13.
Remove the SIM card tray
Now that you have located the SIM card tray on your iPhone 13, it’s time to remove it. Follow these steps:
- Find a SIM card ejector tool or a small paperclip.
- Insert the ejector tool or paperclip into the small hole next to the SIM card tray.
- Apply a gentle amount of pressure to push the tool into the hole until the tray pops out slightly.
- Use your fingers to grasp the tray and pull it out completely from the device.
Be cautious while removing the SIM card tray and ensure that you do not exert excessive force, as it could damage your iPhone.
Once the SIM card tray is removed, you will be ready to insert your SIM card into the tray and complete the setup process.
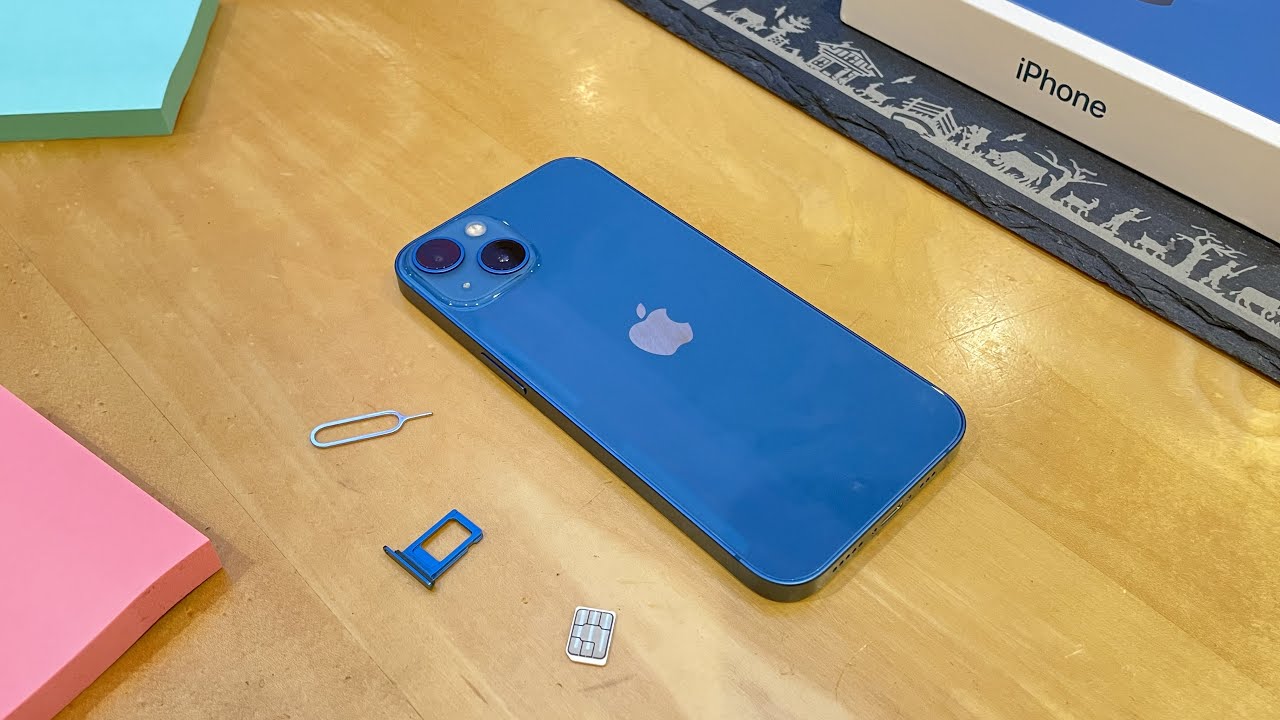
Insert the SIM card into the tray
Now that you have the SIM card tray in your hands, it’s time to install the SIM card into it. Follow these steps to ensure a proper installation:
1. Take a close look at the SIM card. You will notice a small notch on one of the corners. This notch is crucial for aligning the SIM card correctly in the tray.
2. Place the SIM card in the tray by aligning the notch on the card with the corresponding notch on the tray. Make sure the gold contacts on the SIM card are facing downwards. The SIM card should fit snugly into the tray without any force.
3. Once the SIM card is placed correctly in the tray, gently push the tray back into the iPhone. Ensure that it is inserted all the way in until it sits flush with the device.
4. Give the iPhone a moment to recognize the SIM card. You may see a “No SIM Card Installed” message initially, but that should disappear once the device detects the SIM card.
5. Finally, power on your iPhone and wait for it to boot up. Once the device is ready, you should see the network signal bars indicating that your iPhone has successfully detected the SIM card.
It’s worth noting that if you ever need to remove the SIM card in the future, you can repeat the steps above and simply reverse the process. Just remember to power off your iPhone before removing the SIM card.
Now that you have successfully inserted the SIM card into your iPhone 13, you can enjoy the functionalities and connectivity provided by your mobile carrier. Whether it’s making calls, sending messages, or accessing the internet, your SIM card is an essential component that enables seamless communication on your device.
The process of inserting a SIM card into an iPhone 13 is straightforward and simple. With just a few steps, you can get your device up and running with cellular connectivity. Whether you are upgrading from an older iPhone or switching from another device, knowing how to properly insert the SIM card is essential. By following the instructions provided by Apple and ensuring that your SIM card is compatible with the iPhone 13, you can experience seamless communication and access to network services.
Remember to handle the SIM card with care, avoid inserting it upside down, and make sure it locks securely into the SIM card tray. If you encounter any issues or need assistance, Apple support is always available to provide guidance. Enjoy your new iPhone 13 and stay connected wherever you go!
FAQs
Q: How do I put a SIM card in iPhone 13?
To put a SIM card in iPhone 13, follow these steps:
- Make sure your iPhone is turned off.
- Locate the SIM card tray on the side of your iPhone 13.
- Insert the SIM ejector tool (or use a small paperclip) into the tiny hole next to the tray.
- Gently push the tool in to eject the SIM card tray.
- Place your SIM card into the tray with the golden contacts facing downward.
- Slide the tray back into the iPhone until it clicks into place.
- Turn on your iPhone and wait for it to connect to the network.
Q: Can I use a different SIM card in iPhone 13?
Yes, iPhone 13 is unlocked, so you can use a SIM card from any compatible carrier. Simply follow the steps mentioned above to insert the new SIM card into your iPhone and it should connect to the network once it’s turned on.
Q: What type of SIM card does iPhone 13 use?
iPhone 13 uses a nano-SIM card. This is the smallest size of SIM card available and is commonly used in most modern smartphones. Make sure you have a nano-SIM card before attempting to insert it into your iPhone 13.
Q: How do I remove the SIM card from iPhone 13?
To remove the SIM card from your iPhone 13, follow these steps:
- Make sure your iPhone is turned off.
- Locate the SIM card tray on the side of your iPhone 13.
- Insert the SIM ejector tool (or use a small paperclip) into the tiny hole next to the tray.
- Gently push the tool in to eject the SIM card tray.
- Remove the SIM card from the tray.
- Slide the tray back into the iPhone until it clicks into place.
- Turn on your iPhone. It will function without a SIM card, but you won’t have access to cellular networks.
Q: Do I need to transfer my old SIM card to iPhone 13?
If you want to transfer your old phone number and carrier plan to your new iPhone 13, you will need to insert your old SIM card into the new device. However, if you want to switch carriers or use a different phone number, you can use a new SIM card instead. It is recommended to contact your carrier before making any changes to ensure a smooth transition.