
Are you looking to personalize your Fitbit dashboard and make it more functional? Adding tiles to your Fitbit dashboard is a great way to enhance your fitness tracking experience. With customizable tiles, you can easily access the information that matters most to you, such as your daily steps, heart rate, sleep patterns, and more.
In this article, we will guide you through the process of adding tiles to your Fitbit dashboard. Whether you’re a fitness enthusiast or someone who wants to stay on top of their health goals, adding tiles can help you stay motivated and track your progress effortlessly. Let’s dive in and find out how you can make the most out of your Fitbit device by personalizing your dashboard with the information that matters most to you.
Inside This Article
- Overview of the Fitbit Dashboard
- Steps to Add Tiles to Fitbit Dashboard
- Customizing and Rearranging Tiles on Fitbit Dashboard
- Adding Multiple Tiles to Fitbit Dashboard
- Conclusion
- FAQs
Overview of the Fitbit Dashboard
The Fitbit Dashboard is a powerful tool that allows you to track and monitor your fitness goals and progress. It is the central hub where you can view all your fitness data, including steps, distance, calories burned, heart rate, sleep patterns, and more. The dashboard provides you with a comprehensive overview of your overall health and fitness, helping you stay motivated and on track towards achieving your goals.
With a user-friendly interface, the Fitbit Dashboard makes it easy to navigate through different sections and access the information you need. The main screen displays your daily activity summary, showing your progress towards your step goal, active minutes, calories burned, and floors climbed. You can also view your sleep data, hydration levels, weight trends, and other wellness metrics.
One of the standout features of the Fitbit Dashboard is the ability to connect and sync with other fitness apps and tracking devices. Whether you use a Fitbit device, a smartwatch, or other fitness trackers, the dashboard seamlessly integrates all your data, giving you a comprehensive view of your health and fitness journey in one place.
In addition to tracking your physical activity, the Fitbit Dashboard also offers features to help you stay on top of your nutrition. You can log your meals and track your calorie intake, set personalized nutrition goals, and even track your water intake to ensure you stay hydrated throughout the day.
The Fitbit Dashboard also provides insights and personalized coaching to help you make informed decisions about your health and fitness. The dashboard offers tips, guidance, and recommendations based on your activity levels, sleep patterns, and personal goals. This personalized approach empowers you to make positive changes and adopt healthier habits.
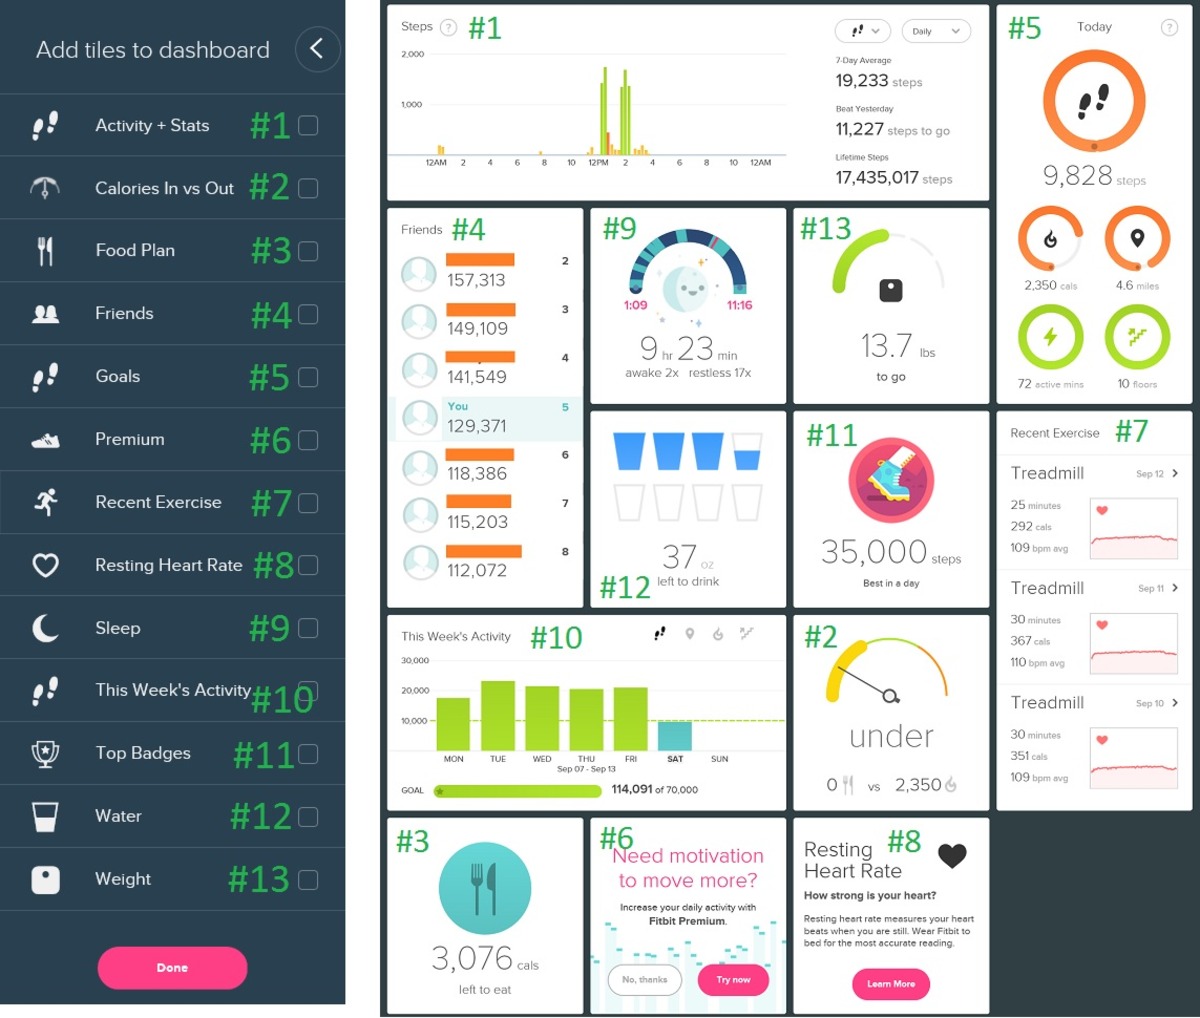
Steps to Add Tiles to Fitbit Dashboard
Fitbit provides a user-friendly interface that allows you to personalize your dashboard by adding tiles. These tiles provide quick access to important information and features that you frequently use. If you want to customize your Fitbit dashboard and add tiles, follow these simple steps:
Step 1: Open the Fitbit app
The first step in adding tiles to your Fitbit dashboard is to open the Fitbit app on your mobile device. Make sure you are logged in to your Fitbit account.
Step 2: Go to the Dashboard settings
Once you are in the Fitbit app, navigate to the Dashboard by selecting the “Dashboard” option at the bottom of the screen. Next, click on the gear icon or the “Settings” option located at the upper right corner of the screen to access the Dashboard settings.
Step 3: Add a tile
In the Dashboard settings, you will find a list of available tiles. To add a new tile to your dashboard, simply tap on the “Add Tile” option. This will display a variety of tile options that you can choose from.
Step 4: Select a tile
Browse through the available tile options and select the one that suits your needs. Fitbit offers a range of tiles, including weather, calendar, water intake, sleep, and more. Tap on the tile that you want to add to your dashboard.
Step 5: Customize the tile
After selecting a tile, you can further customize it to display the information or features that you prefer. For example, if you choose the weather tile, you can set it to display the current temperature or weather forecast for your location. Adjust the settings according to your preferences.
Step 6: Rearrange the tiles
If you want to rearrange the order of the tiles on your Fitbit dashboard, simply press and hold on a tile, then drag it to the desired position. This allows you to prioritize the tiles that are most important to you and organize your dashboard according to your needs.
Step 7: Save your changes
Once you have added and customized the desired tiles, click on the “Save” or “Done” button to apply the changes to your Fitbit dashboard. The new tiles will now appear on your dashboard, providing quick access to the information and features that matter to you.
By following these steps, you can easily add and customize tiles on your Fitbit dashboard, creating a personalized experience that caters to your individual needs and preferences.
Customizing and Rearranging Tiles on Fitbit Dashboard
One of the great features of the Fitbit Dashboard is the ability to customize and rearrange the tiles according to your own preferences. Whether you want to prioritize certain metrics or hide others that are less relevant to you, customizing the tiles can help you personalize your Fitbit experience. Here are the steps to customize and rearrange tiles on the Fitbit Dashboard:
1. From the Fitbit app on your smartphone, navigate to the Dashboard tab. Here, you will see the tiles representing different metrics such as your step count, heart rate, sleep duration, and more.
2. Tap and hold on any tile that you want to customize or rearrange. A pop-up menu will appear with options to resize, remove, or rearrange the tile.
3. To resize a tile, select the Resize option from the pop-up menu. You can choose from small, medium, or large sizes, depending on your preference and the amount of space you want the tile to occupy on your dashboard.
4. If you want to remove a tile from the dashboard, select the Remove option from the pop-up menu. The tile will be removed from your dashboard, but you can always add it back later if you change your mind.
5. To rearrange the tiles, select the Move option from the pop-up menu. Now, you can drag and drop the tile to your desired position on the dashboard. You can easily rearrange the tiles to prioritize the metrics that matter most to you.
6. Repeat these steps for each tile you want to customize or rearrange on your Fitbit Dashboard. You have the freedom to arrange the tiles in any order you prefer, giving you a personalized view of your fitness and health data.
By customizing and rearranging the tiles on your Fitbit Dashboard, you can create a personalized and intuitive experience that aligns with your goals and interests. Whether you want to focus on your daily step count, heart rate, or sleep quality, having the ability to tailor the dashboard to your liking allows you to stay motivated and informed about your progress. So go ahead and make the Fitbit Dashboard your own!
Adding Multiple Tiles to Fitbit Dashboard
If you want to make the most of your Fitbit dashboard, adding multiple tiles can help you personalize your experience and access the information that matters most to you. Whether you’re looking to track your steps, monitor your heart rate, or stay on top of your sleep patterns, adding multiple tiles can provide you with a comprehensive overview of your fitness journey.
To begin adding multiple tiles to your Fitbit dashboard, start by accessing the Fitbit app on your smartphone or tablet. Open the app and navigate to the dashboard section, where you’ll find a variety of tiles representing different fitness metrics and activities.
Next, tap on the “+” icon located at the top-right corner of the screen. This will open a selection of available tiles that you can add to your dashboard. Browse through the options to find the ones that align with your fitness goals and preferences.
Once you’ve selected a tile, simply tap on it to add it to your dashboard. Repeat this process for each additional tile you want to include. You’ll notice that each tile you add will appear as a separate section on your Fitbit dashboard, allowing you to easily access and monitor different aspects of your health and fitness.
Keep in mind that you can rearrange the order of your tiles by tapping and holding on a tile, then dragging it to your desired position. This way, you can prioritize the information that is most relevant to you and customize the layout of your dashboard.
Adding multiple tiles also enables you to compare and track different metrics side by side. For example, you can have tiles for step count, heart rate, calories burned, and sleep duration all displayed on your dashboard simultaneously. This comprehensive view allows you to monitor your progress in various areas of your fitness journey at a glance.
By adding multiple tiles to your Fitbit dashboard, you can create a personalized health and fitness hub that suits your specific needs. Whether your focus is on tracking your workouts, monitoring your sleep patterns, or managing your overall well-being, having a dashboard with multiple tiles ensures that you have easy access to the information that matters most to you.
So, don’t hesitate to explore the available tiles on your Fitbit app and start customizing your dashboard today. With just a few taps, you can add multiple tiles and take your fitness tracking to the next level.
Overall, adding tiles to your Fitbit dashboard is a simple and effective way to personalize your device and enhance your fitness tracking experience. With a wide range of tile options available, you can choose to display the information that matters most to you, such as weather updates, hydration reminders, or even guided breathing exercises.
By customizing your dashboard with tiles, you can easily access important data and stay motivated on your fitness journey. Whether you’re a fitness enthusiast looking to optimize your workouts or someone who wants a convenient way to stay on top of their daily activities, adding tiles to your Fitbit dashboard is a great way to make the most of your device.
So take a moment to explore the Fitbit app and discover the array of tiles that can enhance your Fitbit experience. From staying connected to your favorite apps to tracking your sleep patterns, these tiles can provide a seamless and user-friendly experience. Start adding tiles to your Fitbit dashboard today and unlock the full potential of your device.
FAQs
1. Can I add tiles to my Fitbit dashboard?
Yes, you can add tiles to your Fitbit dashboard to customize it according to your preferences and needs. Fitbit offers a range of tiles that provide different functionalities and information, allowing you to personalize your dashboard and make it more useful.
2. How can I add tiles to my Fitbit dashboard?
To add tiles to your Fitbit dashboard, follow these simple steps:
- Open the Fitbit mobile app on your smartphone and ensure that your Fitbit device is connected.
- Navigate to the Dashboard tab.
- Scroll down and tap on “Edit” or the “+” icon to enter the tile gallery.
- Browse through the available tiles and select the ones you want to add to your dashboard.
- Tap on “Add” or drag and drop the tiles to the desired location on your dashboard.
- Arrange the tiles by tapping and holding, then dragging them to the desired position.
- Tap on “Done” or the checkmark icon to save your changes.
3. What kinds of tiles are available for the Fitbit dashboard?
Fitbit offers a variety of tiles that provide different functionalities and information. Some popular types of tiles include:
- Activity tiles: These tiles display your daily step count, distance traveled, calories burned, and active minutes.
- Sleep tiles: These tiles track your sleep patterns and provide insights into your sleep quality and duration.
- Heart rate tiles: These tiles show your current heart rate and allow you to monitor your heart health during workouts or throughout the day.
- Exercise tiles: These tiles allow you to track specific workouts and view detailed statistics about your exercise sessions.
- Weather tiles: These tiles provide current weather information, including temperature, forecast, and conditions.
4. Can I remove tiles from my Fitbit dashboard?
Yes, you can remove tiles from your Fitbit dashboard if you no longer want to have them displayed. To remove a tile, follow these steps:
- Open the Fitbit mobile app on your smartphone and navigate to the Dashboard tab.
- Scroll down and tap on “Edit” or the “+” icon to enter the tile gallery.
- Tap and hold on the tile you want to remove.
- Drag the tile to the “Remove” or trash bin icon that appears at the top or bottom of the screen.
- Release your finger to remove the tile from your dashboard.
- Tap on “Done” or the checkmark icon to save your changes.
5. Are there any limits to the number of tiles I can add to my Fitbit dashboard?
Fitbit does have some limits when it comes to adding tiles to your dashboard. The exact number of tiles you can add may depend on the specific Fitbit model you have and the available screen space on your device’s display. However, Fitbit generally allows you to add multiple tiles to your dashboard, giving you the flexibility to customize it according to your preferences and needs.