
Attaching a monopod to a camera is an essential skill for photographers looking to stabilize their shots and achieve steady, professional-looking images. A monopod is a single-legged support device that allows photographers to reduce camera shake and capture sharp, clear photos, especially in situations where tripods are impractical or too bulky to carry. Whether you’re shooting fast-action sports, wildlife, or even engaging in self-portraits, knowing how to attach a monopod to your camera can make all the difference in capturing the perfect shot. In this article, we will guide you through the process of securely attaching a monopod to your camera, offering valuable tips and insights along the way. With these techniques, you’ll be able to take your photography skills to new heights and achieve stunning results. Let’s dive in!
Inside This Article
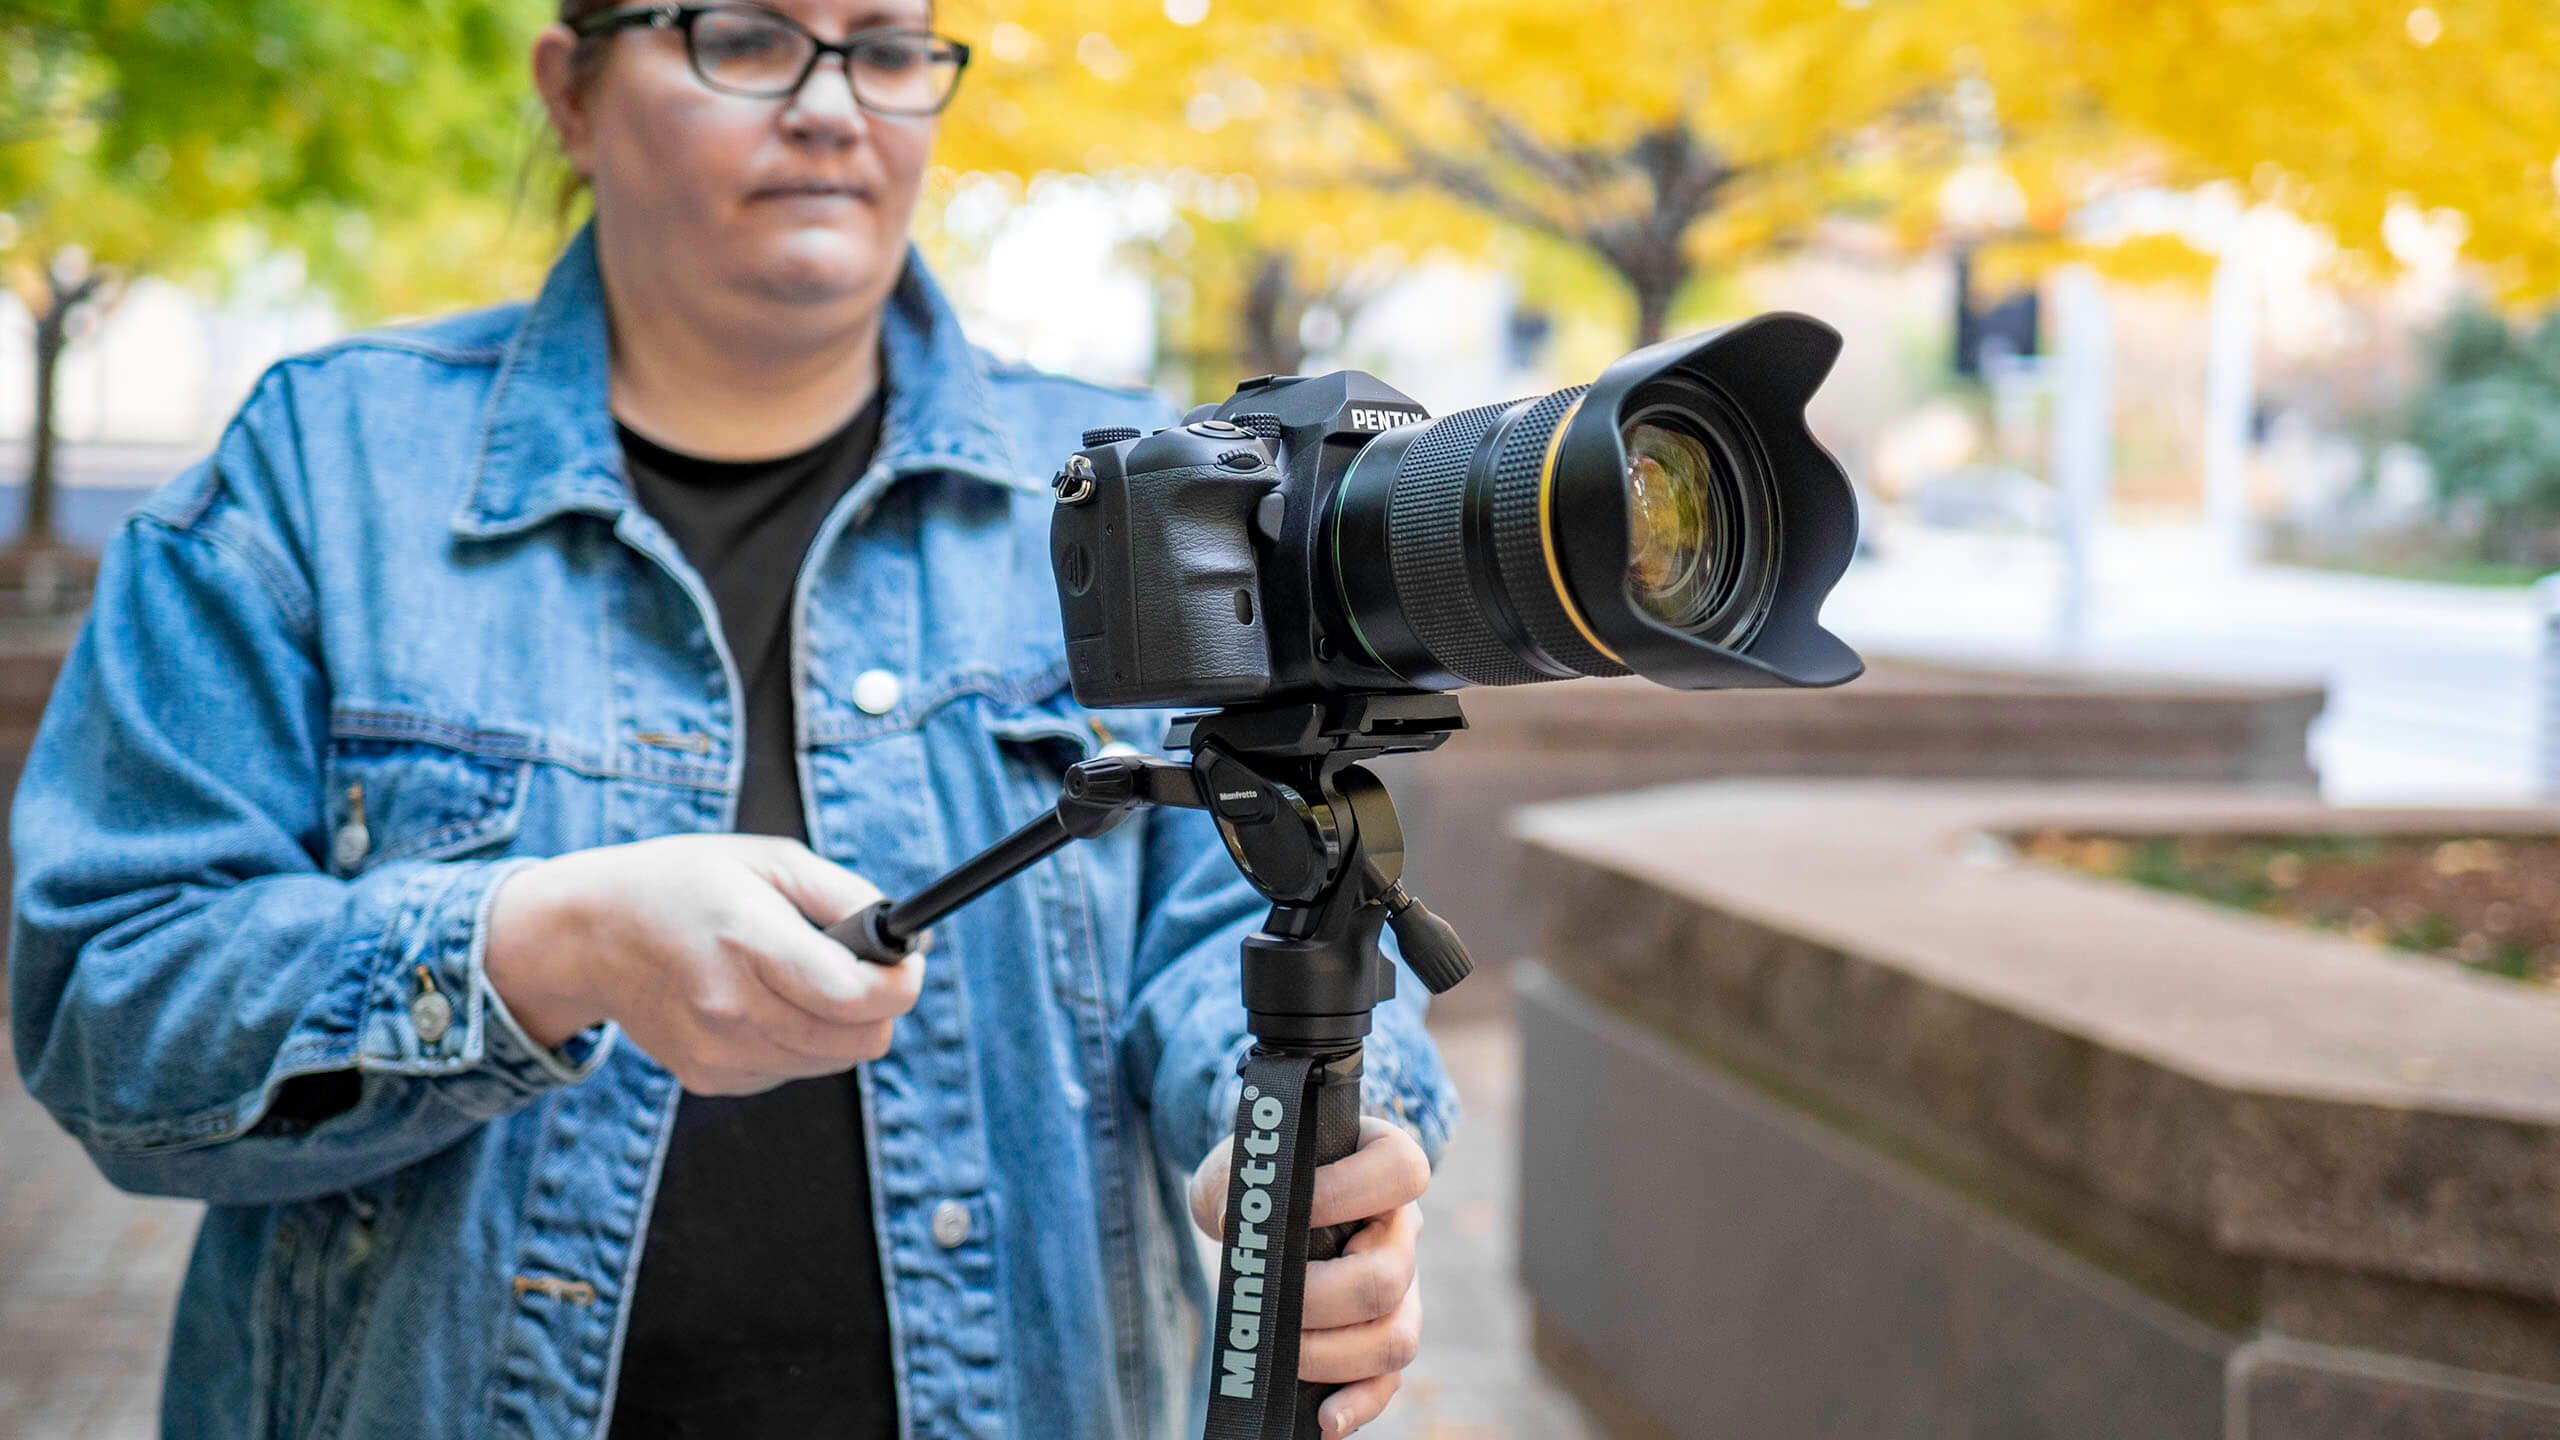
- Attaching a Monopod to a Camera
- # 1. Understanding Monopod Basics
- Choosing the Right Monopod for Your Camera
- # 3. Mounting the Camera to the Monopod
- # 4. Adjusting the Monopod for Stability
- Conclusion
- FAQs
Attaching a Monopod to a Camera
Attaching a monopod to your camera can greatly improve your photography experience, allowing you to capture steady and sharp images. Whether you’re shooting sports events, wildlife, or any other fast-paced subjects, a monopod provides stability and support for your camera, reducing camera shake and enhancing image quality.
Here are the steps to properly attach a monopod to your camera:
- First, ensure that you have a monopod that is compatible with your camera. Monopods come with different mounting options, such as a standard 1/4-inch screw or a quick-release plate system. Check the specifications of your camera and monopod to ensure they can be securely connected.
- Locate the mounting screw on your monopod. It is usually located at the top or near the top of the monopod. If your monopod has a quick-release plate system, attach the plate securely to the top of the monopod.
- Position your camera on top of the monopod, aligning the mounting screw hole on the camera with the screw or the quick-release plate on the monopod.
- Hold your camera securely and carefully twist it clockwise onto the screw or slide it onto the quick-release plate until it locks into place. Make sure the camera is snugly attached to prevent any accidental drops or movement.
- Once your camera is attached to the monopod, check if it feels secure and stable. Give it a gentle shake to ensure it doesn’t wobble or come loose. If it does, double-check the attachment and tighten it if necessary.
- Adjust the monopod to your desired height by loosening the locking mechanism, extending or contracting the sections of the monopod, and then tightening the locking mechanism again. Ensure that the monopod is set at a comfortable height for your shooting needs.
- If your monopod has a tilt option, adjust the angle by loosening the tilt adjustment knob, tilting the camera to your preferred angle, and tightening the knob to secure it in place.
By following these steps, you can confidently attach a monopod to your camera and start enjoying the benefits of added stability and support. Remember to always double-check the attachment to ensure the safety of your camera and equipment while shooting.
# 1. Understanding Monopod Basics
A monopod is a versatile photography accessory that provides stability and support for your camera, similar to a tripod. However, unlike a tripod, a monopod has only one leg instead of three. This makes it lightweight, compact, and easy to carry, perfect for photographers on the go.
Monopods are particularly useful in situations where you need additional stability but don’t want to carry the bulk of a tripod. They are commonly used for sports photography, wildlife photography, or any other situation where you may need to quickly switch positions or move around with your camera.
With a monopod, you can minimize camera shake and achieve sharper images, especially when shooting with long telephoto lenses or in low light conditions. The monopod acts as a support structure, reducing the strain on your arms and allowing you to focus more on framing and capturing the perfect shot.
Another advantage of using a monopod is improved ergonomics. By resting the monopod on the ground or against your body, you can maintain a more relaxed posture while shooting. This not only reduces fatigue during long photography sessions but also helps with overall image stability.
When selecting a monopod, consider factors such as height, weight capacity, and materials. Look for a monopod that can support the weight of your camera and lens comfortably. Aluminum and carbon fiber are common materials used, with carbon fiber being lighter and more expensive.
Overall, understanding the basics of a monopod and its benefits will help you make an informed decision when choosing one for your camera. In the next section, we will delve into the process of selecting the right monopod that is compatible with your camera.
Choosing the Right Monopod for Your Camera
When it comes to selecting a monopod for your camera, there are a few key factors to consider. Choosing the right monopod is crucial to ensure stability and support while capturing your shots. Here are some important factors to keep in mind:
1. Weight Capacity: Before making a purchase, determine the weight of your camera and any additional accessories you may use. It’s essential to choose a monopod that can handle the weight of your equipment to prevent any instability or potential damage.
2. Height: Consider the height that you need for your shooting style. Monopods typically have adjustable height options, allowing you to find the perfect shooting position. Whether you’re a portrait photographer or shoot landscapes, finding a monopod that offers suitable height is essential.
3. Construction and Material: Look for a monopod made of durable materials such as carbon fiber or aluminum. These materials offer stability and strength while being lightweight and easy to carry. They also provide durability for long-term use, ensuring that your monopod will withstand various shooting conditions.
4. Compatibility: Ensure that the monopod you choose is compatible with your camera. Check for the appropriate mounting attachment, whether it’s a standard 1/4″-20 screw or a quick-release plate. It’s crucial to have a secure and stable connection between the monopod and your camera for worry-free shooting.
5. Portability: Consider the portability factor, especially if you’re frequently on the move or travel for photography. Look for a monopod that is lightweight, collapsible, and easy to transport. Compact monopods are convenient for photographers who need mobility without compromising stability.
6. Price: Finally, consider your budget. Monopods can vary in price range depending on their features and build quality. Assess your needs and find the best monopod that fits your budget while still meeting your requirements for stability and functionality.
By taking these factors into account, you can select a monopod that perfectly complements your camera and shooting style. The right monopod will provide the necessary stability, allowing you to capture breathtaking photos with confidence.
# 3. Mounting the Camera to the Monopod
Once you have selected the right monopod for your camera and adjusted its height and angle, it’s time to securely mount your camera to the monopod. This step is crucial to ensure stability and prevent any accidental drops or movements while shooting. Follow these simple steps to attach your camera to the monopod:
1. Start by locating the camera mount or tripod socket on the bottom of your camera. It is usually located in the center and has a threaded hole.
2. Take the mounting plate or quick-release plate that came with your monopod and attach it to the camera mount. Align the screw on the plate with the tripod socket on your camera.
3. Use a coin or the appropriate tool to securely tighten the screw on the mounting plate, ensuring a firm connection between the plate and the camera.
4. Once the mounting plate is securely attached, align it with the monopod’s head or mount. Most monopods have a quick-release mechanism that allows for easy attachment and detachment of the camera.
5. Line up the plate with the monopod’s head and slide it onto the mount. Make sure it locks into place to prevent any accidental disconnects.
6. Double-check the stability of the camera by gently applying pressure in different directions. It should feel secure and not move or wobble on the monopod.
7. Adjust the camera’s position by loosening the monopod’s tilt lock or ball head, if applicable. This will allow you to tilt the camera at the desired angle for your shot.
8. Once you are satisfied with the camera’s position, tighten the tilt lock or ball head to secure it in place.
9. Test the stability and balance of the camera on the monopod by gently tilting and panning. Make any necessary adjustments to ensure smooth movement and stability during shooting.
With your camera securely mounted on the monopod, you are now ready to capture stunning shots with increased stability and versatility.
# 4. Adjusting the Monopod for Stability
Once you have successfully attached your monopod to your camera, the next step is to adjust it for stability. Proper adjustment of the monopod will ensure that you can capture sharp and steady photos.
Here are some tips for adjusting the monopod:
- Extend the monopod: Start by extending the monopod to your desired height. Most monopods come with adjustable sections that can be locked in place. Make sure to tighten each section securely to avoid any wobbling.
- Position the monopod: Place the monopod on a stable surface, such as the ground or a solid tripod foot. If you’re shooting on uneven terrain, try to find a spot where the monopod can rest securely without any slippage.
- Grip the monopod: Hold the monopod firmly with your hand, ensuring a tight grip. You can also use a rubber grip or foam sleeve for added comfort and stability.
- Distribute the weight: Position your camera and lens towards the front of the monopod to distribute the weight evenly. This will help prevent any imbalance and reduce the chances of the monopod tipping over.
- Stabilize your stance: To further enhance stability, stand with your legs slightly apart, similar to a tripod stance. This will provide a solid foundation and minimize any unwanted movement.
By following these adjustments, you can achieve better stability while using a monopod. Experiment with different heights and angles to find the most comfortable and effective shooting position for your specific needs.
Conclusion
In conclusion, attaching a monopod to a camera is a simple and effective way to enhance stability and improve the quality of your photographs. By properly attaching and utilizing a monopod, you can achieve sharper images, capture smoother videos, and explore creative angles with ease. The process of attaching a monopod to a camera involves securely connecting the monopod to the tripod mount on the camera body, ensuring a tight fit and stability. Additionally, adjusting the height and angle of the monopod can further enhance your shooting experience.
Whether you’re a professional photographer looking to add another tool to your arsenal or an amateur seeking to improve the quality of your mobile photography, investing in a monopod is a worthwhile choice. With its portability, versatility, and stability benefits, a monopod is a valuable accessory that can take your photography skills to the next level. So don’t hesitate to give it a try and discover the incredible difference it can make in your photography pursuits.
FAQs
Q1: How do I attach a monopod to my camera?
Attaching a monopod to a camera is a simple process. Start by locating the tripod socket on the bottom of your camera. This is usually located near the center. Next, screw the monopod’s mounting plate into the camera’s tripod socket. Ensure that it is securely tightened. Once attached, adjust the monopod’s height to your preference by extending or retracting its sections.
Q2: Can I attach any monopod to any camera?
Most monopods are designed with a standard 1/4-inch screw at the top, which is compatible with the tripod socket found on most cameras. Therefore, you can attach any monopod to any camera as long as they both have these compatible features. However, it’s always a good idea to check the specifications of your monopod and camera to ensure compatibility.
Q3: Do I need a specific mount or adapter for my camera to attach to a monopod?
In most cases, you do not need a specific mount or adapter to attach your camera to a monopod. As mentioned earlier, the standard 1/4-inch screw found on monopods is compatible with the tripod socket on most cameras. However, if you have a camera with a different type of mount, it may require an adapter to be compatible with the monopod.
Q4: Is using a monopod better than handholding the camera?
Using a monopod offers several advantages over handholding a camera. It provides stability, reduces camera shake, and allows for longer exposure times. This is especially beneficial in low light conditions or when capturing fast-moving subjects. Additionally, using a monopod can alleviate fatigue and help you achieve sharper and more professional-looking photos.
Q5: Can I use a monopod for video recording?
Absolutely! Monopods are not limited to photography; they are also great for video recording. By stabilizing the camera, a monopod helps to capture smooth and steady footage. It allows you to pan, tilt, and move the camera more effortlessly, resulting in professional-looking videos. Whether you’re shooting weddings, sports events, or vlogs, a monopod can be a valuable tool for videography.