
Are you struggling with a weak or dead battery in your Toyota key fob? Don’t worry, help is at hand! In this article, we will guide you through the step-by-step process of changing the battery in your Toyota key fob, ensuring that you never get locked out of your car due to a faulty key. Having a properly functioning key fob is essential for easy and convenient access to your vehicle, so it’s important to know how to replace the battery when needed. With our comprehensive instructions and tips, you’ll have a fresh battery in your Toyota key fob in no time, ready to start your car with ease. Say goodbye to the frustration of a malfunctioning key fob and say hello to hassle-free driving!
Inside This Article
- Overview
- Step 1: Gather Supplies
- Step 2: Open the Key Fob
- Step 3: Remove the Old Battery
- Step 4: Insert the New Battery
- Step 5: Close the Key Fob
- Step 6: Test the Key Fob
- Conclusion
- FAQs
Overview
Changing the battery in your Toyota key fob is a simple and straightforward process that can save you time and money. A key fob is an essential accessory for any car owner, as it allows for convenient entry and ignition of the vehicle. Over time, the battery in the key fob may become weak or drain completely, rendering the fob useless. Luckily, replacing the battery is a quick task that can be done at home without the need for a professional.
In this article, we will guide you through the step-by-step process of changing the battery in your Toyota key fob. We will provide you with a list of supplies you will need, as well as detailed instructions on how to safely open the key fob, remove the old battery, insert the new battery, and test the key fob to ensure it is working properly. By following these instructions, you can have your Toyota key fob up and running again in no time.
Step 1: Gather Supplies
Before you begin changing the key battery for your Toyota, it’s important to make sure you have all the necessary supplies. Here are the items you will need:
- A new battery: Check your vehicle’s owner’s manual or consult the manufacturer’s website to find the specific battery type needed for your key fob.
- A small flathead screwdriver: This will be used to pry open the key fob.
- A soft cloth: This will help protect the key fob and prevent any scratches during the battery replacement process.
- A clean, well-lit workspace: Find a comfortable and well-lit area to work on your key fob, ensuring that you have enough space to handle the small components.
Having these supplies on hand will make the process smoother and ensure that you can complete the battery replacement without any interruptions.
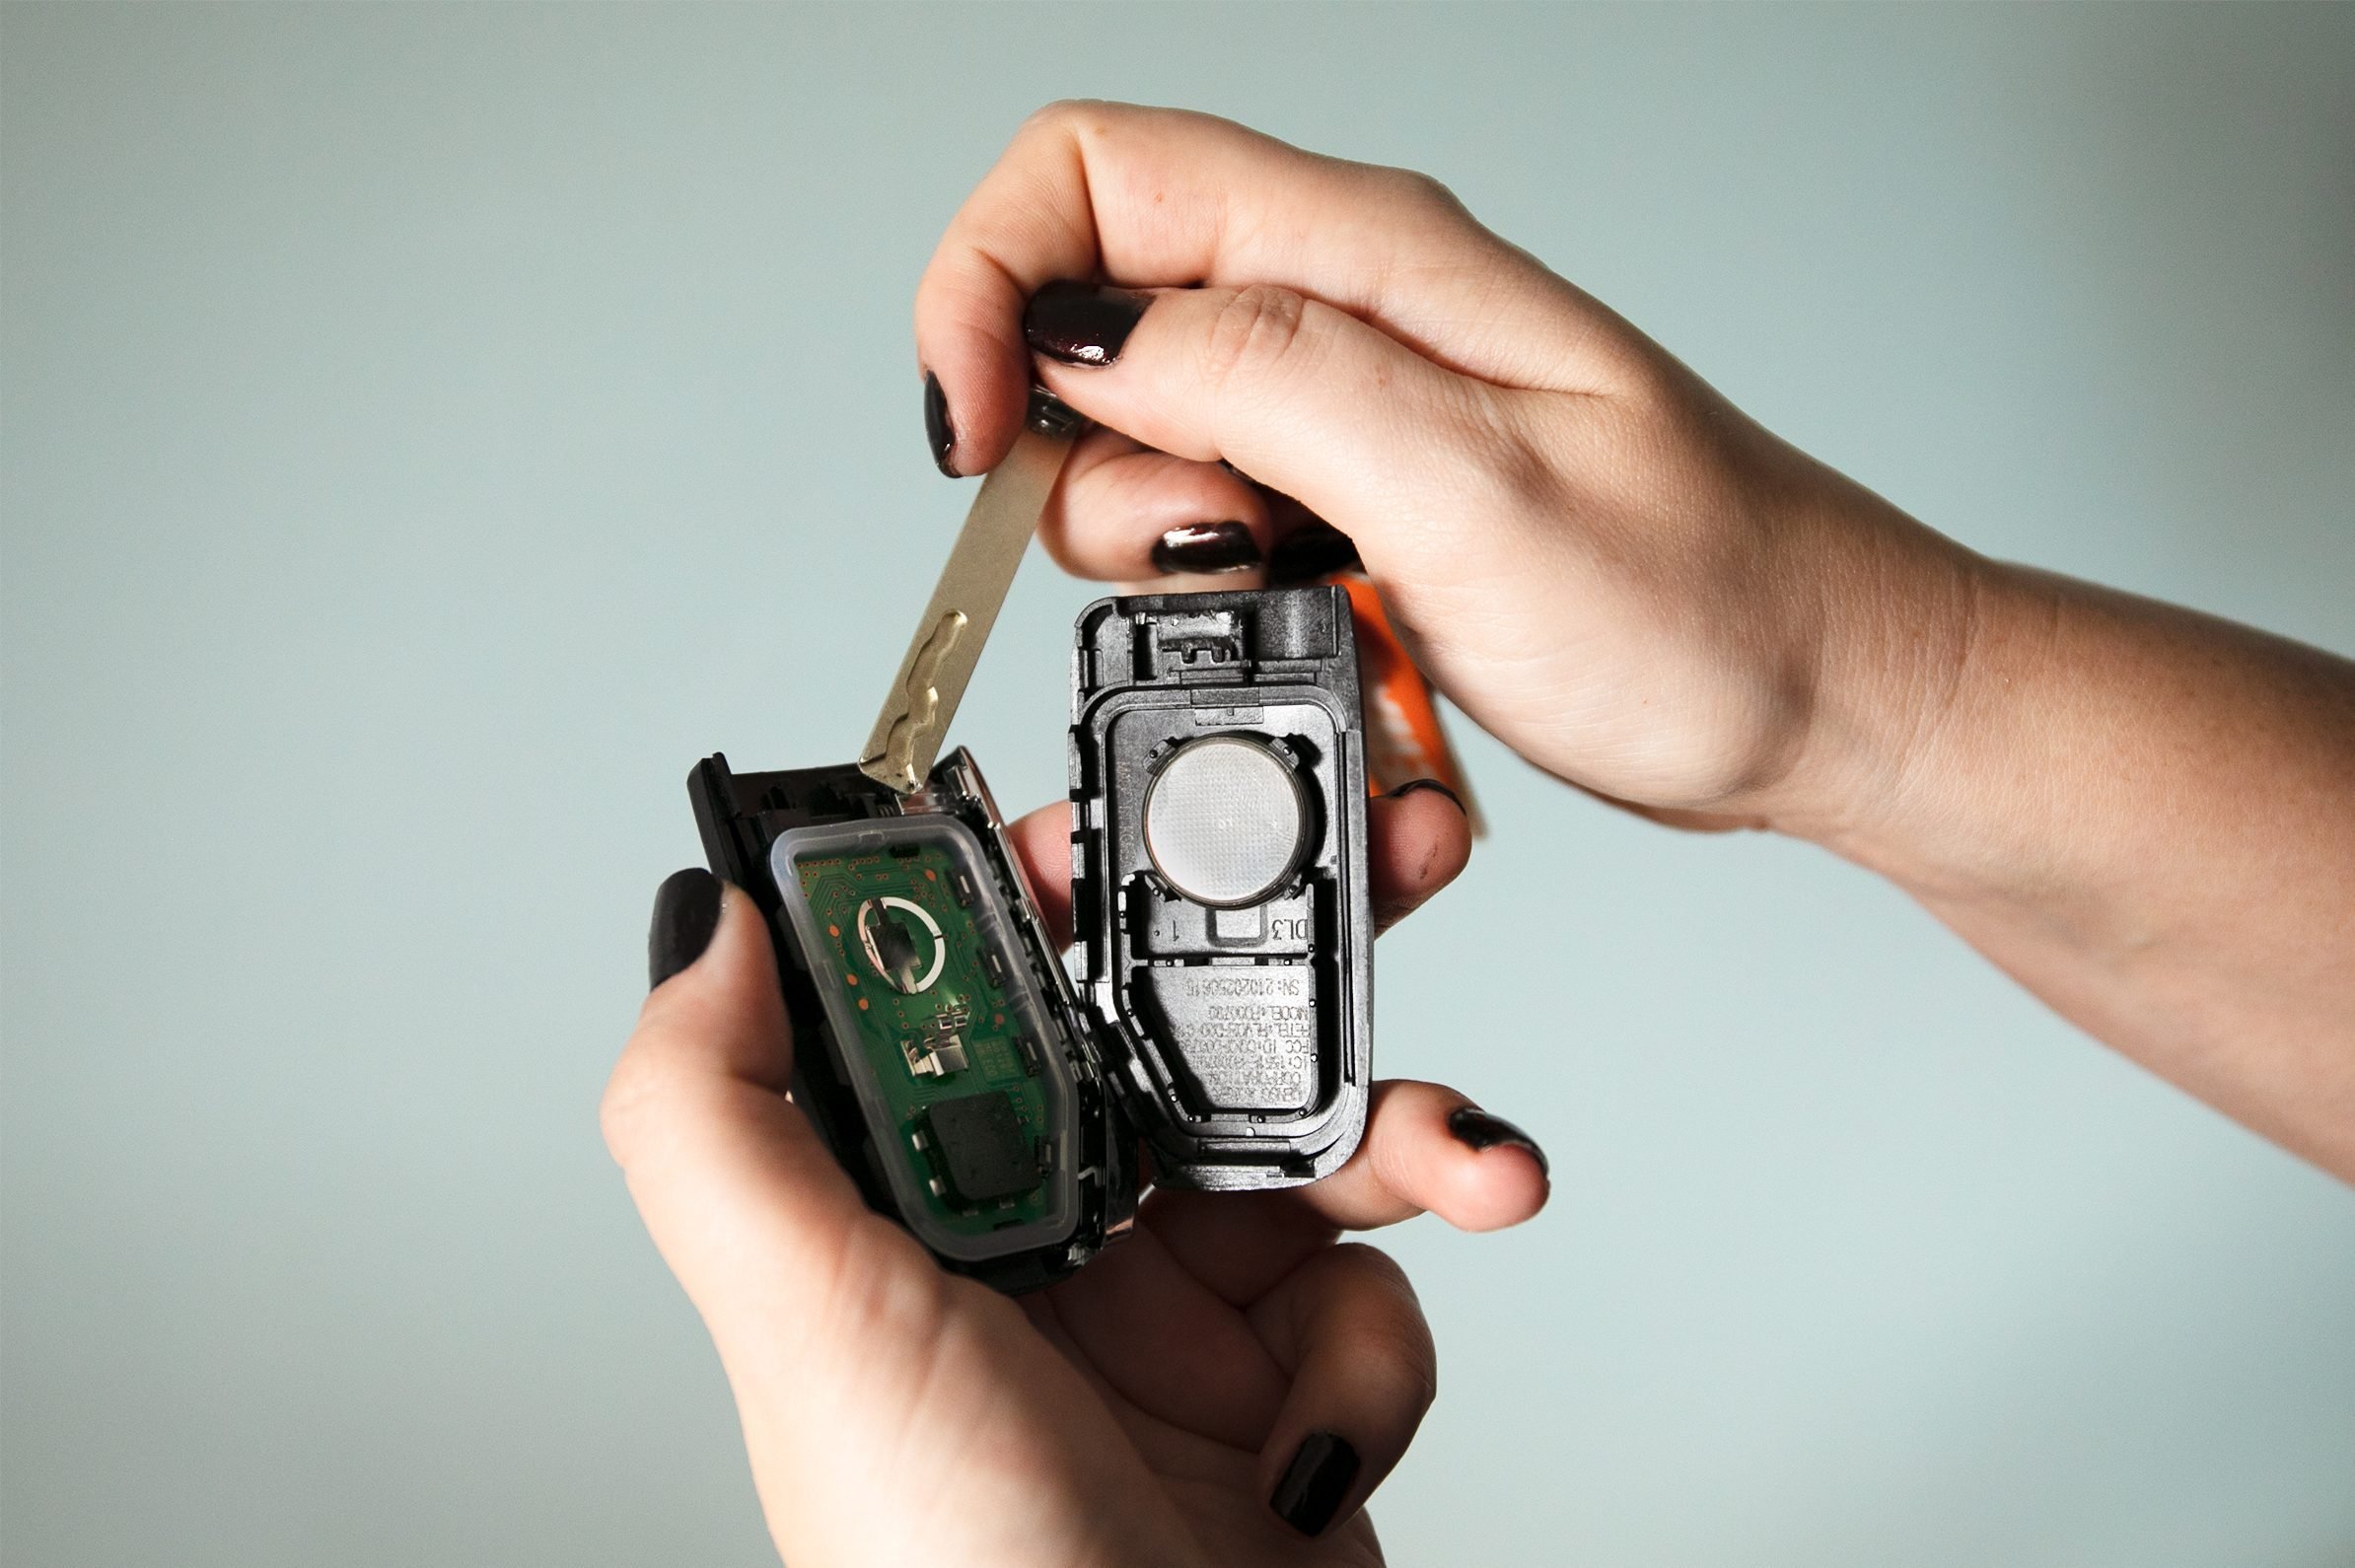
Step 2: Open the Key Fob
Now that you have gathered all the necessary supplies, it’s time to open the key fob. Opening the key fob is an important step in changing the battery, as it gives you access to the battery compartment.
Start by locating the small seam or slot on the side of the key fob. It may be on the bottom or along the edge of the key fob. Use a small flathead screwdriver or a key fob opening tool to gently pry open the key fob. Be careful not to apply too much force, as this can damage the key fob or the internal components.
Once you have inserted the tool into the seam or slot, gently twist it to pry open the key fob. You may hear a slight popping sound as the key fob opens. Continue to apply gentle pressure until the key fob is fully open.
Some key fobs may have clips or tabs that hold the two halves of the key fob together. If you encounter any resistance while trying to open the key fob, check for these clips or tabs. Use the tool to release them, allowing you to fully open the key fob.
Once the key fob is open, be careful not to lose any small parts or buttons that may be inside. Note the orientation of the buttons and circuit board, as you will need to put them back in the correct positions when reassembling the key fob.
With the key fob open, you now have access to the battery compartment. In the next step, we will walk you through the process of removing the old battery and inserting the new one.
Step 3: Remove the Old Battery
Now that you have successfully opened the key fob in the previous step, it’s time to remove the old battery. Follow these simple steps to safely remove the old battery:
- Locate the battery within the key fob. In most Toyota key fobs, the battery will be easily visible once you remove the back cover. It is typically a small, silver disc-shaped object.
- Identify the battery type. Look for any markings on the battery that indicate its correct identification. Common battery types used in Toyota key fobs include CR2032 or CR2025. Ensure you have the right replacement battery on hand before proceeding.
- Take note of the battery orientation. Observe the position of the old battery in the key fob. Note which side is facing up and make a mental or physical note so that you can correctly insert the new battery later.
- Use a small flathead screwdriver or a fingernail. Gently pry the old battery out of its compartment. Be careful not to damage any other components or the key fob itself while doing this. If you are having trouble removing the battery, try using a small tool like a paperclip to carefully push it out.
- Dispose of the old battery properly. Do not throw the old battery in the regular trash as it can be harmful to the environment. Check with your local recycling center or electronic stores for appropriate battery disposal methods.
Once the old battery has been removed, you are now ready to proceed to the next step: inserting the new battery.
Step 4: Insert the New Battery
After successfully removing the old battery from your Toyota key fob, it’s time to insert the new one. Follow these simple steps to ensure a smooth battery replacement process:
- Take the fresh replacement battery out of its packaging. Make sure it’s the correct size and type, as specified in your Toyota’s owner manual or on the old battery itself.
- Hold the battery with the positive (+) side facing up.
- Using your fingers, carefully place the positive side of the battery into the corresponding positive terminal slot inside the key fob. The positive terminal is usually marked by a “+” symbol or a small indent.
- Press down gently on the battery to secure it in place. Ensure that the battery is seated properly and making good contact with the terminals.
- Once the battery is securely inserted, take a moment to double-check that it is properly positioned and aligned with the key fob.
- Now, you can move on to the final step of the battery replacement process: closing the key fob. This will ensure the battery is protected and secure.
Remember, it’s essential to handle the battery and key fob with care during the insertion process. Avoid using excessive force or damaging the battery or the key fob components. If you encounter any difficulties or resistance when inserting the battery, double-check the orientation and try again.
With the new battery inserted, your Toyota key fob is now ready to be closed and tested.
Step 5: Close the Key Fob
After inserting the new battery, the next step is to close the key fob securely. Follow these simple steps to ensure the key fob is properly closed:
1. Align the halves: Make sure that the two halves of the key fob are properly aligned. This will ensure that all the buttons and components fit back into place correctly.
2. Press the halves together: Firmly press the two halves of the key fob together. Apply even pressure to make sure that the casing is fully closed and there are no gaps or openings.
3. Listen for a click: As you close the key fob, listen for a satisfying click. This indicates that the halves have securely locked into place.
4. Check for gaps: After closing the key fob, visually inspect it for any gaps or openings. If you notice any, it may indicate that the fob isn’t fully closed. In that case, repeat the steps above to ensure a proper closure.
5. Test the buttons: Once the key fob is closed, test all the buttons to make sure they are working properly. Press each button to check if they engage smoothly and trigger the desired function.
By following these steps, you can ensure that your key fob is securely closed and ready for use. Taking the time to properly close the key fob will help prevent any damage or accidental button presses while in your pocket or bag.
Step 6: Test the Key Fob
Once you have successfully inserted the new battery and closed the key fob, it’s time to test it to ensure that it is functioning properly. Testing the key fob is an important step as it will confirm whether the new battery has been installed correctly and if the key fob is still in good working condition.
To test the key fob, simply press the buttons on the remote control. Depending on your Toyota model, you may have a lock button, unlock button, panic button, and trunk release button. Press each button individually to verify that it sends the signal to your car.
If the buttons on the key fob are responsive and you can hear the clicking sound when you press them, it means the battery replacement was successful. You should also check if the range of the key fob is still adequate. Walk a few meters away from your vehicle and press the buttons to see if it can still communicate with your car.
If, on the other hand, you notice any issues with the key fob after replacing the battery, such as unresponsiveness or reduced range, it could indicate a problem with the key fob itself. In such cases, it is recommended to consult a professional or visit a Toyota service center to get the key fob inspected and repaired.
Testing the key fob is crucial to ensure that you can continue to use it to remotely control your Toyota vehicle. It provides peace of mind knowing that your key fob is functioning optimally and that you won’t have any trouble accessing your car or activating its security features.
After testing the key fob and confirming its functionality, you can safely say that you have successfully changed the battery in your Toyota key fob. By following the steps outlined in this guide, you have saved both time and money by avoiding a visit to a dealership or professional locksmith.
Now, you can confidently enjoy the convenience and security of your key fob, knowing that you have taken the necessary steps to maintain its reliability. Remember, it is always a good idea to periodically check the battery in your key fob and replace it as needed to avoid any unexpected issues in the future.
Conclusion
In conclusion, changing the key battery in your Toyota is a simple and essential task to ensure the smooth functioning of your vehicle’s keyless entry system. With the right tools and a few easy steps, you can replace the battery yourself and avoid the inconvenience of a dead key fob. Remember to determine the correct battery size, follow the manufacturer’s instructions, and handle the battery with care to avoid any potential risks or damage.
Regularly maintaining the key battery not only ensures that you always have easy access to your vehicle, but it also prevents any potential lockouts or security system malfunctions. By taking the time to replace your Toyota key battery when needed, you can enjoy the convenience and peace of mind that comes with a fully functioning keyless entry system.
So, the next time you notice a weak or dead battery in your Toyota key fob, don’t hesitate to change it. Refer back to this article as a guide, and you’ll have your key fob up and running again in no time. Happy driving!
FAQs
1. How often should I change the battery in my Toyota key fob?
2. What type of battery does my Toyota key fob use?
3. Can I replace the Toyota key battery myself, or do I need to go to a dealer?
4. How do I know when the battery in my Toyota key needs to be replaced?
5. Are there any precautions I should take when changing the battery in my Toyota key fob?