
Introduction: In today’s fast-paced world, our reliance on mobile devices has increased exponentially. Whether it’s our smartphones, tablets, or laptops, we rely on them to stay connected, be productive, and entertain ourselves. And at the heart of these devices is the battery – the lifeline that keeps them powered. However, have you ever wondered how to check if your battery is in good condition? Whether you’re experiencing a decrease in battery life or simply want to ensure optimal performance, knowing how to check your battery can save you from unexpected power shortages. In this article, we will explore the various methods to check your battery’s health, including built-in tools, third-party apps, and visual indicators. So, let’s dive in and discover how to assess your battery’s health and make the most out of your mobile device!
Inside This Article
- Why is it important to check a battery?
- Visual inspection of the battery
- Visual inspection of the battery
- Testing the battery voltage
- Testing the battery voltage
- Conducting a load test on the battery
- Conducting a load test on the battery
- Using a battery analyzer
- Using a battery analyzer
- Conclusion
- FAQs
Why is it important to check a battery?
Checking a battery regularly is vital for several reasons. Firstly, a battery is the heart of any electronic device and plays a crucial role in its performance. Whether it’s your smartphone, laptop, or even a portable charger, a healthy battery ensures that your device functions optimally.
Secondly, batteries have a limited lifespan and eventually degrade over time. Regularly checking the battery allows you to assess its condition and take necessary precautions to ensure its longevity. This prevents unexpected battery failures and extends the overall lifespan of your device.
Moreover, a weak or faulty battery can lead to performance issues. It may cause your device to heat up, drain power quickly, or even shut down unexpectedly. By checking the battery, you can identify any potential issues and take appropriate actions, such as replacing it or seeking professional help, to avoid such inconveniences.
Additionally, checking your battery can help you conserve energy and save money. A weak battery often consumes more power, resulting in increased energy bills. By monitoring its health and taking necessary steps, like optimizing device settings or replacing the battery, you can minimize energy wastage and reduce your expenses.
Lastly, a well-maintained battery contributes to a better user experience. Whether you’re relying on your smartphone for work, entertainment, or communication, a healthy battery ensures a consistently reliable performance without any interruptions. It allows you to stay connected, be productive, and enjoy your device to the fullest.
Visual inspection of the battery
Before performing any tests on a battery, it’s important to visually inspect it for any signs of damage or wear. Here are a few key things to look out for:
- Corrosion: Check for any corrosion on the battery terminals. Corrosion can interfere with the battery’s ability to function properly.
- Leakage: Look for any signs of fluid leakage from the battery. Leakage can be an indication of a damaged or faulty battery.
- Physical damage: Inspect the battery casing for any cracks or physical damage. Damaged batteries may need to be replaced.
- Secure connections: Ensure that the battery terminals are securely connected and free from any loose connections.
By visually inspecting the battery, you can identify any visible issues that may affect its performance. If you notice any abnormalities, it’s best to consult a professional for further assistance.
Visual inspection of the battery
When it comes to checking a battery, a visual inspection is the first step. It involves examining the physical condition of the battery to ensure that it is in good shape. This inspection can provide important clues about the battery’s overall health and potential issues.
Start by inspecting the battery terminals. Look for any signs of corrosion or build-up on the terminals. Corrosion can hinder the flow of electricity and weaken battery performance. If you notice any corrosion, it’s important to clean the terminals using a wire brush or a terminal cleaner.
Next, check the battery casing for any cracks, leaks, or swelling. A cracked casing can lead to acid leaks, compromising the battery’s performance and safety. Similarly, swelling can indicate an internal problem with the battery, which may require further investigation or replacement.
Inspect the battery cables for any signs of damage or wear. Ensure that the cables are securely connected to the terminals and there is no loose connection. Loose or damaged cables can lead to poor electrical flow and may result in battery failure.
Lastly, check the battery’s overall cleanliness. Dust, dirt, and debris accumulation can hinder proper battery operation. Clean the battery exterior using a damp cloth to remove any contaminants.
A thorough visual inspection can provide valuable insights into the condition of the battery. It is an essential first step in determining if further testing or maintenance is required.
Testing the battery voltage
Testing the voltage of a battery is a crucial step in determining its overall health and performance. By measuring the voltage, you can assess if the battery is fully charged, partially charged, or completely discharged. Here’s a step-by-step guide on how to test the battery voltage:
- Gather the necessary tools: To test the battery voltage, you’ll need a digital multimeter, also known as a voltmeter.
- Turn off the vehicle’s engine: Before proceeding, make sure the engine is turned off to ensure safety.
- Locate the battery: The battery is usually found under the hood of the vehicle. It is a rectangular or square-shaped box with two terminals marked with positive (+) and negative (-) symbols.
- Clean the battery terminals: Inspect the battery terminals for any corrosion or debris. If there is any buildup, clean it using a wire brush or battery terminal cleaner to ensure accurate readings.
- Set the multimeter: Set the multimeter to the DC voltage setting. Choose a range that can accommodate a voltage of at least 12 volts.
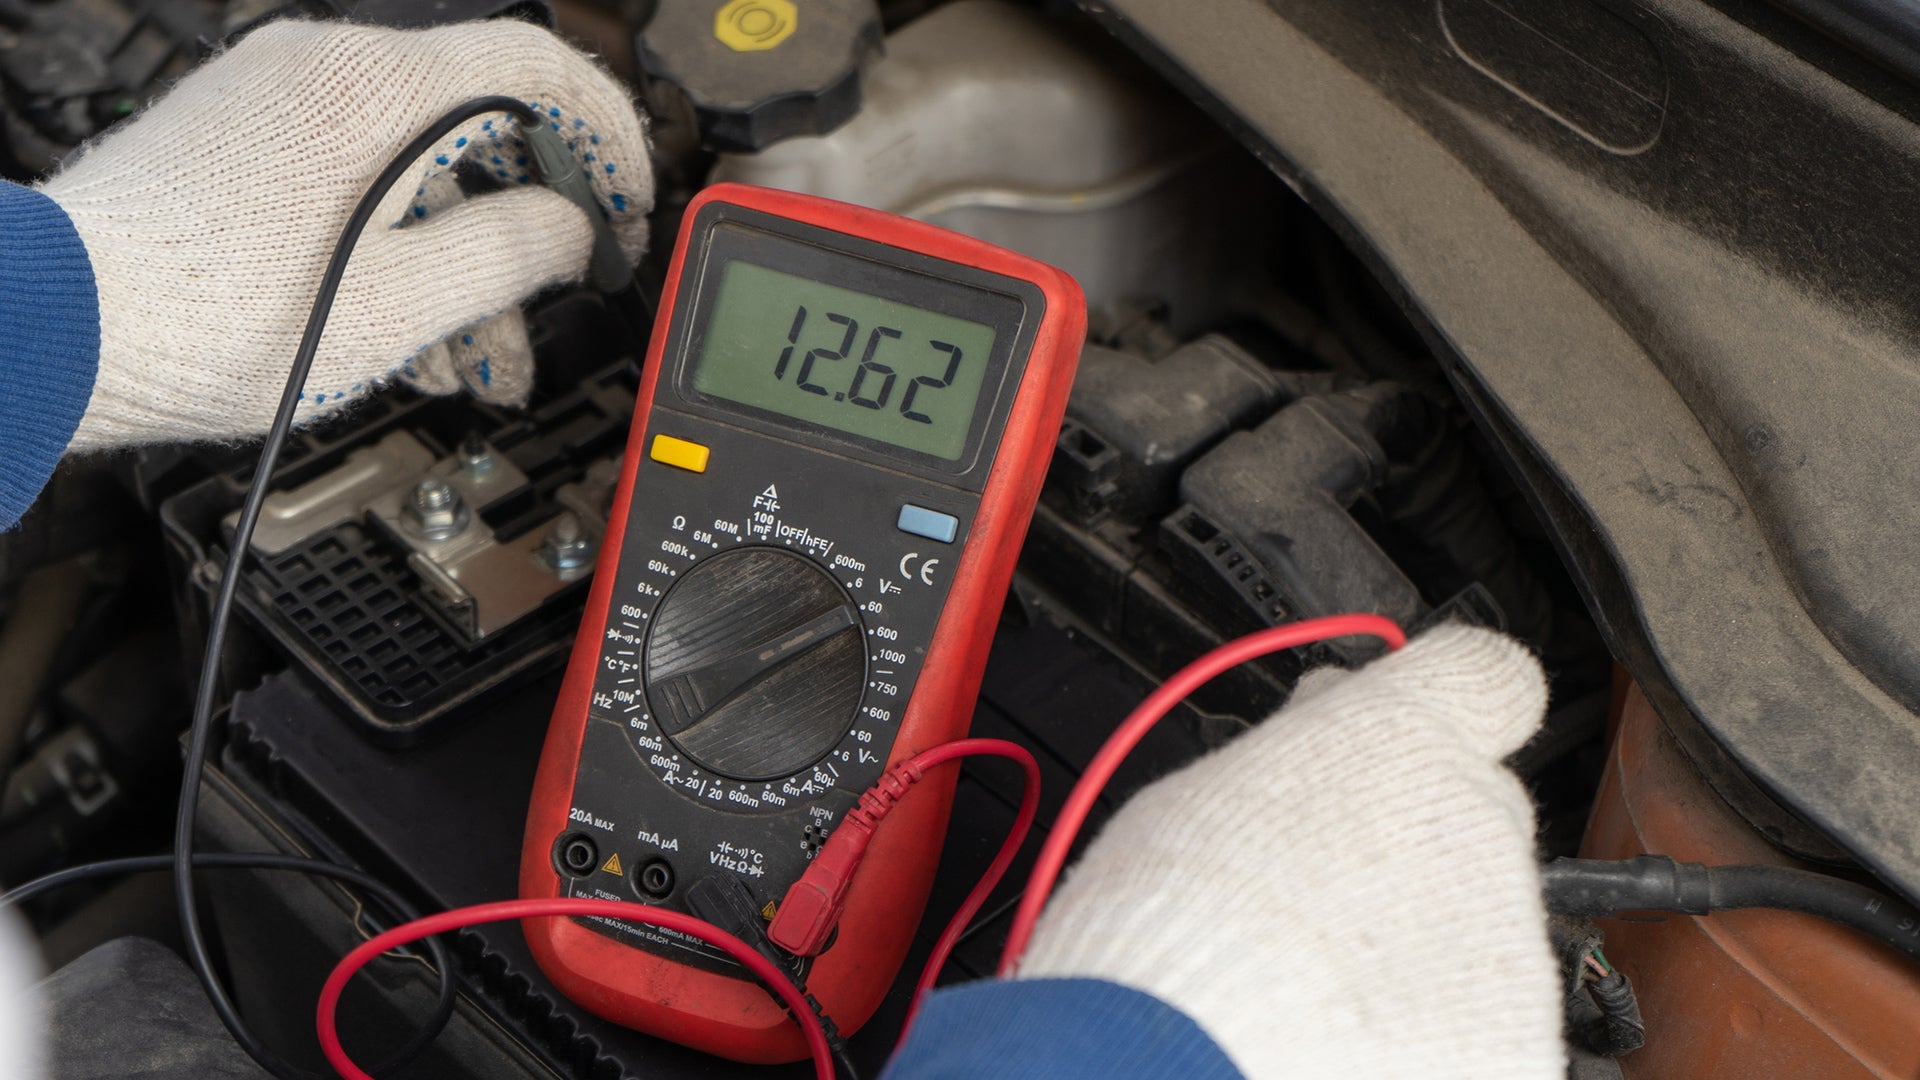
- Connect the multimeter: Attach the positive (red) probe of the multimeter to the positive terminal of the battery and the negative (black) probe to the negative terminal.
- Read the voltage: Once the connections are secure, read the voltage displayed on the multimeter. A fully charged battery typically has a voltage reading between 12.6 to 12.8 volts. Anything below 12 volts may indicate a partially charged or discharged battery.
Keep in mind that the readings can vary depending on external factors such as temperature and the age of the battery. If the voltage reading is significantly lower than the optimal range, it may be a sign that the battery needs attention or replacement.
It’s important to note that testing the battery voltage provides a general indication of its condition. For a more accurate assessment, it is recommended to perform additional tests such as a load test or using a battery analyzer (as mentioned in later sections).
Testing the battery voltage
Testing the voltage of a battery is a crucial step in determining its health and performance. By measuring the voltage, you can get an idea of the charge level and overall condition of the battery. Here are the steps to accurately test the battery voltage:
1. Begin by ensuring that the vehicle’s engine is turned off and all electrical accessories are turned off as well. This will provide a more accurate reading of the battery voltage.
2. Next, locate the battery in the vehicle. Most car batteries are situated under the hood, while some may be in the trunk or under the rear seat. Consult the vehicle’s owner’s manual if you’re unsure of the battery’s location.
3. Once you’ve located the battery, identify the positive (+) and negative (-) terminals. The positive terminal is usually labeled with a plus sign (+), while the negative terminal may have a minus sign (-) or be marked with the letters “NEG” or “GROUND”.
4. Using a voltmeter or multimeter, set the dial to the DC voltage setting with a range that includes at least 12 volts. This will allow you to accurately measure the battery’s voltage.
5. Connect the voltmeter’s red probe to the positive terminal of the battery and the black probe to the negative terminal. Ensure that the connections are secure and free from corrosion.
6. Once the voltmeter is properly connected, turn it on and observe the meter’s reading. A fully charged battery should ideally read around 12.6 to 12.8 volts.
7. If the battery voltage is below 12.4 volts, it may indicate a partially discharged or weak battery. If the voltage is significantly lower, such as 11 volts or below, it could mean that the battery is severely discharged or faulty.
8. Keep in mind that temperature can affect the battery voltage reading. Colder temperatures can lead to a slightly lower voltage reading, while warmer temperatures may result in a slightly higher reading.
9. If the battery voltage is within the ideal range, it indicates that the battery is in good condition. However, if the voltage is outside the recommended range, further testing and investigation may be required to determine the battery’s health.
By testing the battery voltage, you can gain valuable insights into its condition and take appropriate actions if necessary. Remember to always wear safety gloves and eye protection when working with batteries, and consult a professional if you’re unsure or lack experience in handling car batteries.
Conducting a load test on the battery
One of the most accurate ways to check the health and overall condition of a battery is by conducting a load test. This test measures the battery’s ability to deliver power under a simulated real-world load.
To perform a load test, you will need a battery load tester, which is specifically designed for this purpose. Here’s how you can conduct a load test on a battery:
- Start by making sure that the battery is fully charged. If it is not, charge it until it reaches the recommended voltage.
- Connect the battery load tester to the battery terminals, ensuring that you have a secure and proper connection.
- Follow the instructions provided by the manufacturer of the load tester to select the appropriate load for the test.
- Activate the load and let it run for a specific period, usually around 15 seconds.
- Observe the voltage drop during the test. A significant drop in voltage may indicate a weak or failing battery.
- If the battery passes the load test and maintains a stable voltage, it is likely in good condition. However, if the voltage drops sharply or the battery fails to deliver the required power, it may be time to replace it.
It’s important to note that a load test can put a strain on the battery and potentially damage it further if the battery is already weak. Therefore, it’s crucial to use the appropriate load tester and follow the instructions carefully to minimize any potential risks.
Conducting a load test on the battery
Conducting a load test on the battery is an important step in determining its overall health and capacity. This test measures the battery’s ability to deliver a steady amount of power over a specified period of time. It helps identify any issues with the battery’s internal components or its ability to hold a charge.
Before conducting a load test, it is essential to ensure that the battery is fully charged. Connect the load tester to the battery terminals, following the manufacturer’s instructions. Set the load tester to the appropriate testing mode, which is typically labeled as “load” or “discharge.”
The load test simulates real-world conditions by drawing a high amount of current from the battery. The load tester will monitor how well the battery can maintain its voltage during this process. A healthy battery should be able to maintain a stable voltage level without dropping significantly.
During the load test, observe the voltage readings on the load tester. If the voltage drops significantly below the manufacturer’s specified range, it indicates that the battery may be faulty or losing its capacity. In such cases, it is recommended to replace the battery to avoid unexpected power failures.
It is important to note that conducting a load test requires specialized equipment and knowledge. If you are unsure about performing this test yourself, it is best to consult a professional or take your vehicle to a qualified mechanic who can accurately assess the battery’s condition.
Additionally, it’s important to keep safety in mind while conducting a load test. Follow all safety guidelines provided by the manufacturer and wear appropriate protective gear to prevent any accidents or injuries.
Regularly conducting load tests on your battery can help you catch any potential issues early on and prevent unexpected breakdowns. It is recommended to incorporate battery load testing into your routine maintenance schedule, especially for vehicles or equipment that rely heavily on battery power.
By conducting load tests and monitoring the health of your battery, you can ensure its optimal performance and prolong its lifespan. Remember, a healthy and reliable battery is essential for uninterrupted power supply and the overall efficiency of your devices.
Using a battery analyzer
Another method to check a battery is by using a battery analyzer. This tool provides a comprehensive assessment of the battery’s health and performance.
A battery analyzer measures various parameters of the battery, including voltage, internal resistance, and capacity. It can give you an in-depth analysis of the battery’s condition and determine if it needs to be replaced.
To use a battery analyzer, follow these steps:
- Connect the analyzer to the battery according to the manufacturer’s instructions.
- Select the appropriate testing mode on the analyzer. It may offer options such as a quick test, a full discharge and recharge cycle, or a capacity test.
- Start the test and wait for the analyzer to complete its analysis. This can range from a few minutes to a couple of hours, depending on the testing mode.
- Review the results displayed on the analyzer. It will typically show information about voltage levels, internal resistance, and battery capacity.
Based on the results, you can determine if the battery is in good condition or if it needs to be replaced. A battery analyzer can provide more accurate and detailed information compared to other testing methods.
It is worth mentioning that battery analyzers are more commonly used in professional settings or by enthusiasts who require precise battery diagnostics. For regular consumers, visual inspection and basic voltage testing methods are usually sufficient. However, if you want a thorough analysis of your battery’s health, investing in a battery analyzer can be beneficial.
Using a battery analyzer
A battery analyzer is a specialized tool designed to provide a comprehensive analysis of a battery’s health and performance. It is a valuable device for accurately assessing the condition of a battery and determining if it needs to be replaced or if it can still perform optimally.
When using a battery analyzer, there are a few steps to follow:
- First, ensure that the analyzer is properly calibrated according to the manufacturer’s instructions. This will ensure accurate results.
- Connect the positive and negative leads of the battery analyzer to the corresponding terminals of the battery. Make sure the connections are secure.
- Next, select the appropriate test mode on the analyzer. Most battery analyzers offer various test options, such as a capacity test, a conductance test, or a resistance test.
- Start the test by following the prompts on the analyzer’s display. Some analyzers require the user to manually trigger the test, while others have an automated process.
- The battery analyzer will then measure and analyze various parameters, such as voltage, current, and internal resistance. These measurements will provide a detailed assessment of the battery’s condition.
- Once the test is complete, the battery analyzer will display the results, indicating whether the battery is healthy, weak, or needs replacement. Some analyzers may provide additional information, such as the battery’s expected remaining life or its capacity compared to its original specification.
- Based on the results, make an informed decision about the battery. If the battery is determined to be in good condition, it may still have a long lifespan. However, if the battery is weak or failing, it is recommended to replace it to avoid unexpected breakdowns or diminished performance.
Using a battery analyzer is a precise and reliable method of evaluating battery health. It eliminates guesswork and provides clear results that can guide you in making the right decision regarding your battery’s longevity and performance.
In conclusion, knowing how to check a battery is a valuable skill that can save you time, money, and frustration. By following the steps outlined in this article, you can ensure that your battery is in good condition and avoid unexpected breakdowns or inconveniences. Regularly checking your battery’s voltage, visual appearance, and terminal connections can help you detect any potential issues early on and take proactive measures to address them. Remember to use the necessary safety precautions when handling batteries and consult a professional if you’re unsure about any aspect of the process. With proper maintenance and care, your battery will serve you well and keep your devices powered up for maximum convenience and productivity.
FAQs
Q: How can I check the battery level on my phone?
A: To check the battery level on your phone, simply go to the settings menu and look for the “Battery” or “Power” option. Tap on it, and you will see a percentage indicating the remaining battery life. You can also see the battery icon in the status bar at the top of your phone’s screen.
Q: How often should I check my phone’s battery level?
A: It is recommended to check your phone’s battery level regularly, especially when you are expecting a long day or if you are planning to use your phone extensively. By keeping an eye on your battery level, you can ensure that you have enough power to get through the day without interruptions.
Q: Can I check the battery health on my phone?
A: Yes, many smartphones provide the option to check the battery health. You can typically find this option in the settings menu under “Battery” or “Battery Health”. By checking the battery health, you can assess the overall condition and performance of your phone’s battery.
Q: Are there any apps that can help me check my phone’s battery level?
A: Yes, there are several battery monitoring apps available on both Android and iOS platforms. These apps provide detailed information about your battery, including the percentage of remaining charge, estimated battery life, and even battery usage history. Some popular battery monitoring apps include AccuBattery, Battery Doctor, and Battery HD.
Q: What should I do if my phone’s battery is draining too quickly?
A: If you notice that your phone’s battery is draining faster than usual, there are a few steps you can take to improve battery life. First, check for any battery-draining apps or processes running in the background and close or uninstall them if necessary. You can also reduce screen brightness, disable unnecessary features like Bluetooth and GPS, and limit background data usage to conserve battery power.