
Are you frustrated with those annoying bubbles that appear on your screen protector? Don’t worry, you’re not alone. Many cell phone users struggle with these pesky bubbles, which can detract from the overall viewing experience and even affect touch sensitivity. But fret not, as we’re here to help. In this article, we’ll provide you with some useful tips and tricks on how to fix bubbles on your screen protector. Whether you’re using a tempered glass or plastic film protector, these techniques will work like magic and restore your screen to its pristine condition. So, let’s dive in and say goodbye to those unsightly bubbles once and for all!
Inside This Article
- Introduction
- Understanding the Causes of Bubbles
- Preparing the Screen and Protector
- Applying the Screen Protector Correctly
- Removing Bubbles from the Screen Protector
- Introduction
- Understanding the Causes of Bubbles
- Preparing the Screen and Protector
- Applying the Screen Protector Correctly
- Removing Bubbles from the Screen Protector
- Conclusion
- Conclusion
- FAQs
Introduction
Welcome to our comprehensive guide on how to fix bubbles on a screen protector. If you’ve ever applied a screen protector to your mobile device, you may have encountered the frustrating issue of bubbles appearing on the surface. These bubbles can be annoying and detract from the overall visual appeal of your device. But fear not! In this article, we will provide you with practical tips and techniques to help you effectively remove bubbles and achieve a flawless screen protector installation.
Screen protectors are essential accessories for safeguarding the delicate screens of our mobile devices against scratches, smudges, and other damages. However, achieving a bubble-free installation requires proper preparation and technique. Whether you have a tempered glass protector or a plastic film protector, the methods outlined in this guide can be applied to both types.
By following the steps outlined in this article, you’ll be able to achieve a smooth and bubble-free screen protector installation, ensuring optimal clarity and protection for your mobile device’s screen. Let’s dive in and explore the necessary steps to rid your screen of those pesky bubbles.
Understanding the Causes of Bubbles
When it comes to applying a screen protector on your cell phone, one of the most common frustrations is the appearance of bubbles. These unsightly air pockets can obstruct your view and diminish the overall look of your device. Understanding the causes of bubbles can help you prevent them from occurring and ensure a smooth and seamless application process.
One of the main causes of bubbles is improper cleaning of the screen before applying the protector. Even the smallest dust particles or fingerprints can create tiny air pockets when the protector is placed on the surface. To avoid this issue, it is essential to thoroughly clean and remove any debris from the screen before installation.
Additionally, another cause of bubbles is the presence of dust or debris trapped between the screen and the protector. When these particles are sandwiched between the two surfaces, they create air pockets that manifest as bubbles. It is crucial to ensure that both the screen and the protector are free from any contaminants before application.
Poor technique during the installation process can also lead to the formation of bubbles. Applying too much pressure or not applying enough can result in uneven contact between the screen and the protector, causing air to get trapped and forming bubbles. It is important to take your time and follow the proper installation instructions to achieve the best results.
In some cases, the quality of the screen protector itself can contribute to the formation of bubbles. Low-quality protectors may not adhere properly to the screen or may be more prone to trapping air. Investing in a high-quality screen protector from a reputable brand can reduce the likelihood of encountering this issue.
Lastly, environmental factors can also play a role in the formation of bubbles. Applying the screen protector in a dusty or humid environment can increase the chances of dust particles or moisture getting trapped, resulting in bubbles. It is advisable to choose a clean and controlled environment when installing the protector.
By understanding these common causes of bubbles, you can take proactive steps to prevent them from appearing on your screen protector. Properly cleaning the screen, removing dust and debris, using the correct installation technique, choosing a high-quality protector, and maintaining an optimal environment can all contribute to a bubble-free application.
Preparing the Screen and Protector
Before applying a screen protector, it’s crucial to ensure that both the screen and the protector itself are properly prepared. This will help minimize the chances of bubbles forming during the application process. Follow these steps to prepare the screen and protector:
- Clean the screen: Start by cleaning the screen of your device using a microfiber cloth or a screen cleaning solution. This will remove any dirt, dust, or fingerprints that can interfere with the adhesion of the protector.
- Eliminate residue: If there are any stubborn residue or adhesive remains from a previous protector, gently remove them using a mild adhesive remover or isopropyl alcohol. Be careful not to use excessive force or abrasive materials that can damage the screen.
- Wipe down the protector: If the screen protector came with a protective film or packaging, make sure to remove it before applying it to the screen. Use a lint-free cloth or the cleaning cloth provided to wipe down the protector and ensure it is free from dust or particles.
- Check for fit: Before proceeding, check if the screen protector is the correct size and fit for your device. Some protectors may require trimming to align perfectly with the screen. Use a pair of scissors or a precision knife, if necessary, to achieve the optimal fit.
By properly preparing both the screen and the protector, you create a clean and optimal surface for the protector to adhere to. This minimizes the risk of bubbles forming during the application process.
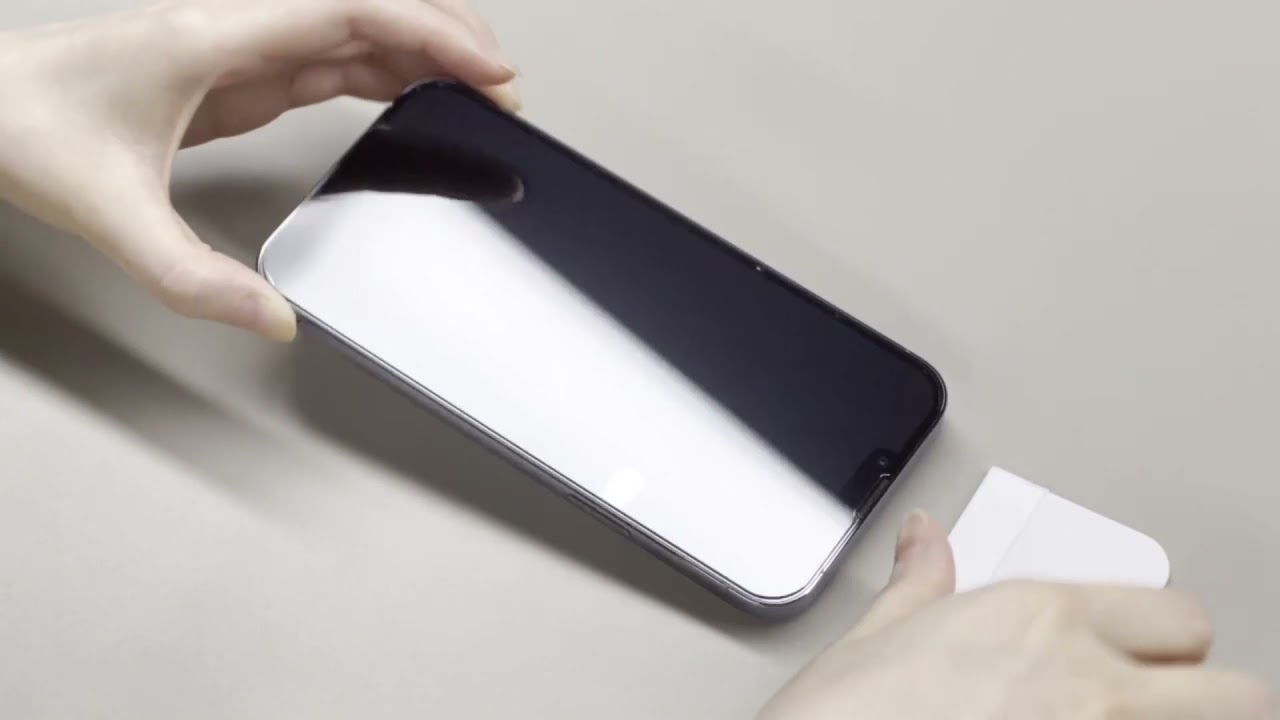
Applying the Screen Protector Correctly
Now that you have prepared your screen and removed any dust or debris, it’s time to apply the screen protector. Here are some tips to ensure a successful application:
- Peel off the backing: Carefully remove the backing from the screen protector, making sure not to touch the adhesive side with your fingers.
- Align the protector: Line up the edges of the screen protector with the edges of your device’s screen. Most screen protectors are designed to fit perfectly, so take your time to align it correctly.
- Apply the protector: Slowly lower the screen protector onto the screen, starting from one end and gradually pressing it down to the other end. Use your fingertips or a screen cleaning cloth to smooth out any bubbles or wrinkles as you go.
- Use a card or squeegee: If you’re having trouble getting rid of stubborn bubbles, you can try using a credit card or a dedicated screen protector squeegee. Gently press and push the card or squeegee across the screen to push out the air bubbles towards the edges.
- Smooth out any remaining bubbles: If there are still a few small bubbles remaining, don’t worry. Most screen protectors have a self-healing feature that allows bubbles to disappear over time. Give it a day or two, and you’ll likely find that the bubbles have disappeared on their own.
Remember, patience is key when applying a screen protector. Take your time and be gentle to avoid damaging the protector or your device’s screen. If you’re still having trouble, don’t hesitate to seek assistance from a professional or the manufacturer of the screen protector.
Removing Bubbles from the Screen Protector
Once you have successfully applied the screen protector to your device, you may notice some small bubbles trapped underneath. Don’t worry, as this is a common issue that can easily be resolved. Here are some simple steps you can follow to remove the bubbles and ensure a smooth and clear screen:
- Patience is Key: It’s important to have patience when dealing with bubbles. Avoid the temptation to immediately start pressing on the screen protector to remove them. Give it some time, as often, the bubbles will dissipate on their own within a day or two.
- Use a Microfiber Cloth: If you’re still seeing bubbles after a few days, you can gently use a clean microfiber cloth to try and push the bubbles towards the edge of the screen. Apply light pressure and use circular motions to help move the bubbles outwards.
- Apply Some Heat: Another effective method to remove bubbles is to apply gentle heat to the screen protector. You can use a hairdryer on its lowest heat setting and hold it about six inches away from the screen. Heat the surface of the protector for about 20 to 30 seconds, then gently press down on the heated area to help the bubbles escape. Be careful not to overheat the device or apply too much pressure.
- Use a Credit Card or Squeegee: If the above methods don’t work, you can try using a credit card or a dedicated screen protector squeegee. Start from the center of the screen and slowly push the bubbles towards the edges, using even pressure and sweeping motions. Be gentle to avoid scratching the screen or damaging the protector.
- Apply a Second Layer: If you are still unable to remove the bubbles, you can consider applying a second layer of the screen protector. Carefully remove the existing protector, clean the screen once again, and then reapply a new one. Sometimes, a second layer can help eliminate any remaining bubbles.
Remember, it’s important to be gentle and patient when trying to remove bubbles from the screen protector. Rushing or applying excessive force can lead to damage or even breakage of the protector or device. Take your time, follow these steps carefully, and soon you’ll have a clear and bubble-free screen.
Introduction
Screen protectors are essential accessories for mobile phones, providing an extra layer of protection against scratches, smudges, and cracks. However, one common issue that many users face is the presence of bubbles on the screen protector. These bubbles not only affect the overall appearance of the phone but can also interfere with touch sensitivity and display clarity. In this article, we will explore the causes of bubbles on screen protectors and provide step-by-step instructions on how to fix them effectively. So, let’s dive in and uncover the secrets to a bubble-free screen protector!
Understanding the Causes of Bubbles
Before we delve into the solution, it’s important to understand the main causes of bubbles on screen protectors. The most common cause is improper installation. If the screen is not adequately cleaned prior to applying the protector, dust particles, and debris can get trapped underneath, leading to bubbles. Another factor that contributes to bubble formation is excessive pressure during installation, which can create air pockets between the screen and the protector. Additionally, environmental factors such as humidity and temperature can also play a role in bubble formation.
Preparing the Screen and Protector
Proper preparation is crucial to ensure a smooth and bubble-free installation of the screen protector. Here are some steps to follow:
- Clean the screen: Use a microfiber cloth and a gentle screen cleaner to thoroughly clean the surface of the phone’s screen. Remove any dust, fingerprints, or smudges that could potentially cause bubbles.
- Choose a dust-free environment: Find a clean and dust-free area to work in. A bathroom after a hot shower or a room with low air circulation can help minimize the chances of dust particles settling on the screen.
- Prepare the screen protector: Carefully remove the protective film from the adhesive side of the screen protector. Be cautious not to touch the adhesive surface.
Applying the Screen Protector Correctly
Now that the screen and protector are clean and properly prepared, it’s time to apply the screen protector. Follow these steps for a smooth installation:
- Align the protector: Gently place the screen protector on the phone’s screen, aligning it with the edges and cutouts. Most screen protectors come with alignment guides that can assist with proper placement.
- Begin from the center: Starting from the center, apply light pressure to the screen protector and gradually smooth it out towards the edges. This will help minimize the formation of bubbles.
- Use a smoothing card: If bubbles start to appear, use a smoothing card or a credit card wrapped in a microfiber cloth to gently push out the bubbles towards the edges. Work in small, circular motions to ensure a thorough removal of the bubbles.
Removing Bubbles from the Screen Protector
If, despite your best efforts, some bubbles are still present on the screen protector, don’t worry. You can try the following techniques to remove them:
- Remove and reapply: Carefully peel off the screen protector, starting from one corner, and reapply it. Often, this simple act of reapplying can help eliminate the bubbles.
- Use a hairdryer: If the bubbles persist, use a hairdryer on the lowest heat setting. Gently warm the surface of the screen protector while applying light pressure with a smoothing card to push out the bubbles.
- Patience is key: In some cases, small bubbles may disappear on their own over time as the screen protector adheres to the screen. Allow a few days for the bubbles to settle before attempting any further removal techniques.
Conclusion
Having a screen protector on your mobile phone is an excellent way to safeguard it from scratches and other damages. However, dealing with bubbles on the screen protector can be frustrating. By understanding the causes of bubbles, properly preparing the screen and protector, applying the protector correctly, and using the right techniques to remove bubbles, you can achieve a bubble-free and crystal-clear screen protector. Follow the steps outlined in this article, be patient, and soon you’ll enjoy a flawless and well-protected screen on your mobile device!
Conclusion
In conclusion, dealing with bubbles on your screen protector can be frustrating, but it is a common issue that has simple solutions. By following the steps mentioned in this article, you can easily fix bubbles on your screen protector and restore the clarity and functionality of your device’s screen.
Remember to start with a clean and dust-free surface, take your time during the installation process, and use a credit card or soft cloth to push out any trapped air bubbles. If necessary, you can also try using a hairdryer or a heat gun to apply gentle heat to the screen protector, which can help in smoothing out any persistent bubbles.
By taking proper care of your screen protector and following these helpful tips, you can enjoy a bubble-free and visually appealing display on your mobile device. So, don’t let those pesky bubbles ruin your viewing experience, take action and fix them today!
FAQs
1. What causes bubbles on a screen protector?
There are a few factors that can cause bubbles to appear on a screen protector. Some common reasons include not properly cleaning the screen before application, trapping air between the screen and the protector, or using a low-quality or incompatible screen protector.
2. How can I prevent bubbles when applying a screen protector?
To prevent bubbles during the application of a screen protector, start by cleaning your device’s screen thoroughly. Make sure to remove any dust or fingerprints that could interfere with adhesion. Additionally, follow the manufacturer’s instructions and apply the protector slowly and carefully, smoothing out any air pockets or bubbles as you go.
3. Can bubbles on a screen protector be fixed?
Yes, bubbles on a screen protector can often be fixed. You can try gently lifting the protector and reapplying it, making sure to smooth out any bubbles as you go. Alternatively, some screen protectors come with a small squeegee or card that can be used to remove bubbles. If all else fails, you may need to remove the protector and start again with a new one.
4. Can I use heat to remove bubbles from a screen protector?
In some cases, using heat can help remove bubbles from a screen protector. You can try using a hairdryer on a low heat setting to warm up the protector, making it easier to lift and reposition. However, be cautious not to overheat your device or apply excessive heat, as this could potentially damage the screen or other components.
5. Are there any preventive measures I can take to avoid bubbles on a screen protector?
Absolutely! To avoid bubbles on a screen protector, make sure to thoroughly clean the screen before application, preferably using a microfiber cloth. Additionally, choose a high-quality screen protector that is compatible with your device. Take your time during the application process, ensuring that the protector aligns correctly and smoothing out any bubbles or air pockets as you go.