
Are you tired of wearing plain and boring lanyards for your ID badges? Spice up your work or school attire with a stylish and personalized touch! Making beaded lanyards is a creative and fun way to add some flair to your everyday accessories. Whether you’re looking to express your personality or simply want to enhance your outfit, beaded lanyards are a fantastic option. Not only are they visually appealing, but they also serve a practical purpose by securely holding your ID badge. In this article, we’ll guide you through the process of making your very own beaded lanyards. So, get ready to unleash your creativity and elevate your style with our step-by-step instructions and tips!
Inside This Article
- Materials Needed
- Step 1: Choosing Your Beads
- Step 2: Measuring and Cutting the Cord
- Step 3: Adding the Clasp
- Step 4: Stringing the Beads
- Step 5: Securing the Beads
- Step 6: Finishing touches
- Tips for Personalization
- Conclusion
- FAQs
Materials Needed
Making beaded lanyards is a fun and creative way to add a personal touch to your ID badges. Whether you want to make lanyards for yourself or as gifts, the following materials will be essential:
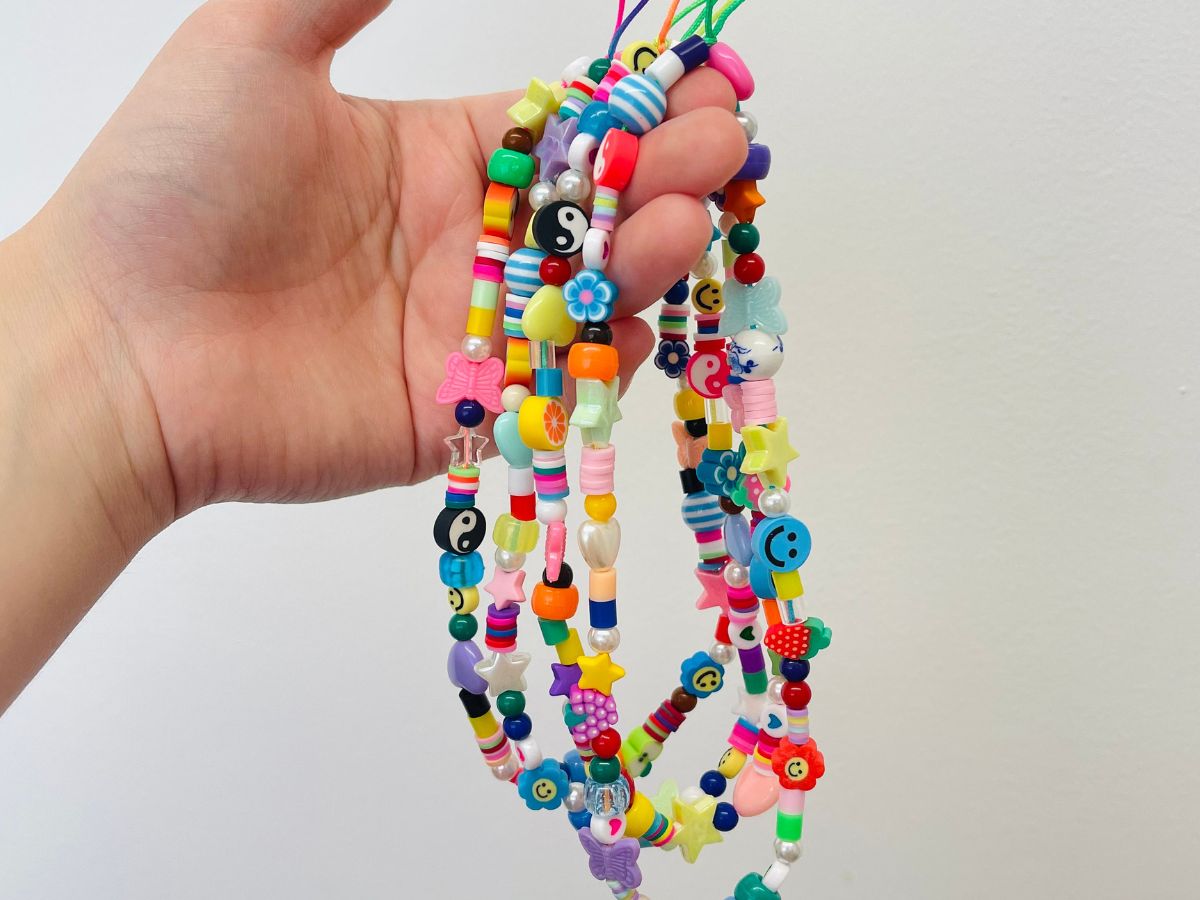
- Beads: Choose your favorite beads in different colors, shapes, and sizes. You can opt for glass beads, crystal beads, or even wooden beads to showcase your unique style.
- Cord: Select a sturdy and durable cord that can hold the weight of the beads and provide longevity to your lanyard. Nylon cord or paracord are popular choices.
- Clasp: Get a clasp that can easily attach to your ID badges or keys. Lobster claw clasps or swivel hooks work well for this purpose.
- Scissors: Have a pair of sharp scissors handy to cut the cord and trim any excess.
- Jewelry Pliers: These will come in handy for opening and closing jump rings, attaching clasps, and fixing any loose beads.
- Optional Decorative Items: If you want to add embellishments to your lanyard, consider including charms, pendants, or spacers to give it a more personalized touch.
Once you have gathered all these materials, you’ll be ready to embark on your beading journey and create your unique beaded lanyards.
Step 1: Choosing Your Beads
When it comes to making beaded lanyards, one of the most important steps is choosing the beads. The beads you select will not only determine the overall appearance of your lanyard, but also its durability and functionality. Here are some factors to consider when choosing your beads:
1. Size: Beads come in various sizes, ranging from tiny seed beads to larger decorative beads. Consider the purpose of your lanyard and the size of the ID badge or key card you will be attaching. If you want a delicate and dainty lanyard, opt for smaller beads. For a bolder and more eye-catching look, go for larger beads.
2. Material: Beads are made from a wide range of materials such as glass, plastic, wood, metal, and gemstones. Each material offers a different aesthetic and level of durability. Glass beads give a polished and professional look, while wooden beads create a natural and rustic feel. Keep in mind that some workplaces may have specific requirements regarding the use of materials.
3. Color and Pattern: Beads are available in a plethora of colors and patterns. Consider your personal style and the purpose of the lanyard when selecting the colors and patterns. If you want a lanyard that matches your corporate colors or outfit, choose beads that complement the desired color scheme.
4. Shape and Texture: Beads come in various shapes, including round, cylindrical, faceted, and irregular. The shape and texture of the beads can add dimension and visual interest to your lanyard. Experiment with different shapes and textures to create a unique and personalized design that stands out.
5. Weight: Take into account the weight of the beads when choosing them for your lanyard. Heavy beads can cause the lanyard to sag or strain the clasp. Opt for lightweight beads if you want a comfortable and wearable lanyard.
Remember to consider your personal preferences, the purpose of the lanyard, and any specific requirements or guidelines that may be applicable. By carefully selecting the right beads, you’ll be one step closer to creating a beautiful and functional beaded lanyard.
Step 2: Measuring and Cutting the Cord
After choosing the beads for your lanyard, the next step is to measure and cut the cord. The cord will serve as the base for threading the beads and attaching the clasp. It’s essential to measure the cord accurately to ensure the lanyard fits comfortably around your neck and holds your ID badge securely.
Here’s how you can measure and cut the cord for your beaded lanyard:
- Measure the desired length: Determine how long you want your lanyard to be. Consider the level at which you want the ID badge to hang comfortably. It’s typically recommended to go for a length of around 30 inches (76 cm) for a standard lanyard. Add a few extra inches if you prefer a longer lanyard or want more room for customization.
- Secure the cord: Once you have determined the desired length, secure one end of the cord by tying a knot or using a clip. This will prevent the beads from sliding off while you measure and cut.
- Measure and mark: Starting from the secured end, use a ruler or measuring tape to measure and mark the determined length on the cord. Make sure to measure accurately to achieve a professional-looking lanyard.
- Use sharp scissors: Using sharp scissors, carefully cut the cord at the marked spot. Make sure to apply enough pressure to ensure a clean cut. Dull scissors may result in frayed ends, which can make it difficult to thread the beads.
Remember, while cutting the cord, it’s always better to start with a longer length. You can always trim it later if needed. It’s easier to cut more off than to add length back to the lanyard.
Once you have measured and cut the cord, you are ready to proceed to the next step of adding the clasp. Remember to handle the cord with care as it can be slippery, especially if it’s made of satin or nylon material.
Step 3: Adding the Clasp
Now that you have chosen your beads and measured and cut the cord, it’s time to move on to the next step: adding the clasp. The clasp is essential as it allows you to easily attach and detach the lanyard from your ID badge or any other item you wish to carry.
To add the clasp, you will need a lobster clasp, jump rings, and jewelry pliers. These can be easily found at your local craft store or online.
Start by opening one of the jump rings using the pliers. Gently grasp the jump ring on either side of the opening and twist it apart. Be careful not to pull the ring out of shape.
Next, take one end of the cord and thread it through the jump ring. Make sure to leave a small loop at the end of the cord to prevent the beads from sliding off when you wear the lanyard.
Once the cord is threaded through the jump ring, fold the cord in half to create a loop. Bring the loose ends of the cord through the loop, forming a simple overhand knot. This will create a secure attachment point for the jump ring.
Now, it’s time to close the jump ring. Use the pliers to twist the jump ring back into its original shape, ensuring the ends are securely closed. This will prevent the clasp from accidentally coming off.
Repeat the same process with the other end of the cord and the second jump ring. Once both jump rings are securely attached, you can connect the lobster clasp to one of the jump rings. Simply open the clasp using the pliers, hook it onto the jump ring, and then close it tightly.
And there you have it! The clasp is now attached to your beaded lanyard. You can easily attach your ID badge or other items to the lobster clasp, ensuring that they are held securely.
Remember, adding the clasp is an important step in creating your beaded lanyard. Take your time and follow the instructions carefully to ensure a durable and functional finished product.
Step 4: Stringing the Beads
Now that you have your chosen beads and your cord ready, it’s time to start stringing the beads onto your lanyard. This step is where you can get creative and make unique patterns or combinations with your beads.
To begin, take one end of your cord and thread it through the hole of a bead. You can start with any bead you like, but if you have a specific pattern in mind, you may want to begin with the central bead.
Once you have threaded the first bead onto the cord, pull it all the way down until it reaches the end where you tied the clasp. At this point, you should have a bead sitting right at the end of the cord.
Next, choose the next bead you want to add to your lanyard and thread it onto the cord. Again, pull it all the way down until it rests against the previous bead. Make sure the beads are snug against each other to avoid any gaps in your lanyard.
Continue this process of threading and pulling each bead until you have added all the beads you want for your lanyard. Take your time to ensure that each bead is securely in place.
If you are creating a pattern, make sure to follow your desired sequence as you string the beads. This will help create a visually appealing design for your lanyard.
Once you have finished stringing all the beads, hold your lanyard up and give it a gentle shake to make sure the beads are secure and won’t slide off. Adjust any beads if needed.
With your beads now strung onto the cord, you are one step closer to completing your DIY beaded lanyard. The next step will involve securing the beads in place to prevent them from moving around.
Step 5: Securing the Beads
After you have carefully strung your chosen beads onto the cord, it’s time to make sure they stay in place. This step is crucial to ensure the longevity and functionality of your beaded lanyard. Here’s how you can securely fasten the beads:
1. Knotting: Begin by creating a tight knot right after the last bead. This will prevent the beads from slipping off the cord and provide a secure base for the lanyard.
2. Adding a Bead Stopper: To further secure the beads, you can add a bead stopper. This small accessory serves as a barrier, preventing the beads from sliding off the cord. Simply slide the bead stopper onto the cord after the knot.
3. Creating a Sturdy Loop: To create a loop at the end of the lanyard, fold the cord back around and thread it through the bead stopper. Ensure that the loop is large enough to accommodate an attachment clip or badge holder.
4. Reinforcing with Knots: To reinforce the loop and ensure its durability, tie a tight knot at the end of the loop where the cord is threaded through the bead stopper.
5. Checking the Security: Give your beaded lanyard a gentle tug to check if the beads and knots are securely in place. If you notice any loose beads or knots, adjust and tighten them as necessary.
By following these steps, you can ensure that your beaded lanyard is secure and ready to hold your ID badge or other small items.
Step 6: Finishing touches
Now that you have successfully strung the beads and secured them in place, it’s time to add the finishing touches to your beaded lanyard for ID badges. These final steps will give your lanyard a polished and professional look.
First, take a few moments to inspect your work and ensure that the beads are all in the desired position. Adjust any beads if necessary to create a balanced and visually appealing design.
Next, carefully trim any excess cord that may be sticking out at the ends. Use sharp scissors to make clean cuts, ensuring that the cord is neatly trimmed without any frayed edges or loose strands.
If you want to add a touch of elegance to your lanyard, consider adding some decorative elements. You can incorporate small charms or pendants that reflect your personality or interests. Attach them to the lanyard using jump rings or split rings.
Additionally, you can also add small spacer beads or seed beads between each of the larger beads to create a more intricate and detailed pattern. This will enhance the overall aesthetic appeal of your lanyard.
Once you are happy with the placement of beads and any additional embellishments, it’s time to secure everything in place. Apply a small amount of jewelry glue or clear nail polish to the knots at both ends of the lanyard. This will prevent the knots from unraveling and add extra durability.
Allow the glue or nail polish to dry completely before handling or wearing your beaded lanyard. This will ensure that the knots and beads remain securely in place.
Lastly, take a moment to admire your handiwork. Your beaded lanyard is now complete, ready to hold your ID badge in style and showcase your creativity.
Remember, you can always experiment with different bead combinations, colors, and designs to create lanyards for different occasions or to match your outfits. The possibilities are endless!
Tips for Personalization
When making beaded lanyards for ID badges, personalization is a great way to add a unique touch to your creation. Whether you’re making lanyards for yourself or as gifts, here are some tips to help you personalize them:
-
Choose meaningful beads: Consider selecting beads that hold significance to you or the person who will be wearing the lanyard. This could be birthstone beads, beads in favorite colors, or beads with symbolic shapes or charms.
-
Use alphabet beads: Spell out a name or a meaningful word using alphabet beads. This adds a personalized touch and makes the lanyard more special.
-
Add unique charms: Incorporate charms that reflect the wearer’s hobbies, interests, or profession. For example, if the person loves music, add a tiny music note charm. If they are a nurse, include a stethoscope charm. These small details can make a big impact.
-
Experiment with different bead sizes and shapes: Mixing various bead sizes and shapes can create an interesting and visually appealing lanyard. Try using larger focal beads combined with smaller accent beads to add depth and texture.
-
Consider color combinations: Choose colors that coordinate with the person’s favorite hues, or pick colors that represent a particular theme. For example, if you’re making a lanyard for a sports fan, incorporate the team’s colors.
-
Add initials or a monogram: Use alphabet beads or metal letter charms to add the wearer’s initials or create a monogram. This personal touch can make the lanyard feel more customized.
-
Include meaningful symbols: Look for beads with symbolic patterns, such as hearts, stars, or infinity symbols. These symbols can hold personal meaning and add sentimental value to the lanyard.
-
Experiment with different cord materials: Instead of using a standard nylon cord, consider using different materials such as leather, suede, or even elastic cord. This can give the lanyard a different look and feel, adding to its personalization.
-
Add personalized tags or labels: Attach a small tag or label to the lanyard with the person’s name or a special message. This can further personalize the lanyard and make it truly unique.
Remember, personalization is all about making the lanyard meaningful and special. Get creative and have fun with the process as you make something that’s truly one-of-a-kind!
Conclusion
Creating beaded lanyards for ID badges is not only a practical solution for keeping your identification secure but also a creative way to showcase your personal style. With the right materials and a bit of patience and practice, you can craft unique lanyards that add a touch of flair to your professional attire.
Whether you choose to use beads, charms, or a combination of both, the possibilities for design are endless. Experiment with different color combinations, patterns, and bead sizes to create lanyards that reflect your personality or match your organization’s branding.
Not only are beaded lanyards a fashionable accessory, but they also provide a functional solution for keeping your ID badge visible and easily accessible. The durability of beaded lanyards ensures that they will withstand daily wear and tear, making them a long-lasting investment.
So, grab your beads, get creative, and start making your own beaded lanyards to add a touch of style and professionalism to your everyday work attire!
FAQs
1. What are beaded lanyards used for?
Beaded lanyards are commonly used for holding and displaying ID badges, such as employee badges, student ID cards, or conference passes. They provide a convenient and stylish way to carry identification while keeping it easily accessible.
2. Can I make beaded lanyards with any type of beads?
Yes, you can use a wide variety of beads to make beaded lanyards. Popular choices include glass beads, plastic beads, seed beads, and crystal beads. You can mix and match different colors, sizes, and shapes to create unique and personalized designs.
3. How do I start making a beaded lanyard?
To start making a beaded lanyard, you will need a length of beading wire or cord, beads of your choice, a clasp or attachment for the badge, and jewelry-making tools such as pliers and wire cutters. Begin by threading the beads onto the wire in your desired pattern, leaving enough space at the ends to attach the clasp. Secure the ends with crimp beads and attach the clasp to one end.
4. Do I need any special skills or tools to make beaded lanyards?
No, you do not need any special skills or tools to make beaded lanyards. Basic jewelry-making techniques can be easily learned and applied. The necessary tools, such as pliers and wire cutters, are readily available at craft stores or online.
5. Can I customize my beaded lanyard design?
Absolutely! Beaded lanyards offer endless opportunities for customization. You can choose beads in your favorite colors or match them to your organization’s branding. Additionally, you can incorporate charms, pendants, or letter beads to add a personal touch to your lanyard. Let your creativity shine and make a beaded lanyard that reflects your unique style.