
Are you tired of searching for a stable internet connection while on the go? Don’t fret! With the advent of technology, you can easily turn your laptop into a hotspot on Windows 10, transforming it into a portable Wi-Fi hub. Whether you’re traveling, attending a meeting, or simply finding yourself in an area with limited connectivity options, creating a hotspot on your laptop can be a lifesaver. In this article, we will guide you through the process of making your laptop a hotspot on Windows 10. By following our step-by-step instructions, you’ll be able to share your internet connection with other devices effortlessly. So, get ready to stay connected wherever you are with this nifty feature!
Inside This Article
- How To Make Your Laptop A Hotspot On Windows 10
- II. Prerequisites
- III. Method 1: Using the Windows 10 Settings
- IV. Method 2: Using the Command Prompt
- V. Method 3: Using a Third-Party Software
- VI. Troubleshooting
- Conclusion
- FAQs
How To Make Your Laptop A Hotspot On Windows 10
Are you tired of weak Wi-Fi signals or limited connectivity on your laptop? One solution is to turn your laptop into a hotspot. By doing so, you can share your laptop’s Internet connection with other devices, such as smartphones, tablets, or other laptops. In this article, we will guide you through the steps to make your laptop a hotspot on Windows 10.
Before you start, make sure you meet the following prerequisites:
- Your laptop should be running on Windows 10.
- Your laptop should have an active Internet connection.
- You need administrator access to your laptop.
Now, let’s look at three different methods to make your laptop a hotspot:
Method 1: Using the Windows 10 Settings
- Open the “Settings” on your laptop by pressing the “Windows key + I” or by clicking on the “Start” button and selecting “Settings”.
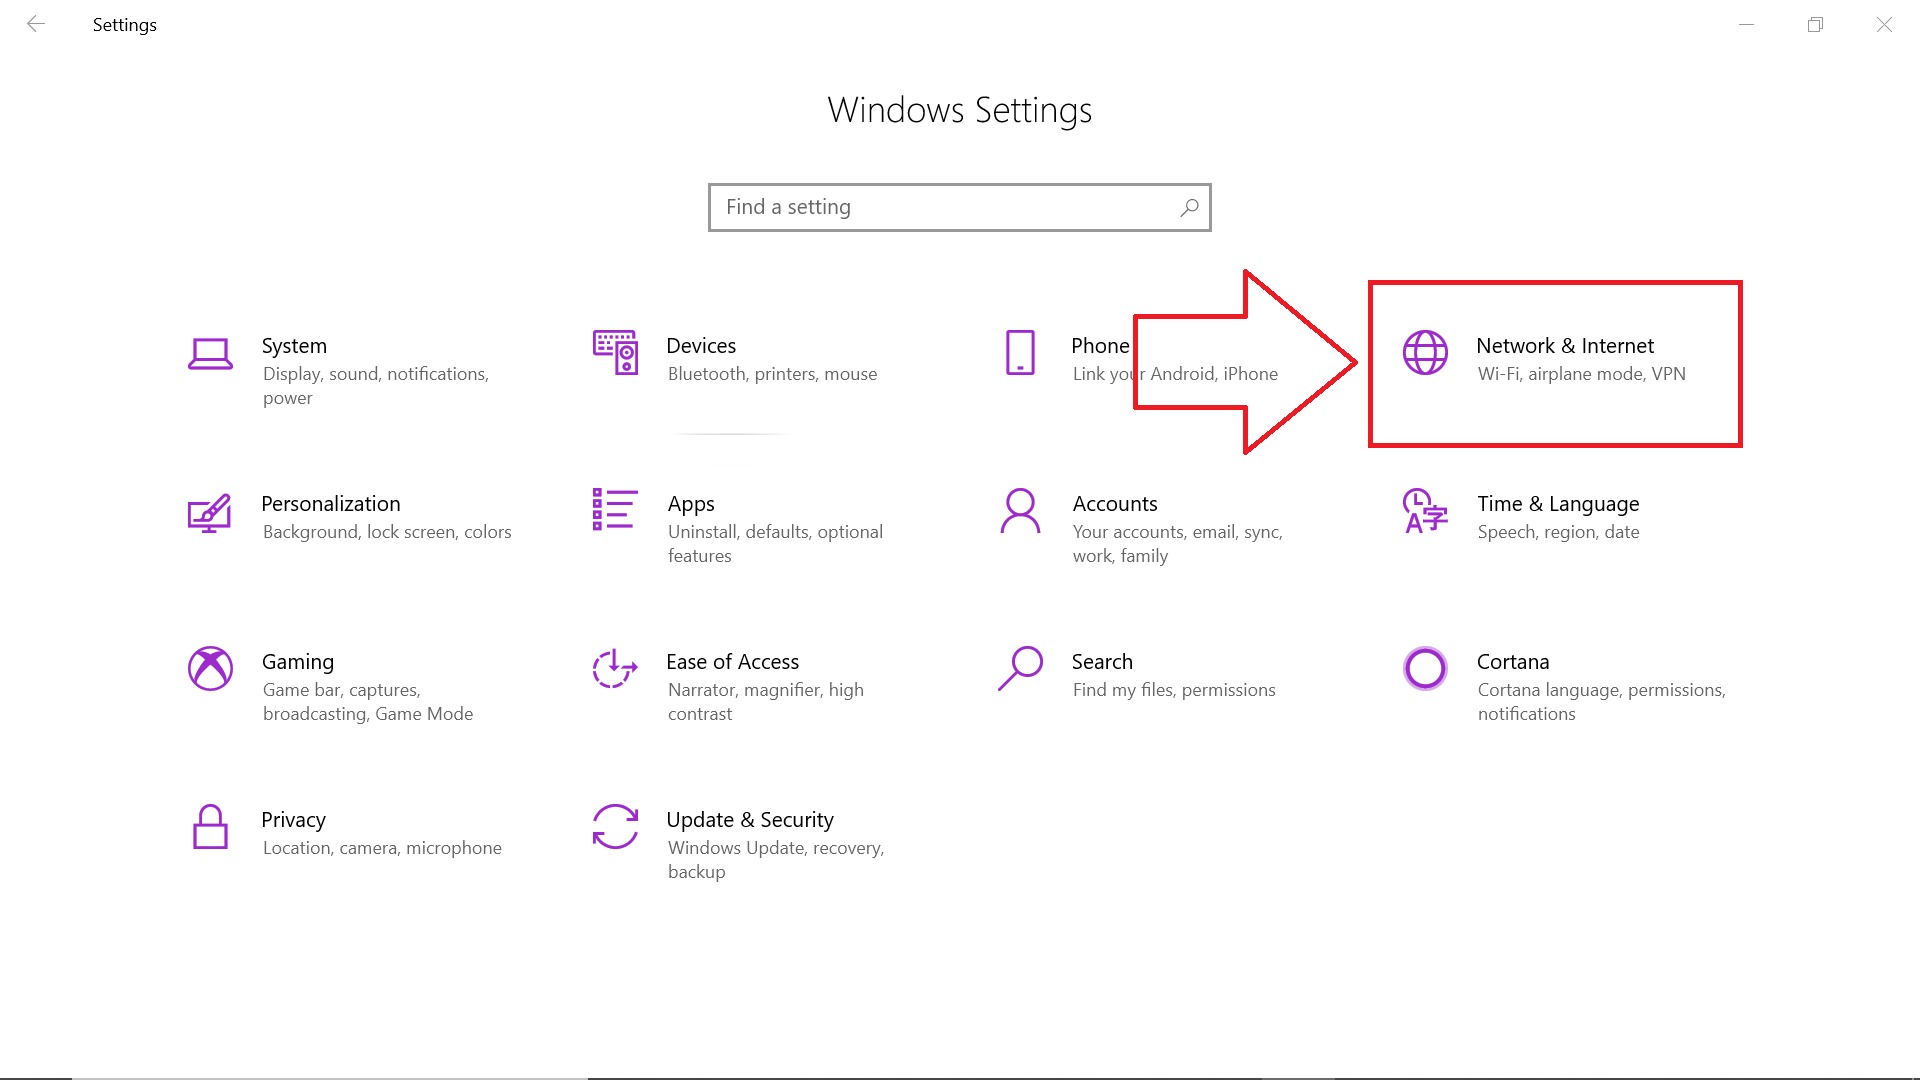
- In the Settings menu, click on “Network & Internet”.
- In the left sidebar, click on “Mobile hotspot”.
- Toggle the “Share my Internet connection with other devices” option to “On”.
- Customize the network name and password if desired.
Method 2: Using the Command Prompt
- Open the Command Prompt as an administrator.
- Type the command “netsh wlan set hostednetwork mode=allow ssid=YourNetworkName key=YourNetworkPassword” and press Enter.
- To start the hotspot, type the command “netsh wlan start hostednetwork” and press Enter.
Method 3: Using a Third-Party Software
- If you prefer a user-friendly interface, you can use third-party software like Connectify Hotspot or MyPublicWiFi to turn your laptop into a hotspot.
- Download and install the software of your choice.
- Follow the on-screen instructions to set up and configure the hotspot.
Finally, let’s address some common troubleshooting tips:
Troubleshooting
- If your hotspot is not visible to other devices, make sure your laptop’s Wi-Fi adapter supports the hotspot feature.
- If you encounter connectivity issues, try restarting your laptop or the connected devices.
- Ensure that your laptop’s Wi-Fi is turned on.
- Double-check that you have entered the correct network name and password.
II. Prerequisites
Before you proceed with turning your laptop into a hotspot on Windows 10, there are a few prerequisites that you need to have in place:
- Windows 10 Operating System: Make sure that your laptop is running on Windows 10. This method may not be applicable for older versions of Windows.
- Active Wi-Fi Connection: You will need to have an active Wi-Fi connection on your laptop to be able to share it with other devices.
- Administrative Privileges: To make changes to your laptop’s settings and create a hotspot, you will need to have administrative privileges on your Windows 10 account.
- Compatible Wireless Adapter: Ensure that your laptop has a compatible wireless network adapter that supports the creation of a hotspot. Most modern laptops come equipped with this feature, but it’s always better to check to avoid any compatibility issues.
Once you have checked off these prerequisites, you are ready to proceed with turning your laptop into a hotspot and share your internet connection with other devices.
III. Method 1: Using the Windows 10 Settings
If you want to turn your Windows 10 laptop into a hotspot, you can easily do so using the built-in settings. This method is ideal for users who prefer a straightforward and hassle-free approach without the need for additional software.
To begin, make sure that your laptop is connected to the internet through either Wi-Fi or an Ethernet connection. Once you have established a stable internet connection, follow these steps:
- Open the Start menu by clicking on the Windows icon in the bottom-left corner of your screen.
- Click on the “Settings” icon, which resembles a gear.
- In the Windows Settings menu, click on “Network & Internet.”
- In the left sidebar, select the “Mobile hotspot” option.
- In the main section of the Mobile hotspot menu, toggle the switch to “On.”
- Under the “Share my Internet connection from” dropdown menu, choose either “Wi-Fi” or “Ethernet” depending on your internet source.
- Click on the “Edit” button to change the network name and password if desired. This step is optional but recommended for security purposes.
- Once you have made any necessary changes, click on “Save” to apply the settings.
Now that you have successfully enabled the mobile hotspot feature on your Windows 10 laptop, other devices can connect to it by searching for available Wi-Fi networks and selecting the one you just created. They will need to enter the password you set during the setup process.
Remember that using your laptop as a mobile hotspot may drain the battery faster, especially if you have multiple devices connected at once. Additionally, make sure you have an adequate internet plan that allows for sharing your connection.
This method is the most straightforward way to turn your Windows 10 laptop into a hotspot without the need for third-party software. However, if you encounter any issues or want more control over the settings, you can explore alternative methods, which will be covered in the next sections.
IV. Method 2: Using the Command Prompt
If you are a tech-savvy individual and prefer using the command prompt to perform tasks on your Windows 10 laptop, then this method is for you. While it may seem a bit more complex than using the settings, it offers more flexibility and control over your hotspot settings.
Here is a step-by-step guide on how to turn your laptop into a hotspot using the command prompt:
- Open the Command Prompt: Press the Windows key + X on your keyboard and select “Command Prompt” from the menu. Alternatively, you can search for “Command Prompt” in the search bar and open it from the results.
- Run the Command Prompt as an administrator: Right-click on the Command Prompt icon and select “Run as administrator” from the drop-down menu. This will ensure that you have the necessary permissions to execute the commands.
- Type the command: Once the Command Prompt window opens, type the following command and press Enter:
netsh wlan set hostednetwork mode=allow ssid=YourNetworkName key=YourNetworkPassword - Configure the hotspot: In the same Command Prompt window, enter the command
netsh wlan start hostednetworkand press Enter. This will start the hotspot using the settings you specified. - Enable internet sharing: To share your internet connection with other devices, press the Windows key + X and select “Network Connections” from the menu. Right-click on your active internet connection and choose “Properties.”
- In the Properties window, go to the “Sharing” tab and check the box that says “Allow other network users to connect through this computer’s internet connection.”
- Connect to the hotspot: Finally, on your other devices, search for available Wi-Fi networks and select the hotspot you just created. Enter the password you set in the command prompt and connect to the network.
Using the command prompt offers a more hands-on approach to creating a hotspot on your Windows 10 laptop. It gives you greater control over the network name and password settings. However, keep in mind that you will need to repeat the configuration every time you restart your laptop.
Remember to turn off the hotspot when you’re finished using it to save battery power and prevent unauthorized connections to your network.
V. Method 3: Using a Third-Party Software
If the previous methods don’t suit your needs or if you prefer a more user-friendly approach, you can utilize third-party software to turn your laptop into a hotspot. There are several reliable applications available that can simplify the process and provide additional features.
Some popular third-party software options for creating hotspots on Windows 10 include Connectify Hotspot, Virtual Router, and MyPublicWiFi. These applications have intuitive interfaces and offer seamless hotspot creation with just a few clicks.
One of the advantages of using third-party software is the ability to customize your hotspot settings. You can assign a unique network name (SSID) and password, manage connected devices, and even control bandwidth usage. This can be particularly useful if you want to limit the number of devices connected or prioritize certain applications or users.
Before downloading and installing any third-party software, it’s essential to ensure that it’s from a reputable source. Always verify the software’s authenticity to avoid downloading malware or compromising your system’s security.
Once you have chosen a suitable third-party software, follow these general steps to create a hotspot:
- Download and install the chosen software from a trusted source.
- Launch the software and look for the option to create a hotspot.
- Configure your hotspot settings, such as the network name (SSID) and password.
- Toggle the hotspot on or activate it using a designated button.
- Connect your other devices to the newly created hotspot using the provided network name and password.
Remember to refer to the software’s specific instructions or documentation for a more detailed step-by-step guide on creating and managing your hotspot.
Using third-party software can offer a straightforward and flexible solution for turning your laptop into a hotspot, allowing you to share your internet connection with multiple devices effortlessly.
VI. Troubleshooting
Despite the best of intentions, things may not always go as planned when setting up your laptop as a hotspot on Windows 10. Don’t worry, though – we’re here to help! Here are some common troubleshooting tips to get you back on track:
1. Check your network settings: Ensure that your laptop’s Wi-Fi is turned on and that you’re connected to the internet. Sometimes, a simple network restart can fix any connectivity issues.
2. Verify hotspot compatibility: Not all laptops support the hotspot feature, so double-check if your laptop is capable of creating a hotspot. Consult the manufacturer’s documentation or support resources for more information.
3. Update your drivers: Outdated network drivers can cause hotspot-related problems. Visit your laptop manufacturer’s website or use Windows Update to download and install the latest drivers for your network adapter.
4. Disable VPN or firewall: Virtual Private Networks (VPNs) and firewalls can sometimes interfere with hotspot functionality. Temporarily disable them to see if it resolves the issue. Remember to re-enable them once you’re done using the hotspot.
5. Restart your laptop: A good old-fashioned reboot can often fix glitches and restore functionality. Restart your laptop and try creating the hotspot again.
6. Reset network settings: If you’re still facing issues, you can try resetting your network settings. Go to the “Network & Internet” settings in Windows 10 and choose the “Network reset” option. Keep in mind that this will remove any saved network connections and may require you to set them up again.
7. Seek professional help: If none of the above troubleshooting steps work, it may be time to reach out to a technical expert or your laptop manufacturer’s customer support for further assistance. They can provide more specific guidance based on your laptop model and any additional software installed.
Remember, troubleshooting can be a process of trial and error. Be patient, follow these steps, and explore additional resources or community forums for more specific troubleshooting tips if needed. With a little perseverance, you’ll soon have your laptop hotspot up and running smoothly.
Conclusion
Creating a hotspot on your Windows 10 laptop is a convenient way to share your internet connection with other devices. By following the straightforward steps outlined in this article, you can turn your laptop into a hotspot in just a few clicks.
Remember to keep your hotspot secure by choosing a strong password and limiting the number of devices connected at one time. Additionally, be mindful of your data usage and adjust your settings accordingly.
Whether you’re on the go, working remotely, or simply need to share your internet connection with others, knowing how to make your laptop a hotspot on Windows 10 is a valuable skill. By utilizing this feature, you can stay connected and productive wherever you are.
So go ahead and give it a try! Turn your laptop into a hotspot and enjoy the convenience and flexibility it brings.
FAQs
1. Can I turn my laptop into a hotspot on Windows 10?
Yes, you can turn your laptop into a hotspot on Windows 10. Windows 10 has a built-in feature that allows you to create a Wi-Fi hotspot using your laptop’s internet connection.
2. How do I make my laptop a hotspot on Windows 10?
To make your laptop a hotspot on Windows 10, you can follow these steps:
– Go to Settings by clicking on the Start menu and selecting the gear icon.
– In the Settings window, click on “Network & Internet”.
– In the Network & Internet menu, click on “Mobile hotspot” in the left sidebar.
– Toggle the “Share my Internet connection” switch to turn on the hotspot.
– Customize the hotspot name and password if needed.
– Connect your other devices to the hotspot using the provided credentials.
3. Can I share my laptop’s internet connection with multiple devices?
Yes, you can share your laptop’s internet connection with multiple devices through the hotspot feature in Windows 10. Once you set up the hotspot, other devices can connect to it using the provided credentials.
4. What are the advantages of using my laptop as a hotspot?
Using your laptop as a hotspot offers several advantages:
– Flexibility: You can create a hotspot wherever you have your laptop, providing internet connectivity on the go.
– Cost-effectiveness: By using your existing laptop’s internet connection, you avoid the need for separate data plans or Wi-Fi routers.
– Security: You have control over the hotspot’s name and password, ensuring that only authorized users can connect.
– Convenience: You can easily connect your other devices, such as smartphones or tablets, to the hotspot without the need for additional setup.
5. Are there any limitations to using my laptop as a hotspot?
While using your laptop as a hotspot is convenient, there are a few limitations to keep in mind:
– Range: The range of a laptop hotspot is typically limited, so the connected devices need to be within close proximity to maintain a stable connection.
– Performance: Sharing your laptop’s internet connection may impact its performance, especially if you have multiple devices connected or are using bandwidth-intensive applications.
– Battery Life: Running a hotspot on your laptop can drain battery life faster, so it’s advisable to have your laptop plugged in while using the hotspot feature.