
Apple Watch has revolutionized the way we use technology on our wrists. However, like any electronic device, the battery life of the Apple Watch will eventually diminish over time. When you notice that your Apple Watch’s battery is not holding a charge like it used to, it may be time to consider replacing the battery. In this article, we will guide you through the process of replacing the battery in your Apple Watch, ensuring that you can continue enjoying the full functionality of your device without any interruptions. Whether you have the Apple Watch Series 1, 2, 3, 4, 5, 6, or SE, we will provide you with clear instructions and valuable tips to make the battery replacement process a breeze. So, grab your tools and let’s dive into the world of Apple Watch battery replacements!
Inside This Article
- Step 1: Gather the necessary tools
- Step 2: Power off the Apple Watch
- Step 3: Remove the Apple Watch band
- Step 4: Open the Apple Watch casing
- Step 5: Replace the old battery
- Step 6: Close the Apple Watch casing
- Step 7: Reattach the Apple Watch band
- Step 8: Power on the Apple Watch
- Conclusion
- FAQs
Step 1: Gather the necessary tools
Before you begin the process of replacing the battery on your Apple Watch, it is essential to gather all the necessary tools. Having the right tools at hand will ensure a smoother and hassle-free battery replacement process. Here are the tools you will need:
- Small screwdriver set: You will need a set of precision screwdrivers to remove the screws holding the Apple Watch casing.
- Non-metallic prying tool: A non-metallic prying tool or a plastic spudger will help you safely open the Apple Watch casing without damaging the delicate components inside.
- Replacement battery: Make sure to purchase a compatible replacement battery for your specific Apple Watch model.
- Tweezers: Tweezers will come in handy when handling small screws or delicate components inside the Apple Watch.
- Cleaning cloth: A soft, lint-free cleaning cloth will help you keep the Apple Watch and its components clean during the battery replacement process.
- Adhesive strips or adhesive remover: Depending on the Apple Watch model, you may need adhesive strips or adhesive remover to secure the battery in place.
By gathering these tools before you begin, you will have everything you need to successfully replace the battery on your Apple Watch. This will eliminate the frustration of having to stop midway due to a missing tool, allowing you to complete the process smoothly and efficiently.
Step 2: Power off the Apple Watch
Before you begin the process of replacing the battery in your Apple Watch, it is crucial to power off the device properly. This will prevent any potential issues or damage during the battery replacement process.
To power off your Apple Watch, simply follow these steps:
- Press and hold the side button on your Apple Watch.
- A power-off slider will appear on the screen.
- Swipe the power-off slider to the right to shut down your Apple Watch.
Wait for a few moments, and your Apple Watch will power off completely. This step ensures that your device is safely turned off before you proceed with the battery replacement.
Remember to handle your Apple Watch with care and avoid pressing any buttons or interacting with the screen while performing the battery replacement. This will minimize the risk of accidental damage or errors.
Powering off your Apple Watch is a necessary precautionary measure to ensure a smooth and successful battery replacement process. So, take the time to follow these steps before moving on to the next stage of the battery replacement.
Step 3: Remove the Apple Watch band
Before you can access the internals of your Apple Watch and replace the battery, you’ll need to remove the watch band. This step is necessary to ensure a smooth and hassle-free battery replacement process.
Here’s how you can easily remove the Apple Watch band:
- Start by positioning your Apple Watch face-down on a soft, clean surface. This will protect the screen from getting scratched or damaged during the process.
- Locate the two small buttons on the back of the Apple Watch band. These buttons are known as the “release buttons.”
- Simultaneously press and hold both release buttons, and while doing so, gently slide the band away from the watch. You’ll feel a slight resistance, but with a firm and steady grip, the band should easily detach from the watch housing.
- Repeat the same steps for the other side of the watch band to completely remove it from the Apple Watch.
It’s important to note that the process of removing the Apple Watch band may vary slightly depending on the specific model and band type you have. However, most bands follow a similar mechanism of using the release buttons for detachment.
By removing the watch band, you’ll have better access to the internal components, making it easier to replace the battery and perform any other necessary repairs or maintenance on your Apple Watch.
Step 4: Open the Apple Watch casing
Now that you have gathered the necessary tools and powered off your Apple Watch, it is time to open the casing. Opening the Apple Watch casing requires precision and careful handling to avoid any damage. Follow these steps to safely open the Apple Watch casing:
- Prepare a clean, well-lit workspace: Find a flat surface with good lighting where you can comfortably work on your Apple Watch. Make sure there is ample space to organize the tools and components.
- Place the Apple Watch face down: Lay your Apple Watch face down on a soft, lint-free cloth or microfiber towel to prevent any scratches or damage to the display.
- Locate the slots for opening the casing: Turn your attention to the side of the Apple Watch where the band is attached. You will notice two small slots located between the band connection points. These slots are where you will insert your opening tool.
- Select a suitable opening tool: There are various opening tools available for opening the Apple Watch casing. Some common options include plastic pry tools, suction cups, or guitar picks. Choose the tool that you feel most comfortable using and that will fit into the slots on the watch securely.
- Insert the opening tool into the slots: Gently insert the chosen opening tool into one of the slots. Apply a small amount of pressure and carefully slide the tool along the edge of the slot to separate the casing. Repeat the same process for the other slot.
- Work your way around the casing: Once you have successfully separated the casing on both sides, you can now carefully work your way around the entire circumference of the Apple Watch. Continue using the opening tool to lift the casing and gradually release the clips that hold it in place. Take your time and ensure you don’t apply excessive force to avoid any damage.
- Remove the protective casing: As you progress around the casing, you will eventually be able to fully lift it off. Once the casing is removed, be mindful of any cables or connectors that may be attached to the casing, and gently detach them using tweezers if necessary.
By following these steps, you should now have successfully opened the Apple Watch casing. Ensure you handle the casing and components with care to avoid any damage. Let’s move on to the next step to learn how to replace the old battery.
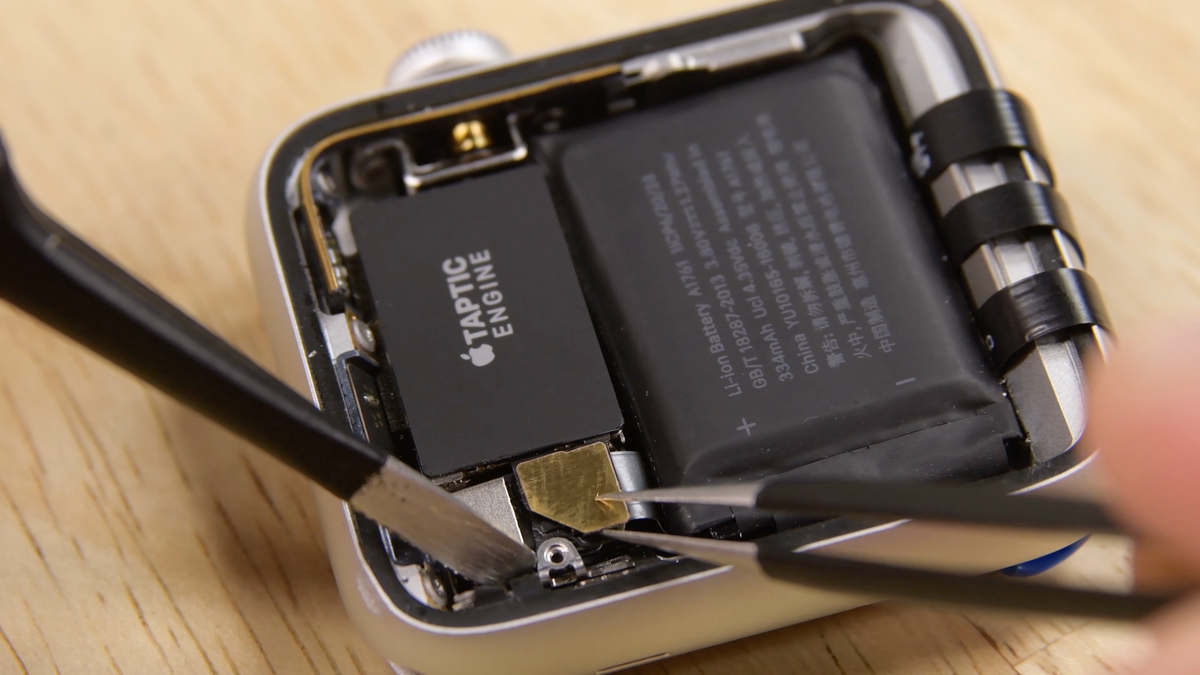
Step 5: Replace the old battery
Replacing the battery of your Apple Watch is a straightforward process, but it requires careful handling. Follow the steps below to replace the old battery:
1. Gently lift the display assembly from the casing of the Apple Watch. Be careful not to damage any cables or connectors.
2. Locate the battery connector, which is a small rectangular strip connecting the battery to the Apple Watch’s circuit board. Carefully disconnect the connector by gently lifting it with a plastic tool or your fingernail.
3. Once the battery connector is disconnected, carefully remove the old battery from the Apple Watch’s casing. It may be secured with adhesive, so gently pry it loose using a plastic tool.
4. Take the new battery and align the connector with the battery connector port on the Apple Watch’s circuit board. Press it firmly into place until you hear a click, indicating that it is securely connected.
5. Ensure that the new battery is properly positioned within the casing, with the cable neatly tucked away. This will prevent any unwanted pressure or strain on the battery or its connectors.
6. Slowly lower the display assembly back into the casing, being careful to align it properly. Gently press it down until it sits flush with the watch case.
7. Power on your Apple Watch and check if the new battery is functioning correctly. You should notice improved battery life and performance.
It is important to note that replacing the battery of your Apple Watch may void any existing warranties. It is recommended to consult with a professional or Apple authorized service center if you are unsure about performing the replacement yourself.
With the old battery successfully replaced, you can now enjoy extended usage time and optimal performance from your Apple Watch.
Step 6: Close the Apple Watch casing
After successfully replacing the battery, the next step is to securely close the Apple Watch casing. Follow these steps to ensure a proper closure:
1. Align the casing: Carefully align the edges and corners of the Apple Watch casing. Ensure that the openings for the buttons, Digital Crown, and speaker are properly aligned.
2. Press firmly: Apply firm, but gentle, pressure to the casing. Make sure all edges and corners are pressed together evenly.
3. Listen for a click: As you press the casing, listen for a satisfying click. This indicates that the casing is securely closed and that the internal components are properly protected.
4. Check for any gaps: After closing the casing, inspect the edges carefully. Ideally, there should be no visible gaps between the front and back of the Apple Watch.
5. Test the closure: Give the Apple Watch a gentle shake and listen for any rattling sounds. If you hear any, it may indicate an improper closure. In such cases, you may need to repeat the closing process.
6. Reassess the alignment: If the closure feels secure and there are no gaps or rattling sounds, double-check the alignment of the casing. Ensure all buttons and the Digital Crown operate smoothly without any obstruction.
7. Clean the casing: Before reattaching the Apple Watch band, use a lint-free cloth to wipe away any fingerprints or smudges from the casing. This will help maintain the sleek and polished appearance of your Apple Watch.
By following these steps, you can close the Apple Watch casing with confidence, knowing that your newly replaced battery is securely protected.
Step 7: Reattach the Apple Watch band
Now that you have successfully replaced the battery of your Apple Watch, it’s time to reattach the watch band. Follow these steps to ensure a secure connection.
1. Starting with one end of the band, align the pin with the slot on the back of the watch case. Make sure the band is perpendicular to the case.
2. Gently slide the pin into the slot, making sure it clicks into place. You may need to apply slight pressure to ensure a snug fit.
3. Repeat this process for the other end of the band, aligning the pin with the slot on the opposite side of the watch case.
4. Ensure both pins are securely inserted and the band is not loose. Give it a gentle tug to test its stability.
5. Once you are satisfied with the alignment and fit of the watch band, you can now proceed to the final step: powering on the Apple Watch.
Congratulations! You have successfully reattached the Apple Watch band. Now you can enjoy using your newly replaced battery and continue tracking your activities and receiving notifications on your wrist.
Step 8: Power on the Apple Watch
After successfully replacing the battery of your Apple Watch, it is time to power it on and get it up and running again. Follow these simple steps to power on your Apple Watch:
- Make sure the Apple Watch is securely fastened to your wrist.
- Press and hold the side button on the right-hand side of the Apple Watch until the Apple logo appears on the screen.
- Once the Apple logo appears, release the side button.
- Wait patiently as the Apple Watch boots up. This process may take a few moments.
- When the Apple Watch is fully powered on, you will be greeted with the familiar watch face and a subtle vibration to let you know it’s ready to use.
With the Apple Watch powered on, you can now access all its features and functionalities, such as checking the time, receiving notifications, and tracking your fitness activities. Enjoy the seamless experience of your newly replaced battery!
Conclusion
Replacing the battery in your Apple Watch can be a straightforward process if you have the right tools and follow the instructions carefully. By taking the time to learn about the battery replacement process and gathering the necessary resources, you can ensure that your Apple Watch continues to perform optimally for years to come.
Remember to prioritize safety throughout the procedure by taking precautions and handling the battery with care. If you don’t feel comfortable replacing the battery yourself, it’s always a good idea to seek assistance from a professional.
With a new battery, your Apple Watch will have improved battery life, allowing you to enjoy all its features and functions without interruptions. Whether you’re an avid fitness enthusiast or rely on your Apple Watch for everyday tasks, a new battery will ensure that your device remains powered up and ready to go. So, don’t delay – take the necessary steps to replace your Apple Watch battery and get back to fully enjoying your device!
FAQs
1. How often should the battery of an Apple Watch be replaced?
The battery life of an Apple Watch varies depending on usage, but on average, it can last for about 18 hours before needing to be recharged. Over time, the battery capacity may decrease, and you may notice a shorter battery life. If you find that your Apple Watch battery is not lasting as long as it used to, it may be time to consider replacing the battery.
2. Can I replace the battery of my Apple Watch myself?
While it is technically possible to replace the battery of an Apple Watch yourself, it is not recommended unless you have prior experience in electronics repairs. Apple Watches are complex devices, and attempting a battery replacement without the necessary skills and tools can lead to damage or even complete device failure. It is best to take your Apple Watch to an authorized service center or an experienced professional for battery replacement.
3. How much does it cost to replace the battery of an Apple Watch?
The cost of replacing the battery of an Apple Watch can vary depending on the model and location. Typically, the cost can range between $79 to $99. It is advisable to check with Apple or authorized service providers for accurate pricing.
4. How long does it take to replace the battery of an Apple Watch?
The time required to replace the battery of an Apple Watch can also depend on the model and technical expertise of the person performing the replacement. Generally, it can take anywhere from 1 to 2 hours for the battery replacement process. However, it is recommended to consult with the service center or professional technician to get an accurate estimation.
5. Will replacing the battery of my Apple Watch void the warranty?
In most cases, replacing the battery of an Apple Watch does not void the warranty as long as it is performed by an authorized service center or a professional technician using genuine Apple parts. However, it is always a good idea to check the terms and conditions of your warranty or consult with Apple customer support to ensure that you are following the correct procedure.