
Are you a proud owner of an Oculus VR headset? If so, you probably know how important the Oculus Touch controllers are in providing an immersive and interactive virtual reality experience. However, over time, you may notice that the battery life of the controllers start to decline. Don’t worry, though, as replacing the battery in your Oculus controller is a straightforward process that can extend its lifespan and ensure you never miss a moment of gaming excitement. In this article, we will guide you through the step-by-step process of replacing the battery in your Oculus controller, allowing you to continue enjoying your virtual adventures without any interruptions. So, let’s dive in and discover how to give those controllers a battery boost!
Inside This Article
- Overview
- Tools and Materials Needed
- Step 1: Removing the Battery Cover
- Step 2: Removing the Old Battery
- Step 3: Inserting the New Battery
- Step 4: Replacing the Battery Cover
- Troubleshooting Tips
- Final Thoughts
- Conclusion
- FAQs
Overview
Replacing the battery in your Oculus controller is a simple and straightforward process. Whether your controller needs a new battery or you simply want to have a spare on hand, this guide will walk you through the steps to ensure a successful replacement. By following these easy instructions, you’ll be able to get back to your virtual reality adventures in no time.
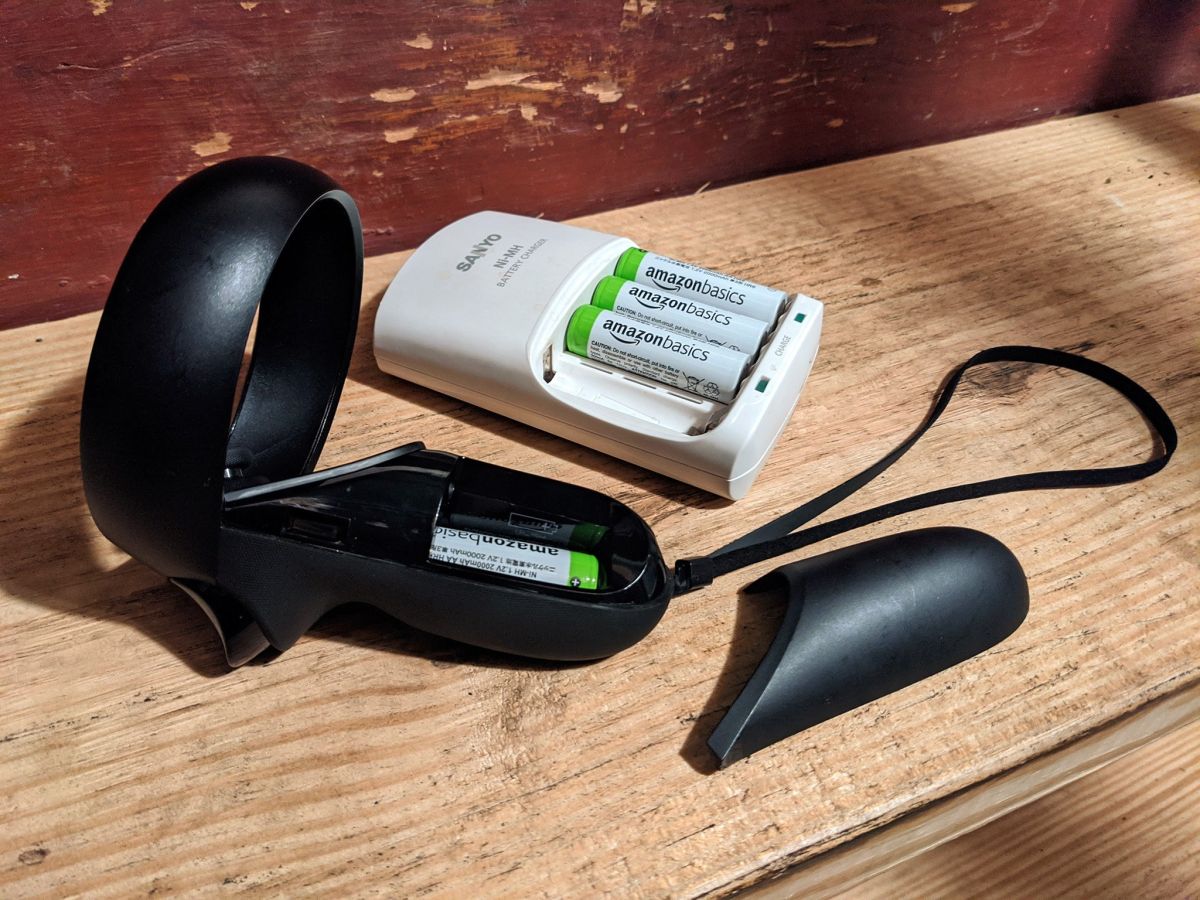
Before we begin, it’s important to note that the specific battery model required for your Oculus controller may vary depending on the model and version you have. Make sure to check the user manual or consult the manufacturer’s website for the correct battery type. In general, most Oculus controllers utilize standard alkaline or rechargeable AA batteries.
In this guide, we will outline the steps involved in replacing the battery in your Oculus controller, from removing the battery cover to inserting the new battery and securing the cover back in place. Additionally, we’ll provide some troubleshooting tips in case you encounter any difficulties along the way.
Tools and Materials Needed
When it comes to replacing the battery in your Oculus controller, there are a few essential tools and materials you will need to get the job done. Before you begin, make sure you have the following items on hand:
- Small Phillips head screwdriver: This will be used to remove the screws that hold the battery cover in place.
- New battery: Make sure to have a replacement battery that is compatible with your Oculus controller. Check the manufacturer’s specifications for the correct battery type.
- Clean cloth: It’s always handy to have a clean cloth nearby to wipe away any dust or dirt that may have accumulated on your controller.
With these tools and materials in your possession, you’ll be well-prepared to tackle the task of replacing the battery in your Oculus controller.
Step 1: Removing the Battery Cover
One of the first steps in replacing the battery in your Oculus controller is removing the battery cover. The battery cover is designed to protect the battery and ensure it stays securely in place. To remove the battery cover, follow these simple steps:
1. Hold your Oculus controller with the front facing towards you.
2. Locate the battery compartment on the back of the controller.
3. Take note of the directional arrow on the battery cover.
4. Use your thumb or finger to push down on the battery cover and slide it in the direction indicated by the arrow.
By pushing down on the battery cover, you will release the latch and allow the cover to slide off easily. It’s important to be gentle while removing the battery cover to avoid any damage.
Once the battery cover is removed, you will have access to the old battery and can proceed to the next step of replacing it.
Step 2: Removing the Old Battery
Once you have successfully removed the battery cover, it’s time to proceed with the next step: removing the old battery.
Locate the battery inside the controller. It is usually situated in a small compartment near the bottom of the controller. Depending on the model, you may need to use a small screwdriver or simply apply gentle pressure to open the compartment.
Once you have accessed the battery compartment, take a moment to observe how the old battery is positioned inside. Look for any release mechanisms or tabs that are securing the battery in place.
Using a pair of tweezers or your fingers, carefully remove the old battery from its compartment. Be sure to grip the battery firmly but gently to avoid damaging it or the surrounding components.
Remember to dispose of the old battery in accordance with local regulations. Batteries should never be thrown in the trash as they can pose environmental hazards. Most communities have designated recycling centers or drop-off points for proper battery disposal.
Once the old battery is safely disposed of, take a moment to clean the battery compartment. Use a soft cloth or a cotton swab dipped in isopropyl alcohol to remove any dust, debris, or corrosion that may have accumulated. This will ensure optimal performance when you insert the new battery.
Congratulations! You have successfully removed the old battery from your Oculus controller. Now, it’s time to move on to the next step: inserting the new battery.
Step 3: Inserting the New Battery
Now that you have successfully removed the old battery from your Oculus controller, it’s time to insert the new one. Follow these simple steps to complete the battery replacement process:
-
Take the new battery out of its packaging. Make sure it is the correct size and type recommended for your Oculus controller model. Double-check the battery’s polarity markers to ensure that you insert it correctly.
-
Align the positive (+) and negative (-) ends of the battery with the corresponding contacts inside the battery compartment. It should fit snugly in place.
-
Gently push the battery into the compartment until it is fully inserted. Take care not to apply excessive force or pressure, as this may damage the battery or the controller.
-
Once the battery is properly inserted, you can close the battery compartment. Align the cover with the controller body and slide it back into place until you hear a click or feel it lock securely.
-
Give the battery cover a gentle tug to ensure that it is securely fastened. A loose battery cover may result in connection issues or accidental battery ejection during gameplay.
That’s it! You have successfully inserted the new battery into your Oculus controller. Take a moment to ensure that it is properly seated and secure.
Now, you can power on your controller and enjoy uninterrupted gaming sessions with your Oculus device. Remember to dispose of the old battery responsibly and keep an extra set of batteries handy for future replacements.
Step 4: Replacing the Battery Cover
Now that you have inserted the new battery into your Oculus controller, it’s time to replace the battery cover. Follow these simple steps to ensure a snug and secure fit:
- Align the battery cover: Place the battery cover back onto the controller, aligning it with the designated slots or grooves. Make sure the cover is positioned correctly before proceeding to the next step.
- Press firmly: Using your fingertips, press down firmly on the battery cover. Apply equal pressure across the entire cover to ensure it snaps into place securely. You may hear a slight clicking sound when the cover is properly attached.
- Test the fit: Once the battery cover is in place, give it a gentle tug to ensure it is securely attached. It should not move or come loose easily. If the cover feels loose, repeat step 2 to ensure a proper fit.
- Double-check the alignment: Verify that the battery cover is aligned properly with the controller’s body. Ensure that there are no gaps or misalignments that could affect the performance or durability of the cover.
By following these steps, you can easily replace the battery cover of your Oculus controller. Properly securing the cover is essential to prevent any accidental opening or battery damage.
Remember to handle the battery cover and controller with care throughout the process to avoid any unnecessary mishaps. Once the cover is securely attached, you can rest assured knowing your Oculus controller is ready for action.
Troubleshooting Tips
If you encounter any issues while replacing the battery in your Oculus Controller, here are some troubleshooting tips to help you resolve the problem:
1. Check the battery orientation: Ensure that the battery is inserted correctly, with the positive and negative terminals aligned properly. Sometimes, a simple mistake in orientation can prevent the controller from working.
2. Clean the battery contacts: Over time, dirt and debris can accumulate on the battery contacts, leading to poor connection and malfunction. Use a cotton swab lightly dampened with rubbing alcohol to gently clean the contacts and remove any residue.
3. Restart the Oculus app: If the controller is still not functioning properly, try restarting the Oculus app on your device. Sometimes, a software glitch can cause issues with the controller’s functionality, and a restart can fix it.
4. Restart the controller: Press and hold the Oculus button and the B button simultaneously until the controller powers off. Then, press and hold the Oculus button again to power it back on. This can help reset the controller and resolve any temporary issues.
5. Re-pair the controller: If the controller is still not working, you may need to re-pair it with your Oculus device. Go to the Oculus app settings, select the controller tab, and follow the on-screen instructions to pair the controller again.
6. Update the firmware: Check for any available firmware updates for both your Oculus device and the controller. Keeping the firmware up to date can address compatibility issues and improve overall performance.
7. Contact support: If none of the troubleshooting steps work, it’s best to reach out to Oculus support for assistance. They have a dedicated support team that can guide you through advanced troubleshooting steps or provide further solutions for your specific issue.
Remember to always follow the manufacturer’s guidelines and instructions when troubleshooting or performing any maintenance on your Oculus Controller. Taking proper care of your device will ensure its longevity and optimal performance.
Final Thoughts
Replacing the battery in your Oculus controller is a relatively simple task that can greatly enhance your VR gaming experience. By following the steps outlined in this guide, you can ensure that your controller always has a reliable power source.
Remember to use the appropriate tools and materials, such as a small screwdriver and the correct battery type, to avoid damaging your controller. Take your time during the process and be gentle when handling the components.
If you encounter any issues during the battery replacement process, refer to the troubleshooting tips section to help resolve common problems. It’s important to address any concerns or difficulties you may have before continuing to use the controller.
With a fresh battery, you can enjoy hours of uninterrupted gameplay without worrying about your controller dying unexpectedly. Make sure to periodically check the battery level and replace it when needed to ensure optimal performance.
By taking care of your Oculus controller and maintaining its battery, you can continue to immerse yourself in the exciting world of Virtual Reality. So, don’t let a dead battery interrupt your gaming adventures – follow the steps in this guide and keep on playing!
Conclusion
Replacing the battery in your Oculus controller is a fairly simple and straightforward process. By following the step-by-step instructions provided and ensuring you have the necessary tools, you can easily keep your gaming experience running smoothly. Remember to always use the correct battery type and handle it with care to avoid any damage to your controller.
Regularly checking the battery level and replacing it when needed will ensure that you never have any interruptions in your gaming sessions. By taking good care of your Oculus controller and keeping it in optimal condition, you can continue immersing yourself in the world of virtual reality with ease.
So, don’t let a low battery ruin your gaming experience. With just a few minutes of your time, you can replace the battery in your Oculus controller and get back to your favorite games in no time. Happy gaming!
FAQs
1. Can I replace the battery in my Oculus controller?
Yes, you can replace the battery in your Oculus controller. The controller uses standard AA batteries, making it easy to swap them out when they run out of charge.
2. How do I replace the battery in my Oculus controller?
To replace the battery in your Oculus controller, follow these steps:
- Locate the battery compartment on the back of the controller.
- Using your thumb or a small coin, slide the battery cover off.
- Remove the old batteries and dispose of them properly.
- Insert new AA batteries, ensuring they are inserted in the correct orientation.
- Slide the battery cover back on until it snaps into place.
3. How long do the batteries in the Oculus controller last?
The battery life of the Oculus controller can vary depending on usage. On average, a pair of AA batteries can last for approximately 30-40 hours of continuous gameplay. However, factors such as vibration intensity and overall usage can affect battery life.
4. Can I use rechargeable batteries in my Oculus controller?
Yes, you can use rechargeable batteries in your Oculus controller. It is recommended to use high-quality rechargeable AA batteries with a high mAh rating for optimal performance and longer battery life. Remember to recharge the batteries before they completely run out of charge to avoid any interruptions during your VR experience.
5. Is it necessary to remove the batteries when the Oculus controller is not in use?
It is not necessary to remove the batteries from the Oculus controller when it is not in use. However, if you do not plan on using the controller for an extended period of time, it is good practice to remove the batteries to prevent any potential corrosion or damage caused by leakage.