
Are you ready to immerse yourself in the world of virtual reality with your Oculus headset? One essential component of the Oculus experience is the controller, which allows you to interact with the virtual environment. In order to fully enjoy your VR adventures, you need to pair the Oculus controller with your headset. But don’t worry, we’ve got you covered! In this article, we will guide you through the step-by-step process to seamlessly pair your Oculus controller with your headset. Whether you’re a seasoned gamer or a VR enthusiast, this tutorial will ensure that you can start gaming and exploring in virtual reality without any hiccups. So, let’s dive in and get your Oculus controller paired with your headset for the ultimate VR experience!
Inside This Article
- Step 1: Power on the Oculus headset
- Step 2: Turn on the Oculus controller
- Step 3: Put the Oculus headset in pairing mode
- Step 4: Pair the Oculus controller with the headset
- Troubleshooting Tips
- Conclusion
- FAQs
Step 1: Power on the Oculus headset
The first step in pairing your Oculus controller to your headset is to power on the Oculus headset itself. Follow these simple instructions to turn on the headset:
1. Locate the power button on the Oculus headset. It is usually located on the side or front of the device.
2. Press and hold the power button for a few seconds until you see the Oculus logo appear on the screen. This indicates that the headset is powering on.
3. Once the logo appears, release the power button and wait for the device to complete its startup process. This may take a few moments.
4. After the startup process is complete, you will be prompted to put on the headset for the next set of instructions. Follow the on-screen prompts to proceed.
5. Congratulations! You have successfully powered on your Oculus headset. Now, it’s time to move on to the next step and turn on the Oculus controller.
Step 2: Turn on the Oculus controller
Once you have powered on your Oculus headset, the next step is to turn on the Oculus controller. The controller is an essential component that allows you to navigate through the virtual reality experience with ease. Here’s how to do it:
1. Locate the Oculus controller. It typically comes in a compact, ergonomic design that fits comfortably in your hand. Look for the power button on the controller. It is usually located at the top or bottom. Press and hold the power button to turn it on.
2. As you press and hold the power button, you should see a brief light indicator or hear a sound to confirm that the controller is turning on. Keep holding the power button until the controller fully powers on.
3. Once the controller is powered on, it is time to pair it with your Oculus headset. Make sure the headset is nearby and in pairing mode. Refer to the instructions in Step 3 for putting the headset in pairing mode.
4. Now that both the Oculus headset and controller are powered on, they are ready to establish a wireless connection. This connection allows you to interact with virtual content through the controller’s buttons and joysticks.
5. Situate yourself within the play area and hold the controller comfortably. The controller should automatically connect to the headset after a few seconds. Look for the virtual representation of the controller in your virtual reality environment to confirm the successful pairing.
6. Once the pairing is complete, you can start exploring the vast world of virtual reality using your Oculus controller. Move the controller around, press the buttons, and engage in immersive experiences to fully enjoy the capabilities of your Oculus device.
Remember, the process of turning on the Oculus controller may vary slightly depending on the controller model or software updates. Always refer to the official documentation provided by Oculus for the most accurate and up-to-date instructions.
Now that your Oculus controller is turned on, it’s time to move on to Step 3: Put the Oculus headset in pairing mode.
Step 3: Put the Oculus headset in pairing mode
Before you can pair your Oculus controller with the headset, you need to ensure that the Oculus headset is in pairing mode. Follow the steps below to put the headset in pairing mode:
- Turn on your Oculus headset by pressing the power button located on the side or the top of the device.
- Wait for the Oculus logo to appear on the headset’s display. This indicates that the headset is powered on and ready to be paired with a controller.
- Next, locate the sync button on the Oculus headset. It is usually found on the bottom or side of the device, near the volume buttons. The sync button is a small, circular button that you can press with a pin or pen tip.
- Press and hold the sync button on the headset for a few seconds until you see a light or indicator on the device start flashing. This indicates that the headset is now in pairing mode and ready to connect to a controller.
- Once the Oculus headset is in pairing mode, it will start searching for available controllers to connect with.
Now that you have successfully put the Oculus headset in pairing mode, you can proceed to the next step and pair the Oculus controller with the headset.
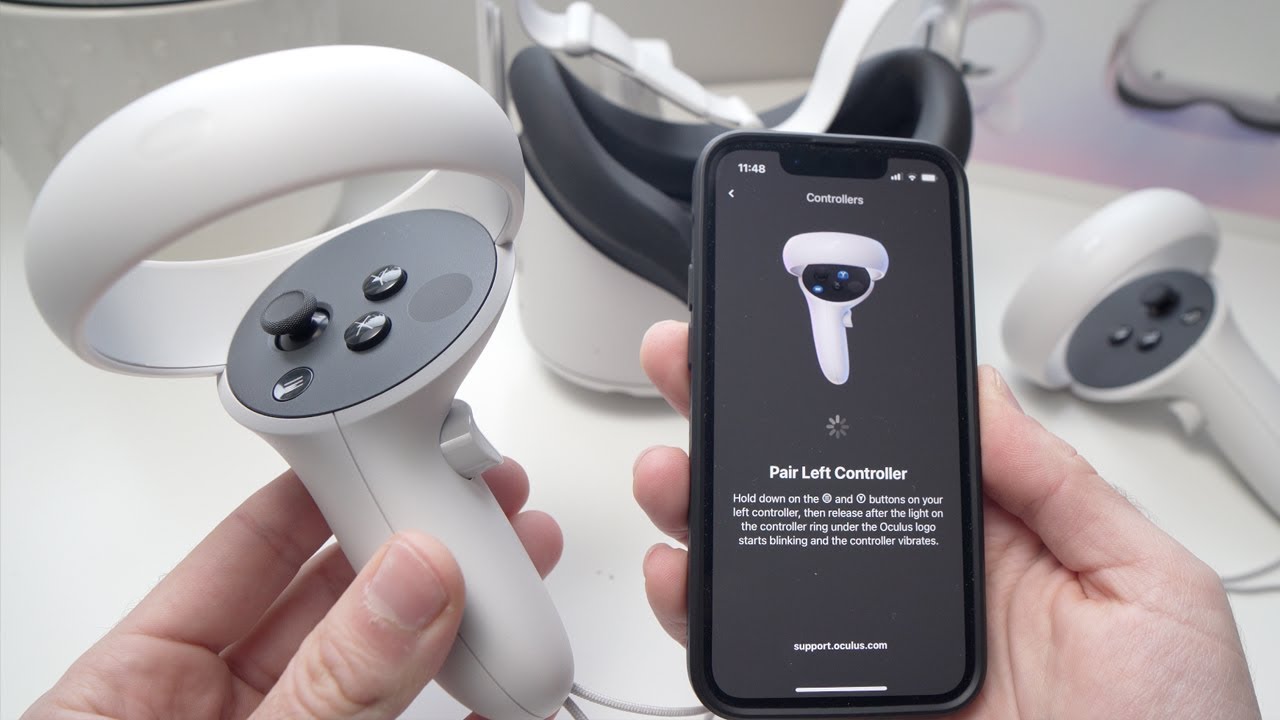
Step 4: Pair the Oculus controller with the headset
Now that your Oculus headset and controller are powered on and in pairing mode, it’s time to pair them together. Follow these simple steps to ensure a seamless connection:
1. Look for the Oculus logo on the controller. This is the button you’ll use to initiate the pairing process.
2. Locate the Oculus button on the side of the headset. This is the button you’ll use to access the menu options and settings.
3. Press and hold the Oculus button on the controller until the LED light on the front starts flashing. This indicates that the controller is in pairing mode.
4. With the Oculus button lit up on the controller, navigate to the menu on the headset by pressing the Oculus button on the side.
5. In the menu, select the “Devices” option. This will open up the device settings for your Oculus headset.
6. Within the device settings, you should see an option for “Pair New Controller.” Select this option to initiate the pairing process.
7. The headset will then search for nearby controllers and display them on the screen. Make sure to select the correct controller that you want to pair.
8. Once you’ve selected the controller, the headset will establish a connection with it. This process may take a few seconds, but once it’s complete, you’ll see a confirmation message on the screen.
9. Test the controller by pressing buttons and moving the joysticks. If the controller is properly paired, you should see the movements reflected on the screen.
And there you have it! Your Oculus controller is now successfully paired with your headset. Enjoy a fully immersive and interactive virtual reality experience with your new setup!
Troubleshooting Tips
If you encounter any issues while trying to pair your Oculus controller to your headset, don’t worry. Here are some troubleshooting tips to help you resolve common problems:
1. Check the battery: Ensure that the Oculus controller has enough battery power. If the battery is running low, replace it with fresh batteries or charge it using a compatible charging cable.
2. Restart the headset and controller: Sometimes a simple restart can fix connectivity issues. Power off both the Oculus headset and the controller, then turn them back on and try pairing them again.
3. Move closer to the headset: If you’re having trouble pairing the controller, try moving closer to the headset. Sometimes, a weak wireless signal can interfere with the pairing process.
4. Check for Bluetooth interference: Make sure there are no other devices nearby that could interfere with the Bluetooth connection. Devices like smartphones, laptops, or other wireless peripherals can cause interference. Move away from these devices and try pairing again.
5. Reset the controller: If the controller still won’t pair, you can try resetting it. Look for a small reset button on the back or bottom of the controller and use a thin object like a paperclip to press and hold it for a few seconds. Then, retry the pairing process.
6. Update firmware and software: Check for any available firmware or software updates for your Oculus headset and controller. Keeping them up to date can often fix compatibility and connectivity issues.
7. Contact Oculus support: If you have tried all the troubleshooting tips and are still unable to pair the controller, it’s best to reach out to Oculus support for further assistance. They have the expertise to help you resolve any technical issues you may be facing.
By following these troubleshooting tips, you should be able to successfully pair your Oculus controller to your headset. Enjoy your VR gaming experience!
Conclusion
In conclusion, pairing your Oculus controller to your headset is a simple and straightforward process. By following the correct steps, you can enjoy a fully immersive gaming experience on your Oculus device. Remember, it is essential to ensure that your controller and headset are fully charged and within range during the pairing process.
Whether you are a casual gamer or a dedicated enthusiast, having a properly paired Oculus controller enhances your gameplay and allows you to explore the virtual world with ease. Take the time to familiarize yourself with the steps outlined in this guide, and you’ll be ready to dive into the exciting world of virtual reality in no time.
So, grab your Oculus controller, put on your headset, and get ready for an unforgettable gaming adventure!
FAQs
Q: How do I pair my Oculus controller to the headset?
To pair your Oculus controller to the headset, follow these steps:
- Ensure that your Oculus headset is turned on and charged.
- Open the Oculus app on your smartphone or tablet.
- Tap on Devices in the bottom menu.
- Select the Oculus headset you want to pair the controller with.
- In the headset, press and hold the Oculus button and the Menu button simultaneously for a few seconds until the light on the controller starts flashing.
- On your smartphone or tablet, tap Pair Controller on the screen.
- Wait for the app to connect and pair the controller with the headset.
- Once the pairing is successful, you should see the controller appear in the Oculus app under the paired devices.
Q: Can I use multiple controllers with my Oculus headset?
Yes, you can use multiple controllers with your Oculus headset. The number of controllers that can be connected at the same time may vary depending on the specific headset model. However, most Oculus headsets support up to two controllers for an immersive and interactive VR experience.
Q: What should I do if my Oculus controller is not pairing with the headset?
If your Oculus controller is not pairing with the headset, try the following troubleshooting steps:
- Make sure that both the controller and the headset are fully charged.
- Restart your Oculus headset and your smartphone or tablet.
- Ensure that Bluetooth is enabled on your smartphone or tablet.
- Make sure that your Oculus app is up to date.
- Try unpairing and repairing the controller by following the steps mentioned earlier.
- If the issue persists, check the batteries in the controller and replace them if necessary.
- Contact Oculus Support for further assistance.
Q: Can I use third-party controllers with my Oculus headset?
No, you cannot use third-party controllers with your Oculus headset. Oculus headsets are designed to be compatible with their own controllers, providing the best user experience and optimal functionality. Using third-party controllers may result in compatibility issues and may not work as intended.
Q: How do I know if my Oculus controller is connected to the headset?
To check if your Oculus controller is connected to the headset, follow these steps:
- Ensure that your Oculus headset is turned on and paired with the controller.
- Put on the headset and navigate to the Oculus home screen.
- In the VR environment, look down at your virtual hands.
- If your controller is connected and properly paired, you should see virtual representations of your hands, including the controller.
Q: Can I use the Oculus controller for non-gaming activities?
Yes, you can use the Oculus controller for non-gaming activities. The Oculus controller is not limited to gaming and can be used for a variety of virtual reality experiences, such as navigating menus, interacting with apps, watching videos, and more. The controller provides a versatile and intuitive way to interact with your Oculus headset, enhancing the overall VR experience.