
Have you ever found yourself struggling to read small text on your PC screen? With the help of the Magnifier tool in Windows 10, you can easily zoom in on content, making it larger and more accessible. Whether you have vision impairment or simply want to enhance your viewing experience, adjusting the magnification level on your PC can make a significant difference. In this article, we will guide you through the process of setting the Magnifier tool to less than 100% on Windows 10. We will provide you with step-by-step instructions and valuable tips to ensure a seamless and personalized experience, regardless of your specific needs. Let’s dive in and explore how you can make your PC screen magnification the perfect fit for your eyes.
Inside This Article
- Overview of Magnifier in Windows 10
- Methods to Set Magnifier to Less Than 100% in Windows 10
- Adjusting Magnification Settings in Windows 10
- Using Keyboard Shortcuts to Decrease Magnifier Zoom Level
- Conclusion
- FAQs
Overview of Magnifier in Windows 10
The Magnifier is a built-in accessibility feature in Windows 10 that helps users with visual impairments to see and interact with their computer screens more effectively. It acts as a virtual magnifying glass, allowing users to zoom in on specific areas of the screen and make the content more readable.
The Magnifier tool in Windows 10 offers various customization options, allowing users to adjust magnification levels, choose different views, and utilize keyboard shortcuts for easier navigation. It can be particularly beneficial for those who have difficulty reading small text or discerning details on their computer screens.
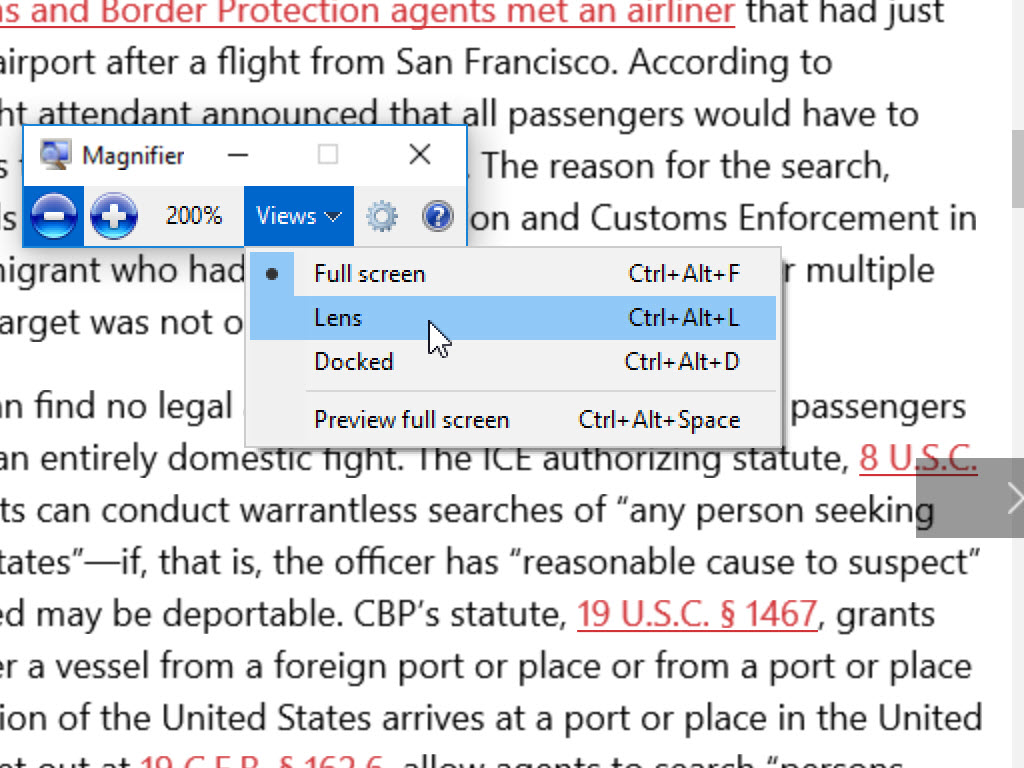
With the Magnifier feature, users can not only enlarge the content on their screens but also customize the appearance to suit their specific needs. This includes options to choose between full-screen or lens views, adjust the size of the magnified area, and change the color contrast to enhance visibility.
Additionally, the Magnifier in Windows 10 provides a range of options for controlling the zoom level, allowing users to set it to a value less than 100%. By reducing the zoom level, users can see more content on the screen at once, which can enhance productivity and ease of use.
Overall, the Magnifier tool in Windows 10 is a valuable accessibility feature that empowers individuals with visual impairments to better navigate and interact with their computers. With its customizable settings and zooming capabilities, it provides a more inclusive computing experience for all users.
Methods to Set Magnifier to Less Than 100% in Windows 10
Windows 10 offers the convenient Magnifier tool to enhance visibility on your screen. By default, it magnifies the screen to 100%, but sometimes you may want to decrease the zoom level to less than 100%. In this article, we will guide you through various methods to achieve this.
There are a few different ways to adjust the magnification level in Windows 10. You can either use the Magnifier settings or utilize keyboard shortcuts to quickly decrease the zoom level. Let’s explore each method in detail.
Adjusting Magnification Settings in Windows 10
To set the magnifier to less than 100% using the settings, follow these steps:
- Click on the “Start” button and go to “Settings”.
- In the Settings menu, click on “Ease of Access”.
- From the left sidebar, select “Magnifier”.
- Toggle the “Magnifier” switch to “On”.
- Under the “Zoom level” section, use the slider or input a specific value to decrease the magnification level.
- Close the Magnifier settings window to apply the changes.
By following these steps, you can easily set the magnifier to less than 100% using the built-in settings in Windows 10.
Using Keyboard Shortcuts to Decrease Magnifier Zoom Level
If you prefer a quicker method to adjust the zoom level, you can use the following keyboard shortcuts:
- Press the “Windows” key and the “+” key simultaneously to activate the Magnifier.
- Press the “+” key to zoom in and the “-” key to zoom out.
- Keep pressing the “-” key until the zoom level is less than 100%.
- Press the “Esc” key or the “Windows” key again to exit the Magnifier.
These keyboard shortcuts provide a fast and efficient way to decrease the zoom level of the Magnifier without going through the settings menu.
Adjusting Magnification Settings in Windows 10
Windows 10 offers a range of accessibility features, including the Magnifier tool, which allows users to zoom in and magnify the content on their screen. However, you may find that the default zoom level of 100% is too high for your needs. Fortunately, Windows 10 provides various methods for adjusting the magnification settings to a level that is comfortable for you.
Here are some simple steps to help you adjust the magnification settings in Windows 10:
- Open the Magnifier Settings: To access the magnifier settings, go to the Start menu and click on the gear icon to open the Settings page. From there, select the “Ease of Access” option, and then click on the “Magnifier” tab in the left panel.
- Choose Your Preferred Magnification Level: In the Magnifier settings, you will find a slider labeled “Change zoom level.” Drag the slider to the left to decrease the magnification level. As you move the slider, the content on your screen will adjust accordingly, allowing you to find the right balance between magnification and visibility.
- Preview the Magnification Changes: To preview the changes you made, you can enable the “Preview changes” toggle switch below the zoom level slider. With this option enabled, you will see a small window showing the magnified content as you move the slider. This allows you to gauge the impact of your adjustments in real-time.
- Customize Additional Magnifier Settings: Besides the magnification level, Windows 10 provides several additional options to customize the behavior of the Magnifier tool. You can toggle options like “Follow the mouse cursor” to automatically track and magnify the area around the cursor, or “Follow the keyboard focus” to keep the magnification centered on the currently focused element.
- Save and Apply the Changes: Once you have fine-tuned the magnification settings according to your preferences, click on the “Apply” button to save the changes. You can then close the Magnifier settings window, and the adjusted magnification level will remain in effect.
By following these simple steps, you can easily adjust the magnification settings in Windows 10 to a level that suits your needs. Whether you require a higher or lower zoom level, Windows 10 provides the flexibility to personalize your viewing experience and ensure optimal visibility on your screen.
Using Keyboard Shortcuts to Decrease Magnifier Zoom Level
Windows 10 offers several keyboard shortcuts that can help you quickly decrease the zoom level of the Magnifier tool. These shortcuts are designed to provide a convenient and efficient way to adjust the zoom level without the need for excessive mouse movements or navigating through multiple menus.
The following are the keyboard shortcuts you can use to decrease the zoom level of the Magnifier:
1. Press the Windows key + Plus (+) at the same time to zoom in.
2. Press the Windows key + Minus (-) at the same time to zoom out.
3. Press the Ctrl + Alt + Mouse Scroll Down simultaneously to decrease the zoom level incrementally.
By using these keyboard shortcuts, you can quickly and easily adjust the Magnifier’s zoom level to a value that suits your needs. Whether you want to decrease the zoom level for better readability or to get a more comprehensive view of the screen, these shortcuts provide a convenient way to do so.
It’s important to note that these keyboard shortcuts work specifically with the Magnifier tool in Windows 10. They may not work in other applications or programs that have their own zoom features.
Additionally, if you have a laptop or a keyboard with a different layout, the specific keys or combination of keys required to perform these shortcuts may vary. It’s always a good idea to refer to your device’s documentation or the Windows support website for the exact keyboard shortcuts applicable to your specific setup.
Using keyboard shortcuts to decrease the zoom level of the Magnifier is a quick and efficient way to customize your viewing experience on Windows 10. Whether you’re reading documents, browsing the web, or navigating through applications, these shortcuts can make it easier to view and interact with content at a comfortable level.
Conclusion
In conclusion, setting the magnifier to less than 100% on Windows 10 is a straightforward process that can greatly enhance your viewing experience. By reducing the magnification level, you can fit more content on the screen and improve readability. Whether you have difficulty seeing small text or simply prefer a larger display, adjusting the magnifier settings allows you to customize your Windows 10 experience to meet your needs.
Remember that the magnifier feature is just one of the many accessibility options available in Windows 10. Take the time to explore other features that can enhance your computer usage, such as the narrator, high contrast mode, and keyboard shortcuts. The accessibility settings are designed to make the operating system more inclusive and adaptable for all users.
So, whether you’re a student, professional, or casual computer user, adjusting the magnifier setting to less than 100% can make a significant difference in your productivity and comfort. Don’t let small text or low visibility hinder your Windows 10 experience – take advantage of the magnifier feature and fully optimize your display.
FAQs
1. How do I set the magnifier to less than 100% on Windows 10?
To set the magnifier to less than 100% on Windows 10, you can use the following steps:
- Click on the Start button and open the Settings app.
- Go to the Ease of Access section and select “Magnifier” on the left sidebar.
- In the Magnifier settings, you will find a slider labeled “Magnification” which by default is set at 100%. Decrease the slider to set the magnification to less than 100%.
2. Can I adjust the magnifier on Windows 10 to fit my specific needs?
Yes, Windows 10 allows you to customize the magnifier to fit your specific needs. In the Magnifier settings, you can adjust settings such as magnification level, tracking options, color modes, and more. You can also use keyboard shortcuts like Windows key combined with the plus or minus sign to zoom in or out.
3. Does adjusting the magnifier affect the resolution or display quality?
Adjusting the magnifier on Windows 10 does not affect the resolution or display quality of your device. The magnifier simply zooms in on a portion of the screen to make it easier to see and interact with. The resolution and display quality remain the same.
4. Can I enable or disable the magnifier shortcut keys on Windows 10?
Yes, you can enable or disable the magnifier shortcut keys on Windows 10. In the Magnifier settings, there is an option to toggle the “Shortcut key” feature. If enabled, the magnifier shortcut keys like Windows key combined with the plus or minus sign will work. If disabled, these shortcut keys will be inactive.
5. Is there a way to change the appearance of the magnifier on Windows 10?
Yes, you can change the appearance of the magnifier on Windows 10. In the Magnifier settings, you will find options to choose from different color modes, such as inverted colors, grayscale, high contrast, and more. You can select the color mode that suits your visual preferences and makes it easier for you to read and view content.