
Are you struggling to remove the magnifier on your Chromebook? Fear not, because in this article, we will show you exactly how to take it off. The magnifier feature on Chromebooks can be helpful, especially for users with visual impairments, as it allows for easier readability. However, it can also be a nuisance for those who prefer a more standard display. Whether you accidentally turned on the magnifier or simply want to disable it, we’ve got you covered. Follow our step-by-step guide to remove the magnifier from your Chromebook, and say goodbye to those pesky enlarged screens. Let’s dive in and get your Chromebook back to its normal display!
Inside This Article
- Enabling Developer Mode on Chromebook
- Accessing the Crosh Shell
- Disabling the Magnifier in Chromebook Settings
- Troubleshooting Magnifier Issues on Chromebook
- Conclusion
- FAQs
Enabling Developer Mode on Chromebook
Developer Mode is an essential setting for users who want to have more control and customization options on their Chromebook. By enabling Developer Mode, you can bypass certain restrictions imposed by Chrome OS and gain access to advanced features and tools. Here’s a step-by-step guide to enable Developer Mode and take full control of your Chromebook.
1. Before proceeding, it’s important to note that enabling Developer Mode will result in a complete data wipe of your Chromebook. Make sure to back up any important files or documents before proceeding.
2. To enable Developer Mode, start by turning off your Chromebook completely.
3. Press and hold the Esc key and the Refresh key (the circular arrow key) simultaneously.
4. While holding down both keys, press the Power button to turn on your Chromebook.
5. Release the Power button, but continue to hold the Esc and Refresh keys.
6. After a few seconds, you’ll see a screen that says “Chrome OS is missing or damaged“. This is the recovery screen.
7. Press Ctrl + D on your keyboard to enter Developer Mode.
8. A message will appear on the screen, warning you about the risks of enabling Developer Mode. Read the message carefully and press Enter to proceed.
9. Your Chromebook will now reboot and enter Developer Mode. This process may take a few minutes.
10. Once your Chromebook finishes rebooting, you’ll see a “OS Verification is OFF” message on the screen. This indicates that Developer Mode is enabled.
11. From now on, whenever you start your Chromebook, you’ll see a warning screen that reminds you about the potential risks of running in Developer Mode. To proceed, simply press Ctrl + D on your keyboard.
With Developer Mode enabled, you’re now ready to explore advanced options, install custom firmware, and experiment with different settings on your Chromebook. Just remember to proceed with caution and be mindful of the potential risks associated with Developer Mode.
Accessing the Crosh Shell
Accessing the Crosh shell on your Chromebook allows you to interact directly with the Chrome operating system and execute various commands. This can be particularly useful when troubleshooting or performing advanced tasks.
To access the Crosh shell, follow these steps:
- Press the Ctrl + Alt + T keys simultaneously on your Chromebook keyboard. This will open a new browser tab.
- In the browser tab that opens, type crosh in the address bar and press Enter.
After following these steps, the Crosh shell window will open, providing you with a command-line interface. From here, you can execute various commands and perform actions that are not available through the regular Chrome OS interface.
It’s important to note that the Crosh shell is a powerful tool and should be used with caution. Executing certain commands without proper knowledge or guidance can have unintended consequences or potentially damage your Chromebook.
Now that you know how to access the Crosh shell, you can explore its capabilities and use it to troubleshoot issues or perform advanced tasks on your Chromebook.
Disabling the Magnifier in Chromebook Settings
If you’re using a Chromebook and find the magnifier feature to be more of a hindrance than a help, don’t worry – you can easily disable it in the Chromebook settings. Disabling the magnifier will prevent it from automatically activating when you scroll or zoom on your screen.
To disable the magnifier on your Chromebook, follow these simple steps:
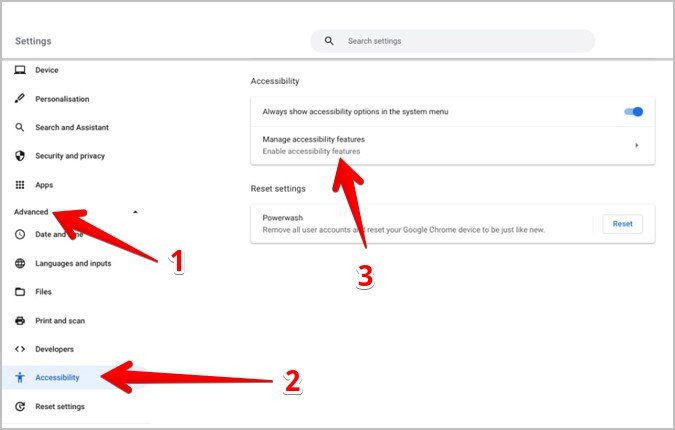
- Open the Chromebook settings by clicking on the clock icon in the bottom-right corner of the screen, then selecting the gear icon.
- In the settings menu, scroll down and click on “Accessibility.”
- Look for the “Manage accessibility features” section and click on “Keyboard and text input.”
- Within the “Manage accessibility features” section, find the “Enable virtual keyboard” option and click on the toggle switch to turn it off.
- Close the settings menu and try using your Chromebook. The magnifier should no longer activate automatically.
If you prefer to enable the magnifier again in the future, simply follow the same steps and toggle the “Enable virtual keyboard” option back on.
Disabling the magnifier in Chromebook settings not only saves you from the hassle of unintentionally activating it, but it also helps improve your overall user experience. So, take control of your Chromebook and tailor it to your preferences by disabling the magnifier feature.
Troubleshooting Magnifier Issues on Chromebook
If you’re experiencing issues with the magnifier on your Chromebook, there are a few troubleshooting steps you can take to try and resolve the problem. Here are some common issues and their solutions:
- Magnifier not working: If the magnifier is not functioning properly or not turning on, the first step is to restart your Chromebook. Sometimes a simple restart can resolve software glitches that may be causing the issue. If that doesn’t work, check to see if there are any updates available for your Chrome OS. Updating your operating system can often fix bugs and improve functionality.
- Magnifier freezing or lagging: If the magnifier is freezing or experiencing lag, it could be due to insufficient hardware resources. Chromebooks with low RAM or slow processors may struggle to run resource-intensive applications smoothly. Close unnecessary apps and tabs to free up system resources and see if that improves the performance. Additionally, consider disabling any conflicting extensions or plugins that may be interfering with the magnifier.
- Screen resolution issues: If the magnifier is distorting or pixelating the screen, it may be due to mismatched screen resolution settings. To fix this, go to the “Display settings” on your Chromebook and adjust the screen resolution to a setting that works best for you. Experiment with different resolutions until the magnifier provides a clear and sharp display.
- Accessibility options not available: If you can’t find the magnifier or any other accessibility options on your Chromebook, it’s possible that they are not enabled. To check this, go to the “Accessibility settings” in your Chromebook’s settings menu and ensure that the magnifier option is toggled on. If it’s already enabled but still not showing up, try restarting your Chromebook to refresh the settings.
- Compatibility issues with websites or apps: In some cases, the magnifier may not work as expected on certain websites or applications. Web developers and app creators may not have optimized their platforms for magnifier compatibility. If you consistently encounter issues with a specific website or app, consider reaching out to the developers and letting them know about the problem. They may be able to provide a workaround or fix in a future update.
Remember, if you’re unable to resolve the magnifier issues on your Chromebook using these troubleshooting steps, it’s always a good idea to reach out to Chromebook support or consult the Chromebook community forums. They can provide specific guidance based on your device model and operating system version.
Conclusion
In conclusion, knowing how to take off the magnifier on your Chromebook is essential for a seamless and comfortable browsing experience. By following the steps outlined in this article, you can easily disable the magnifier feature and return your Chromebook to its normal display settings. Whether you accidentally activated the magnifier or simply find it inconvenient, these simple solutions will help you regain control over your device’s display. Remember to adjust the settings according to your preferences and requirements.
With the ability to customize your Chromebook’s display settings, you can optimize your browsing experience and ensure optimal visibility and usability. By understanding how to toggle off the magnifier, you will have one less obstacle in your path while enjoying the convenience and functionality of your Chromebook. So, don’t let the magnifier feature hinder your productivity – follow the steps and take control of your device’s display today!
FAQs
1.
How do I remove the magnifier on my Chromebook?
To disable the magnifier on your Chromebook, you can follow these steps:
- Press the ‘Search’ or ‘Launcher’ key on your Chromebook keyboard (usually depicted by a magnifying glass or a circle with a dot in the center).
- Type ‘Settings’ and press Enter.
- In the Settings window, scroll down and click on ‘Accessibility’.
- Under the ‘Accessibility’ section, locate the ‘Mouse and Touchpad’ option and click on it.
- Within the ‘Mouse and Touchpad’ settings, find the ‘Enable screen magnifier‘ option and toggle it off.
- The magnifier function will now be disabled on your Chromebook.
2.
Can I use keyboard shortcuts to disable the magnifier on my Chromebook?
Yes, you can use keyboard shortcuts to toggle the magnifier on and off on your Chromebook. The shortcut to enable or disable the magnifier is ‘Ctrl + Alt + M’.
3.
Why is the magnifier on my Chromebook automatically turning on?
If the magnifier on your Chromebook is automatically turning on, it could be due to a setting or a keyboard shortcut that is triggering it. To resolve this issue, try the following steps:
- Go to the ‘Settings’ by pressing the ‘Search’ or ‘Launcher’ key and typing ‘Settings’.
- Click on ‘Accessibility’ and select ‘Keyboard’.
- Locate the ‘Screen Magnifier’ section and check if there are any keyboard shortcuts enabled for the magnifier.
- Disable any shortcuts that you do not want to use.
4.
Is it possible to adjust the magnification level on my Chromebook?
Yes, you can adjust the magnification level on your Chromebook to suit your needs. To do this:
- Open the ‘Settings’ by pressing the ‘Search’ or ‘Launcher’ key and typing ‘Settings’.
- Click on ‘Accessibility’ and select ‘Mouse and Touchpad’.
- Under the ‘Mouse and Touchpad’ settings, look for the ‘Magnifier zoom level’ option.
- Use the slider to adjust the magnification level to your preference.
5.
What should I do if the magnifier function on my Chromebook is not working?
If the magnifier function on your Chromebook is not working, you can try the following troubleshooting steps:
- Restart your Chromebook to see if it resolves the issue.
- Check for any pending updates and install them.
- Ensure that the ‘Enable screen magnifier’ option is toggled on in the ‘Mouse and Touchpad’ settings.
- If the issue persists, contact Chromebook support for further assistance.