
Are you looking to set up a headset on your Xbox One, but not sure where to start? Don’t worry – you’re in the right place! Whether you’re a seasoned gamer or new to the Xbox world, having a headset can greatly enhance your gaming experience. It allows you to communicate with your teammates, immerses you in high-quality audio, and ensures you don’t miss out on any crucial in-game sounds. However, setting up a headset on your Xbox One can sometimes be a bit confusing, with various cables, connections, and settings involved. In this comprehensive guide, we’ll walk you through the step-by-step process of setting up your headset on Xbox One, from connecting the cables to adjusting the audio settings. So, let’s get started and get you ready to jump into the world of gaming with a fantastic audio experience!
Inside This Article
- Step 1: Check the compatibility of your headset
- Step 2: Connect the headset to the Xbox One controller
- Step 3: Adjust audio settings on the Xbox One
- Step 4: Test the headset for proper functionality
- Troubleshooting common issues with headsets on Xbox One
- Conclusion
- FAQs
Step 1: Check the compatibility of your headset
Before you begin setting up your headset on Xbox One, it’s essential to check if it is compatible with the console. Xbox One supports various headset options, but not all headsets are compatible. Checking compatibility ensures that your headset will work seamlessly with your Xbox One and provide you with an optimal gaming experience.
To check the compatibility of your headset with Xbox One, you can refer to the manufacturer’s website or the packaging of the headset. Look for indications or logos specifying compatibility with Xbox One. It is important to note that some headsets may require additional adapters or firmware updates to work with Xbox One, so make sure to check for any specific requirements mentioned by the manufacturer.
Furthermore, if you already own a headset but are unsure if it is compatible with the Xbox One, you can also consult the Xbox support website or forums for a list of officially supported headsets. This resource can help you ensure that your headset is compatible and save you from the frustration of setting up a headset that may not work with your console.
By confirming the compatibility of your headset, you can avoid potential issues and setbacks during the setup process. It enables you to make informed decisions about purchasing a new headset or utilizing your existing one with your Xbox One.
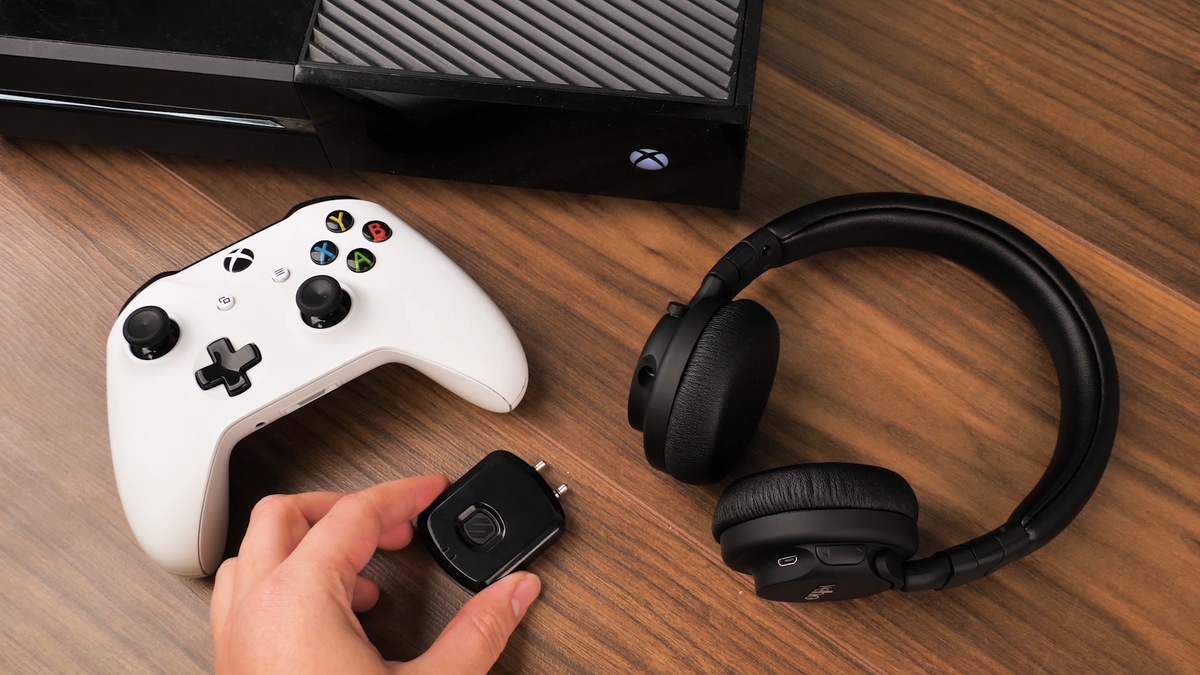
Step 2: Connect the headset to the Xbox One controller
After confirming the compatibility of your headset with the Xbox One, the next step is to connect your headset to the Xbox One controller. This will allow you to hear the game audio and communicate with other players during online gaming sessions. Here’s a step-by-step guide on how to do it:
1. Start by turning on your Xbox One console and your Xbox One controller. Ensure that both are properly charged or have fresh batteries.
2. Locate the 3.5mm audio jack on your Xbox One controller. It is usually located at the bottom of the controller, near the headset icon.
3. Take the headset cable and insert the 3.5mm jack securely into the audio jack on the controller. Make sure it is firmly inserted to ensure a stable connection.
4. Once connected, you can adjust the volume and audio settings of the headset using the on-screen menu of the Xbox One console. This will allow you to control the game audio and chat volume separately, ensuring a well-balanced audio experience.
5. If your headset comes with a microphone, ensure that it is positioned correctly and within an optimal range for clear communication. Adjust the microphone boom or in-line microphone accordingly, paying attention to the guidelines provided by the headset manufacturer.
6. Lastly, make sure that the headset is properly fitted and comfortable to wear. Adjust the headband and ear cups as necessary to achieve a snug fit without causing discomfort or pressure on your ears.
Once you have successfully connected the headset to the Xbox One controller, you can now enjoy immersive gaming experiences while being able to communicate effectively with other players. Remember to follow the manufacturer’s instructions for any additional features or settings specific to your headset model for the best experience.
Step 3: Adjust audio settings on the Xbox One
Once you have connected your headset to the Xbox One controller, the next step is to adjust the audio settings on the console. This will ensure that you can hear game audio and communicate with other players clearly. Follow the steps below to adjust the audio settings:
1. Start by turning on your Xbox One and signing in to your account. This will take you to the dashboard.
2. From the dashboard, navigate to the “Settings” tab. You can find this tab at the far right of the dashboard menu.
3. Within the “Settings” menu, select the “Audio” option. This will take you to the audio settings page.
4. On the audio settings page, you will see various options that you can customize. The most important settings for your headset are “Headset Chat Mixer” and “Mic Monitoring.”
5. Adjust the “Headset Chat Mixer” setting to control the balance between game audio and chat audio. Move the slider towards “Game” if you want to prioritize game audio, or towards “Chat” if you want to prioritize chat audio. This will allow you to fine-tune the audio balance based on your preferences.
6. The “Mic Monitoring” setting controls the volume of your own voice that is played back in your headset. This helps you gauge the volume of your own voice while wearing the headset, which can prevent you from unintentionally speaking too loudly or too softly. Adjust the slider to your desired level.
7. In addition to these settings, you can also adjust the master volume and mic sensitivity. This can be done by selecting the “Volume” and “Mic Sensitivity” options respectively on the audio settings page.
8. Once you have adjusted the audio settings to your preference, test your headset to ensure that everything is working correctly. You can do this by joining a party or starting a game with voice chat enabled and checking if you can hear and communicate with others clearly.
By taking the time to adjust the audio settings on your Xbox One, you can enhance your gaming experience and ensure clear communication with other players. Remember, these settings can be customized to meet your personal preferences, so don’t be afraid to experiment and find the perfect audio balance for your headset.
Step 4: Test the headset for proper functionality
Once you have connected your headset to the Xbox One controller and adjusted the audio settings, it is essential to test the headset for proper functionality. This step will ensure that the headset is working correctly and that you can enjoy a seamless gaming or communication experience.
Here are some steps to follow when testing your headset:
- Check the audio output: Start by checking if you can hear audio through the headset. Launch a game or play some music on your Xbox One and see if the sound comes through the headset. Adjust the volume using the controls on the headset or the Xbox One controller to ensure optimal sound levels.
- Test the microphone: After confirming that you can hear audio, it’s time to test the microphone. Connect with a friend or join a party chat to see if your voice is transmitting successfully. Speak into the microphone and ask your friend if they can hear you clearly. Make sure the microphone volume is adjusted to an appropriate level and that it is not muted.
- Check for audio interruptions: While testing the headset, pay attention to any audio interruptions or static noise. If you experience crackling, buzzing, or other distractions, there may be an issue with the headset or the connection. Try disconnecting and reconnecting the headset to see if it resolves the problem. Additionally, ensure that the cables are securely plugged in.
- Use in-game chat: Launch an online game that supports in-game chat and test the headset’s functionality in a multiplayer setting. Talk to other players and listen for their responses. This will give you a better idea of the headset’s performance in a real gaming environment.
If you encounter any issues during the testing process, refer to the troubleshooting section for solutions to common headset problems. It’s essential to ensure that your headset is functioning correctly before diving into long gaming sessions or important communication tasks.
By following these steps to test your headset for proper functionality, you can enjoy the full audio and communication experience that it provides. Be sure to take care of your headset and keep it in good condition to maximize its lifespan and performance.
Troubleshooting common issues with headsets on Xbox One
Using a headset with your Xbox One can greatly enhance your gaming experience, but sometimes you may encounter some common issues that can disrupt your gameplay. Don’t worry, though! Here are some troubleshooting steps to help you resolve these problems and get back to enjoying seamless communication and immersive sound while gaming.
1. No Sound or Audio
If you’re experiencing a lack of sound or audio through your headset, there are a few things you can try:
- Ensure that your headset is properly connected to the Xbox One controller.
- Check if the volume on your headset is turned up and not muted.
- Verify that the audio settings on your Xbox One are configured correctly. Go to Settings > Display & sound > Audio output and make sure the correct audio output option is selected.
- If using a wireless headset, ensure that the battery is charged and the headset is within range of the console.
2. Mic Not Working
If your microphone is not working or your voice is not being transmitted to other players, follow these steps:
- Check if your mic is connected securely to the Xbox One controller.
- Ensure that the microphone is not muted. On the Xbox One controller, there is a mute button that you can press to toggle the microphone on/off.
- Make sure your Xbox Live account’s privacy settings allow for voice communication. Go to Settings > Account > Privacy & online safety > Xbox Live privacy > View details & customize > Communicate with voice and text and set it to “Everybody” or “Friends.”
- Test your microphone on another device to ensure it’s functioning properly. If it doesn’t work on another device, you may need to replace your headset or the microphone itself.
3. Connection Issues
If you’re experiencing connection issues with your headset, which can result in intermittent sound or dropped audio, try the following steps:
- Check the connection between your headset and the Xbox One controller. Ensure that the cable is securely plugged in and not damaged.
- Try using a different controller or a different headset to see if the issue persists. This can help determine if the problem lies with the headset or the controller.
- Reset your Xbox One console and restart the headset. Sometimes a simple power cycle can resolve connectivity issues.
- If you’re using a wireless headset, make sure it’s within range of the console and that there are no significant obstructions causing signal interference.
4. Echo or Feedback
If you’re hearing an echo or feedback in your headset, follow these troubleshooting steps:
- Reduce the volume on your headset or adjust the game/chat audio balance to minimize feedback.
- Make sure that your microphone is not too close to speakers or other audio devices that may be causing the echo.
- Try using a different headset or contacting the manufacturer for further assistance. It’s possible that the issue is related to the headset’s design or quality.
If you’re still experiencing issues with your headset on Xbox One, it may be worth contacting customer support for additional guidance. They can provide specific troubleshooting steps based on your headset model and assist you in resolving any technical problems. Remember, a properly functioning headset can greatly enhance your gaming experience, so it’s worth taking the time to troubleshoot and resolve any issues you encounter!
Conclusion
Setting up a headset on your Xbox One is an essential step to fully immerse yourself in the gaming experience. By following the simple steps outlined in this guide, you can easily connect and configure your headset to enjoy crystal-clear audio and seamless communication with other players.
Remember to choose a headset that suits your preferences, whether it’s a wired or wireless option, and make sure it is compatible with the Xbox One console. Keep in mind that some headsets may require additional adapters or firmware updates for full functionality.
With your headset properly set up, you can take your gaming sessions to the next level, collaborating with teammates, coordinating strategies, and enjoying immersive sound effects. So, grab your favorite headset, plug it in or connect it wirelessly, and get ready for a gaming experience like no other on your Xbox One!
FAQs
1. How do I set up a headset on Xbox One?
To set up a headset on Xbox One, follow these steps:
- Connect the headset to the controller. Most headsets have a 3.5mm audio jack, which can be plugged into the controller’s audio input port.
- On the Xbox One, go to the home screen and navigate to the settings menu.
- In the settings menu, select “Devices & accessories.”
- Find your connected controller in the list of devices, and select “Device info.”
- Under “Audio,” set the “Headset audio” option to “Stereo Uncompressed” for the best audio quality.
- Adjust the volume and other audio settings for the headset using the on-screen sliders or the Xbox One controller.
2. Can I use wireless headsets with Xbox One?
Yes, you can use wireless headsets with Xbox One. However, it is important to note that not all wireless headsets are compatible with Xbox One. Make sure to check the product specifications and compatibility details before purchasing a wireless headset for use with your Xbox One console.
3. Why is my headset not working on Xbox One?
If your headset is not working on Xbox One, try the following troubleshooting steps:
- Make sure the headset is properly connected to the controller or console.
- Check if the headset volume is turned up and not muted.
- Try using a different headset to see if the issue is with the original headset.
- Restart your Xbox One console and try again.
- Ensure that your controller’s firmware is up to date.
- If none of the above steps work, contact Xbox support for further assistance.
4. Can I use a mobile phone headset with Xbox One?
In most cases, mobile phone headsets are not directly compatible with Xbox One. Xbox One requires headsets with a 3.5mm audio jack or a wireless headset specifically designed for use with the console. However, there are adapters available that can convert the mobile phone headset’s connector for use with Xbox One. Make sure to check the compatibility of the adapter before purchasing.
5. Can I use a PC gaming headset with Xbox One?
Yes, you can use a PC gaming headset with Xbox One, as long as the headset has a 3.5mm audio jack or a USB connection. For headsets with a USB connection, simply plug it into one of the USB ports on the Xbox One console. For headsets with a 3.5mm audio jack, follow the steps mentioned in the first FAQ to connect it to the Xbox One controller.