
The RetroPie is a popular gaming platform for those who love the nostalgic feeling of playing retro games. One of the key aspects of this platform is the ability to use a gamepad for a more immersive gaming experience. Setting up a gamepad on RetroPie can be a bit daunting if you’re new to it, but fear not! In this article, we will guide you step-by-step on how to set up your gamepad on RetroPie, ensuring that you can start gaming in no time. Whether you’re using a wired or wireless gamepad, we’ve got you covered. So grab your coffee, sit back, and let’s dive into the wonderful world of RetroPie gaming!
Inside This Article
- Overview of Retropie
- What is a Gamepad?
- Connecting a Gamepad to Retropie
- Configuring a Gamepad in Retropie
- Conclusion
- FAQs
Overview of Retropie
Retropie is a popular open-source software package that allows users to turn their Raspberry Pi into a retro gaming console. It is based on the EmulationStation frontend and has support for various emulators, allowing gamers to play games from a wide range of consoles and platforms.
Retropie provides a user-friendly interface that makes it easy to navigate through your game library. It supports a multitude of classic gaming systems, including Nintendo Entertainment System (NES), Super Nintendo Entertainment System (SNES), Sega Genesis, Game Boy, and many more.
One of the key features of Retropie is its extensive customization options. Users can customize the look and feel of their gaming console by choosing from different themes and changing the layout of the menu system. Additionally, Retropie supports various controller options, including gamepads, joysticks, and even arcade cabinets.
Another great aspect of Retropie is its ability to handle save states, allowing players to save and resume their game progress at any time. This is particularly useful in games that don’t have built-in save functionality, ensuring that you never lose your progress.
While Retropie offers a vast collection of pre-installed emulators, it also enables users to add their own ROMs and emulators if desired. This means you can expand your gaming library and play games from even more consoles and platforms.
Whether you are a nostalgic gamer or simply looking to experience the classic titles of the past, Retropie provides an excellent solution for reliving the golden era of gaming. With its user-friendly interface, customization options, and vast library of supported games, Retropie opens up a world of retro gaming possibilities.
What is a Gamepad?
A gamepad, also known as a controller, is an input device used to interact with video games on various platforms such as consoles, computers, and even smartphones. It is designed to provide a more intuitive and comfortable gaming experience by offering a range of buttons, joysticks, directional pads, and triggers.
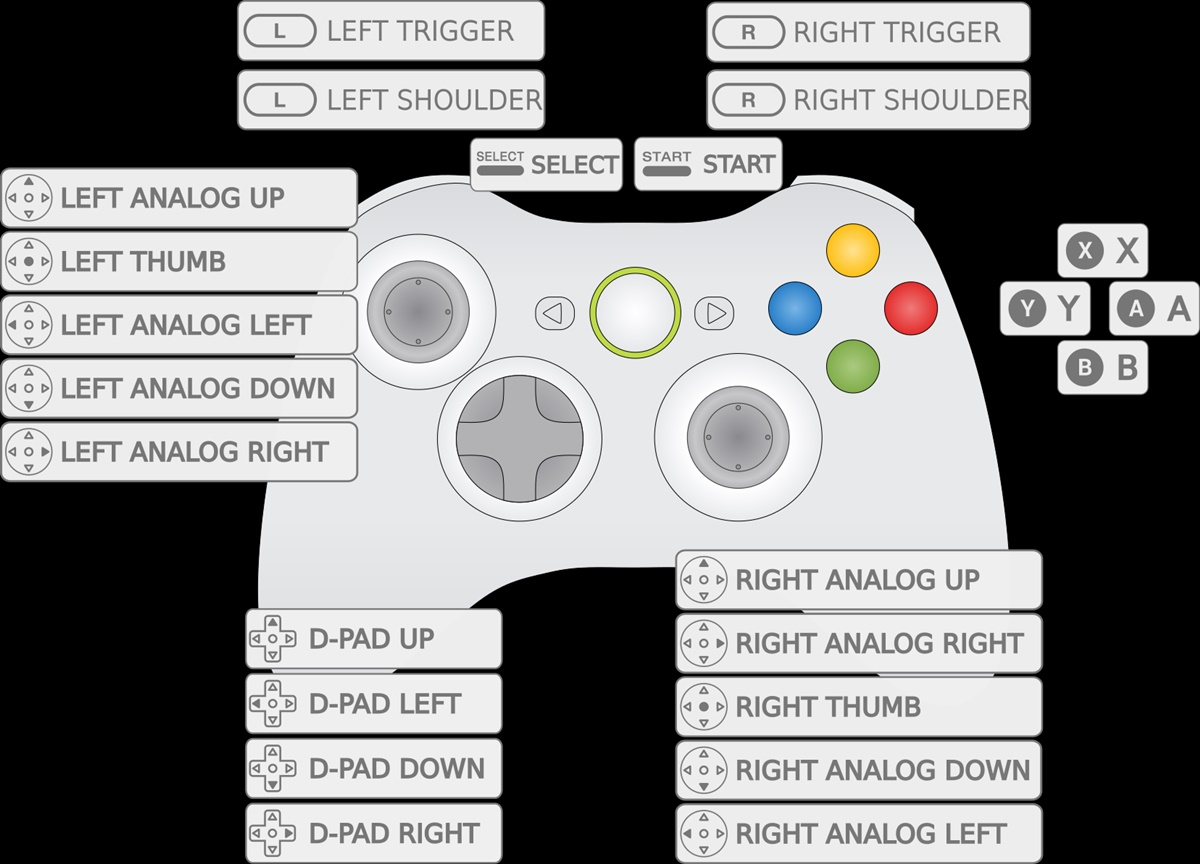
Gamepads come in various shapes, sizes, and designs, but they all serve the same basic function of allowing players to control the on-screen action. The standard gamepad layout typically includes two analog joysticks, a D-pad (directional pad), face buttons (labeled A, B, X, and Y), shoulder buttons, and triggers.
Gamepads provide a convenient and ergonomic way to navigate through game menus, perform precise movements, and execute various in-game actions. They are essential for playing a wide range of gaming genres, including action, adventure, sports, racing, and fighting games.
The evolution of gamepads has seen significant improvements over the years. Modern gamepads often feature advanced features such as motion sensors, touch-sensitive surfaces, haptic feedback, and even wireless connectivity options like Bluetooth.
With the rise of mobile gaming, gamepads have also become compatible with smartphones and tablets, allowing players to enjoy console-like gaming experiences on their portable devices.
Connecting a Gamepad to Retropie
Retropie is a versatile software platform that allows you to turn your Raspberry Pi into a retro gaming console. But to fully enjoy the games, you need a gamepad or controller to navigate and play. Connecting a gamepad to Retropie is a relatively straightforward process. In this section, we will guide you through the steps to set up and connect your gamepad so you can start gaming.
Before you begin, make sure you have a compatible gamepad. Most gamepads with USB or Bluetooth connectivity will work with Retropie. USB gamepads are the easiest to set up, as they can be directly connected to the Raspberry Pi. Bluetooth gamepads require a few additional steps to pair them with your Raspberry Pi.
If you have a USB gamepad, simply plug it into one of the USB ports on your Raspberry Pi. Retropie should automatically detect and configure the gamepad for you. You can test if it’s working properly by navigating through the Retropie menu using the gamepad buttons. If everything is working as expected, you’re all set!
For Bluetooth gamepads, you will need to pair them with your Raspberry Pi. First, make sure Bluetooth is enabled on your Raspberry Pi by going to the RetroPie menu and selecting the Bluetooth option. Then, put your gamepad in pairing mode according to the manufacturer’s instructions.
Once your gamepad is in pairing mode, navigate to the Bluetooth menu on your Raspberry Pi and select “Register and Connect to Bluetooth Device.” Your gamepad should appear in the list of available devices. Select it and follow any on-screen prompts to complete the pairing process.
After successful pairing, go back to the RetroPie menu and select the Configure Input option. Follow the on-screen instructions to map the buttons on your gamepad. This step is essential to ensure that the gamepad works correctly with the games you play on Retropie.
During the button mapping process, simply press the corresponding buttons on your gamepad when prompted by Retropie. Once you have mapped all the buttons, save the configuration and exit the menu. Your gamepad is now ready to use with Retropie.
If you encounter any issues during setup, make sure to check the official Retropie documentation or seek help from the Retropie community. With your gamepad successfully connected and configured, you can dive into a world of nostalgic gaming and relive the classics on your Raspberry Pi with Retropie!
Configuring a Gamepad in Retropie
Once you have successfully connected your gamepad to Retropie, the next step is to configure it so that it works seamlessly with your favorite retro games. Configuring a gamepad in Retropie is a straightforward process that can be done through the EmulationStation menu. Here’s a step-by-step guide on how to do it:
- Launch Retropie on your device and wait for it to boot up. Once it is ready, you will be greeted with the EmulationStation menu.
- With the EmulationStation menu displayed, connect your gamepad to the device if you haven’t already done so. Retropie will automatically detect the gamepad and assign it a controller number.
- Using the arrow keys on your keyboard or the navigation controls on your gamepad, navigate to the “Configure Input” option in the EmulationStation menu and select it.
- You will now be prompted to configure the buttons on your gamepad. Follow the on-screen instructions, which will guide you through the process of assigning each button on your gamepad to a specific function.
- To start the configuration, press and hold any button on your gamepad. Retropie will then ask you to press the corresponding button for each of the different functions, such as “Up,” “Down,” “Left,” “Right,” etc. Press the corresponding button on your gamepad for each function until all the buttons have been configured.
- Once you have successfully configured all the buttons, Retropie will save the configuration and return you to the EmulationStation menu. Your gamepad is now ready to use with Retropie!
It’s important to note that Retropie supports a wide variety of gamepads, including popular options like Xbox controllers, PlayStation controllers, and USB gamepads. However, if you are using a more uncommon or specialized gamepad, you may need to do some additional configuration or mapping to ensure compatibility.
If you run into any issues during the configuration process, you can refer to the Retropie documentation or search online forums for troubleshooting tips and solutions. Remember, configuring your gamepad is a one-time process, and once it’s done, you’ll be able to enjoy countless hours of retro gaming fun on your Retropie device.
Conclusion
Setting up a gamepad on a RetroPie system is a relatively simple process that can greatly enhance your gaming experience. By following the step-by-step instructions provided in this guide, you can ensure that your gamepad is properly configured and ready for gaming action. Whether you’re using a wired or wireless gamepad, RetroPie offers excellent compatibility and customization options to suit your preferences.
Remember to choose a gamepad that is compatible with RetroPie and offers good build quality and responsiveness. This will ensure a smooth and enjoyable gaming experience. Additionally, take advantage of the RetroPie community and forums, where you can find valuable tips, tricks, and troubleshooting advice from fellow gamers.
So go ahead, set up that gamepad, load up your favorite retro games, and immerse yourself in the nostalgia and joy of gaming on your RetroPie system. Step back in time and rediscover the magic of classic gaming with the convenience and power of modern technology.
FAQs
1. Can I use any gamepad with Retropie?
Yes, Retropie supports a wide range of gamepads, including USB and Bluetooth controllers. However, it’s always a good idea to check the compatibility list or do some research before purchasing to ensure your gamepad is supported.
2. How do I connect a Bluetooth gamepad to Retropie?
To connect a Bluetooth gamepad to Retropie, first, make sure that your gamepad is in pairing mode. Then, go to the Bluetooth menu in the Retropie settings and select “Register and Connect to Bluetooth Device”. Follow the on-screen instructions to complete the pairing process.
3. Can I use multiple gamepads with Retropie?
Yes, Retropie supports multiple gamepads. You can connect multiple USB gamepads by plugging them into the available USB ports on your Raspberry Pi, or pair multiple Bluetooth gamepads following the same process as described in the previous FAQ.
4. How do I map the buttons on my gamepad in Retropie?
To map the buttons on your gamepad in Retropie, navigate to the Retropie menu, select “Configure Input”, and follow the instructions to map each button on your gamepad. Retropie will prompt you to press each button and assign it a corresponding function.
5. My gamepad is not recognized by Retropie, what should I do?
If your gamepad is not recognized by Retropie, try the following troubleshooting steps:
– Check if the gamepad is connected properly and powered on.
– Verify if the gamepad is supported by Retropie.
– Restart your Raspberry Pi and try connecting the gamepad again.
– Update Retropie to the latest version.
– Consult the Retropie community forums or online resources for further assistance.