
Welcome to this comprehensive guide on how to set up the Logitech G930 headset! If you’ve recently purchased this premium wireless headset and you’re eager to start enjoying crisp audio and immersive gaming experiences, you’ve come to the right place. In this article, we will walk you through the step-by-step process of setting up your Logitech G930 headset, including connecting it to your computer, configuring the audio settings, and troubleshooting common issues that may arise along the way. Whether you’re a seasoned gamer or a music aficionado, the Logitech G930 headset promises to deliver top-notch performance and comfort. So, let’s dive in and get your headset up and running in no time!
Inside This Article
- System Requirements
- Step 1: Installing the Logitech G930 Software
- Step 2: Connecting the Logitech G930 Headset to your computer
- Step 3: Pairing the Logitech G930 Headset
- Step 4: Adjusting the Sound Settings
- Step 5: Testing the Logitech G930 Headset
- Troubleshooting Common Issues
- Conclusion
- FAQs
System Requirements
Before setting up your Logitech G930 Headset, it’s important to ensure that your system meets the necessary requirements. Here are the system requirements you need to consider:
1. Operating System:
The Logitech G930 Headset is compatible with various operating systems, including Windows 10, Windows 8.1, Windows 8, Windows 7, and Windows Vista. It also works with macOS 10.11 or later.
2. USB Port:
You’ll need an available USB port on your computer to connect the Logitech G930 Headset. Make sure you have an open USB 2.0 or USB 3.0 port for a stable and reliable connection.
3. Internet Connection:
While not mandatory, an internet connection is required to download the Logitech Gaming Software (LGS) for additional customization options. It also allows you to access the latest firmware updates for your headset.
4. System Requirements for Logitech Gaming Software:
- For Windows systems: Intel Core 2 Duo processor (or equivalent) and 2 GB RAM.
- For macOS systems: Intel-based Mac with 2 GB RAM.
5. Disk Space:
Ensure that you have sufficient available disk space on your computer to install the Logitech Gaming Software. It’s recommended to have at least 100 MB of free space.
By meeting these system requirements, you can ensure a smooth and hassle-free setup process for your Logitech G930 Headset. Now that you’re aware of the necessary prerequisites, let’s move on to unboxing and connecting your headset.
Step 1: Installing the Logitech G930 Software
Before you can begin enjoying the full range of features and functionalities that the Logitech G930 headset has to offer, you need to install the necessary software. The Logitech Gaming Software allows you to customize your headset settings, create personalized audio profiles, and access additional features.
To install the Logitech G930 software, follow these simple steps:
- Start by inserting the Logitech G930 software installation disc into your computer’s optical drive. If you don’t have the installation disc, you can download the software from the official Logitech website.
- A setup wizard should automatically launch when the disc is inserted. If it doesn’t, navigate to the disc’s contents and locate the “Setup.exe” file. Double-click on it to begin the installation process.
- Follow the instructions provided by the setup wizard. It will guide you through the installation process, which includes accepting the software license agreement, selecting the installation folder, and choosing additional options.
- Once the software is installed, you may be prompted to restart your computer. If so, save any unsaved work and click “Restart” to complete the installation.
After restarting your computer, the Logitech Gaming Software should be ready to use. You can access it by locating the software icon in your computer’s system tray or by searching for “Logitech Gaming Software” in your start menu.
With the Logitech Gaming Software installed, you’ll be able to explore a wide range of customization options for your G930 headset. From adjusting audio settings and microphone sensitivity to creating personalized audio profiles for different games or applications, the software allows you to fine-tune your gaming experience to perfection.
Remember to keep the software up to date by checking for updates on the Logitech website or using the automatic update feature within the Logitech Gaming Software itself. This ensures that you always have access to the latest features and improvements.
Now that you have successfully installed the Logitech G930 software, you’re one step closer to fully immersing yourself in your gaming sessions. In the next section, we will explore how to connect the G930 headset to your device.
Step 2: Connecting the Logitech G930 Headset to your computer
Once you have unboxed your Logitech G930 headset and familiarized yourself with its components, it’s time to connect it to your computer. Follow these simple steps to ensure a seamless connection:
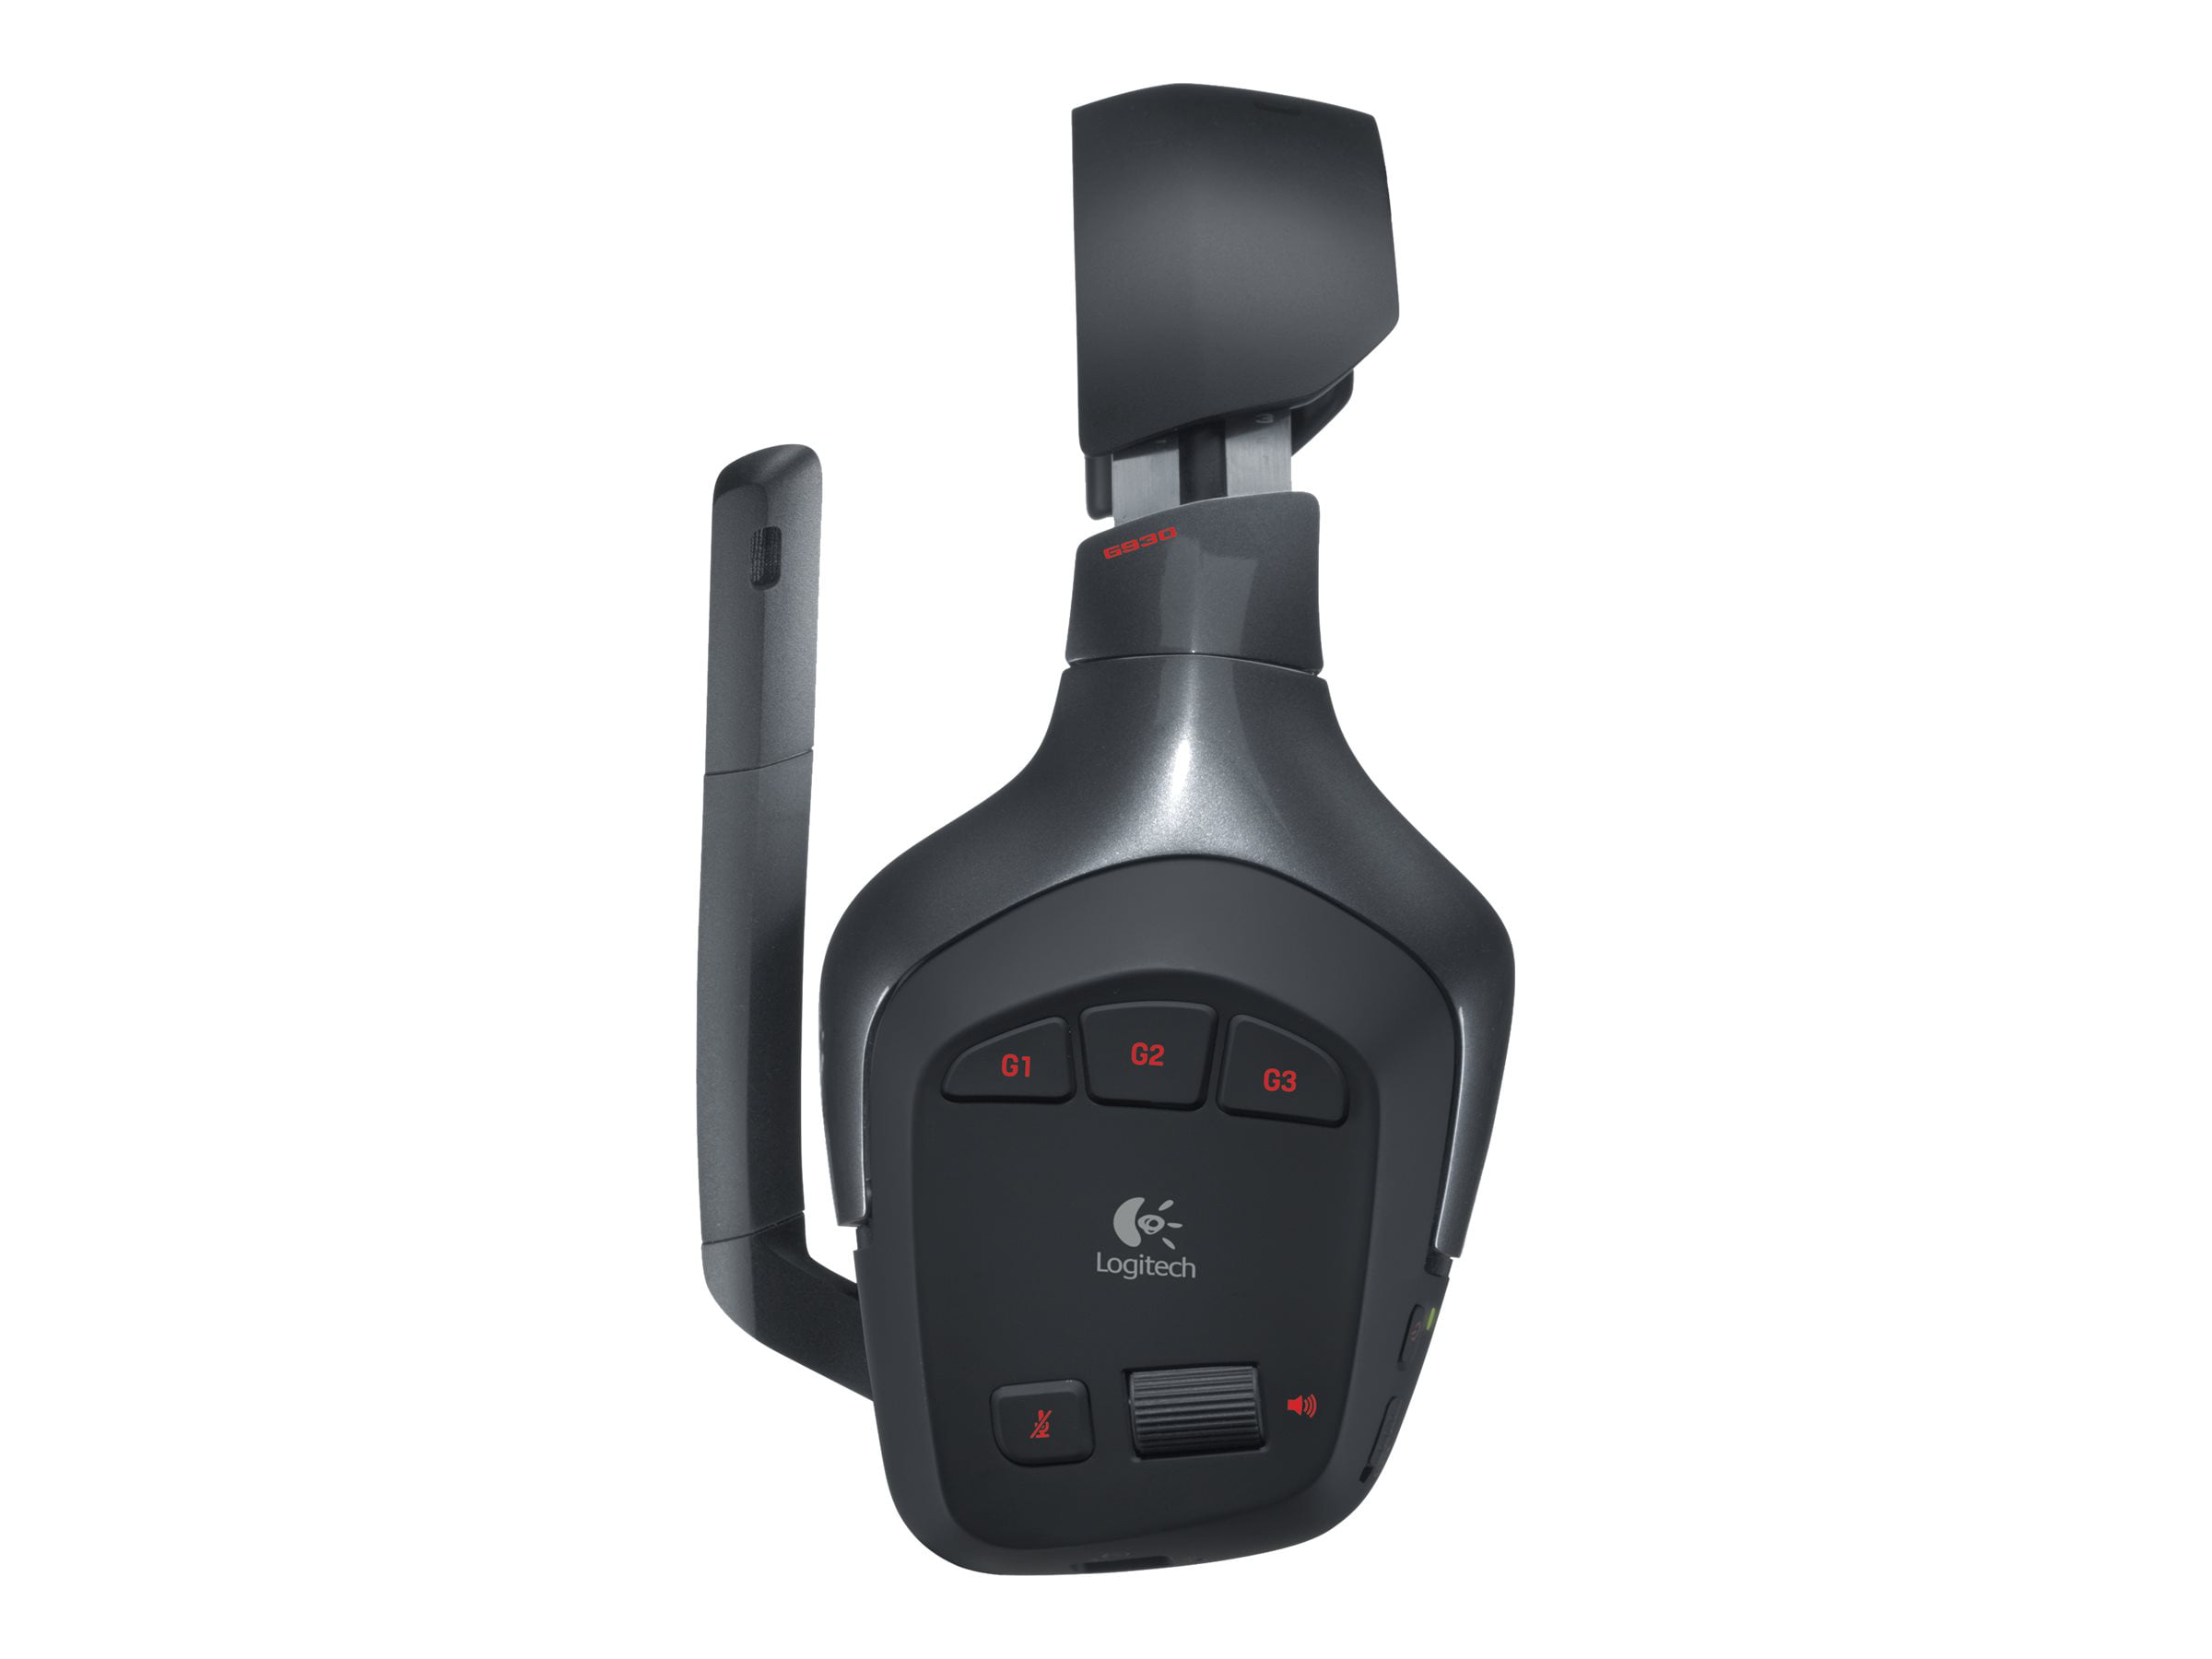
Step 1: Locate the wireless USB adapter that came with your Logitech G930 headset. It is a small device with a USB connector at one end and a headphone symbol on it.
Step 2: Insert the wireless USB adapter into an available USB port on your computer. Make sure to choose a port that is easily accessible for convenience.
Step 3: Once the USB adapter is connected, turn on your Logitech G930 headset by sliding the power switch to the “on” position. The power switch is usually located on the side or bottom of the headset, depending on its model.
Step 4: After turning on the headset, it will start searching for the wireless USB adapter. Give it a few moments to establish the connection.
Step 5: Once the connection is established, you may need to install any required drivers or software. Check the manufacturer’s website or the included instruction manual for specific instructions on driver installation.
Step 6: Once the drivers are installed (if needed), your Logitech G930 headset is now connected to your computer. You should be able to enjoy high-quality audio and microphone capabilities without the hassle of wires.
Note: If you experience any connectivity issues, ensure that the USB adapter is firmly inserted into the USB port. Additionally, try restarting your computer and headset to troubleshoot any potential software conflicts.
Congratulations! You have successfully connected your Logitech G930 headset to your computer. Now you can immerse yourself in the world of gaming, conference calls, or entertainment without the constraint of wires.
Step 3: Pairing the Logitech G930 Headset
Once you have unboxed and connected your Logitech G930 headset to your device, the next step is to pair it. Pairing allows the headset to establish a wireless connection with your device, enabling you to experience high-quality audio without any physical constraints.
Follow these steps to successfully pair your Logitech G930 headset:
- Turn on your Logitech G930 headset by switching the power button located on the side of the earcup to the ‘on’ position. A blue LED indicator will light up to indicate that the headset is powered on.
- On your computer or gaming console, make sure Bluetooth is enabled and in discovery mode. If you’re using a computer, locate the Bluetooth icon in the system tray or navigate to the Bluetooth settings in the control panel. For gaming consoles, refer to the respective manual or settings menu for Bluetooth setup.
- On your Logitech G930 headset, press and hold the pairing button, which is located next to the power button, for a few seconds. The LED indicator on the headset will start blinking rapidly, indicating that it is in pairing mode.
- On your computer or gaming console, search for available Bluetooth devices. The Logitech G930 headset should appear in the list of available devices. Click on it to initiate the pairing process.
- If prompted, enter the passkey or PIN provided with your Logitech G930 headset. This step ensures a secure connection between your headset and your device.
- Once the pairing process is complete, the LED indicator on your Logitech G930 headset will stop blinking and remain solid. This indicates that the headset is successfully paired with your device.
It’s important to note that the Logitech G930 headset uses a 2.4GHz wireless connection, which provides a stable and reliable connection with minimal latency. This wireless technology allows you to move freely and enjoy immersive gaming or audio experiences without being tethered to your device.
Now that you have successfully paired your Logitech G930 headset, you can start enjoying its exceptional audio quality and advanced features. Whether you’re gaming, listening to music, or watching movies, the G930 headset ensures an immersive and personalized audio experience.
Step 4: Adjusting the Sound Settings
Once you have connected your Logitech G930 headset to your device and installed the Logitech Gaming Software, it’s time to fine-tune the sound settings to suit your preferences. The G930 offers a range of customizable options to enhance your gaming experience.
Here are the steps to adjust the sound settings on your Logitech G930 headset:
- Open the Logitech Gaming Software: Launch the Logitech Gaming Software application on your device. You can find it in the list of installed programs or through the system tray icon.
- Select the G930 Headset: In the Logitech Gaming Software, navigate to the “Headset” section and ensure that the G930 headset is selected as the active audio device. This will allow you to access all the available sound options.
- Equalizer and Surround Sound: The G930 headset is equipped with customizable equalizer settings that allow you to adjust the sound frequencies to your liking. Experiment with different presets or manually adjust the sliders to enhance the bass, treble, or any other specific frequency range. Additionally, enable the surround sound feature to immerse yourself in a realistic audio environment while gaming.
- Sidetone and Mic Monitoring: The G930 headset also offers the option to adjust the sidetone and mic monitoring levels. Sidetone allows you to hear your own voice in the headset, which can be helpful to prevent speaking too loudly during gameplay. Mic monitoring, on the other hand, lets you listen to your own voice through the headset, ensuring that your teammates can hear you clearly.
- Volume and Mute Controls: The Logitech G930 headset has convenient volume and mute controls that can be accessed directly on the headset itself. Adjust the volume to your preferred level using the volume wheel, and quickly mute the microphone by flipping up the flexible boom.
- Customize Voice Morphing: For added fun and customization, the G930 headset allows you to apply voice morphing effects while using the microphone. Transform your voice into a deep robot-like tone or a high-pitched chipmunk voice, making your gaming sessions even more entertaining.
- Save and Apply Settings: Once you have adjusted the sound settings according to your preferences, make sure to save and apply the changes. This will ensure that your customized settings are preserved for future use.
By taking the time to adjust the sound settings on your Logitech G930 headset, you can optimize your gaming experience and immerse yourself in the audio world of your favorite games.
Step 5: Testing the Logitech G930 Headset
Now that you have successfully installed and customized your Logitech G930 headset, it’s time to put it to the test. Follow these steps to ensure that everything is working as it should:
- Launch your favorite media player or a game that supports audio.
- Put on your G930 headset and adjust it to your desired comfort level.
- Make sure the headset is turned on and check that the volume is at an appropriate level.
- Play a piece of audio or start the game to see if you can hear the sound through the headset.
- If you can hear the audio clearly, congratulations! Your Logitech G930 headset is working perfectly fine.
- If you are experiencing any issues with the audio or if it’s not playing through the headset, try the following troubleshooting steps:
1. Check the audio settings on your device and make sure that the Logitech G930 headset is selected as the default audio output. Adjust the volume and ensure that it’s not muted.
2. Verify that the wireless USB adapter is properly connected to your device. Disconnect and reconnect it if necessary.
3. Ensure that the headset is within range of the USB adapter. If you are too far away from the adapter, you may experience connectivity issues.
4. Try restarting your device and relaunching the application or game you’re testing the headset with.
5. If none of the above steps resolve the issue, consult the user manual or visit the Logitech support website for further assistance.
Remember, the Logitech G930 headset offers an immersive audio experience with its advanced features and surround sound technology. Take the time to explore different game settings and audio profiles to enhance your overall gaming or listening experience.
With the testing complete and any issues resolved, you can now enjoy your Logitech G930 headset and immerse yourself in an incredible audio journey!
Troubleshooting Common Issues
Despite being a top-quality headset, the Logitech G930 may encounter some common issues that can be easily resolved. Here are the most common problems users may experience and their corresponding troubleshooting steps:
1. No sound or audio playback issues: If you are not getting any sound from your Logitech G930 headset, try the following solutions:
- Check that the headset is properly connected to your device.
- Ensure that the headset volume is not muted or set too low.
- Check the audio settings on your device and make sure that the headset is selected as the default audio output.
- Update your audio drivers to the latest version.
2. Poor sound quality or static noise: If you are experiencing distorted or poor sound quality, try these troubleshooting steps:
- Check that the headset is charged and has sufficient battery power.
- Ensure that the wireless receiver is not obstructed by any objects and is located within range of the headset (usually within 15-20 feet).
- Clean the headset’s ear cups and microphone to remove any dust or debris that may be affecting the sound quality.
- Try adjusting the equalizer settings on the Logitech Gaming Software to optimize the audio output.
3. Connection and sync issues: If your Logitech G930 headset is having trouble connecting or syncing, consider these troubleshooting steps:
- Make sure that both the wireless receiver and the headset are powered on.
- Try reconnecting the headset to the wireless receiver by pressing the connect button on both devices.
- Check for any interference from other wireless devices in the area, such as Wi-Fi routers or cordless phones, and move them further away from the headset.
- If all else fails, reinstall the Logitech Gaming Software and follow the setup process again.
4. Mic not working or mic sensitivity issues: If the microphone on your Logitech G930 headset is not functioning properly or the sensitivity needs adjustment, try these troubleshooting steps:
- Ensure that the microphone is not muted or set too low in the audio settings of your device.
- Check the microphone connection to make sure it is securely plugged into the headset.
- Make sure that the microphone boom is properly positioned near your mouth for optimal audio pickup.
- Adjust the microphone sensitivity settings in the Logitech Gaming Software to achieve the desired level of sound pickup.
5. Battery life and charging issues: If you are experiencing problems with the battery life or charging of your Logitech G930 headset, consider these troubleshooting steps:
- Make sure that the headset is properly connected to the charging cable and that the cable is securely plugged into a power source.
- Check that the charging port on the headset is not damaged or blocked by any debris.
- Try using a different USB port or charging cable to rule out any issues with the power source or cable.
- If the battery life continues to be poor, consider replacing the rechargeable battery inside the headset.
By following these troubleshooting steps, you should be able to resolve most common issues encountered with the Logitech G930 headset. If the problem persists, it may be necessary to contact Logitech support for further assistance.
Conclusion
Setting up the Logitech G930 headset is a straightforward process that allows you to enhance your gaming or audio experience. Whether you’re a professional gamer or someone who enjoys immersive sound quality, this headset offers a range of features and customization options to suit your needs. By following the step-by-step instructions outlined in this guide, you can easily connect and configure your headset to get the most out of its capabilities.
The Logitech G930 provides exceptional audio quality, a comfortable fit, and convenient controls, making it a popular choice among gamers and audiophiles alike. With its wireless functionality and long-lasting battery life, you can enjoy uninterrupted gaming sessions or immersive listening experiences. Don’t forget to regularly update the headset’s drivers and firmware to ensure optimal performance.
So, go ahead and experience the immersive sound and comfort of the Logitech G930 headset. Prepare to be blown away by the incredible audio performance and the added edge it brings to your gaming or entertainment sessions. Upgrade your gaming setup and take your audio experience to the next level with the Logitech G930 headset!
FAQs
1. How do I connect the Logitech G930 headset to my computer?
To connect the Logitech G930 headset to your computer, follow these steps:
- Locate the USB receiver that comes with the headset.
- Insert the USB receiver into an available USB port on your computer.
- Turn on the headset by pressing the power button located on the left earcup.
- Wait for your computer to detect and install the necessary drivers for the headset.
- Once the drivers are installed, the headset should be ready to use.
2. How do I charge the Logitech G930 headset?
To charge the Logitech G930 headset, follow these steps:
- Connect the micro-USB charging cable to the micro-USB port on the headset.
- Connect the other end of the charging cable to a USB power source, such as a computer or wall adapter.
- The LED light on the headset will indicate the charging status. A solid red light means it is charging, and a solid green light means it is fully charged.
- Allow the headset to charge fully before using it for the best battery performance.
3. Can I use the Logitech G930 headset with my console?
No, the Logitech G930 headset is designed specifically for use with a computer. It is not compatible with gaming consoles such as Xbox or PlayStation. However, Logitech offers other gaming headsets that are compatible with consoles, such as the G933 Artemis Spectrum.
4. How do I adjust the audio settings on the Logitech G930 headset?
To adjust the audio settings on the Logitech G930 headset, you can use the Logitech Gaming Software. This software allows you to customize the equalizer settings, surround sound options, microphone volume, and more. Simply download and install the Logitech Gaming Software from the Logitech website, and then launch the software to access the audio settings.
5. Can I use the Logitech G930 headset wirelessly?
Yes, the Logitech G930 headset is a wireless headset that uses a 2.4GHz wireless connection. The USB receiver included with the headset allows you to connect wirelessly to your computer, providing freedom of movement without the constraints of a wired headset.