
Are you concerned about your privacy while using your Lenovo laptop? Whether you’re working on sensitive documents or just want to keep your personal information secure, turning on the privacy screen feature can provide you with an added layer of protection. In this article, we will guide you through the process of enabling the privacy screen on your Lenovo laptop. By following a few simple steps, you can ensure that the contents of your screen are only visible to you, preventing any prying eyes from accessing your confidential data. So, let’s dive in and learn how to activate the privacy screen feature on your Lenovo laptop for enhanced privacy and peace of mind.
Inside This Article
- Why is Privacy Screen Important?
- Steps to Turn On Privacy Screen on Lenovo Laptop
- Troubleshooting Privacy Screen Issues on Lenovo Laptop
- Conclusion
- FAQs
Why is Privacy Screen Important?
In today’s world, privacy is a growing concern for individuals and businesses alike. With the increasing reliance on technology, it has become more important than ever to protect our sensitive information from prying eyes. One way to safeguard your privacy is by using a privacy screen on your Lenovo laptop.
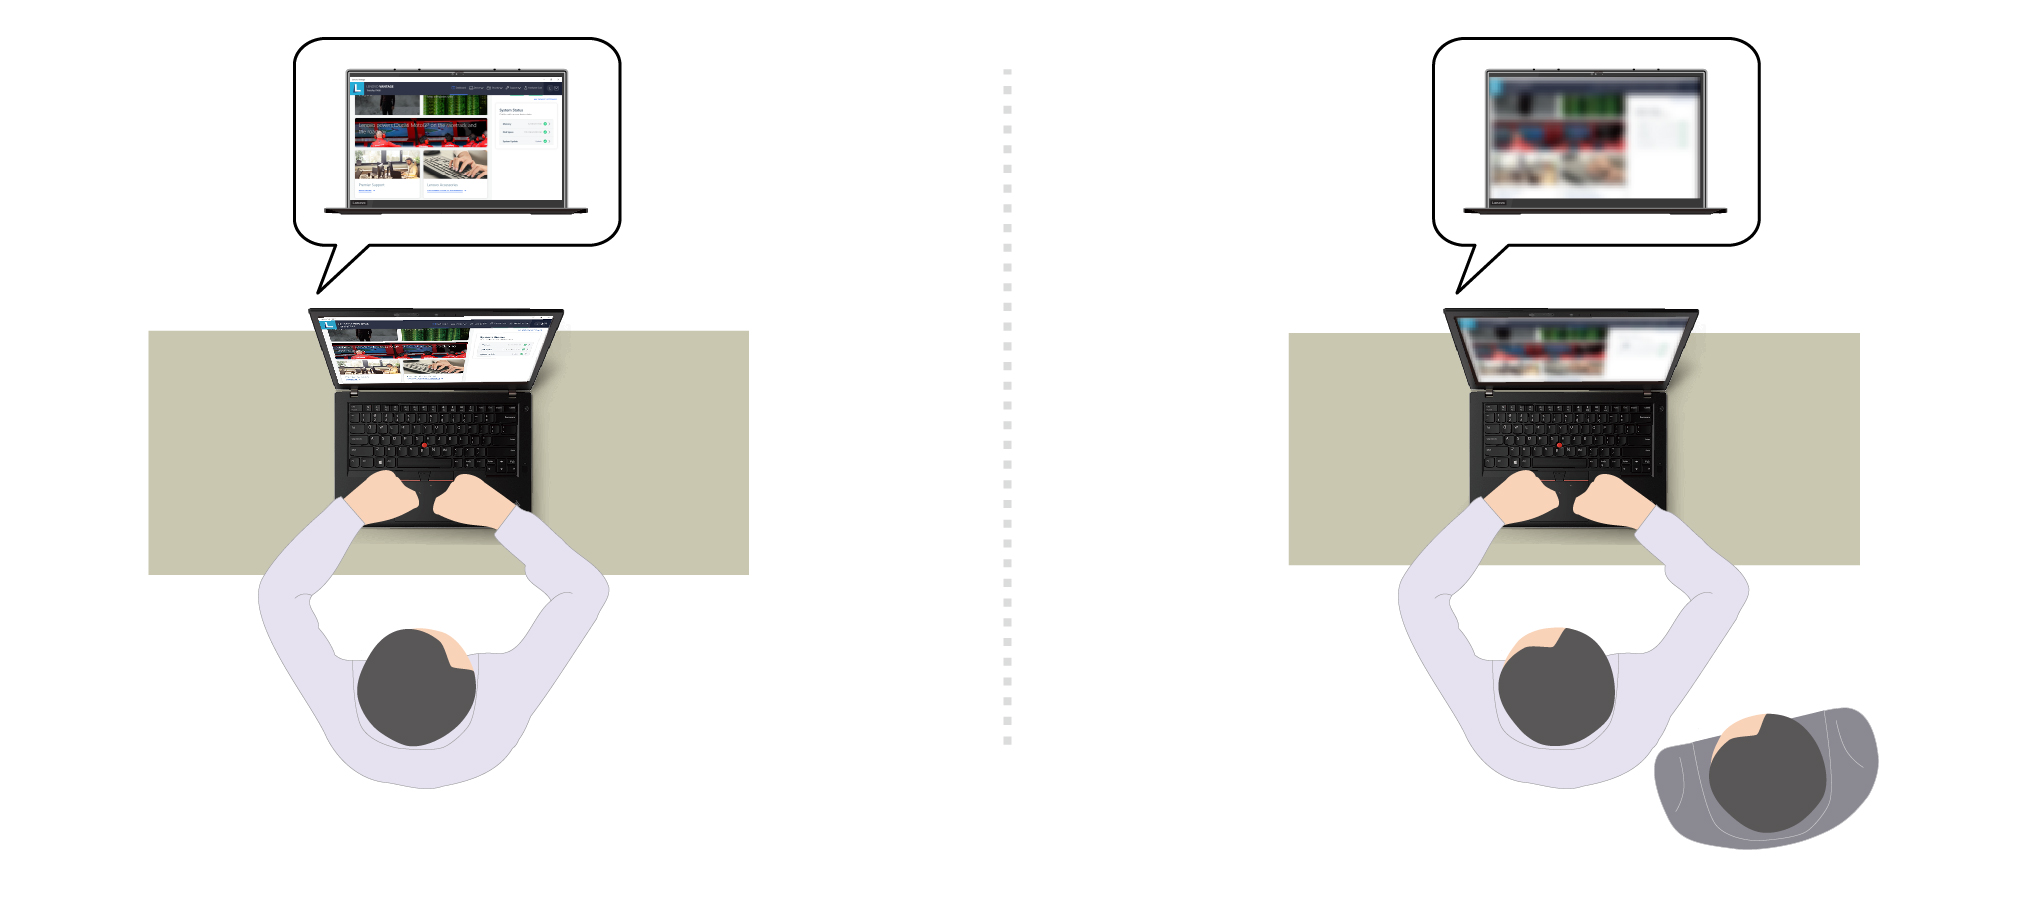
A privacy screen is a thin film that is placed over your laptop’s display. It works by limiting the viewing angle of the screen, making it difficult for anyone sitting beside or behind you to see what you are working on. This ensures that only the person directly in front of the screen can view its contents, keeping your data safe from unauthorized access.
There are several reasons why privacy screens have become important. Firstly, they prevent visual hacking, which is the act of obtaining confidential information by visually observing a computer screen. This is especially crucial when working in public spaces such as coffee shops, airports, or libraries, where there is a high risk of someone snooping on your activities.
Moreover, privacy screens are essential for professionals who handle sensitive or confidential data. Whether you are a lawyer reviewing client documents, a healthcare provider accessing patient records, or a financial analyst studying market trends, it is crucial to keep this information private. A privacy screen acts as an additional layer of security, reducing the risk of data breaches and maintaining client confidentiality.
Additionally, privacy screens promote productivity in shared workspaces. By limiting the visibility of your screen to only yourself, you can work freely without worrying about the prying eyes of coworkers. This allows you to focus on your tasks and maintain your concentration, ultimately enhancing your overall workflow.
Furthermore, privacy screens can also serve as a deterrent against shoulder surfing, a technique used by individuals to steal personal information by observing someone’s screen from a distance. By blocking the view from all but the optimal angle, a privacy screen thwarts such attempts, ensuring that your data remains safe and secure.
Overall, a privacy screen is an indispensable accessory for your Lenovo laptop. It not only protects your personal information from prying eyes but also safeguards confidential business data. Whether you are a student, a professional, or a casual user, investing in a privacy screen is a proactive step towards preserving your privacy and maintaining the security of your data.
Steps to Turn On Privacy Screen on Lenovo Laptop
Protecting your privacy while using your Lenovo laptop is essential in today’s digital world. One way to safeguard your personal and sensitive information is by enabling the privacy screen feature. The privacy screen on your Lenovo laptop prevents people from viewing your screen from different angles, ensuring that only you have a clear view of your display. Follow these simple steps to turn on the privacy screen on your Lenovo laptop:
- Step 1: Open the system settings on your Lenovo laptop. You can do this by clicking on the Windows icon in the bottom left corner of your screen and selecting “Settings” from the menu.
- Step 2: Navigate to the “System” category within the settings menu.
- Step 3: Click on the “Display” option within the system settings menu.
- Step 4: Scroll down until you find the “Privacy” section.
- Step 5: Look for the “Privacy screen” or “Privacy filter” option. This option may vary depending on your laptop model and operating system version.
- Step 6: Toggle the switch to turn on the privacy screen feature. If the option is not available, it may indicate that your Lenovo laptop does not have a built-in privacy screen feature.
- Step 7: Adjust the angle and brightness of your screen to optimize the privacy screen feature. Experiment with different viewing angles to determine the best position for maintaining privacy.
- Step 8: Test the privacy screen feature by having someone view your screen from different angles. You should notice that the display becomes significantly darker or less visible, ensuring your privacy.
Once you have followed these steps, your privacy screen feature will be activated on your Lenovo laptop, providing an added layer of protection for your sensitive information.
Troubleshooting Privacy Screen Issues on Lenovo Laptop
If you’re experiencing issues with your privacy screen on your Lenovo laptop, there are a few troubleshooting steps you can take to resolve them. Privacy screens are a crucial feature for laptop users, as they help protect sensitive information from prying eyes. Here are some common problems you might encounter and their respective solutions.
1. Privacy Screen Not Functioning: If your privacy screen is not turning on or displaying properly, the first step is to ensure that you have activated it correctly. Check if the privacy screen button or option is enabled in your laptop settings. You can usually find this setting in the Display section of your system preferences. If it’s already enabled but not working, try restarting your laptop to see if that resolves the issue.
2. Dim or Flickering Privacy Screen: Sometimes, the privacy screen may appear dim or flicker intermittently. This can be caused by a variety of factors, such as a faulty screen protector or incompatible software. If you have a screen protector installed, remove it and check if the issue persists. Additionally, ensure that your laptop’s display driver is up to date by visiting the Lenovo support website and downloading the latest driver for your model.
3. Discoloration or Distorted Privacy Screen: If you notice discoloration or distortion on your privacy screen, it could be due to physical damage or a malfunctioning screen. Check if there are any visible cracks or scratches on the screen. If so, you may need to replace the privacy screen. If there are no visible signs of damage, try adjusting the display settings on your laptop to see if that improves the image quality.
4. Privacy Screen Not Engaging Properly: In some cases, the privacy screen may not engage properly when you activate it. This can happen if there is debris or dust blocking the screen mechanism. Carefully clean the edges of the screen with a microfiber cloth to remove any obstructions. If the issue persists, you may need to contact Lenovo support for further assistance.
5. Privacy Screen Power Drain: Lastly, if you find that your laptop’s battery drains significantly faster when the privacy screen is enabled, it could be a power management issue. To mitigate this, try adjusting the power settings on your laptop. You can reduce the display brightness or optimize the power settings to conserve battery life.
If none of the troubleshooting steps mentioned above resolve your privacy screen issues, it is recommended to contact Lenovo customer support or visit a certified service center for further assistance. They will be able to diagnose the problem more accurately and provide you with a solution tailored to your specific laptop model.
Conclusion
In conclusion, the privacy screen feature on Lenovo laptops provides an added layer of security and convenience for users looking to protect their sensitive information from prying eyes. By enabling the privacy screen, you can work confidently in public spaces without worrying about strangers peeking at your screen.
The process of turning on the privacy screen varies depending on the specific Lenovo laptop model you have. However, the steps are generally straightforward and can be easily followed by referring to the user manual or Lenovo’s support website.
Remember to make use of the privacy screen feature whenever you are in a public setting or when you need to keep your work confidential. It is a valuable tool that ensures your privacy and maintains the security of your sensitive data.
With the privacy screen turned on, you can enjoy peace of mind knowing that your Lenovo laptop screen is obscured from others, keeping your work and personal information safe and secure.
FAQs
Q: How do I turn on the privacy screen on my Lenovo laptop?
To enable the privacy screen feature on your Lenovo laptop, follow these steps:
- Locate the Function (Fn) key on your keyboard. It is usually located on the bottom left corner.
- Look for the Display or Screen Brightness key. It is typically located on the top row of keys and has an icon resembling a monitor or a sun.
- Press and hold the Function (Fn) key and simultaneously press the Display or Screen Brightness key to toggle the privacy screen on or off.
- If your laptop has a physical privacy screen button, you can also use it to enable or disable the feature.
Q: Can I adjust the privacy screen intensity on my Lenovo laptop?
While some Lenovo laptops allow you to adjust the intensity of the privacy screen, it depends on the specific model and configuration. Check your laptop’s user manual or the Lenovo website for instructions on how to adjust the privacy screen intensity, if available.
Q: Why is the privacy screen not working on my Lenovo laptop?
There could be several reasons why the privacy screen is not functioning correctly on your Lenovo laptop. Here are a few troubleshooting steps you can try:
- Make sure you are using the correct key combination (Fn + Display or Screen Brightness key) to enable or disable the privacy screen.
- Check if your laptop has a physical privacy screen button and ensure it is not stuck or damaged.
- Update your laptop’s graphics drivers to the latest version available. You can download the drivers from the official Lenovo website.
- Restart your laptop and try enabling the privacy screen again.
- If none of the above solutions work, contact Lenovo customer support for further assistance.
Q: Does the privacy screen affect the viewing experience on my Lenovo laptop?
Yes, the privacy screen feature is designed to limit the viewing angles, making it difficult for others to see your screen unless they are directly in front of it. However, it may also slightly affect your viewing experience by reducing the brightness or clarity of the display. Adjusting the screen brightness or intensity may help alleviate this issue.
Q: Can I use a privacy screen filter instead of the built-in privacy screen on my Lenovo laptop?
Yes, if your Lenovo laptop does not have a built-in privacy screen, you can opt for a privacy screen filter. These filters are attachable screens that limit the viewing angles and protect your screen from prying eyes. Ensure you purchase a privacy screen filter that is compatible with the size and dimensions of your Lenovo laptop.