
Are you looking for a reliable and efficient way to wire your Speakon connectors? Look no further! In this comprehensive guide, we will walk you through the step-by-step process of wiring Speakon connectors like a pro. Speakon connectors are commonly used in audio systems, providing a secure and high-quality connection between amplifiers and speakers. Whether you’re a seasoned professional or just starting out, understanding how to wire Speakon connectors is essential for achieving optimal sound performance. We will cover everything from the different types of Speakon connectors to the tools you’ll need and the proper wiring techniques. So, let’s dive in and get you on your way to achieving crisp, clear sound with your Speakon connectors!
Inside This Article
- Understanding Speakon Connectors
- Tools and Materials Required
- Step 1: Identifying the Connectors
- Step 2: Preparing the Wires
- Step 3: Wiring the Speakon Connector
- Step 4: Testing the Connection
- Tips and Precautions
- Conclusion
- FAQs
Understanding Speakon Connectors
Speakon connectors are widely used in the audio industry for their reliability, durability, and high-quality signal transmission. These connectors are specifically designed for professional audio applications, such as sound systems, amplifiers, and loudspeakers. Understanding how Speakon connectors work and their various configurations can help you successfully wire your audio setup and ensure optimal performance.
Unlike traditional audio connectors, Speakon connectors are designed with a locking mechanism to securely fasten the connection. This feature prevents accidental disconnections and ensures a stable and uninterrupted signal flow, making Speakon connectors ideal for live performances and high-powered audio setups.
One of the key advantages of Speakon connectors is their ability to handle higher power levels without compromising audio quality. They are available in different configurations, such as 2-pole, 4-pole, and 8-pole, allowing for connections of various audio components with different needs.
Speakon connectors also have a unique design that allows for easy and quick connections. They feature a twist-lock design, where you simply insert the connector and twist it, securing it in place. This design not only facilitates quick setup and teardown but also eliminates the risk of loose connections or unintentional disconnections during performances.
It’s essential to understand the polarity of Speakon connectors, as it can impact the sound quality and overall performance of your audio system. Speakon connectors have two poles, labeled +1 and -1. It’s important to connect the positive (+1) terminal to the corresponding positive terminal of your audio equipment to maintain proper phase alignment and avoid phase cancellation issues.
Another critical aspect to consider when dealing with Speakon connectors is the wire gauge. The wire gauge determines the maximum amount of current that can pass through the connector. Using the appropriate wire gauge for your specific setup is crucial to prevent signal loss, distortion, or even damage to your equipment.
Overall, understanding Speakon connectors can greatly enhance your audio setup and ensure optimal performance. Whether you’re an audio professional or a music enthusiast, knowing how to properly wire and utilize Speakon connectors will enable you to create a reliable and high-quality audio system for any occasion.
Tools and Materials Required
Before you start wiring a Speakon connector, make sure you have the following tools and materials ready:
1. Wire stripper: You’ll need a wire stripper to remove the insulation from the ends of the wires. This tool ensures a clean and precise cut, making it easier to connect the wires to the Speakon connector.
2. Small flathead screwdriver: A small flathead screwdriver will be needed to tighten the screws on the Speakon connector. This tool allows you to secure the wires in a firm and stable manner.
3. Soldering iron (optional): While not strictly necessary, a soldering iron can be useful if you want to ensure the strongest and most reliable connection between the wires and Speakon connector. Soldering creates a permanent bond, minimizing the risk of loose or disconnected wires.
4. Solder and flux (optional): If you decide to use a soldering iron, you’ll need solder and flux. Flux helps to clean the surfaces of the wires and connector, allowing the solder to properly adhere. Solder creates a secure joint that is resistant to movement or detachment.
5. Speakon connector: Of course, you’ll need the Speakon connector itself. Ensure you have the appropriate type of Speakon connector for your specific application. Speakon connectors come in various sizes and configurations, so choose the one that matches your requirements.
6. Suitable cables: Lastly, you’ll need the appropriate cables to connect your audio equipment. Make sure you have high-quality speaker cables that are compatible with the Speakon connector. The cables should have the required gauge and length for your setup.
Having these tools and materials on hand will ensure a smooth and successful wiring process. Make sure to double-check that you have everything before you start, as it will save you time and frustration later on.
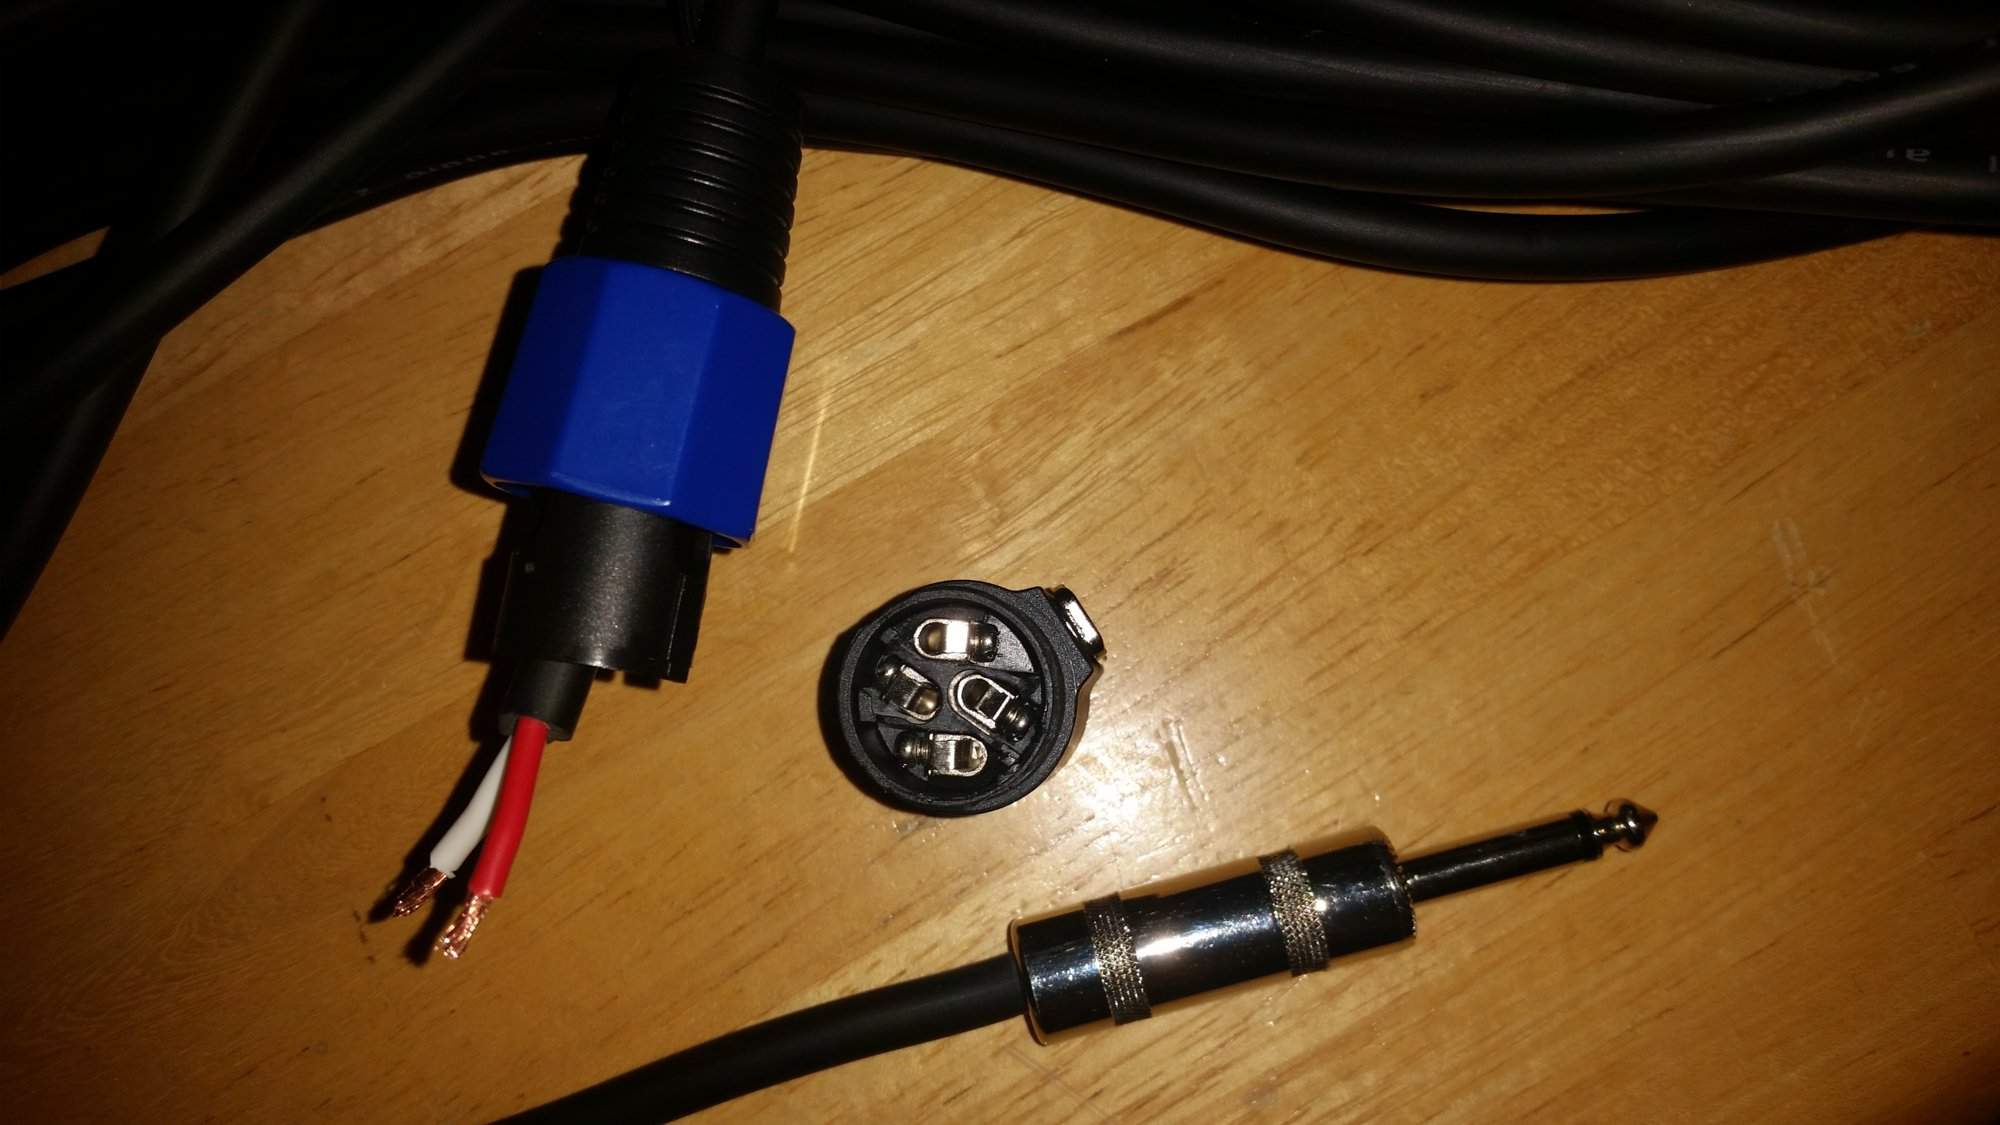
Step 1: Identifying the Connectors
Before you begin wiring a Speakon connector, it’s crucial to understand the different parts and their functionalities. A Speakon connector is specifically designed for professional audio equipment, providing a secure and reliable connection for audio signals.
The Speakon connector consists of three main components: the connector body, the contacts, and the locking mechanism. The connector body is typically cylindrical in shape and made of durable materials like plastic or metal. It houses the contacts and provides a protective enclosure for the wiring.
The contacts in a Speakon connector play a vital role in transmitting the audio signal efficiently. They are either male or female, depending on whether they are plugged into a male or female socket. The contacts are color-coded for easy identification. The most common configuration is the four-pole Speakon connector, with two connectors for positive and negative signals, and two connectors for the speaker output.
Lastly, the Speakon connector features a locking mechanism that ensures a secure connection. This lock prevents accidental disconnection, especially during live performances or when equipment is moved around. The locking mechanism is designed to be simple and user-friendly, with a quick-release button that allows for easy disconnection when needed.
Identifying these key components of the Speakon connector will help you understand how to wire it correctly. In the next steps, we will guide you through the process of preparing the wires and connecting them to the Speakon connector.
Step 2: Preparing the Wires
Once you have identified the type of Speakon connector you are working with in Step 1, the next step is to prepare the wires that will be connected to the connector. Properly preparing the wires ensures a secure and reliable connection.
The first thing you need to do is strip the outer insulation of the wire. Take a wire stripper and carefully remove about half an inch of the outer insulation from each wire. Be sure to expose enough bare wire to make a solid connection, but not too much that it extends beyond the metal contact points inside the connector.
After stripping the outer insulation, you may notice that there are multiple strands of wire within. To ensure the best possible connection, it’s recommended to twist the strands together. Hold the stripped end of the wire in one hand and use your other hand to gently but firmly twist the strands together in a clockwise direction. This will prevent any loose strands that could potentially cause a bad connection.
Once the strands are twisted together, it’s a good idea to tin the wires. Tinning involves coating the exposed wire with solder to prevent corrosion and improve conductivity. To do this, heat your soldering iron and apply a small amount of solder to the tip. Touch the tip of the soldering iron to the twisted strands of wire and allow the solder to melt onto the wire, coating it evenly. Be careful not to apply too much solder as it can create bulges that may interfere with inserting the wire into the connector.
After tinning the wires, trim any excess solder or strands that may be sticking out. Use wire cutters or scissors to carefully remove any excess material. It’s important to have clean and neat wire ends for a proper connection.
Lastly, it’s a good practice to label the wires for easy identification. Use colored electrical tape or markers to mark each wire with a unique identifier. This will make it easier to connect the wires to the correct terminals in the Speakon connector.
By properly preparing the wires, you are ensuring a solid and reliable connection between your audio equipment and the Speakon connector. This step may seem small, but it plays a crucial role in achieving optimal sound quality and preventing any potential issues with your audio setup.
Step 3: Wiring the Speakon Connector
Now that you have identified the terminals and prepared the wires, it’s time to start wiring the Speakon connector. Follow these simple steps to ensure a secure and reliable connection:
1. Insert the stripped end of the positive wire into the positive terminal of the Speakon connector. Make sure the wire is inserted securely and that there is no exposed copper.
2. Tighten the terminal by turning it clockwise using a screwdriver or a connector tightening tool. This will ensure a tight and secure connection that minimizes the risk of signal loss or interference.
3. Repeat the same process with the negative wire, inserting it into the negative terminal of the Speakon connector. Again, make sure the wire is inserted properly and tighten the terminal securely.
4. Double-check your connections to ensure that the positive and negative wires are connected to the correct terminals. This is crucial for maintaining the polarity of your audio signal and preventing any potential damage to your equipment.
5. Once all the wires are securely connected, gently push the wires and terminals into the housing of the Speakon connector. Make sure that there is enough clearance for the connector to fit properly and that the wires are not in contact with any metal parts.
6. Finally, give the connector a gentle tug to ensure that the wires are firmly held in place. If the wires come loose or there is any movement, recheck your connections and tighten the terminals if necessary.
Remember, a proper and secure wiring connection is essential for optimal signal transmission and audio performance. Take your time and ensure that each wire is securely attached to the correct terminal before moving on to the next one.
Once you have successfully wired the Speakon connector, you can proceed to the next step, which involves testing the connection to ensure everything is working as intended.
Step 4: Testing the Connection
Once you have successfully wired the Speakon connector, it’s crucial to test the connection to ensure everything is functioning as it should. Testing the connection will give you the confidence that your wiring is correct and that the audio signal will pass through without any issues.
To test the connection, follow these steps:
- Prepare an audio source: Begin by connecting an audio source, like a microphone or a musical instrument, to the Speakon connector. This will help you determine if the signal is being transmitted effectively.
- Attach the other end: Connect the other end of the Speakon connector to an audio input, such as an amplifier or a mixing console. This will complete the audio signal path.
- Power on the devices: Make sure to power on both the audio source and the audio input devices.
- Check for audio signal: Once everything is powered on, speak into the microphone or play your instrument to generate an audio signal. Monitor the output from the audio input device to see if the signal is being received properly.
- Listen for quality: Pay close attention to the sound quality of the audio signal. Make sure there are no distortions, crackling noises, or any other unwanted sounds. Adjust the levels on the audio input device if necessary.
If you encounter any issues during the testing process, it’s important to troubleshoot the problem. Check the wiring connections, ensure they are securely connected, and verify that you have wired the correct pins on the Speakon connector. Additionally, double-check the settings on both the audio source and the audio input devices to ensure they are properly configured.
Testing the connection is a critical step in the wiring process, as it allows you to identify and rectify any issues before using the Speakon connector in a live performance or recording session. By meticulously testing the connection, you can ensure reliable and high-quality audio transmission.
Tips and Precautions
When it comes to wiring Speakon connectors, there are a few important tips and precautions to keep in mind. Following these guidelines will ensure a safe and reliable connection for your audio equipment.
1. Double-check the polarity: Pay close attention to the polarity of the wires when connecting them to the Speakon connector. Incorrect polarity can result in phase cancellation and affect the sound quality. Ensure that the positive and negative wires are correctly connected.
2. Use the appropriate wire gauge: It’s crucial to use the right gauge of wire for your installation. Using wire that is too thin can lead to signal loss and poor performance. Consult the manufacturer’s specifications to determine the appropriate wire gauge for your specific application.
3. Secure the wires firmly: When wiring the Speakon connector, make sure that the wires are secured tightly to the terminal connections. Loose connections can cause intermittent signal loss or even damage to your equipment. Use a screwdriver or appropriate tool to secure the wires firmly in place.
4. Avoid mixing different wire types: It’s best to use the same type of wire throughout your audio setup to maintain consistency and avoid impedance mismatching. Mixing different wire types could result in signal degradation and reduced performance.
5. Test the connection before use: Once you have wired the Speakon connector, it’s essential to test the connection before using it with your audio equipment. This will help identify any potential issues and ensure that the connection is functioning correctly.
6. Label your connectors: To make future troubleshooting and maintenance easier, label your Speakon connectors with appropriate descriptions or color coding. This will help you quickly identify which devices or speakers are connected to the respective connectors.
7. Disconnect power when making connections: Before starting any wiring or connection work, ensure that the power is properly disconnected from your audio equipment. This will prevent accidental electrical shock or damage to your devices.
8. Seek professional help if needed: If you are unsure about the wiring process or lack the necessary expertise, it’s always a good idea to seek the help of a professional. They can ensure that the wiring is done correctly and safely, minimizing the risk of any issues or damage.
Following these tips and precautions will help you wire Speakon connectors with confidence and achieve optimal performance from your audio system. Remember to take your time and be careful during the wiring process to maintain the integrity of your equipment.
Conclusion
In conclusion, learning how to wire a Speakon connector is a valuable skill for anyone working with audio systems, whether it’s for professional or personal use. By understanding the different parts of the Speakon connector and following the step-by-step instructions, you can easily and safely connect your devices without the hassle of using traditional XLR or quarter-inch cables. Speakon connectors provide a secure and reliable connection, ensuring optimal audio quality and minimizing the risk of accidental disconnections. With this knowledge, you can confidently set up and manage your audio equipment, whether it’s for a live performance, recording studio, or even a home theater setup. So go ahead and give it a try—you’ll be amazed at the difference it can make in your audio experience.
FAQs
1. What is a Speakon connector?
A Speakon connector is a type of electrical connector commonly used in audio systems and amplifiers. It is specifically designed for high-power audio connections, providing a secure and reliable connection for professional audio applications.
2. How does a Speakon connector work?
A Speakon connector works by utilizing a locking mechanism to ensure a secure connection. It uses a twist-and-lock system, where the connector is inserted into the socket and then twisted to lock it in place. This locking mechanism prevents accidental disconnection and provides a stable connection for optimal audio performance.
3. What are the advantages of using Speakon connectors?
Speakon connectors offer several advantages over other types of audio connectors. They are designed to handle high-power audio signals, making them suitable for professional audio setups. The locking mechanism ensures a secure connection, reducing the risk of accidental disconnections. Speakon connectors are also reliable and durable, capable of withstanding regular use and providing long-lasting performance.
4. Can I use a Speakon connector for low-power audio applications?
While Speakon connectors are primarily designed for high-power audio applications, they can also be used for low-power audio applications. However, it’s important to ensure that the connector is compatible with the specific power requirements of your audio setup. In some cases, using a Speakon connector for low-power applications may not be necessary, and other types of connectors, such as 1/4″ or XLR connectors, may be more suitable.
5. Are Speakon connectors interchangeable?
Speakon connectors come in different sizes and configurations, including 2-pole, 4-pole, and 8-pole options. It’s important to ensure that you are using the correct type of Speakon connector for your audio setup. While some connectors may appear similar, they may have different pin configurations and power ratings. Using an incompatible Speakon connector can result in improper connections and potential damage to your audio equipment.