
Are you struggling to move an event from one calendar to another? Don’t worry, we’ve got you covered! In this article, we will guide you through the step-by-step process of transferring an event seamlessly from one calendar to another. Whether you’re using a digital calendar app on your phone or a web-based platform, we will provide you with easy-to-follow instructions to ensure a smooth transition. Whether you’re reorganizing your personal schedule or coordinating events with colleagues, this guide will help you efficiently move your event without any hassle. So, let’s dive in and learn how to effortlessly transfer events from one calendar to another!
Inside This Article
- Overview
- Step 1: Accessing the Calendars
- Step 2: Choosing the Event to Move
- Step 3: Exporting the Event from the Source Calendar
- Step 4: Importing the Event to the Destination Calendar
- Step 5: Verifying the Event Transfer
- Step 6: Deleting the Event from the Source Calendar
- Additional Tips and Considerations
- Conclusion
- FAQs
Overview
Transferring events from one calendar to another can be a useful feature when managing multiple calendars or when you want to consolidate your schedule. Whether you’re using a mobile app or a web-based calendar, the process is often straightforward and user-friendly. In this article, we’ll guide you step by step on how to move an event from one calendar to another.
If you find yourself with different events scattered across various calendars, it can be cumbersome to keep track of everything. Moving an event consolidates your schedule, ensuring all your important commitments are in one place.
Whether you’re using a mobile app or a web-based calendar, the steps to move an event are generally similar. The key is to have access to both the source and destination calendars, which can be easily done within most calendar applications.
Now, let’s dive into the specific steps required to move an event from one calendar to another!
Step 1: Accessing the Calendars
When it comes to moving an event from one calendar to another, the first step is to access the calendars you want to work with. This can be done through a variety of methods, depending on the platform or application you are using.
If you are using a mobile app for managing your calendars, start by opening the app on your device. Look for the option to access your calendars or to view all available calendars. Depending on the app, this may be found in the settings menu or as a separate tab.
If you are using a web-based calendar service, such as Google Calendar or Microsoft Outlook, you will need to navigate to the respective website and sign in to your account. Once you are logged in, locate the option to view your calendars, which is typically found in the main menu or sidebar.
Once you have accessed your calendars, take a moment to familiarize yourself with the layout and organization of the calendar interface. This will make it easier to locate and manage the specific event you wish to move.
It’s worth noting that some calendar applications or services may require you to have separate accounts for each calendar you want to access. In this case, make sure you are logged in to the correct accounts before proceeding.
Now that you have accessed the calendars you need, you are ready to move on to the next step of choosing the event you want to move.
Step 2: Choosing the Event to Move
Once you have accessed the source and destination calendars, the next step is to choose the event that you want to move. This step requires careful consideration to ensure that you select the correct event and avoid any confusion or loss of information.
Here are some guidelines to help you choose the right event:
- Identify the event: Take a moment to review the events in the source calendar and identify the specific one that you want to move. Look for any distinctive details such as the event title, date, time, or location to help you ensure you are making the correct selection.
- Consider the impact: Think about the implications of moving the event. Will it affect any other events or attendees? Will there be any conflicts or overlaps in the destination calendar? Assessing the potential consequences will help you make an informed decision.
- Verify the event details: Double-check the event details to ensure accuracy. Make sure the event start and end times, location, and any additional notes or reminders are correct. This step is crucial to avoid any discrepancies or errors during the transfer process.
- Take note of any attachments or attendees: If the event includes attachments or has attendees associated with it, make a note of this information. You will need to ensure that these attachments and attendees are transferred along with the event to the destination calendar.
By following these steps, you can confidently choose the event you want to move, taking into account its impact, verifying its details, and noting any additional attachments or attendees. This careful consideration will help ensure a seamless transfer of the event from one calendar to another.
Step 3: Exporting the Event from the Source Calendar
Now that you’ve accessed both the source and destination calendars, it’s time to export the event from the source calendar. This step ensures that you have a file containing all the event details that you can later import into the destination calendar.
To start the export process, locate the event you want to move from the source calendar. Once you’ve found the event, select it and look for the “Export” or “Download” option. This option may be available in the event’s settings or when you right-click on the event.
Click on the “Export” or “Download” option, and you’ll be prompted to choose a file format for the exported event. The most common file formats for exporting calendar events are .ics (iCalendar) and .csv (Comma Separated Values).
Choose the file format that is compatible with the destination calendar you will be importing the event into. If you’re unsure, it’s advisable to select the .ics format, as it is widely supported by various calendar applications and services.
After selecting the file format, you will be prompted to save the exported event file to your device. Choose a location where you can easily access the file later, such as your computer’s desktop or a dedicated folder.
Once the event has been successfully exported, you now have a file containing all the event details from the source calendar. This file serves as the bridge between the two calendars, allowing you to import the event into the destination calendar effortlessly.
Step 4: Importing the Event to the Destination Calendar
Once you have exported the event from the source calendar, it’s time to import it into the destination calendar. Importing the event ensures that all the relevant details and settings are transferred correctly.
Here’s how you can import the event to the destination calendar:
- Open the destination calendar application or platform that you want to import the event into. This could be a mobile app, a web-based calendar, or a desktop software.
- Locate the option to import events. This is usually found in the settings or preferences section of the calendar application.
- Click on the import option and choose the file format in which you exported the event from the source calendar. Most calendar applications support popular file formats such as .ics (iCalendar) or .csv (Comma Separated Values).
- Click on the “Browse” or “Choose File” button to select the exported event file from your device’s storage.
- Once you have selected the file, click on the “Import” or “Open” button to initiate the import process.
- The calendar application will begin importing the event, and you may be prompted to confirm any specific details or settings before finalizing the import.
- Wait for the import process to complete. This may take a few seconds to several minutes, depending on the size and complexity of the event.
- Once the import is successful, the event will be added to the destination calendar. You may need to navigate to the specific date or time slot to find the imported event.
It is important to note that the import process may vary slightly depending on the calendar application or platform you are using. However, the general steps mentioned above should give you a good idea of how to import the event to the destination calendar.
Now that the event has been successfully imported, you can move on to the next step to verify that the transfer was completed accurately.
Step 5: Verifying the Event Transfer
Once you have successfully imported the event to the destination calendar, it is crucial to take a few moments to verify that the transfer was completed accurately. This step will ensure that all the event details, such as the date, time, location, and any associated notes or attendees, are correctly transferred to the new calendar.
Here are some essential steps to follow when verifying the event transfer:
- Check the event date and time: Open the destination calendar and locate the transferred event. Ensure that the date and time match the original event details from the source calendar.
- Verify the event title: Cross-reference the event title in the destination calendar with the original title from the source calendar. This will help confirm that the event has been accurately transferred.
- Confirm the event location: Double-check that the location information, such as the address or room number, of the transferred event matches the original details. If the event was associated with a specific place, make sure it still reflects in the new calendar.
- Review attendee information: If the event you transferred included attendees, check that the list of attendees in the destination calendar matches the original list. Make sure that everyone who was invited or required to attend is still included.
- Verify any notes or descriptions: If there were any additional notes, descriptions, or reminders associated with the event, make sure they have been carried over to the new calendar. Review the event details to ensure that all relevant information is present.
By going through these verification steps, you can have peace of mind knowing that the event transfer was successful and that all the necessary details have been accurately transferred to the new calendar.
Step 6: Deleting the Event from the Source Calendar
Once you have successfully moved the event from one calendar to another, it is important to delete the event from the source calendar to avoid duplications or confusion. Follow these steps to delete the event:
- Access the source calendar where the event is currently located.
- Navigate to the date and time of the event.
- Select the event that you have just transferred to the destination calendar.
- Look for the delete icon or option, usually represented by a trash bin or a bin icon.
- Click on the delete icon to remove the event from the source calendar.
- Confirm the deletion when prompted by the system.
By following these steps, you will ensure that the event is no longer present in the source calendar. This helps maintain a clean and organized calendar while eliminating any confusion or duplicate entries.
It is important to note that once you delete an event from the source calendar, it cannot be undone. Therefore, double-check the event details and make sure you have successfully moved it to the destination calendar before proceeding with the deletion.
If you encounter any issues or are unable to delete the event from the source calendar, refer to the help documentation or support resources provided by the calendar application or platform you are using. They can provide further assistance and guidance to ensure the successful deletion of the event.
Additional Tips and Considerations
When moving an event from one calendar to another, there are a few additional tips and considerations to keep in mind to ensure a smooth and successful transition:
1. Double-check the destination calendar: Before importing the event to the destination calendar, make sure it is the correct calendar to avoid any confusion or mix-ups. Verify the name and details of the destination calendar to ensure that it is the intended location.
2. Check for conflicts: When moving an event, be mindful of any potential conflicts with other events in the destination calendar. Ensure that the date, time, and location of the event being moved do not clash with any existing events to avoid scheduling conflicts.
3. Preserve event details: Some calendar apps or platforms may not preserve all the event details when exporting and importing. Check the exported event file before importing it to ensure that all the important details, such as attendees, reminders, and notes, are properly preserved.
4. Consider shared calendars: If you are moving an event from your personal calendar to a shared calendar, be aware that the event may become visible to others who have access to the shared calendar. Ensure that the event contains appropriate information and that all attendees are informed of any changes in the event location or timing.
5. Notification settings: When moving an event, pay attention to the notification settings. Ensure that the notifications associated with the event are also transferred to the destination calendar. Double-check the settings after the transfer to make sure you receive the necessary reminders and notifications.
6. Syncing with other devices: If you have multiple devices or calendars synced, ensure that the event transfer is compatible with all your devices and calendars. Confirm that the event appears correctly and syncs across all the platforms and devices you use to manage your calendar.
7. Back up your data: It’s always a good practice to back up your calendar data, especially before making any major changes or transfers. Consider exporting and saving a backup of your entire calendar or specific events, as it can be helpful in case of any data loss or accidental deletions.
By keeping these additional tips and considerations in mind, you can ensure a seamless and hassle-free process when moving an event from one calendar to another. With careful planning and attention to detail, you can effectively manage and organize your calendar events without any disruptions or complications.
Conclusion
Moving an event from one calendar to another can be a simple and efficient process. Whether you are using a mobile app or a web-based calendar, the steps are generally straightforward. By following the instructions specific to your calendar application, you can easily transfer events, ensuring they are properly organized and easily accessible.
Having the ability to move events between calendars offers flexibility and organization, making it easier to manage your schedule. Whether you need to transfer events between personal and work calendars, or merge multiple calendars into one, the process can be done seamlessly with the right tools and instructions at hand.
Remember to always consider any potential conflicts or overlapping events when moving an event to a new calendar to avoid any confusion. By taking advantage of the features provided by your calendar app, you can optimize your time management and stay on top of your schedule effortlessly.
FAQs
Q: Can I move an event from one calendar to another?
A: Yes, you can easily move an event from one calendar to another. Most calendar applications and platforms provide a simple way to do this, allowing you to easily transfer events between calendars.
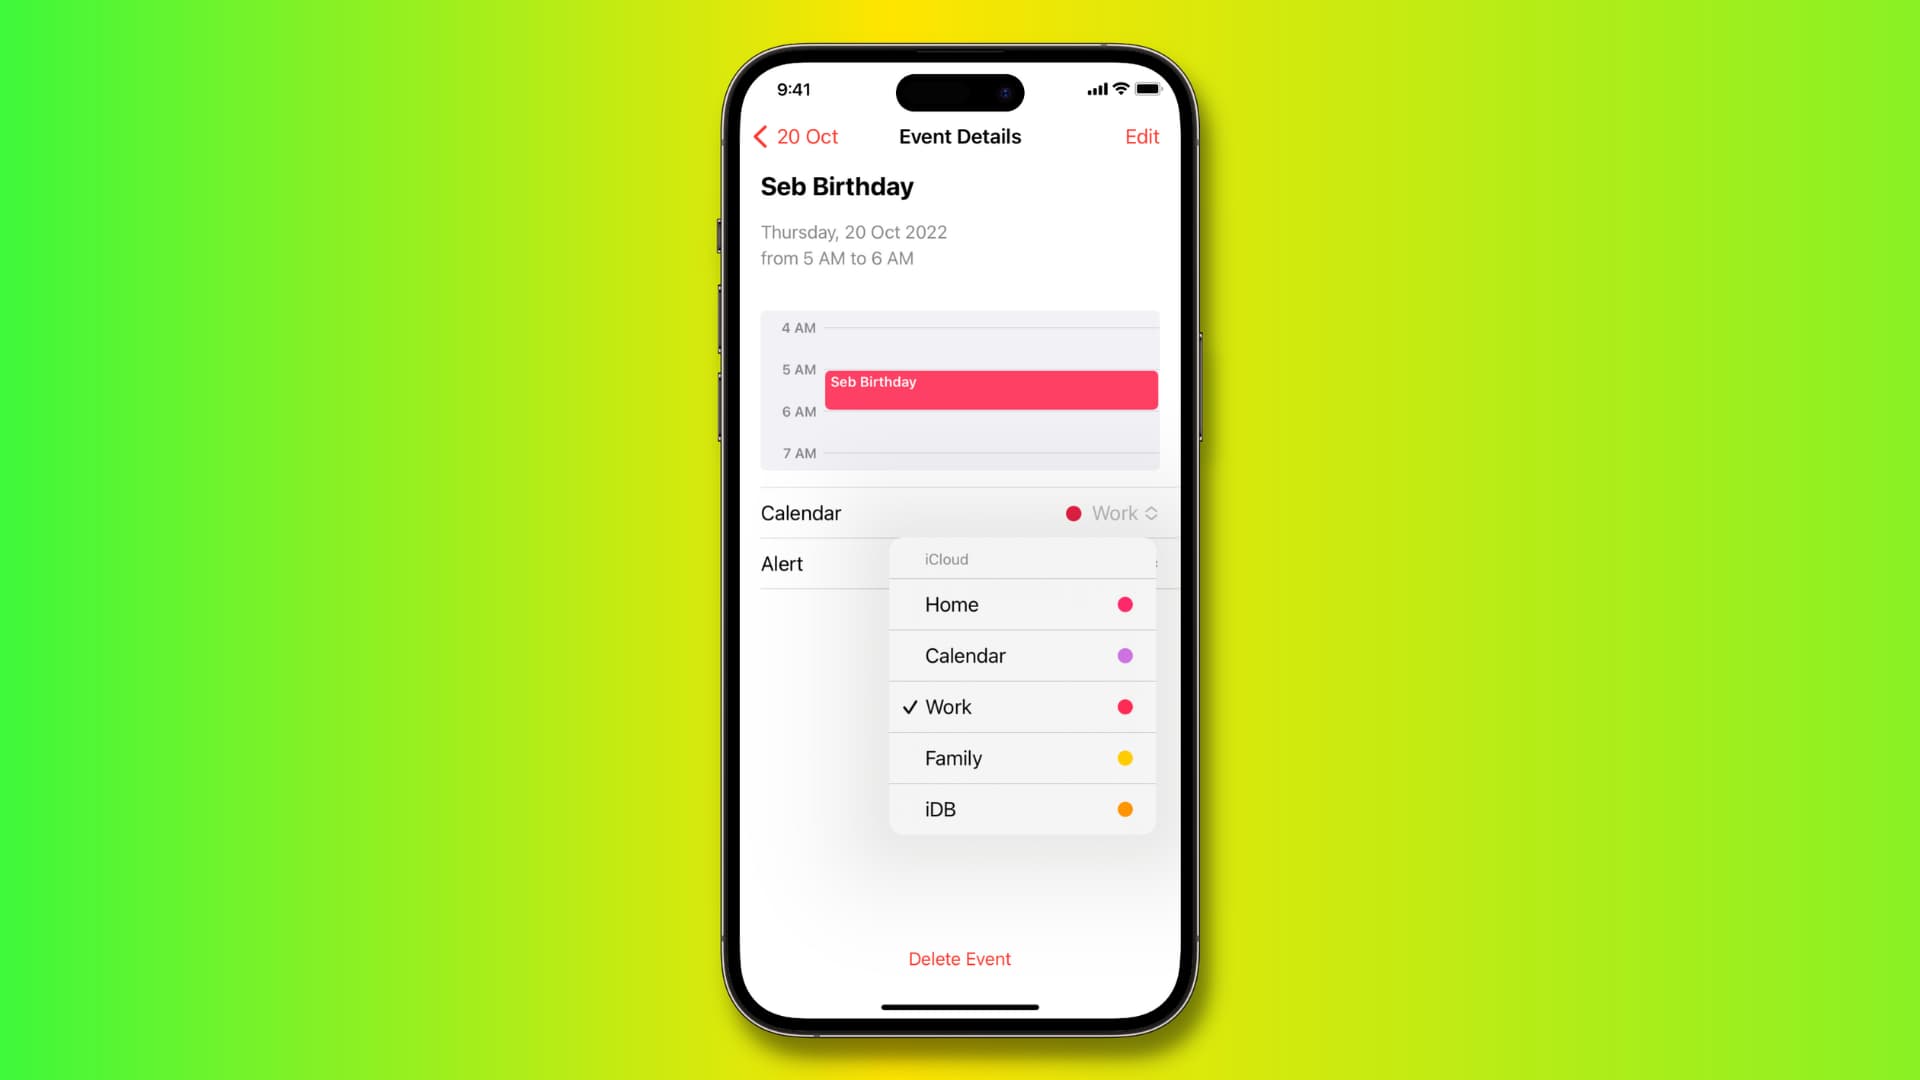
Q: How do I move an event from one calendar to another on my mobile device?
A: To move an event from one calendar to another on your mobile device, open the calendar app and navigate to the event you wish to move. Select the event and look for an option to edit or modify the event details. Within the editing options, you should find an option to change the calendar for the event. Simply select the new calendar you want to move the event to, and save the changes. The event will now appear in the new calendar.
Q: Can I move recurring events from one calendar to another?
A: Yes, most calendar applications and platforms allow you to move recurring events from one calendar to another. When you move a recurring event, all instances of the event will be transferred to the new calendar. This ensures that the event remains on the same schedule even after being moved.
Q: What if I want to keep a copy of the event in the original calendar?
A: If you want to keep a copy of the event in the original calendar after moving it to a new calendar, some calendar apps offer a “Duplicate” or “Copy” option. This allows you to create a copy of the event in the new calendar while retaining the original event in its original calendar. Check the options or settings within your calendar app to see if this feature is available.
Q: Will moving an event to a new calendar affect any reminders or notifications?
A: In most cases, moving an event to a new calendar will not affect any reminders or notifications that have been set for that event. The event will retain its original settings, including any reminders or notifications, even after being moved to a different calendar. However, it’s always a good idea to double-check the event details and notification settings after moving an event, just to ensure everything is still set up correctly.