
Are you tired of constantly losing your internet connection while using your Realme 4 smartphone? We understand the frustration of interrupted browsing and slow loading times. That’s why we’re here to help you stay connected at all times with the best 4G network available. In this comprehensive article, we will guide you through the steps to ensure your Realme 4 stays connected to 4G, even in areas with weak signal strength. From optimizing your network settings to troubleshooting common issues, we’ve got you covered. Say goodbye to buffering and say hello to seamless browsing and lightning-fast downloads with these simple tips and tricks. Let’s get started and keep your Realme 4 always on 4G!
Inside This Article
- Setting up a strong network connection
- Optimizing 4G connectivity- Enabling 4G-only mode- Disabling unwanted network services- Clearing cache and data of apps
- Managing background apps and data usage
- Troubleshooting common network issues
- Conclusion
- FAQs
Setting up a strong network connection
Having a strong network connection is essential for a seamless mobile experience. Whether you are browsing the internet, streaming videos, or making important calls, a stable and reliable network is crucial. In this section, we will explore a few key steps to ensure you have a strong network connection on your Realme 4.
Checking network signal strength
The first step in setting up a strong network connection is to check the signal strength on your Realme 4. A weak signal can significantly affect the performance of your device. To do this, simply look at the signal indicator on your screen. If it shows a low signal or no bars at all, you may need to move to a different location to get a better signal.
Ensuring the correct APN settings
Another crucial element in establishing a strong network connection is ensuring that the Access Point Name (APN) settings on your Realme 4 are correct. APN settings control how your device connects to the internet through your service provider. To check and update the APN settings, go to the “Settings” menu, select “Mobile Networks” or “Cellular Networks,” and then choose “Access Point Names.” Make sure the settings match those provided by your service provider.
Updating the firmware
Updating the firmware on your Realme 4 can help improve network connectivity issues. Manufacturers often release firmware updates that include bug fixes and optimizations for network performance. To check for firmware updates, go to the “Settings” menu, select “System updates” or “Software update,” and then click on “Check for updates.” If an update is available, follow the on-screen instructions to download and install it on your device.
Optimizing 4G connectivity- Enabling 4G-only mode- Disabling unwanted network services- Clearing cache and data of apps
When it comes to optimizing your 4G connectivity on your Realme 4, there are several steps you can take to ensure a smooth and fast internet experience. By enabling the 4G-only mode, disabling unwanted network services, and clearing cache and data of apps, you can maximize your device’s potential and enjoy a seamless online experience.
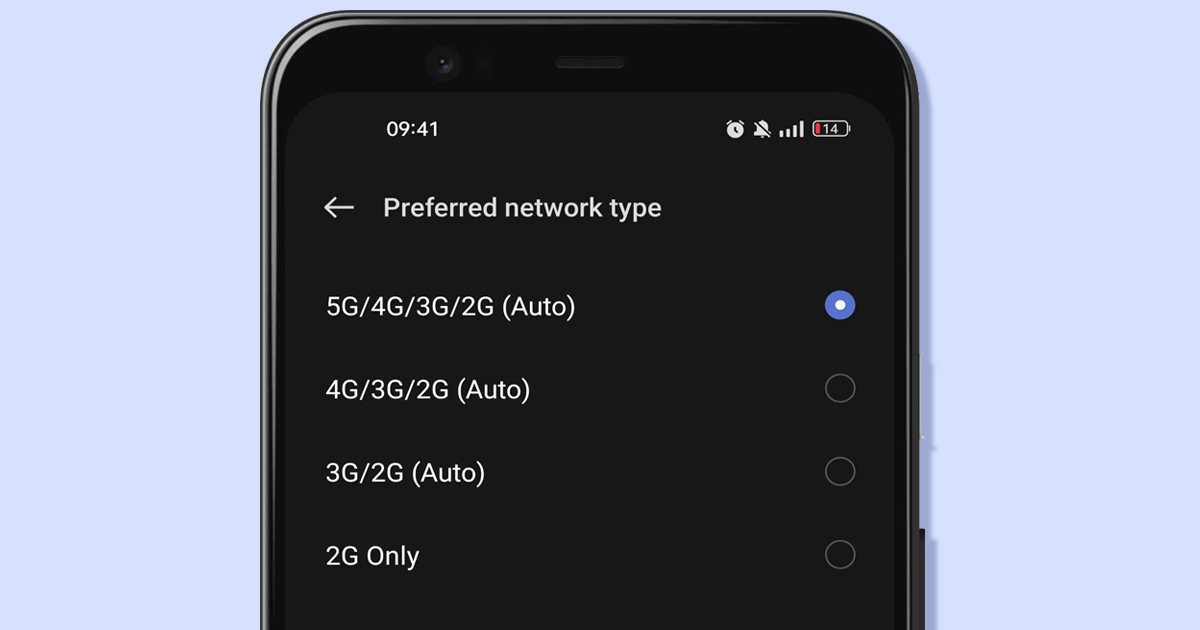
Enabling 4G-only mode: One of the first steps towards optimizing your 4G connectivity is to enable the 4G-only mode on your Realme 4. This mode ensures that your device is using the 4G network exclusively, enhancing your internet speed and stability. To enable this mode, go to your device settings, select “Network & Internet,” then “Mobile Network,” and finally, choose the “Preferred network type” option. From there, select the 4G-only mode, and your device will prioritize the 4G network for data connections.
Disabling unwanted network services: Another way to optimize your 4G connectivity is by disabling unnecessary network services on your Realme 4. These services can consume valuable network resources and affect the overall speed and stability of your internet connection. To disable unwanted network services, go to your device settings, select “Network & Internet,” then “Mobile Network,” and finally, disable any services that you don’t require or use frequently. By doing so, you can ensure that your device is solely focused on providing a smooth 4G experience.
Clearing cache and data of apps: Over time, apps on your Realme 4 can accumulate cache and data, which can hinder your device’s performance and affect your internet connectivity. By regularly clearing the cache and data of apps, you can free up valuable storage space and improve your 4G connectivity. To clear the cache and data of apps, go to your device settings, select “Apps & Notifications,” then “App Info.” From there, choose the app you want to clear cache and data for, and select the respective option. By clearing the cache and data, you can ensure that your apps are running smoothly and not slowing down your 4G connection.
By following these steps to optimize your 4G connectivity on your Realme 4, you can enjoy a faster and more stable internet experience. Enabling the 4G-only mode ensures that your device prioritizes the 4G network, while disabling unwanted network services and clearing app cache and data further enhance your connectivity. Remember to regularly perform these optimizations to maintain optimal performance and make the most out of your Realme 4’s 4G capabilities.
Managing background apps and data usage
In today’s mobile-centric world, managing background apps and controlling data usage have become essential to ensure a smooth and uninterrupted user experience. By effectively managing these aspects, you can optimize your device’s performance, save data, and extend battery life. In this section, we will explore three key techniques: restricting background data for specific apps, monitoring and controlling data usage, and disabling auto-sync for non-essential apps.
Restricting background data for specific apps
Some apps tend to consume a significant amount of data even when running in the background. By restricting background data for select apps, you can prevent them from using up excessive data without your knowledge. To do this, follow these steps:
- Go to the Settings menu on your device.
- Tap on ‘Apps’ or ‘Applications’ to view the list of installed apps.
- Select the app from which you want to restrict background data usage.
- Inside the app settings, look for ‘Data usage’ or ‘Data usage control’.
- Toggle the ‘Restrict background data’ option to enable it for the selected app.
By restricting background data for specific apps, you can effectively manage their data consumption and ensure that your valuable data is utilized only when the app is actively being used.
Monitoring and controlling data usage
To keep a close eye on your data consumption, it is crucial to monitor and control the amount of data used by your device. This can help you identify data-hungry apps and make informed decisions to minimize unnecessary data usage. Here are some useful tips to help you monitor and control data usage:
- Go to the Settings menu on your device and tap on ‘Network & internet’ or ‘Connections’.
- Select ‘Data usage’ or ‘Data usage control’.
- You will see a detailed breakdown of your data usage, displaying the apps using the most data.
- Set a data usage limit to receive alerts and prevent excessive data usage.
- Restrict background data for apps that consume excessive data.
By regularly monitoring your data usage and taking appropriate actions, you can ensure that your data plan is utilized efficiently and avoid any unexpected charges or depletion of your data allowance.
Disabling auto-sync for non-essential apps
Auto-sync is a function that allows apps to automatically update or sync their data in the background. While this feature can be convenient, it can also consume a significant amount of data and drain your device’s battery. To disable auto-sync for non-essential apps, follow these steps:
- Go to the Settings menu on your device.
- Tap on ‘Accounts’ or ‘Accounts & sync’.
- Select the account that you want to modify.
- Disable the ‘Auto-sync data’ option.
By disabling auto-sync for non-essential apps, you can minimize data usage and extend your device’s battery life. You can manually sync the required apps whenever convenient to ensure you have the latest updates.
With the above techniques, you can effectively manage background apps and data usage on your device. By implementing these strategies, you can optimize your device’s performance, conserve data, and enjoy a seamless mobile experience.
Troubleshooting common network issues
Network connectivity issues are not uncommon with mobile phones, and they can be frustrating to deal with. However, there are a few simple troubleshooting steps you can take to resolve common network issues and get back to enjoying a reliable connection. Here are three effective ways to troubleshoot network problems:
1. Restarting the device
One of the simplest and most effective ways to resolve network issues is to restart your device. This action clears any temporary glitches or conflicts that may be affecting your network connection. To restart your mobile phone, simply press and hold the power button until the power menu appears, and then select the “Restart” option. Once your device turns back on, check if the network issue has been resolved.
2. Resetting network settings
If restarting your device doesn’t fix the network problem, you can try resetting your network settings. This action will reset all the network-related configurations on your device, including Wi-Fi, mobile data, and Bluetooth settings. To reset network settings, go to your device’s settings menu, locate the “Network & internet” or “Connections” section, and look for the option to reset network settings. Keep in mind that this action will remove any saved Wi-Fi passwords, so be prepared to re-enter them after the reset.
3. Contacting the service provider for assistance
If restarting and resetting network settings do not resolve the network issue, it may be time to reach out to your service provider for assistance. They have the knowledge and tools to diagnose and address network problems that are beyond your control. Contact their customer support hotline or visit their nearest store to explain the issue you are facing. They will guide you through any necessary troubleshooting steps and can also check if there are any known network outages or maintenance happening in your area.
Remember to provide them with as much detail as possible about the issue, including when it started, specific error messages you are receiving, and any troubleshooting steps you have already taken. The more information you can provide, the better equipped they will be to assist you.
By following these troubleshooting steps, you can effectively address common network issues and ensure a stable and reliable connection on your mobile phone. It’s always a good idea to familiarize yourself with these techniques so that you can resolve any connectivity problems quickly and get back to enjoying your device.
Conclusion
With the Realme 4, staying connected with blazing-fast 4G speeds has never been easier. By following the simple steps outlined in this guide, you can ensure that you’re always enjoying a seamless and reliable 4G connection on your device.
Remember to keep your device updated with the latest software and firmware versions to take advantage of any optimizations and improvements that Realme releases. Additionally, be mindful of your location, as signal strength can vary depending on your surroundings.
Whether you’re browsing the internet, streaming videos, or playing online games, having a stable 4G connection is vital for a smooth and enjoyable mobile experience. By implementing the suggestions mentioned in this article, you can maximize your Realme 4’s 4G capabilities and stay connected at all times, no matter where you are.
So, go ahead and make the most out of your Realme 4’s 4G connectivity, and enjoy seamless browsing, streaming, and downloading on your mobile device.
FAQs
Q: What is Always-On 4G and how does it work on the Realme 4?
Always-On 4G is a feature that allows you to have uninterrupted 4G connectivity on your Realme 4. It ensures that your device remains connected to a 4G network at all times, even during calls or when using data services. This feature makes use of VoLTE (Voice over LTE) technology, which enables high-quality voice calls over a 4G network.
Q: How can I enable Always-On 4G on my Realme 4?
Enabling Always-On 4G on your Realme 4 is simple. Just follow these steps:
1. Open the Settings app on your device.
2. Scroll down and tap on “Dual SIM & Cellular”.
3. Here, you will see the option to enable “VoLTE/4G calling” or “Enhanced 4G LTE Mode”.
4. Toggle the switch to enable the feature.
5. Once enabled, your Realme 4 will always stay connected to a 4G network, even during calls.
Q: How does Always-On 4G benefit me?
Always-On 4G offers several benefits to Realme 4 users. Some of the key advantages include:
– Enhanced call quality: Always-On 4G uses VoLTE technology, ensuring high-definition voice calls with crystal-clear sound.
– Faster call setup: With Always-On 4G, your calls connect faster since there is no need to fall back to 3G or 2G networks.
– Seamless internet connectivity: You won’t experience any interruptions while browsing the internet or using data services, as your Realme 4 will remain connected to a 4G network at all times.
Q: Will Always-On 4G affect my battery life?
Enabling Always-On 4G on your Realme 4 may have a slight impact on battery life since it requires your device to constantly stay connected to a 4G network. However, the difference in battery consumption is usually minimal and varies based on factors such as network strength and usage patterns.
Q: Can I use Always-On 4G on both SIM cards in my Realme 4?
Yes, you can use Always-On 4G on both SIM cards in your Realme 4, provided your network operator supports VoLTE on both SIMs. However, please note that the availability of VoLTE varies by region and carrier, so it’s best to check with your network provider to ensure compatibility.