
In this digital age, where smartphones have become an integral part of our lives, it’s always exciting to find creative and innovative ways to enhance our mobile experience. One such trend that has gained popularity is the concept of a “Cup Phone.” A Cup Phone is a simple yet effective solution that transforms a regular cup into a makeshift phone holder, allowing you to keep your device secure and in an easy-to-view position.
In this article, we will unveil the secrets of creating your very own Cup Phone. Whether you’re looking to make hands-free calls, watch videos, or simply keep your phone within reach, this DIY project will not only give you a unique accessory but also provide practical convenience. So, grab a cup, gather your supplies, and let’s dive into the world of DIY Cup Phones!
Inside This Article
- Supplies Needed
- Step 1: Prepare the Materials
- Step 2: Make Holes in the Cups
- Step 3: Connect the Cups
- Step 4: Test Your Cup Phone
- Conclusion
- FAQs
Supplies Needed
To make a cup phone, you will need a few key supplies. Here’s a list of what you’ll need:
- Two cups: You can use any type of cups, such as plastic cups or paper cups. Make sure they are sturdy enough for the phone to hold its shape.
- String or twine: Choose a string or twine that is long enough to connect the cups. It should be strong enough to carry the sound from one cup to the other.
- Scissors: You will need a pair of scissors to make holes in the cups and cut the string to the desired length.
- Tape: You can use tape to secure the string to the cups, ensuring a more stable connection.
- Optional: Decorative materials: If you’d like to add a touch of creativity to your cup phone, you can use markers, stickers, or any other decorative materials to personalize the cups.
Gather these supplies before getting started, and you’ll be ready to create your very own cup phone! Now, let’s move on to the next step: preparing the materials.
Step 1: Prepare the Materials
Before creating your cup phone, you will need to gather a few essential materials. Here’s a list of what you’ll need:
- Two plastic cups
- A long string or fishing line
- A small nail or sharp object
- A pair of scissors
Make sure that the plastic cups you choose are sturdy enough and have a solid base. The cups should be big enough to hold comfortably in your hand, but not too large that they become cumbersome.
Choose a string or fishing line that is strong and durable. Opt for a length that allows you to connect the cups easily, with some extra length for flexibility.
A small nail or a sharp object such as a compass or an awl will be used to make holes in the cups. Make sure it’s sharp enough to pierce through the plastic without causing any damage to yourself or the cup.
Lastly, keep a pair of scissors handy to cut the string or fishing line to the desired length and to trim any excess material.
Step 2: Make Holes in the Cups
Now that you have gathered all the necessary materials, it’s time to move on to the next step: making holes in the cups for sound transmission. The holes will serve as the communication channels between the two cups of your homemade cup phone.
Here’s what you need to do:
- Take one of the cups and hold it firmly in one hand. You can choose any cup from the pair you have gathered.
- With your other hand, use a sharp object like a pencil or a small nail to carefully poke a hole near the bottom of the cup. Make sure that the hole is large enough for sound to pass through.
- Repeat the same process with the other cup. Remember to keep the holes on both cups at the same level to ensure proper alignment.
- Once you have made the holes, check them to ensure they are clear of any debris or obstructions. You can use a toothpick or the tip of the pencil to gently remove any obstructions that may hinder sound transmission.
By making holes in the cups, you are creating a pathway for sound waves to travel through, allowing you to communicate with the other cup. It is important to make the holes large enough for sound transmission, but not too big that it compromises the structural integrity of the cups.
Remember, the quality of your cup phone will depend on the size and placement of the holes. So take your time and make sure the holes are precise and properly aligned.
Once you have successfully made the holes in both cups, you are ready to move on to the next step, which is connecting the cups together to complete your very own cup phone.
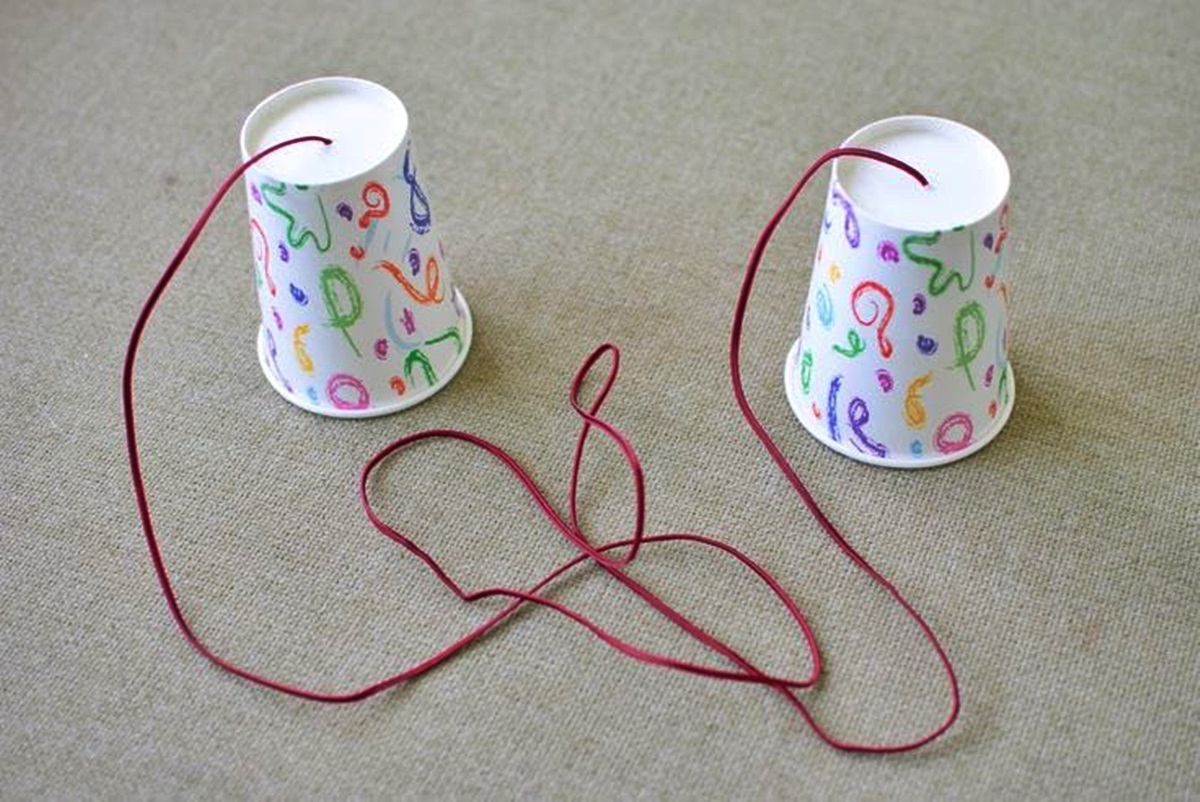
Step 3: Connect the Cups
Now that you have made holes in the cups, it’s time to connect them and turn your DIY cup phone into a functional communication device. Follow these simple steps to connect the cups:
-
Take one end of your string or twine and thread it through the hole in the bottom of one cup. Leave a long enough length of string to reach the desired distance between the cups.
-
Once the string is through the hole, tie a knot on the inside of the cup to secure it in place.
-
Repeat the same process with the other cup, threading the string through the hole and tying a knot inside.
-
Make sure the string is taut, as this will allow you to transmit sound more effectively.
-
At this point, you have successfully connected the two cups using the string or twine. Give it a gentle tug to ensure they are securely fastened together.
-
If desired, you can decorate the cups with markers, stickers, or any other creative elements to personalize your cup phone.
That’s it! You have now connected the cups and completed the construction of your cup phone. You’re ready to test it out and start making calls between cups.
Step 4: Test Your Cup Phone
Now that you have successfully connected your cups and created your cup phone, it’s time to put it to the test! Follow these steps to ensure that your cup phone is working properly:
1. Position yourself and your cup phone at a comfortable distance apart. It’s best to start with a shorter distance and gradually increase it to test the range of your cup phone.
2. Have a friend or family member hold the cup on the receiving end of the phone. Make sure that they have a good grip on the cup and their hand is positioned correctly.
3. Take the cup on your end and place it over your ear, just like you would with a regular phone. Make sure that the cup is securely pressed against your ear to ensure optimal sound transmission.
4. Begin speaking into the cup on your end while your friend listens on the other cup. Talk slowly and clearly to ensure that your voice travels through the cup phone effectively.
5. If you’re able to hear each other clearly, congratulations! Your cup phone is working perfectly. If you’re experiencing any difficulties in hearing or transmitting sound, try adjusting the position of the cups or check for any loose connections.
6. Experiment with different distances between you and your friend to see how far the cup phone can effectively transmit sound. This will give you a better understanding of the range of your homemade device.
7. Once you are satisfied with the performance of your cup phone, go ahead and have fun using it to communicate with your friends and family. Whether it’s for pretend play, a fun experiment, or a makeshift communication device, your cup phone is sure to provide endless entertainment.
Remember to dismantle your cup phone and store it safely after use. This will help prolong the life of your cups and ensure that your cup phone is ready for future adventures.
So go ahead, grab your cup phone and start chatting away, just like the good ol’ days!
Conclusion
In conclusion, creating a cup phone can be a fun and innovative DIY project that allows for convenient and hands-free communication. By following the steps outlined in this article, you can easily transform a couple of cups and a piece of string into a functional and portable communication device. Whether you’re looking for a fun way to connect with friends, engage in imaginative play, or even explore the principles of sound transmission and reception, the cup phone offers a simple and accessible solution.
Remember to secure the string tightly and ensure clear and taut lines of communication between the cups. Experiment with different cup and string materials to see if they affect the sound quality. With a bit of creativity and ingenuity, you can create a cup phone that rivals expensive gadgets in terms of functionality and entertainment value. So go ahead, gather your materials, and get ready to experience the joy and excitement of making your own cup phone.
FAQs
Q: How does a cup phone work?
A: A cup phone is a simple DIY device that uses cups or cans connected by a string or wire to amplify sound. When you speak into one cup, the sound waves travel along the string or wire and are picked up by the other cup, allowing for communication over short distances.
Q: Can any type of cup or can be used for a cup phone?
A: While it is possible to use various types of cups or cans, it is important to select ones that have a rigid structure and are able to hold their shape. Paper or flimsy cups may not provide the desired sound amplification and may affect the overall functionality of the cup phone.
Q: How long can the string or wire be for a cup phone to work effectively?
A: The length of the string or wire used for a cup phone can vary but should generally be kept within a range of 3 to 6 feet for optimal performance. Longer strings may cause a decrease in sound quality and clarity, while shorter ones may limit the effectiveness of communication.
Q: What are some creative ways to decorate a cup phone?
A: Decorating a cup phone can be a fun and creative activity. You can use markers, paints, stickers, or even glue on craft materials like glitter or sequins to give your cup phone a personalized touch. Just make sure that the decorations do not interfere with the functionality of the device.
Q: Can a cup phone be used for long-distance communication?
A: Cup phones are primarily designed for communicating over short distances, typically within a room or between neighboring rooms. While it is possible to experiment with longer strings or wires, the quality and clarity of sound may deteriorate significantly, making long-distance communication impractical.